Purpose of fishing stops
Stoppers are used in almost all types of recreational fishing: they are used in float, spinning, trolling, feeder and other equipment, as well as during winter fishing. The fishing stopper performs the following functions:
- Plays the role of a limiter: it does not allow the element of the sliding equipment to move along the fishing line behind the stopper.
- It is a fastener for the fishing line - it secures the equipment element in a certain position.
- Acts as a fuse to prevent the equipment element from damaging other equipment elements.
The stopper is the most common job that stoppers perform. For example, a stopper for a sliding float, for a weight in a Carolina rig on top, for a sliding feeder when fishing with a bottom. Most often this may be required in float and bottom fishing, less often in winter rigs, when fishing with a spinning rod.
Locking is the function performed by the stopper, mainly in side-lead rigs. For example, if you want the leash to be directed to the side and not come close to the fishing line. In many cases, this helps to avoid the hook getting caught on the main line, especially with short leaders. It is used wherever a small side leash is used - when fishing with a float rod, with a donk, in winter fishing.
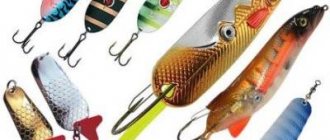
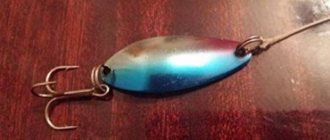
The safety function performed by the stopper is used to protect equipment elements from impacts and hard contact with other equipment elements. For example, when fishing with a spinning rod, a silicone bead is placed - this allows, when reeling in the fishing line, if the angler was not careful, to avoid the bait hitting the upper tulip of the rod. As you know, inserts in tulips are made of ceramic and are sensitive to shock. If there is a silicone bead, the bait will simply softly come into contact with the tip, the angler will feel it and stop reeling.
The stopper will not necessarily serve only one function. For example, stoppers for fishing, installed above and below the weight in an inline feeder rig, will perform both the function of a limiter, eliminating the possibility of the sliding feeder going beyond certain boundaries onto the fishing lines, and a protection function, protecting the upper ring of the rod from impacts, as well as the knot near the swivel for the leash to prevent collision with the feeder.
It is not necessary that the stopper will perform exactly these functions. For example, in the Carolina rig, a glass bead is both a fuse so that the weight does not break the knot on the fishing line, and an acoustic element of the rig, which produces sound vibrations when the weight hits. And a silicone bead in front of the spinner spoon, with the correct stopper size selected, will create streams of water during reeling, which will help the spoon “start up” faster; in addition, it slows down the dive, which is important when fishing in shallow water; the spoon will not catch moss with its hooks.
The author will reveal this little secret of choosing the size: the bead should be slightly larger than the diameter of the spinner core, if it is round, and should not have damage or unevenness.
Types of fishing restraints
Basically, fishing stops differ in the material from which they are made, as well as in the manufacturing methods.
Silicone
The main type of stops used by anglers. These stops may be limiters, detents, or safeties. They are mass-produced and sold in fishing stores. They are movable and immobile. Fixed-type silicone fishing stops are sold with wire loops.
Typically these are used as a limiter or retainer. Movable fishing stops have a large hole in the center and are usually sold in the form of silicone beads, either strung on a wire or loose. Such stoppers are used mainly to protect equipment elements from impacts.
If you plan to choose a silicone stopper, then it is not advisable to use a stopper-limiter if only a protective function is required. For example, there is no need to put a hard stopper instead of a bead. Such a stopper will create an additional chance of the line twisting during reeling. And the bead will move freely along it, without twisting or interfering with unwinding.
The shape of the stopper-limiter can be different. Usually available in olive form. Sometimes can be seen in the shape of a cylinder, and also in the form of balls. The author believes that if the stopper does not pass through the rings, the shape of the stopper does not matter much. The easiest way to use olives is that they are also the cheapest.
Most often, for heavy sliding floats, one stopper is not enough. When fishing while fishing, a single stopper does not fix the depth very well and moves a little over time. To prevent this from happening, it is recommended to use two or even three stoppers placed directly one close to each other.
Such a system almost never moves arbitrarily and will adhere perfectly to the fishing line.
We recommend reading
Sliding floats for long casting and their installation on a fishing rod Sliding floats are a special type of fishing floats that are used in some cases. Their distinctive...
There is one unpleasant moment associated with the use of stoppers-limiters - they practically cannot pass through the upper ring on the fishing rod. This is important when using a sliding float when casting long distances. In this case, a silicone stopper is not used, but stopper knots made from fishing line are used.
Stopper knots
A knot made from a piece of fishing line tied to the main line and performing the functions of a stopper-limiter is often called a stopper knot. The author is used to simply calling it a line stopper, however, in fishing literature there is a different tradition. The stop knot is made from the same fishing line that is used for fishing: the thickness, rigidity and a number of other properties must match. This is important because the author tried other methods, all of them were ineffective.
Stopper knots are used on the main monofilament line; using them on a braided cord has no effect. Moreover, even using silicone stoppers on the cord is impossible - they slide along it too much. Probably, no stopper will be held on the cord itself; only free-running fishing stoppers can be used.
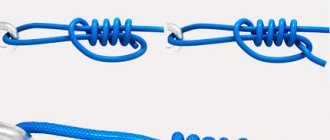
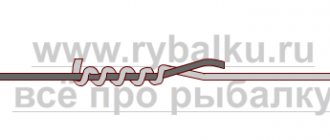
There is also the only effective locking knot, in the author's opinion, which should be used. It is performed as follows:
- A piece 15–30 cm long is cut from the main fishing line to make a stop knot.
- The piece is wrapped around the main line and a loop is made.
- The tip is passed through the loop 6-8 times. It is important that the tip does not wrap around the main line, otherwise you will end up with a straight channel.
- The noose is tightening.
When performing such a knot, the fishing line is folded into a kind of spring, while the main fishing line repeats its turns. Thus, due to the tight knot and the presence of turns, the stopper will hold well. However, in most cases it will be necessary to have not one, but a pair of stoppers.
The ends of the stopper assembly must be machined. You should not cut them close to the knot - the knot itself may unravel in this case, and they will cling to the tulip more strongly when casting. The hard short tip will significantly slow down the equipment during casting, and the soft long tip will bend and pass freely through the ring. Therefore, it is best to leave the ends 2–5 cm long. After tying, they need to be processed.
Monofilament fishing line is clamped between your finger and the tip of a knife or scissors and passed between them. As a result, it becomes thinner, slightly flatter and slightly curled. Such a tip passes through the upper tulip of the rod without any problems at all; the knot will not cling due to the fact that it is pushed by the tip from the edge of the ring.
Other knots, no matter how much the author tried to use them as locking ones, do not provide the necessary fixation, neither a “clinch” nor anything else. The fact is that such knots usually assume the presence of a free channel inside, through which the fishing line will pass without problems, and they hold it very weakly. The knot described at the beginning will create a helical channel for the main fishing line; naturally, it will be held more reliably. Knots made from a fishing line folded in half may give the desired shape of the knot, but they turn out to be too bulky, they don’t hold much better, and they pass through the rod’s ring much worse, and they already begin to cling.
Why you should use exactly the same fishing line - and there is an answer to this. A thinner fishing line will simply wrap around a thick main one, the knot will turn out to have a straight channel inside and will hold worse. A thicker fishing line will give the desired knot, but it will hold with exactly the same force as a knot from a fishing line of the same diameter, but passing through the ring will be worse.
A softer line will wrap around the main line, creating a straight channel inside the knot, and the stopper will hold worse, and a harder line will pass through the ring worse than a softer one, and the knot will not hold tighter than a knot made from the same line. Therefore, in order to simplify the equipment and make it more reliable, knots are made from the same fishing line, simply cutting off a piece from it.
You can remove the stopper from the fishing line after disconnecting the float with weights by pulling it through the tip. Or, using a needle, which usually comes with an extractor for float fishing, unravel the knot and untie it, removing it from the fishing line.
Cambrics
Almost always, cambric is used as a fixative. It can be put on a float, feeder, other part of the equipment for stationary fastening of the float, feeder, etc. on the fishing line. In modern fishing, silicone cambrics are most often used. They give a better fit and better hold.
The second option is to use casings made from heat-shrinkable tubing or homemade casings made from wire insulation. Insulated cambrics are often used to secure fishing line to a fishing rod, since cutting with such fishing line is extremely difficult. Silicone cuts easily, especially with thin fishing line.
Heat-shrink cambrics are also used in loaded connections. They can, however, be cut with fishing line. To do this, they use heat shrink, which shrinks in two or three layers - the fishing line will not be able to break such a cambric. The float still cannot be classified as a heavily loaded unit, so silicone cambrics serve faithfully here - they hold up much better.
There is no point in talking a lot about cambrics, because the properties, applicability and need for them are determined most of all by the equipment in which they are used; it is difficult to indicate any universal applications and requirements for them.
We recommend reading
How to tie a float to a fishing line for different fishing conditions The float is the most important part of a float rod. It holds the bait at the desired depth and signals a bite....
So, how to plant them correctly?
So, how do the boilie-to-hook attachments differ, and what is the most important thing a beginner should know? This bait itself is designed in such a way that carp, which calmly sucks on any bulky food, cannot do the same with it. Therefore, it should be secured in the appropriate way. Initially, it was strung on hooks so that the sting was not visible behind the main body, but fishing in this way did not bring good enough results, so alternative ways of attaching the latter to boilies were invented.
When looking at boilies, many do not even suspect the wide variety of installation methods, and that how to set the bait, how to tie knots and how to generally tie the hook to the fishing line greatly depends on the type of reservoir and the type of fish you are hunting for. One of the most popular methods for catching carp and bream can be called "hair".
In this case, the boilie is installed not on the hook itself, but near the lead outlet, which is located nearby. When boilies are used for carp in this way, the chances that the fish will be hooked on its own due to the swallowed hook increase significantly, and you can only rely on correctly secured gear. Depending on what size hook and size of boilie you use, the chance of that the tackle will still spin due to a sharp jerk from the fish.
In general, this method is suitable for most beginners; doing this with your own hands is as easy as shelling pears. We select the required hook size for the depth, tie it, preferably tie a sea knot, and now everything is attached and set, and the beginner will only have a pleasant experience from such fishing and quite massive carp if you choose the right hook.
Catching fish using this method is much easier, the main thing is to make sure that you managed to secure everything well so that it does not fall off at the last moment. After all, it all depends on how to tie the hook and how the boilie is attached.
- drowning;
- medium buoyancy - suitable for any body of water;
- floating on the surface.
To successfully fish on any type of reservoir and with different types of fish nutrition, a fisherman must be able to set boilies in different ways. The type of fastening may depend on several factors:
- type of reservoir;
- fish feeding horizon;
- fish activity;
- type of nozzle used.
A silicone tube 1–1.5 cm long placed on the eye of the hook improves the grip of installation
Read How to catch carp with boilies and prepare fishing equipment
A hard bait can be attached to a hook in several ways. In the most common version, the “hair” loop is passed through a through hole in the nozzle and then fixed with a stopper. This method is the most universal and allows you to fish with baits of various sizes and any buoyancy.
To attach the bait in this way you will need:
- insert the needle into the hole of the bait;
- hook the pre-formed loop with the needle beard;
- pull the loop through the body of the hard bait;
- secure the end of the loop in the center of the stopper;
- holding the stopper along the edges with your fingers, pull the leash.
The next mounting option is ideal for beginner fishermen who have not had time to acquire a specialized tool. For this method, you need to make a shallow cut around the circumference of the nozzle ball. The cutting depth should be about 1–2 mm. Next to the hook, not an ordinary loop is formed, but a noose loop, which is inserted into the cut and tightened tightly.
Another method involves inserting a swivel into a round nozzle. Before driving the swivel into the boilie, you need to drill a hole in the bait and insert a silicone casing of the appropriate size into it. The swivel is inserted into the cambric only halfway. The free ring of the swivel is put on the hook and secured with a small rubber stopper. This method of attachment is quite reliable and allows you to perform power casts. It is most often used for fishing from the bottom on a slowly dissolving bait.
Fishing with floating pop-up baits involves the use of a fastening element such as a rubber ring. In this case, the fisherman will not have to tie complex equipment. To fix the nozzle, just put a rubber ring of the required diameter on it and hook the hook onto it.
The size of the hook in a boilie rig should always be slightly smaller than the size of the bait used
Mini boilies are equipped with a thread, which makes the installation process very simple. To attach a mini boilie, just hook the hook onto the thread
It is important for the angler to remember that placing a hard bait on a hook should be done with great care. Beginner fishermen are often in a hurry when performing this procedure, which often leads to injury.
Sizes and color of stoppers for fishing: how to choose the right one
The size and color of the stop knot on the fishing line is determined by the thickness of the main fishing line and its color, so the angler has nothing to choose from here. In addition, it will not affect the fishing process. Such a knot is located right next to the float and the fish does not see or feel it while fishing. Another thing is the silicone stopper.
The thickness of the silicone stop-retainer is of little importance for the reliability of the fixation. However, they should not be neglected. The author noticed that narrow, long cylindrical stoppers hold worse than olives, although the former are longer and have a larger contact area with the fishing line. Apparently, some properties of an elastic body are already at work here, creating the greatest pressure precisely at the central point. Therefore, for reliable fixation, you need not only a long stopper, but also a thick one.
The author is convinced that it is the olive stopper that provides the best fixation, and not the cylinder or the ball. If the fixation is insufficient, it is more profitable not to install a long narrow stopper, but to install two normal ones - they provide much greater force for shifting than one stopper, the increase here is not twice, but greater.
Although from the point of view of primitive observation and speculative compliance with the laws of physics this looks strange, nevertheless, in practice this is so; probably, some more complex mechanisms of an elastic body and friction are at work here. Several olive stoppers work especially well against impacts - a single long cylinder stopper almost always moves out during strong impacts, and several olives hold confidently.
When purchasing, you should pay attention to the factory size of the stopper. They are produced in sizes: SSSS, SSS, SS, S, M, L. Size SSSS corresponds to an olive with a thickness of approximately 2 mm, size L corresponds to an olive with a thickness of approximately 6 mm.
| Size | Length | Diameter |
| SSSS | 2 mm | 1.6 mm |
| SSS | 3 mm | 1.8 mm |
| SS | 4 mm | 2 mm |
| S | 4.5 mm | 2.8 mm |
| M | 5 mm | 3 mm |
| L | 6 mm | 3 mm |
It is best to choose a stopper with the minimum required thickness. Almost always 2 mm is enough to prevent a float, sliding feeder, or other piece of equipment from passing through the ring. However, if the stopper also serves as a fuse, it is better to take size L - it is guaranteed not to slip through the tulip and will not allow it to come into contact with metal elements. In general, you should focus on the thickness of the fishing line and take small stoppers for thin ones, and only large ones for fishing lines over 0.3 mm.
Stoppers on thick fishing line should almost always be placed in groups of two or three. It’s difficult to give specific numbers for fishing lines; size S should be considered the most universal, just over 3 mm in thickness.
The color of the stopper is not decisive for the fish to bite. As practice shows, for bottom fishing it is enough to simply choose a dark or any other neutral color. If in doubt, you can use a transparent stopper.
To catch fish species in the water column that have good, subtle vision and can distinguish small objects at a great distance, it is better to use only transparent stoppers. For example, when catching an asp with a bombard, where it is fixed with a stopper. This does not apply to pike - it only distinguishes large objects well, according to the author, but at a great distance.
Nevertheless, it makes sense to use bright stoppers for float limiters during night fishing, when fishing at dusk. You don’t have to look for a bright yellow or bright green stopper on the fishing line, but can immediately see it in the light of a headlamp or under the moon. This helps reduce the time spent adjusting or controlling depth and allows more time to be spent actually fishing.
How to put a stopper on a float line
Stopper knots can be placed on the fishing line in the manner described above. How to remove them was also described. The main feature of such stoppers is that, in principle, they can be installed and removed after installation of the main equipment, when there is a float, hook, and sinker on the fishing line. This is very convenient - some fishermen even refuse silicone stoppers when fishing with blind equipment in favor of these, because they are easy to install and dismantle. The author, however, prefers classic silicone ones in this case.
Silicone stoppers can be installed on the fishing line as follows:
- The fishing line is threaded through a wire loop on which there is a stopper.
- The tip of the fishing line and the main part of the fishing line are clamped in the hand.
- By pulling the fishing line, the ring to which the wire and the stopper is attached, the stopper is pulled onto the loop from the fishing line.
- The loop is pulled out of the line, as a result of which the tip is released and the stopper is on the line.
This method is quite simple and common. Naturally, you need to put stoppers on the fishing line in a certain sequence when making fishing equipment. It is necessary that there is a small piece of fishing line free so that the stopper can be put on it on the fishing line. Otherwise, for example, when the swivel is already attached, it will be impossible to do this through the swivel - you will have to remove it and then reattach it. However, it is possible to attach a stopper to the fishing line through small knots.
The silicone bead is put on the fishing line in the usual way; the tip of the fishing line is simply threaded through a larger hole in the bead. This shouldn't cause any problems. If they occur, it is only with a very thin braided line, which can get stuck in the hole of the bead and begin to fold. You can try simply tying a piece of fishing line to a braided line, thread a regular fishing line through the bead, then thread the braided line through it.
An economical and practical angler will not only put stoppers on the fishing line, but also remove them. It is quite possible to remove the stopper from the line and put it back on the wire loop where it was before use. And also move the stopper from line to line.
To do this, you need to tie a simple knot, tying the fishing line to the wire loop, and then pull the stopper from the fishing line onto the wire. In this case, it is better to leave the tail of the fishing line larger - it will not interfere, and if the knot is untied, it will still allow the operation to be completed. After all, stoppers were designed as disposable products, so they wear out from frequent putting on and taking off. It is not recommended to use the stopper in this way more than two or three times - they will hold worse.
Methods for attaching and attaching boilies to hooks
You can attach boilies to a hook in various ways. The most popular of them are distinguished by a high degree of reliability, simplicity and the possibility of installation in fishing conditions. Each angler gives preference to the one that he considers the most effective and suitable for himself.
Hair editing
Perhaps the most common installation option, the procedure is as follows.
- A loop is tied at the end of the bandage thread, the diameter of which does not exceed half the diameter of the nozzle. Cut off a leash fifteen to twenty centimeters long.
- Using a needle or drill, make a hole along the central axis of the boilie and pass this loop through it.
- A stopper in the shape of the letter T is attached to the loop for the boilie, and the leash is pulled so that the stopper enters the body of the boilie, preventing it from coming off.
- You need to tie the hook so that the length of the gap from its bend to the boilie does not exceed the diameter of the bait. To do this, thread the thread into the eye from the outside and tie it to the fore-end to the level of the tip. This limits the sector of vibration of the hair and the bait at the hook.
- Thread the thread into the eyelet from the inside and tie it tightly.
- A loop is also knitted at the free end of the leash. Excess thread is cut off.
Despite its popularity, hair installation cannot always be used
Therefore, it is worth paying attention to other types of fastenings
Blowback rig with ring
This method is recommended to mount the bait when using several balls at the same time, like a “snowman”. They work very well in carp fishing as these fish prefer bait with several different flavours. The algorithm here is as follows.
- A loop is tied at the end of the leash. The leash is passed through the eye of the hook and secured with any knot. To prevent the knot from coming undone, you can fix it with a drop of glue or install a cambric in advance. The length of the free end may vary, but should not be less than six centimeters from the eyelet.
- Choose a ring with a diameter no less than three times the thickness of the hook (it will be more convenient to put on) and place it in the center of the fore-end.
- Tie it to the fishing line with any usual knot. In the resulting design, the ring moves along the fore-end from its center to the lug.
- The boilies are attached to a leash and secured with a T-shaped stop or a stopper made of plastic or rubber.
Mounting with a swivel on the forend
Suitable for those who use hooks with a small beard or without it at all. Works well with floating and sinking baits. Assembled as follows:
- Hang a small swivel on a hook.
- Its free part is placed in the hole of the boilie.
- Secure the nozzle using a T-shaped stopper or putting on a stop bead.
Some people prefer to start installation by securing the bait to the swivel, after which they thread the tip of the hook into the free eye of the swivel, and install a piece of rubber or plastic tube on the fore-end to eliminate the risk of the bait coming off.
As a result, a structure is obtained with partial longitudinal mobility of the nozzle and the possibility of its full rotation around the axis of the hook.
How to secure with a knotless knot
This method will be appreciated by anglers who master the technique of creating a knotless knot. This technique is not difficult to master. A leash with a loop is placed along the forearm. Its free end is wrapped seven to eight times towards the sting and returned to the ear. Then tighten it a little - and the fastening is ready.
For such fastening, you can use not only a bandage thread, but also a braided line, and even a super-elastic fishing line. This mount is very reliable.
Installation using silicone cambric
This method is reminiscent of attaching a blowback rig with a ring, but instead of a ring, a silicone cambric is used, which does not require fixation, because it is pressed tightly against the shank of the hook.
The assembly order is as follows:
- The hook is tied to the leash, leaving the tip with a loop at the end.
- A leash with a loop is threaded into a silicone cambric.
- Place the cambric over the bend of the forend and lightly pull the loop.
- The loop is passed into the boilie hole and secured with a stopper.
With this installation technology, the barb on the hook should be very small. To avoid injury during the manufacturing process, you need to put on the cambric using pliers or tweezers. A correctly selected cambric should move along the forend with great effort.
Read the test on knowledge of the characteristics of crucian carp fishing