The most popular problems and their repairs
Repair of a spinning reel may be required due to careless handling while fishing. The most common problems and their consequences arise from the spinning reel coming into contact with water or being carelessly thrown onto the sand or ground. The problem may also arise due to a manufacturing defect or the fault of the fisherman himself. Pay close attention to the line roller washer and bushing.
Line breaks under the clutch nut
In designs with a front-mounted clutch, the locking nut is raised 1-2 mm above the edge of the spool. When the line is wound, it often gets caught on the nut and falls under the edge of the spool, which leads to tangling and breakage.
To solve the problem, you need to disassemble the reel with the spool line, unscrew the nut with the brake clutch washers and replace the felt gasket with a similar one made of thin plastic.
The reel mechanism jams under load
If, when winding the fishing line, tapping noises begin to sound inside the device, periodically jams and jams under minor loads, this indicates a failure of the gear mechanism. In such cases, replacement of the driven and drive gears is required.
Reverse stop failure
A sign of wear is slight rotation of the device handle in both directions when the lock is engaged. This is due to the adhesion of contaminants or thickening of the lubricant composition. In such a situation, you should unscrew the reverse stop bolt, dismantle the clutch, and clean and lubricate it.
Noise inside the coil
If the spinning reel squeaks or grinds, you should immediately stop fishing. Noise may appear due to dirt, damage to bearings or other components. Such a problem requires disassembling the mechanism, cleaning, lubricating or installing spare parts.
Spiral line feed
Sometimes, in the process of casting the bait, the line spirals together. This defect occurs due to contamination of the line roller. The solution to the problem is to disassemble and lubricate the mechanism assembly.
Uneven line winding
Occasionally, a defect appears due to uneven, cone-shaped front or rear winding of the fishing line on the spool. In the first case, the washer is removed from the main shaft of the part. And when winding with a cone up, on the contrary, an additional washer is added.
Self-tightening of the clutch
When etching the fishing line, sometimes a break occurs due to the self-tightening of the clutch. This happens with cheap low-quality parts and the problem cannot be eliminated.
Self-resetting line handle
A common defect is the spontaneous reset of the line-laying bow into the line reeling mode. In this case, tighten the screws that secure the headband. If the shackle is self-resetting, try increasing the stiffness of the spring located under the cap. To do this, install a spacer on the rod or install a spring with greater rigidity.
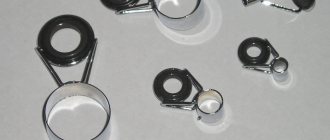
Cleaning the line roller
At the first stage, the fastening screw is unscrewed. The device is disassembled, taking into account the presence of a washer in the cheek of the roller. After removing the washer, the mechanism is disassembled. After carefully inspecting the parts, rinse them in a solvent placed in a container of 50 to 70 grams. The ball bearing should not be washed, as its lubricant will be washed away and it will quickly become unusable.
When installing, add one drop of oil per assembly. Excess lubricant is undesirable, since under the influence of centrifugal forces it can get on the fishing line or cord and ruin them.
After installing the roller on the rod, check for ease of rotation. To do this, run the edge of a folded napkin along the edge of the roller. It should turn easily.
https://youtube.com/watch?v=cXA9qqbHyNU
When installing the second bushing, it is necessary to apply half a drop of grease to the bearing. The arm and the rod are matched and connected with a screw, tightened tightly, but without tightening. It is unacceptable to treat the screw with a thread locker, since with further maintenance it will be impossible to unscrew it.
After completing the assembly, finally check the operation of the roller. To do this, run the edge of a paper napkin over it. The roller should rotate easily and naturally.
Tulip for spinning
From time to time, “accidents” happen while fishing, and then the fisherman hastily looks for a way to solve this or that problem. Often, replacing a tulip on a spinning rod causes difficulties, and there may not be a knowledgeable person nearby to tell you what and how to do.
Most often, this need arises because the ceramic insert has fallen out. If such a problem happens to your fishing rod, then don’t be afraid. The problem is solvable. Repairing a spinning rod with your own hands is not as difficult as it seems.
Let's try to figure out what can be done with a broken tulip on a spinning rod.
How to remove a tulip from a fishing rod
Let’s make a reservation right away: the tulip cannot be repaired, it can only be replaced with a new one. Therefore, go to a specialized store.
The selection of tulips in fishing stores is huge, you shouldn’t rely on your eye and memory, it’s better to have a spinning rod with you and make a choice on the spot.
If it is not possible to take all the tackle or the rod tip with you, then you should use a caliper to measure the place near the border between the tulip and the blank. In the store you will have to try on more than one piece before you get the right size.
So, let's figure out how to quickly and easily remove a tulip from a form:
- Place the form in front of you so that it is convenient to work with it.
- Now you should heat the tulip with a lighter or candle. It doesn't take long to heat up - 3 or 4 seconds.
- Only the tulip itself should be heated, and not the rod, otherwise the binder of the blank fibers may be damaged. If the binder burns out, the rod will lose strength. To protect the spinning rod from unnecessary heating, wrap the area next to the tulip with electrical tape or masking tape.
- Once heated, it can be easily removed. The masking tape is no longer needed; it needs to be unwound and thrown away.
- Now you need to clean the tip of the rod from any remaining glue so that you can put on the end ring. You need to clean off the glue carefully so as not to damage the form itself.
Installing a tulip at home
It remains to perform the last operation in repairing our spinning rod: securely glue the new tulip onto the tip of the blank.
- We will need two-component epoxy glue. Mix the glue components. For this purpose, it is convenient to use a pharmaceutical blister from which tablets are squeezed out. You can stir the epoxy with a small stick, such as a toothpick.
- Apply glue to the tip of the form and put a tulip on it. In order for the epoxy composition to be evenly distributed over the entire inner surface of the tulip, you need to turn it around its axis several times.
- Now we briefly remove the tulip and again apply glue to the tip of the rod.
- We return our tulip to its place, turn it so that it is aligned with the other throughput rings of the spinning rod.
- The epoxy that was squeezed out after planting the tulip must be removed from the surface of the form.
Before applying glue, you need to degrease the surface of the place on which the tulip will sit.
Acetone is suitable for this purpose, but not all household members will be happy with the pungent smell of this substance, so it is better to use alcohol for degreasing.
After the epoxy glue has dried, the spinning rod can be used again. The epoxy dries in about a day.
Emergency tulip replacement
If you don't have time to wait and want to replace the end ring immediately, you can use instant glue.
But then, after the composition has been applied to the tip of the rod, you will need to very quickly align the tulip with the rest of the rings, otherwise the glue will stick out and it will be impossible to turn the ring.
If the correct combination does not work out, then the entire procedure, starting with heating, will have to be repeated.
The advantage of instant glue is that you can use it to change the tulip right while fishing. The use of epoxy glue is preferable for those who like to approach the matter in detail in order to obtain a high-quality repair of their favorite fishing rod.
Advice for novice fishermen: keep with you when fishing at least a minimum set of tools and other items necessary for repairing gear.
This repair kit may include:
- insulating tape;
- masking tape;
- knife;
- pliers;
- lighter;
- instant glue.
As you can see, you can fix spinning rod repair problems yourself, without turning to the help of a specialist.
How to remove a tulip from a fishing rod
Let’s make a reservation right away: the tulip cannot be repaired, it can only be replaced with a new one. Therefore, go to a specialized store.
The selection of tulips in fishing stores is huge, you shouldn’t rely on your eye and memory, it’s better to have a spinning rod with you and make a choice on the spot.
If it is not possible to take all the tackle or the rod tip with you, then you should use a caliper to measure the place near the border between the tulip and the blank. In the store you will have to try on more than one piece before you get the right size.
So, let's figure out how to quickly and easily remove a tulip from a form:
- Place the form in front of you so that it is convenient to work with it.
- Only the tulip itself should be heated, and not the rod, otherwise the binder of the blank fibers may be damaged. If the binder burns out, the rod will lose strength. To protect the spinning rod from unnecessary heating, wrap the area next to the tulip with electrical tape or masking tape.
- Once heated, it can be easily removed. The masking tape is no longer needed; it needs to be unwound and thrown away.
- Now you need to clean the tip of the rod from any remaining glue so that you can put on the end ring. You need to clean off the glue carefully so as not to damage the form itself.
Now you should heat the tulip with a lighter or candle. It doesn't take long to heat up - 3 or 4 seconds.
Replacing telescopic rod rings
On telescopic fishing rods, not only the “tulip” suffers from accidental impacts, but also the guide ring (11) that follows it. If you cannot find exactly the same ring for replacement, you can replace it with a regular ring with a claw, you just need to choose the same one with the standard one in terms of the inner diameter of the insert and the height (distance from the center of the insert to the form).
The defective ring is removed in the same way as the “tulip” - using a lighter, its seat on the form is cleaned of glue residues with the blade of a sharp knife. The new access ring is installed exactly in the place of the old one; to fix it on the form, it is convenient to use Super-Moment glue. You only need to apply glue to one surface to be glued (12)! After winding and varnishing, the new ring will be fully functional (13), while the overall structure of the rod can be significantly improved by reducing the weight of the ring.
It is worth recalling that it is easier to prevent any breakdown than to waste time, effort, and sometimes money on eliminating its consequences.
Source
Emergency tulip replacement
If you don't have time to wait and want to replace the end ring immediately, you can use instant glue. But then, after the composition has been applied to the tip of the rod, you will need to very quickly align the tulip with the rest of the rings, otherwise the glue will stick out and it will be impossible to turn the ring. If the correct combination does not work out, then the entire procedure, starting with heating, will have to be repeated.
The advantage of instant glue is that you can use it to change the tulip right while fishing. The use of epoxy glue is preferable for those who like to approach the matter in detail in order to obtain a high-quality repair of their favorite fishing rod.
Advice for novice fishermen: keep with you when fishing at least a minimum set of tools and other items necessary for repairing gear.
This repair kit may include:
- insulating tape;
- masking tape;
- knife;
- pliers;
- lighter;
- instant glue.
DIY ring replacement
Replacing the ring on a spinning rod may be necessary if it has lost its working properties, is damaged, or if the frame mount is broken. In order to make a quality replacement, the angler must prepare a comfortable workplace with good lighting and the following materials:
- A set of new rings. Or one ring, if the others do not need to be changed.
- Synthetic threads of small diameter.
- A good waterproof polyurethane varnish or Flex Coat.
- Paraffin candle or lighter.
- Epoxy adhesive.
- Sandpaper.
- Magnifying glass.
- A small sharp knife.
- A little duct tape.
- Hair dryer.
- Pliers.
To hold the spinning rod in the desired position during installation, it is necessary to prepare a special stand. It can be cut from a thick cardboard box.
It is clear that in order to install new rings, you first need to remove the old ones. How to properly remove rings from a spinning rod without damaging its body? Follow the following algorithm of actions:
Using a hairdryer, carefully heat the base of the old fastener.
Expert opinion Nikolay Mikhailovich Knipovich Zoologist, hydrobiologist
I am interested in fishing at a professional level.
Important! Don't let the rod overheat
This can lead to damage to its surface and, as a result, to a change in its operating parameters.
In the area of the ring's foot, use a sharp knife to cut its covering. Carefully unwind the old winding, simultaneously removing the old varnish and glue. Remove the ring. We finally clean the fastening area. To do this, heat it with a hairdryer and a stick, carefully scraping off all excess. After removing the old winding, we remove the tulip using rotational movements, grabbing it by the body with pliers.
To do this, heat it with a hairdryer and a stick, carefully scraping off all excess. After removing the old winding, we remove the tulip using rotational movements, grabbing it by the body with pliers.
How to properly attach new rings to a spinning rod is shown below:
- To prepare the ring for installation, you first need to fit its foot(s) to the surface of the blank. This is done using sandpaper.
- Using electrical tape, we temporarily install the rings in their designated places. This must be done to determine the compliance of their sizes and establish correct alignment.
- The next stage is wrapping the legs with synthetic thread. This is a very painstaking and responsible moment. First you need to secure the free end of the thread to the foot, and then wind it, following each new turn closer to the base of the foot.
- For greater reliability of fastening, it is better to make the winding in two or three layers.
- Carefully coat the threads and the base of the foot with epoxy glue. It must be the right consistency in order to secure all surfaces of the thread and the base of the foot.
- After the glue has dried, coat the fasteners with varnish or Flex Coat.
- The tulip must be fastened in the same sequence, with the only difference being that before installing it, you need to use a file to adjust the inner diameter of its mounting ring to the diameter of the tip of your spinning rod.
That's it, after the glue and varnish have completely dried, your spinning rod is ready for use again. You can equip it and go fishing.
How to change the tulip ring on a spinning rod?
The process of replacing a tulip on a spinning rod must be carried out in a place specially prepared for this. You can do this at home or in the garage, the main thing is that you have the necessary consumables and tools.
To replace you will need:
- New tulip;
- Synthetic threads;
- Polyurethane varnish to cover the winding;
- Stand for spinning rod (usually made with your own hands by sawing grooves in a cardboard box);
- Lighter;
- Small sharp knife;
- Magnifier
- Epoxy glue (namely epoxy - resin-based glue is always the most resistant to vibrations and high humidity when drying);
- Wooden stick;
- Thin wire;
- Needle file.
- Let's start replacing the tulip.
Removing the ring from the rod
We remove the tulip from the spinning rod. You need to put the end of the wire on the tulip, carefully heat the base of the tulip with the flame of a lighter and pull the wire. Hold the rod with one hand, the tulip must be removed from the spinning rod with the other. If the metal expands under the influence of fire, but the tulip does not give way, help yourself with pliers (without sudden movements, without excessive force).
If the ring still does not give way, this means that the old varnish coating has attached the ring to the spinning rod very tightly. There is no need to press harder with pliers and try to “overcome” the resistance. It is necessary to remove the varnish and trim the fastening winding of the tulip. After this, the tulip should come off.
Clean the area from adhesive and varnish residues.
Replacing the spinning tulip
The first thing that comes to mind is to change the tulip. It's very easy to do. In order to remove the tulip, you just need to warm up this section of the spinning rod.
For example, I still have a piece of an old spinning rod with a tulip. Now let's try to remove it.
We light a candle, lighter, etc. It is necessary to warm it up very carefully, because with excessively strong heating we can damage the binder that connects the carbon fibers. If the binder burns out, we will be left with bundles of carbon fiber that will bend easily.
You can wrap a wire around the tip of the rod to hold on to, or take a surgical clamp.
We grabbed it and began to gently warm it up (Fig. 15-17).
rice. 15-18
Moreover, it is not the form of the spinning rod tip that needs to be warmed up, but the tulip itself. Here, we have removed the tulip (Fig. 15-18).
Let's say we need to change the tulip. How to attach it to the tip of a spinning rod? There are two ways. You can use glue, preferably two-component epoxy. We put on the tulip and positioned it in such a way that the axis of the tulip coincides with the axis of all the rings, and so that there is no displacement. Leave it for a day for the epoxy to harden.
This is a slow way to mount a tulip. Faster installation is that we use “Moment” or some other “second” glue. Apply a thin layer of glue to the surface to be joined - literally one drop. Now you need to connect very quickly.
If we then try to center the tulip relative to the rings, it will be too late, so we must immediately set the approximate position, connect and press in this position. In just a second the glue will set and we will no longer be able to turn the tulip. Therefore, you need to work very carefully with superglue, since it allows only one attempt. If we have placed a tulip, and it turns out that the rings are in one line, and the tulip is squinting to the left or to the right, we will have to warm it over the fire, remove it and put it back on “second” glue.
Installing a tulip at home
It remains to perform the last operation in repairing our spinning rod: securely glue the new tulip onto the tip of the blank.
- We will need two-component epoxy glue. Mix the glue components. For this purpose, it is convenient to use a pharmaceutical blister from which tablets are squeezed out. You can stir the epoxy with a small stick, such as a toothpick.
- Apply glue to the tip of the form and put a tulip on it. In order for the epoxy composition to be evenly distributed over the entire inner surface of the tulip, you need to turn it around its axis several times.
- Now we briefly remove the tulip and again apply glue to the tip of the rod.
- We return our tulip to its place, turn it so that it is aligned with the other throughput rings of the spinning rod.
- The epoxy that was squeezed out after planting the tulip must be removed from the surface of the form.
Acetone is suitable for this purpose, but not all household members will be happy with the pungent smell of this substance, so it is better to use alcohol for degreasing.
After the epoxy glue has dried, the spinning rod can be used again. The epoxy dries in about a day.
How to increase your fish catch?
Over 7 years of active fishing, I have found dozens of ways to improve the bite. Here are the most effective ones:
- Bite activator. This pheromone additive attracts fish most strongly in cold and warm water. Discussion of the bite activator “Hungry Fish”.
- Increased gear sensitivity. Read the appropriate manuals for your specific type of gear.
- Pheromone-based lures.
To replace the ring on a fishing rod with your own hands, prepare a set of tools and materials from the following list.
- New access element. You can find a new fishing rod ring at any fishing store. Such products are presented in a large assortment. We recommend giving preference to products with ceramic inserts.
- Synthetic fishing line and thread made of the same material (without lint).
- A large cardboard box that will serve as a stand for the spinning rod. In the side parts of the box, located parallel to each other, it is necessary to make triangular grooves for fishing gear.
- Parquet varnish with a polyurethane base, which covers the winding part of the structure.
- Hair dryer.
- Wire of small thickness.
- A lighter or candle with a burning wick.
- Magnifier.
- Epoxy adhesive.
- Sharp knife.
- Silicone tube.
- Masking tape or electrical tape.
- Bowl for mixing epoxy glue.
- A brush with which the adhesive composition is evenly distributed over the surface of the pass ring.
Correct placement of rings
Attaching guide rings to a fishing rod has its own characteristics. According to the rules, these elements are placed along the line of the inner seam on the whip.
You can install them on the rod in the following ways:
- Traditional. You need to take several ring elements and use them to create a cone-shaped tunnel for the fishing line. The largest ring is located at the base, near the coil, and the element with the smallest diameter is at the top of the structure.
- New. The part at the base is moved closer to the center of the structure, reducing the length of the cone. Then the main part of the fishing line is passed through small rings.
The rings can be placed on the rod in 3 positions:
- Below or above in relation to the whip. This spinning rod assembly is ideal and has the greatest rigidity.
- From the side, at an angle of 90 °C (left or right). This placement indicates the installation of pass elements along the soft line of the whip. This may indicate poor quality assembly or that the tackle is designed for slow action.
- A chaotic arrangement of ring elements on a fishing rod is considered incorrect. With such an arrangement, the fisherman will not be able to cast the tackle over a long distance without making mistakes. The twisting forces at the time of landing the fish will deform the rod, and after 1-1.5 months of active fishing the tackle will break.
If you have the desire and free time, you can make a spinning ring with your own hands.
To do this, prepare:
- hard insert;
- electric drill;
- paste.
It is necessary to attach the insert using paste at the base of the frame. Using an electric drill, you should polish the surface to make the fixation as stable as possible. To complete the work, secure the ring to the whip.
Installation features
The following instructions will help you properly attach the ring elements to the rod of your fishing rod.
- Before removing the element, it is necessary to soften the winding that covers it. It is heated with a hot hairdryer.
- The coating should be cut in the area of the ring foot (so as not to damage the spinning rod) and part of it should be removed.
- Next you should find the edge of the thread that comes from the end of the winding. It should be gradually unwound, while simultaneously removing the remaining part of the coating.
- Remains of the coating should be removed from the surface of the rod by scraping. A hairdryer is again used for this purpose. Scraping can be done using a regular plastic stick from a counting set.
- The new ring needs to be prepared for installation. The edges of the legs are slightly ground off with an emery wheel, and their lower part is adjusted for installation on the fishing rod blank using sandpaper.
- The rings must first be secured to the designated places. To tie them, you can use soft silicone products, tape, electrical tape or an elastic band.
- Next, the element is wound in the direction from the foot to the frame. The thread should be kept as taut as possible.
- The top of the winding thread is coated with parquet varnish or Flex Coat.
If the composition used to coat the winding is thick, it is applied in one layer. If it is liquid, then a two-layer coating should be made. The second layer is applied after the first has completely dried.
Emergency tulip replacement
Degrease the tip of the rod, check how the seat diameter matches the diameter of the top of the spinning rod, if necessary, use a file to sharpen the rod. Apply a little epoxy glue to the place where the tulip is attached, and use a wooden stick to spread the glue over the fishing rod.
Let’s make a reservation right away: the tulip cannot be repaired, it can only be replaced with a new one. Therefore, go to a specialized store.
The selection of tulips in fishing stores is huge, you shouldn’t rely on your eye and memory, it’s better to have a spinning rod with you and make a choice on the spot.
If it is not possible to take all the tackle or the rod tip with you, then you should use a caliper to measure the place near the border between the tulip and the blank. In the store you will have to try on more than one piece before you get the right size.
- Place the form in front of you so that it is convenient to work with it.
- Now you should heat the tulip with a lighter or candle. It doesn't take long to heat up - 3 or 4 seconds.
- Only the tulip itself should be heated, and not the rod, otherwise the binder of the blank fibers may be damaged. If the binder burns out, the rod will lose strength. To protect the spinning rod from unnecessary heating, wrap the area next to the tulip with electrical tape or masking tape.
- Once heated, it can be easily removed. The masking tape is no longer needed; it needs to be unwound and thrown away.
- Now you need to clean the tip of the rod from any remaining glue so that you can put on the end ring. You need to clean off the glue carefully so as not to damage the form itself.
If you don't have time to wait and want to replace the end ring immediately, you can use instant glue. But then, after the composition has been applied to the tip of the rod, you will need to very quickly align the tulip with the rest of the rings, otherwise the glue will stick out and it will be impossible to turn the ring.
If the correct combination does not work out, then the entire procedure, starting with heating, will have to be repeated.
The advantage of instant glue is that you can use it to change the tulip right while fishing. The use of epoxy glue is preferable for those who like to approach the matter in detail in order to obtain a high-quality repair of their favorite fishing rod.
Advice for novice fishermen: keep with you when fishing at least a minimum set of tools and other items necessary for repairing gear.
- insulating tape;
- masking tape;
- knife;
- pliers;
- lighter;
- instant glue.
Removing the ring from the rod
Removing the tulip is quite simple.
- We light a candle.
- The tulip frame is hooked with wire or tweezers, whichever is more convenient for you.
- Next, you need to pull the wire in one direction and the spinning rod in the other.
- We continue to warm the tulip with a candle. Using a sharp knife, cut off the winding and varnish. All varnish must be carefully removed. It’s better to do this with a knife too. A magnifying glass will help you understand how thoroughly the cleaning was done.
The same operations are used to attach the ring to the spinning rod:
- heating (not with a candle, but with a hairdryer),
- cutting off the winding - we do this to dismantle other rings.
By following these instructions, you can easily repair a telescopic fishing rod with rings with your own hands. It is also worth remembering that all actions must be done quite carefully and then you will be able to secure the ring at the level of a professional.
There are many ways to increase your fish catch, but the most effective ones are. Below, the site editors share with you the 3 most effective ways to increase your catch:
Bite activator. This is a pheromone-based additive that activates receptors in fish
ATTENTION! Rybnadzor wants to ban this bait! Any other baits with flavorings are less effective; it is better if they contain pheromones. But the most effective way is to take advantage of the new product for 2021 - DYNAMITE EFFECT! Learning different fishing techniques
For example, it is written here about spinning wires.
Stories from our readers. Theme: fishing suit
Changing a tulip in emergency conditions
Experienced fishermen understand that the most unpleasant things happen during the process. If a tulip breaks down while fishing and you don’t always want to go home or to the garage, it makes sense to carry out an emergency replacement of the tulip. To do this you will need a special repair kit consisting of:
- electrical tape;
- masking tape;
- knife;
- pliers;
- lighters;
- instant glue.
There is no point in using epoxy resin, since it takes a very long time to dry, and in extreme conditions you will not be able to do a “clean” job - there is sand, water, dust around. Silicone hotmelt adhesive is also not an option since you need electricity for it. Instant-drying ethyl acetate-based glue - “Second”, “Moment” and others - is ideal for you.
Electrical tape and masking mesh can serve as an excellent seal in case of play between the tulip and the spinning rod. Instead of varnish, you can use ethyl acetate glue; it hardens quickly and has the same properties as varnish when it dries.
Options and methods of arrangement
This point makes sense to read only if the rings are not placed in the old places. Their new location must be thoughtful. For example, the tip broke between the ring and the tulip. Here the actions depend on the feelings you have for the spinning rod. If you don’t really feel sorry for it, we saw off the tip that protrudes from under the winding of the ring - that’s it, the repair of the rings on the spinning rod is done. If it’s a pity, and there is time for a rather painstaking repair, we remove several rings and find a new location for them, taking into account the change in the length of the rod.
Another option is to reduce the number of throughput rings by 1, since the spinning rod has become shorter. To evaluate the result, the rings are temporarily attached to the spinning rod using electrical tape (if they are small, they are cut in half lengthwise). This way of fastening the rings is quite reliable; you can even go fishing with a temporarily repaired fishing rod, checking how the new arrangement of rings will show itself in practice.
If the rings are removed from the knee, you need to find the seam of the rod before installing the tulip. The butt of the spinning rod is placed on the table, the tip rests against the wall. The middle part is pinched between the palms, pressing slightly from top to bottom so that the deflection of the knee is noticeable. The spinning rod rolls between the palms. The seam of the rod in the position in which the spinning rod bends with the least effort is located at the bottom. You can mark the seam using tape (a narrow strip is glued). All rings and the tulip should be placed either along the seam or opposite it.
If there is another seam, place them between the seams.
There are several options for the arrangement of rings on a spinning rod:
- Cone (traditional arrangement). Rings arranged in a straight cone reduce the dynamics of the spinning rod, but increase the casting distance. As a rule, with this arrangement, a small number of rather voluminous rings are used, which is convenient in winter conditions: less ice.
- New concept (Fuji). The top of the spinning rod is maximally unloaded. In terms of mass, all the rings on it are equal to the middle ring in the previous arrangement. Currently, the most popular and effective arrangement of rings on a spinning rod.
- Kirkman arrangement. Kirkman is the name of the rodbuilder who developed it. The top of the blank is even more unloaded than in the Fuji concept due to the abundance of small rings. Provides accuracy and casting distance. With this arrangement of rings it is convenient to fish along banks with vegetation: there are practically no snags on branches.
- Arrangement of rodbuilders. Fishermen note the special range of this arrangement of rings. In this case, the rings on the spinning rod are often arranged as follows:
- Marine arrangement. Used on spinning rods intended for sea fishing. The input ring is located far from the coil. There are no line overlaps, but there is noise during casting.
How to extend the life of a spinning tulip?
The service life of a tulip (as well as all spinning rings) can be increased if they are made with more round grooves. Fishermen process the rings by rounding them. After this procedure, the line passing through the tulip at high speed does not wear out so quickly: when rubbing against the edge of the rounded ring, vibrations are transmitted to the entire rod, and not just to the tulip fastener.
Despite this, an overly rounded ring provides a high area of contact with the cord, which increases heat and wears out the line along its entire thickness, making it thinner.
Therefore, as spinners advise, it makes sense to install a tulip with a ring diameter of up to 2 cm, and reduce the holes in the middle ring to 1.2 cm.
A large tulip makes the spinning rod heavier, which is harmful not only to the quality of fishing, but also to the spinning rod itself.
Practice shows that the following set of parameters is optimal: the butt ring should be less than 1 cm, the second - 0.8 cm, the third: 0.6 cm, the fourth - 0.5 cm, the fifth 0.45 cm, tulip - 0 .8 cm.
After fishing, clean the tulip with a brush and dry it so that residual dirt and water do not cause corrosion and destroy it.
Installation of a washbasin
Installing a sink with your own hands and a washbasin in the bathroom is done by fastening it with dowels to the wall on special brackets.
You need to know that installing a tulip sink on a pedestal, even from the floor to the bottom of the sink, should not be considered as a load-bearing element of the appliance! Self-tapping screws still need to be buried into the wall surface by at least 70 mm; for this reason, you need to use screws with a length of 100 mm or more if the wall is covered with tiles on a layer of plaster, and longer fasteners for thicker coatings. Dowels should be made of propylene; metal anchor bolts are suitable. PVC fasteners crack when humidity and temperature change, metal rusts, and polyethylene fasteners have low strength.
Spacious bathrooms use a sink with a cabinet. A lot of space for such a design is necessary because dirt collects inside the cabinet and under it. And the volume of a seemingly large dressing table is not too large - the main part of the space is occupied by pipes and a siphon
Video: DIY bathroom sink installation. Education