DIY silicone baits
During the fishing process, some silicone baits lose part of their bodies, and it is a pity to throw them away after that. If you collect several processed silicones, you can use them to make new working baits.
Manufacturing technology
- In the prepared container, gypsum is diluted to the state of thick sour cream. After this, old vibrotails or twisters are dipped into the solution to obtain templates; after the plaster has hardened, the baits are removed very carefully so as not to damage the mold. If there are any irregularities, they are smoothed out with a sharp, thin object.
- The mold prepared in this way is thoroughly greased. The most suitable option is sunflower oil. This is necessary so that the finished product does not stick to the mold during the manufacturing process.
- All mold filling operations must be performed outdoors or in a well-ventilated area.
- Old, used silicone products are crushed into pieces and placed in a bowl that is heated on the stove. To prevent the silicone from burning, it must be stirred regularly, and the fire should be at a distance of 15-20 cm from the container with silicone. If you add dyes to silicone, you can get bait of the desired color, and if you add flavoring, it will become edible silicone.
- The well-heated and thoroughly mixed mass is poured into the mold. If you plan to get a two-color bait, then each new layer is poured after the first layer has dried.
- After about 15-20 minutes, when the silicone has cooled, the finished bait is removed from the mold, the mold is cleaned, greased with sunflower oil and the process is repeated.
DIY silicone baits...bogomaz05
Fishing with a feeder near snags
Finding a spot of clean bottom among snags is a big deal! But how many feeders will you tear off before you find that cool penny! About three years ago, one experienced fisherman demonstrated a simple search pattern. Let's say there were some holds at an interesting point on the edge. First of all, we throw at the same distance, but with a lateral shift downstream, first half a meter to the side, a meter, in some cases up to five - until the hooks stop. The fisherman assured that half a meter is usually enough, a maximum of a meter, that is, fishing is carried out practically at the chosen point, the displacement is minimal, and there are no snags. If you can’t get rid of them, then he throws them a little closer, or rather to the same point, but in the process of moving the feeder towards the bottom he makes one or two turns of the reel. If it catches, then it makes 3-4 turns, but at the same time makes sure that the feeder does not completely go over the edge, leaving the place that is interesting to the fish. If this happens, then he throws in the opposite direction - further than the place of the hooks. This technique can also help out when the snag is not very large and spreading. Then all that remains is not to smear it on the found spot.
DIY mini clasp for changing attachments
Almost always, when fishing, it is necessary to quickly and efficiently change the bait or modify the equipment by changing the leash or feeder. For these purposes, there is a fastener design that is quite small in size. Making it at home will not be difficult.
Manufacturing technology
- The following tool is required:
- wire cutters;
- round-nose pliers;
- tweezers.
- The basis of the material can be a large stapler from a stapler.
- The wire is bent with pliers into a shape similar in appearance to a paper clip, but smaller in size.
- Excess ends are cut off with wire cutters.
- A cambric of the appropriate size is selected so that it fits freely on the fastener.
- The size of the cambric should be slightly larger than the fastener, so the excess is cut off.
- A piece of cambric is put on a fishing line and secured with a knot.
- Any bait is attached to the other end of the mini-fastener, after which, with effort, the cambric is pulled.
- Mini clasp, ready to use.
DIY universal fastener in a minute. Fishing.
In the absence of a bite
With a total lack of bite, the partner begins to experiment with his cunning system and equipment. The first step is to increase the length of the leash: 30 cm, 50, 70, 100, 150. Doesn’t take it? Reduces the diameter of the leader line: 0.20, 0.16, 0.12 mm. He will reduce the size of the hook to No. 18 with the transition to the minimum size of the nozzle - one small maggot, the tail of a worm, cut off with a sharp scalpel - he specially carries it with him. Then he will do the “sandwiches”, going through different combinations of baits, and all the time being confident that the fish will soon bite. And he feeds and feeds, throwing them away at intervals of 5-7, maximum 10 minutes. Only at the evening dawn, when small linen usually disappears, does he change his strategy, switching to a large fish: he shortens the leash to 25-30 cm, increases its thickness to 0.18-0.20 mm, and places a decent-sized hook under a bunch of worm or a few grains of corn. Be sure to make bait with a large number of large particles, and more viscous, so that the feeder is washed out no earlier than after 20-25 minutes, at such intervals, and re-casts, not forgetting, even before dark, to strengthen the fireflies on the tips of the rods, so that you are fully armed meet the “trophy time”.
Repairing a delaminated feeder quivertype
Feeder branch-twisting from feedergam
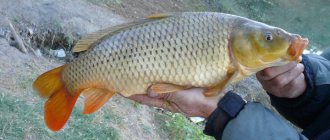
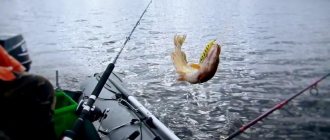
And the pike takes the ruff
Feeder for feeding fish from a boat
For those who regularly fish from a boat, it will be useful to have a simple but effective feeder. It will come in handy if you have to fish on a river where there is a current. To do this you will need the following elements:
- a piece of plastic sewer pipe;
- two fasteners;
- lead;
- electric drill;
- rope, rivets;
- loop and lock.
A piece of pipe up to 30 cm long is taken and plugs are installed on both sides. One of them is installed solidly, and the other is installed in such a way that it can be easily removed. After this, holes are drilled over the entire surface. A rope is attached to the plug that opens. To prevent the plug from opening on its own, a lock or latch of any design is installed.
On the reverse side, where the plug is rigidly fixed, weights should be secured.
The feeder is lowered to the bottom on a rope and remains there until the end of fishing. Thanks to the drilled holes, the bait is slowly washed out of the feeder, which allows you to keep the fish at the fishing point.
DIY feeder for fishing from a boat. Feeders for fishing from the boat with their hands.
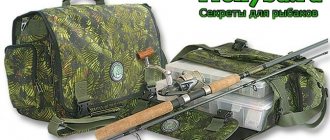
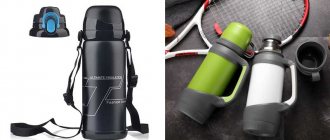
Thermal bag Spectator Cooler Chair with built-in seat
The Spectator Cooler Chair is a great accessory for hikers and fishermen. In fact, this is a folding chair based on an aluminum frame (withstands a carcass up to 90 kg), but its lower part is not empty. There is a fairly spacious thermal bag in which you can easily hide 24 cans of beer or other liquids and enjoy cold drinks while fishing on a hot summer day. Naturally, you can also store delicious sandwiches with poultry, meat, sausage or cheese there and not be afraid that by the evening they will spoil in the heat - the Spectator Cooler Chair holds the temperature well. The size of the bag is 33 x 23 x 23 cm. The included strap allows you to carry it on your shoulder both unfolded and folded. In the latter case, the product becomes completely flat and does not take up much space in the trunk or backpack.
DIY wobbler
Every spinner wants to have a good, catchy wobbler, but not everyone can afford to buy one. As a rule, wobblers are expensive baits, especially if they are related to well-known manufacturers.
In this regard, some fishermen have mastered, and very successfully, making wobblers at home. This is a very interesting and exciting process that does not require special equipment or tools.
How to make a wobbler
- To begin with, you should decide on the shape and color of the future bait. To do this, you will have to take up art and draw a sketch of the future wobbler on paper. Regardless of the material of manufacture, the wobbler is made of 2 symmetrical parts. There should be a reinforcing wire running inside them.
- Foam can also be used as a material for manufacturing, but it is not as durable as wood or plastic. Therefore, having taken the necessary material, they are engaged in the manufacture of blanks.
- Fastenings for rings and tee hooks are prepared from thin stainless steel. The fasteners are mounted in specially cut out places located on the body of the 2 halves of the bait. the two halves are connected using glue. After the glue has dried, a cut is formed for the front blade, after which it is rigidly attached using the same glue.
- After this, the wobbler should be adjusted based on personal preferences.
- Any depressions or voids left on the bait are filled with epoxy resin, after which the bait is sanded and prepared for painting. Painting is also carried out depending on your own imagination.
Making a wobbler with your own hands
Adviсe
- Pay special attention to the color of clothing. Use bright colors to stand out on the ice. This will help you in case of danger.
- If you are caught in severe frost, add sunflower oil to the hole. This will prevent the water from freezing and will also keep the fish interested.
- After fishing, place the fish immediately in the storage container, without leaving it on ice, otherwise you may end up with the fish freezing.
- If you use glasses while fishing, rub the insides of them with dry soap before going out, which will help prevent fogging.
DIY spinner
It’s not at all difficult to make a rotating spoon yourself, if you have at least some skills in working with tools and materials. To make it you will need:
- regular paper clip;
- tee (hook);
- metal plate, 0.5-1 mm thick;
- not a big bead;
- a piece of sheet lead;
- tools: file, pliers, needle files, scissors.
First, on a piece of cardboard you need to draw the shape of a petal for the future bait, after which the drawing is transferred to the metal. Take scissors and carefully cut out a petal from a piece of metal. After this, the cut petal is processed with a file so that there are no burrs. Two holes are drilled along the edges of the petal (one on each edge) and processed with needle files. The places where the holes are drilled must be bent 90 degrees in relation to the petal. Then you need to take the wire and straighten it, and at one of its ends you need to form a loop and secure the tee.
After this, a petal and a bead are put on the same wire, after which a loop is again formed at the end of the wire to attach the fishing line. Moreover, the loop must be made so that it does not interfere with the free rotation of the petal.
The spinner requires adjustment through additional loading. A lead weight is placed between the tee and the petal. Again, everything needs to be calculated correctly so that the load does not interfere with the rotation of the petal. The last stage is painting the petal.
Super catchy spoon with your own hands in 15 minutes.
Wireless fish finder LuckLacker
The device is quite likely to indicate the accumulation of fish under water and the terrain, displaying information on the screen wirelessly.
Works to a depth of up to 45 meters, covering a sector of 90 degrees. Sensitivity can be adjusted for a variety of tasks.
Price: 8705 4701 rub.
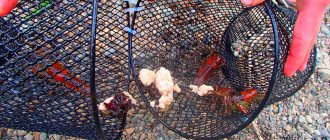
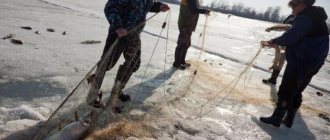
Live bait trap
Arriving for fishing, you have to spend a lot of time catching live bait. The fact is that in the summer it is very difficult to store live bait: it quickly dies in any container, and live bait must always be vigorous. A device made from 2 plastic bottles will help solve this problem:
- Take a 2-liter plastic bottle, the neck of which is cut off in half.
- After this, the neckline is cut off from the same side at the widest part.
- The result is a piece that looks like a watering can.
- The bottom of this bottle is cut off.
- Take a second bottle and cut off the bottom at a distance of 5-7 cm from the greatest thickness.
- Finally, the structure is put together. The cut “watering can” is inserted back, but only in reverse, with the thinnest part inward, after which the structure is firmly connected using artificial threads. Take another bottle and put the cut end on the first bottle with a neck.
- A weight and rope are attached to the trap.
After this, you can place bait in the trap and lower the trap to the bottom of the reservoir. A fish that falls into a trap will no longer be able to get out of it. If you need live bait, you just need to pull the trap out of the water. In order for the fry to always be fresh and lively, the trap must be kept in water for an indefinite period of time.
HOW TO CATCH BIT LITTLE BITTER. BOTTLE LIFE TRAP
Carbon spinning rod Tiascfr
Simple, affordable and high-quality spinning rod in sizes from 3.6 to 6.3 meters. The handle is made of carbon fiber, the rings are made of stainless steel, and the guides are ceramic.
Suitable for catching small fish. However, you shouldn’t expect anything else from an extremely light hiking fishing rod.
Price: from 1353 from 798 rub.
DIY zherlitsa
In winter, the most common tool for catching predators (pike) is girders. It turns out that it can be done quickly and simply:
- The basis for its manufacture is a PVC sewer pipe, 32 mm thick. The pipe needs to be cut into pieces 10-15 cm in size.
- It is better to file all uneven areas where the cuts are made.
- 3 holes should be made in the pipe. Two holes are made on one side, one opposite the other, to install on a tripod, and on the other side one hole is made for the line stopper. Its diameter is 1 mm.
- A line stopper is formed in the shape of the letter P and threaded through a small hole. The stopper should not limit the free movement of the fishing line.
- A ring is formed from a fishing line 0.4-0.5 mm thick, which is passed through two holes located opposite each other. This ring will serve as a kind of fastening. The vent is attached to a metal rod firmly driven into the ice.
- About 10 meters of fishing line is wound onto a piece of pipe.
- A corresponding weight and a hook, such as a tee, are attached to the end of the fishing line.
The zherlitsa is ready for use at the end of the pipe; red tape should be secured at the point of suspension (attachment), which can serve as a bite indicator.
winter zherlitsa. DIY girders Ice Fishing
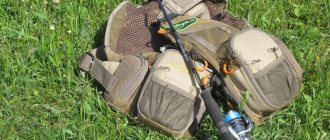
Stohlquist Fisherman Vest with Hard Pockets
When fishing, it is advisable to have all the necessary equipment at hand. This is why vests with lots of pockets, or even with a built-in backpack, are so popular among fishermen. But it’s still more convenient when the accessory is developed by a fisherman specifically for a fisherman. This is the Stohlquist Fisherman Vest .
Compared to some examples, there are not very many pockets, but everything is thought out. In particular, the main two sections have rigid linings that can also serve as a stand. That is, having opened them, you can lay out some small things, like on a table, and calmly do the job (change the lure, hook, etc.). Inside the compartments there is enough space for attaching tools and all sorts of small items. There are holds and rings that are useful for different situations. You can attach a net to the back, and a rope to the fish tank in front, so that you can quickly remove it from the water and throw the catch inside. The vest is made of Cordura 500D nylon, contains neoprene lining in the straps and a comfortable belt system for comfortable placement and retention of the accessory on the body.
If you want something simpler, then look at summer fishing suits.
Making bait for crucian carp
The average crucian carp, which most anglers catch, prefers semolina bait prepared according to a special recipe.
Recipe for making catchable bait for crucian carp:
- Pour water into a bowl, add a couple of drops of flavoring, and bring to a boil.
- Semolina is poured into boiling water with constant stirring. The result should be a homogeneous thick mass.
- The heat is turned off to allow the porridge to cool and steam.
- After reaching room temperature, knead the porridge with your hands to obtain even greater density.
- After this, the porridge is wrapped in several layers of gauze.
- It is not recommended to wrap porridge in plastic.
Balls are molded well from the finished porridge, after which they are placed on a hook.
Recipe for preparing porridge bait using the cold method:
- Water is collected from a reservoir into a suitable container and a little flavor is added.
- After this, semolina is added to the bowl with vigorous stirring.
- As a result of active stirring, a homogeneous mass should be obtained. The readiness of the bait is checked as follows: if you lift the spoon with the porridge up and turn it over, the porridge should remain in the spoon.
- Stirring is stopped and the porridge is left for 10 minutes to swell.
- Finally, you need to take a syringe and fill it with porridge.
The porridge from the syringe is squeezed onto the hook in a spiral so that the tip of the hook is the last to close.
Rolls with garlic. Super bait killer of crucian carp with the smell of garlic
Fishing on the rapids
A riffle can even be a bream one - I didn’t know about this before, but a couple of years ago I became convinced that on river riffles, even small ones, bream bite well at night and at dawn. Without hiding, one of my acquaintances told me about this, unloading excellent bream caught at night from a cage. He advised fishing not on the crest of the riffle, where the water swirls, forming a noticeable strip almost across the river, but a little further upstream, where deeper, the coastal longitudinal drop running along the riffle is also interesting. He also said that the riffle is good as a visual reference for searching for holes located above and below fifty meters; bream bites in these depressions during the day; large silver bream and ide are mixed in