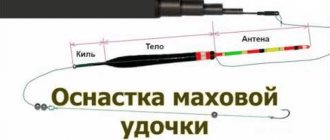
Method and flat method
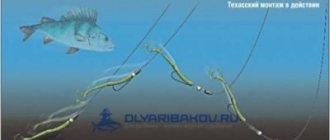
Effective installation for feeder fishing of carp, carp, carp and crucian carp - method.
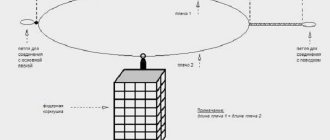
On silted reservoirs, it is better to use the flat method - feeders with a flat bottom that do not fall into the bottom sediments. The feeder itself in the design has a through hole, through which it is attached to the main fishing line. You can secure the flat either in the inline version or in the blind version for self-hooking. Flat feeder leads are used short to place the bait next to or in the feeder, molded into the feed. The lump of bait gradually breaks down and releases the bait. The nozzle can be used sinking or floating. In the floating version, the ascent height is limited by a pellet on a leash. Read more about feeder fishing using the flat method.
Flat method inline
Methods and methods for installing feeder equipment are not limited to the listed classic options. An amateur feeder can also use the usual bottom equipment familiar to everyone - springs, rocker arms, nipples.
Equipment for inline feeder with outlets for feeder and leash
This type of installation is widely used on silt-covered reservoirs.
When we use a running rig without a feeder outlet, our feeder is located on the main line, near the feeder outlet, which is why a section of the main line, near the feeder, goes into the silt. This will negatively affect the quantity and quality of bites, especially for cautious fish. The presence of a branch will allow you to move the fishing line away from the feeder a little to the side and will not pull it along with you into the silt.
Also, thanks to the presence of an outlet, the feeder first sinks to the bottom and then, with a slight delay, the nozzle itself, as a result of which we can use such equipment in cases where it is necessary to catch while falling. So this method of installing feeder equipment can be used for feeder fishing for roach, silver bream or chub.
The process of installing inline feeder equipment with an outlet for the feeder and habits is similar to the above-mentioned inline installation methods, but with some peculiarities.
- First, we need to make an outlet for the feeder, which should be at least 7 cm, for which we take a bead, but with a larger internal diameter, so that a double fishing line can be threaded into it, and insert a piece of fishing line or fluorocarbon with a diameter of 0. 33-0.35 mm, length 20 – 25 cm.
- We fold the fishing line in half so that the bead is in the middle.
- We pinch each edge with our fingers and begin to twist. The twist is made 9 cm long. Next, we put a crimp tube on the fishing line and bring it to our twist, at a distance of 7 cm from the bead, now we pass a carabiner with a clasp through the fishing line. We pass the remaining part of the fishing line folded in half through a crimping tube, so that a small loop is formed. Next, we bring the crimp tube as close as possible to the swivel and clamp it with pliers. We cut off the excess mustache and the outlet for the feeder is ready.
- Now, we put our bead on the main fishing line, followed by a smaller bead (stoppers) and continue making inline equipment for the feeder in a way already known to us. Only the allotment for the habit is made longer, about 12-15 cm.
- So, we retreat 30-35 cm from the edge of the fishing line, fold it in half and knit a loop 2 cm long with a figure eight knot.
- Next, we make a twist and secure it from unwinding with the help of a double knot, cut off the excess and our equipment is ready.
Types of inline montages
Technically, inline installations are divided into two types - with completely free line movement and using a limiter. We discussed the operating principle of the first type of installation above.
As for the second type, it is the one that is used most often, as it ensures that the fish hooks itself when it bites. That is, if you place a stopper above the feeder, then after the free sliding of the fishing line is completed, the stopper will rest against the feeder and, due to its weight, self-hooking will occur. The free sliding length of the fishing line, depending on different fishing conditions, can be from 5 to 40 cm.
Shifting the stopper close to the feeder turns the installation from sliding to blind. This option significantly reduces the sensitivity of the equipment, but can be used in cases where it is necessary to leave the equipment unattended for some time.
Do-it-yourself installation of inline equipment on the feeder
Inline feeder installation, as a rule, can be done without any extra effort with your own hands.
It is important to follow these steps during installation:
- first, a silicone limiter is installed on the main line, but only if it was initially decided to make a fixed installation;
- the fishing line is pulled through a hole located in the feeder;
- The limiter-damper is installed after the line is pulled. This could be a regular bead, a vinyl tube or a silicone stopper;
- at the last stage, a figure-eight knot is tied or a swivel is installed, and then the flood is attached to them. The connector is used only in some cases, if you have to change the leash frequently.
What is inline equipment
Inline equipment for a feeder is translated from English as “in line”. The translation says that the sinker-feeder is not tightly attached to the fishing line, but easily moves along it between the stoppers.
Other fishermen divide inline rigs and sliding rigs. In their opinion, this division differs according to the type of feeder. Although everything is conditional, because the work of the gear with different types of feeders simply does not differ.
The inline feeder rig is not as common as the Gardner loop. But experienced fishermen successfully use it in various fishing conditions. Beginners should learn how to tie such equipment at home, then all this will be useful on the water when catching fish such as crucian carp, carp, and silver carp.
Inline feeder equipment is now beginning to be in increasing demand among fishermen. There are several modifications of it. Inline installation means that the feeder is not fixed to the fishing line or to the outlet. Stoppers are placed on the main line and it slides between them.
What is it like?
Types of inline equipment:
- the line is pulled through the flat feeder itself, which is very popular and is used for still water when fishing for crucian carp and crucian carp;
- the fishing line is threaded through the ring of the swivel to which the feeder is attached. Universal equipment, suitable for lakes and calm currents;
- the feeder is attached to the outlet, which in turn is attached to the swivel of the main fishing line. Suitable for fast flowing rivers.
The options vary, but the principle is the same: the feeder is not fixed and moves freely along the line, the fish does not feel the tension.
Advantages and disadvantages
Feeder tackle inline:
- quite catchable when spot fishing;
- in the event of a break, the fish will have to free itself only from the hook, and not from the entire tackle;
- inline is used in all reservoirs and at different flow speeds, you just have to select the composition of the feed in the feeder;
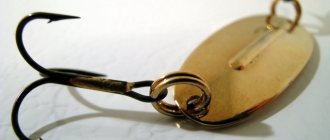
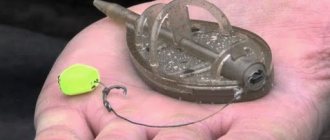
- The “Method” feeder is best suited, with a spiral on one side and lead on the other. You can buy one here.
It lies on the bottom with its heavy side, which increases its stability in the current;
inline equipment is self-hooking, because the fish does not hear the tension of the fishing line and, when twitching, is hooked due to the heavy feeder.
Among the shortcomings, it is only necessary to indicate the loss of gear due to a break.
To make the most of all the capabilities of such equipment, you need to perform all the steps sequentially while fishing:
- cast to a pre-designated location;
- Wait for the equipment to be completely submerged; it may take some time;
- place the rod on the stand so that the angle between the rod and the surface of the water is 45 degrees;
- make several turns of the reel to eliminate sagging line, but the load should lie in one place.
Such a set of operations, together with a high-quality fishing rod, will give the angler the opportunity to feel all the delights of inline feeder equipment.
Inline equipment for feeder
There are many options for inline gear for a feeder, but technically they are implemented in two versions:
- Unlimited sliding - the movement of the bait container is not restrained by anything. Self-cutting is unlikely.
- Stopper limitation. There may be one or two dampers.
The second option is universal, since if you move the stopper towards the feeder, you will get a blind paternoster. Removing the damper from the container by 12-15 cm will immediately transform the limited installation of feeder inline into loops: symmetrical or asymmetrical.
Sliding rigs
This group includes feed containers with a through channel for fishing line: watermelons, spring containers with rocker arms and many other configurations. Techniques: helicopter, loops.
Running
This is the inline feeder rig that recreational fishermen have in mind when they talk about sliding rigging. In running fishing lines, shock leaders pass through a swivel to which feeders are attached: bullets, “cages”, curlers.
Running
Make such equipment using monofilament and braid. The feeder moves freely along the cord, without alerting the fish during their feast. However, the sensitivity of the bite alarm is increased many times: the “nodding” tip reacts to the smallest representatives of river fauna.
Self-hooking is rare, so the entire responsibility for hooking and landing lies with you.
Method and flat
Open flat feeders with a thick bottom are designed for standing water, otherwise the feed will be carried away by the flow. The installation principle does not change; it is suitable for carp fishing.
Carp anglers use an open flat feeder as a pacifier, pressing the hook inside. The evenly loaded bottom prevents the container from turning over; it always falls to the top with bait. The method works well over long distances, and in stagnant silted ponds it has no equal.
Method and flat
Considering that you intend to take trophy specimens on the flat, select the appropriate feeder: rod length is at least 3.9 m, test 150-180 g, action – medium.
For a successful hunt, take a bait rod when fishing: you will use it to explore the bottom and pre-feed the future catch.
Anti-twist
The main thread runs through the entire device, starting from the short arm. Next, a swivel with a stopper is attached to it, then a leash. The feeder is used with a heavy plastic bar.
Selection of gear for beginners
The best option for configuring feeder tackle for beginners would be to purchase a ready-made set. It includes all the necessary elements of bottom gear:
- feeder rod
- reel
- fishing line
- installation
- hooks
- feeders
- stand
Fishing store consultants will help a novice fisherman choose the optimal set. If this is not possible, then we independently select the elements of equipment for the medium rod. This video explains in detail how to choose a feeder for beginners:
The reel for the fishing rod is selected taking into account the fishing distance and the type of cord. The best option for beginners are models with a spool size of 3000, adapted for fishing with thin braided lines.
Many of them indicate that these are feeder coils
In the store, it is important to check its progress and the operation of the clutch. The weight of the reel should not exceed the weight of the rod
It is very important that the kit includes a spare spool. When fishing, sometimes you have to change the type of line.
Beginner feeders often ask the question: “Which is better to choose fishing line or braid?” It is optimal to buy both fishing line and braid. If you fish at a distance of more than 35 meters, then we definitely use a braided cord with a cross-section of 0.1-0.14 mm, depending on the object of fishing.
If fishing is carried out at close range, then fishing line and cord are equally suitable. When fishing in specific conditions - in sub-zero temperatures or during periods of mass accumulation of fluff on the surface of the water, a fishing line is used. Its diameter varies from 0.18 to 0.25 mm. Beginners can be offered models with a cross section of 0.23 mm. The fishing line should not have memory and not lose strength at the knots.
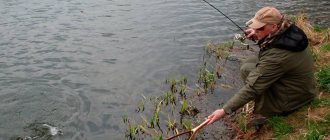
Feeder feeders vary in weight, volume, shape, and the material from which they are made. The main criterion for selecting feeders is the strength of the current at the fishing site. The fisherman’s task is to choose a feeder that would lie on the surface of the bottom and not be carried away by the current.
How can a novice fisherman check whether the feeder is being carried by the current or not? After casting, the feeder is installed on the stand and the behavior of the tip is observed. If it stands still, then the feeder is “caught on the bottom.” If the tip bends smoothly with the same frequency, then the feeder is carried by the current. Install a heavier one. For beginners, we can recommend bullet feeders with a plastic body:
With this model it is easy to make accurate casts even in windy weather. When reeling out the gear, the feeder quickly floats up and does not cling to bottom obstacles and grass.
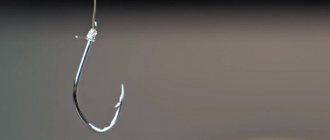
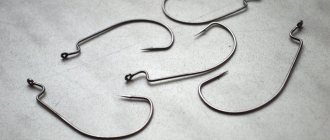
Hooks and leaders are the most important elements of equipment. For catching medium-sized fish, it is optimal to use hooks No. 12-14 according to international numbering. For plant baits, hooks with a short shank length are used. For the worm, models with long forends are used. When fishing with bloodworms and maggots, preference is given to models made of thin wire. Among the manufacturers we can recommend Ovner, Dekoy, Gamakatsu.
The main criterion when choosing fishing hooks is sharpness. Remember that a sharp hook will significantly increase the number of successful hooks.
The simplest and most reliable feeder installation for beginners is a paternoster.
It literally takes one minute to knit as follows:
The length of the leash is selected depending on the strength of the current. When fishing on reservoirs without a current or with minimal water movement, leashes with a length of 20 to 40 cm are preferred. On rivers with a current, leashes with a length of 40 to 70 cm are more often used. For passive biting, leashes from 1 to 2 meters are used. The line diameter varies from 0.08 to 0.16 mm depending on the activity of the fish. The worse the bite, the thinner the leash.
Feeder fishing requires many other accessories. A novice feeder will need an extractor, a rod stand, a chair, a landing net and a cage.
Online editing
The inline installation method for a feeder is not considered a specific equipment option, but a popular method of attaching a feeder in a sliding design. By this name, many novice fishermen understand the running feeder method, but there are other methods of equipment.
On monofilament line
A similar rigging scheme is performed directly on monofilament wound on a spinning reel. The edge of the monofilament is passed through the thin eye of a carabiner with a secure clasp, onto which the cormac is secured. Next, a bead is put on, the inner diameter of which is slightly larger than the size of the fishing line. This will allow her to move freely. The bead acts as a locking mechanism and prevents the swivel from sliding close to the leash outlet.
Then the withdrawal itself is made. To do this, leave 25 cm from the edge of the monofilament, bend the line in half and leave a small loop using a reliable knot. Next, the monofilament stretches in the air and twists.
The length of the lead should be such that a small loop for a thin leash is 4 cm below the feeder
To prevent the important twist from unwinding, you need to make a double knot at the very end and cut off the excess part
Inline installation with outlet
With proper installation of the inline with a small outlet under the feeder, the feeder is first lowered to the bottom of the reservoir, and then, with some delay, the bait. For this reason, such equipment should be used when you need to fish on the fall.
The running feeder rig method with a small outlet is optimal for catching the following types of river inhabitants:
- bream;
- roach;
- chub;
- silver bream.
To assemble the gear, you first need to prepare an outlet for the feed:
- Since it must have a length of at least 7 cm, a bead with a large internal diameter is taken so that a double fishing line can fit into it.
- A piece of monofilament with a diameter of 0.33 mm and a length of about 20 cm is inserted into the bead.
- The monofilament is folded in half so that the bead is in the middle.
- Then each edge is securely clamped with your fingers and twisted.
- The twist is 10 cm long. Then a crimp tube is put on the monofilament and brought to a distance of 6 cm from the bead, and then the fishing line is passed through the carabiner.
- The rest of the folded monofilament is threaded into the tube so that a small loop comes out. Next, it is brought as close as possible to the swivel and compressed with pliers.
- The remaining antennae are cut off - and a ready-made outlet for the cormak is obtained.
That's not all. The bead is put on the main fishing line, and it should be followed by a small stopper. Then the feeder inline is made using the previous method, only the branch for the leash is made 10 cm longer - 30 cm are retreated from the edge of the monofilament, folded in half, and a knot is tied. This creates a loop. After this, a twist is made, which is fixed with a reliable knot, and the excess elements are cut off.
Installation of tackle flat method
A similar installation of feeder equipment is used for fishing both in slow currents and on muddy lakes, because the feeder has a wide and flat bottom. Thanks to this, the device is buried only a few centimeters into the silt, unlike other feeders.
Then a bead is passed through the end of the monofilament and brought to the swivel - the bead itself should be slightly larger than the inner tube of the cormac. The monofilament is passed through the hole in the feeder, 40 cm away from the top edge of which, and a loop is made - the main braid will be attached to it. Many fishermen use a swivel instead of a loop. When installing using the flat method, the length of the leash is about 15 cm.
Carp equipment
To make an inline carp feeder rig, you need to tie a swivel to the monofilament, and then attach a blind rubber stopper, which should remain in one place on the monofilament
It is important to ensure that it does not injure the knot that holds the swivel. Then the monofilament is threaded into the hole of the “Method” cork, 25 cm of monofilament is measured and a loop is formed to attach to the main fishing line
The leash can be made from monofilament or a special material for cyprinids. It is this element of the tackle that is subject to maximum wear and tear when fishing for prey. Fish can swim away into snags, break the monofilament on shells or sharp stones, so the rig’s leash must withstand heavy loads. The leash is made about 10 cm long. The hook must be selected with a hair coating to securely fix the bait.
Inline installation on mono line
Inline for feeder
Installation of inline on a monofilament line is done by analogy with those shown above. The difference is that the twist for the leash is done directly on the fishing line.
- A swivel with a fastener or a connector is put on the main line;
- The end of the fishing line is folded into a loop approximately 15 cm long, the resulting loop is fixed with a figure-of-eight knot;
- An even and tight twist about 10 cm long is made and fixed with the same figure eight knot;
- We fasten the feeder and secure the leash - the equipment is ready for use.
Simplified inline installation with tap:
This sliding installation on monofilament can also be done with a retract. How to make an inline tap is shown in one of the videos above and in the next one. Such equipment is not self-hooking, so you need to carefully monitor fish bites and hook in time.
For convenience, we included these and other videos in a separate playlist “Feeder Online”:
What is inline
This is a type of feeder equipment in which the feeder is not firmly attached to either a rigid line or a branch. The container slides freely along the working thread. The fish, busy with food, do not notice the weight of the cargo container, so they are not alarmed. This is the main meaning of inline installation for the feeder.
What is inline
But, by and large, the term “inline equipment” is incorrect. It is, rather, a way of attaching the feed container to the working line: hence the wide variety of modifications.
Fishing method
There are holes made in the feeder or swivel through which a fishing line or cord is passed. The tackle becomes very sensitive. When a fish bites, the feeder moves, about which the fisherman receives instant information: the slightest touch on the leash, hook, or feeder is transmitted to the quivertip.
pros
The inline rig for the feeder is good for catching bream, carp, and crucian carp. Beginners need to master this method, as it will come in handy when fishing for large fish.
Inline feeder installation has the following advantages:
- High sensitivity – the ability to record even the most timid bites.
- A way to often self-hook prey, increasing the effectiveness of the fishing session.
- With modification, it can be used in any water area.
Inline feeder installation
Minuses
A sliding feeder rig would be ideal, but if you snag, you lose the feeder, and this is an expensive component of the feeder rig. Another disadvantage is that a long retractable leash often gets tangled, and the sliding effect is immediately lost. Fishermen consider the method difficult to manufacture and requiring skill.
Do you like the fishing method using inline rigs?
Yes 0%
No 0%
Still more disadvantages than advantages 0%
Haven't tried it yet, but I'm planning on 0%
Voted:
Necessary materials for online
The feeder will always have components for inline tackle. Required items:
- feeding trough for feeder;
- monofilament and braid;
- swivel with carabiner;
- anti-twist;
- hooks;
- stoppers (plastic beads, silicone tubes);
- feeder gum (feedergam).
Accessories for inline tackle from the feeder
When to use inline feeder equipment and installation options
Inline feeder equipment is not as widespread and popular as the Gardner loop or asymmetric installation. However, experienced fishermen use it in different situations, and beginners definitely need to learn how to tie it, since this knowledge will be useful on subsequent trips to the reservoir, especially when fishing for fish such as carp, crucian carp and silver carp.
Recently, inline equipment has begun to be used by an increasing number of anglers. There are several modifications of it, slightly different from each other. As a result, the feeder gets the opportunity to use this installation both in the flow and in a standing reservoir.
The inline equipment for the feeder, or “Running Feeder Rig”, came to us from our European colleagues. There it was invented for fishing on flat feeders and hunting for carp and crucian carp in closed reservoirs without a current. In our country, it is successfully used not only on ponds and lakes without a current, but also, after slightly modifying it, it is used in rivers with currents of varying strengths.
The essence of inline installation for a feeder is that the feeder is not fixed in any way to the fishing line or loop branch, but slides freely along it. Its movement is only limited by knots or stop beads located on the main cord, which determine its degree of movement.
There are several types of sliding equipment. All of them are effective, but are designed for specific conditions. For a novice fisherman, it is still advisable to explore all the options in order to be able to adapt to the body of water and the potential type of fish. So,
- Equipment for a method or flat feeder, when the fishing line passes directly through it. The most popular for closed lakes, ponds and quarries when fishing for carp and crucian carp.
- Installation when the cord passes through the swivel ring to which the feeder is attached. The most versatile option and suitable for both lakes and moderate and medium currents.
- The feeder is tied to a branch, which is attached to a swivel. And that, in turn, is attached with one ring to the main fishing line. Suitable for current.
As you can see, the equipment options differ slightly, but the principle remains the same: the feeder is not fixed to the fishing line, but slides freely along it.
In every installation, the inline feeder does not slide along the entire line. Its movement is naturally limited with the help of special stop beads. The lower stopper, in addition to its main function, also protects the knot that connects the main cord to the leash from damage.
The inline feeder rig is very sensitive and the fish are not afraid of it. She calmly takes the bait without feeling any resistance, since the line slides freely through the feeder or swivel ring. At the same time, it usually self-locks due to the counteraction of the rod.
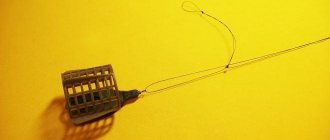
Photo 1. Equipment for the feeder method.
You can use inline rigs with both braided and nylon fishing lines. She shows her best qualities equally well in both cases. The nozzles used are also different. In other words, the installation is universal and suitable for almost any conditions.
Inline equipment, like other feeder installations, has its advantages and disadvantages. The advantages should be noted as follows:
- It is a self-cutting rig, which makes fishing easier and increases the number of successful bites.
- High sensitivity, allowing you to catch passive fish that only slightly fiddle with the bait.
- Suitable for standing water. In fact, this is the best equipment for closed reservoirs without current.
- Used with flat feeders and is effective on muddy, sticky bottoms.
- Suitable for spot fishing when you need to carefully fish a specific promising area.
- It is considered more humane and does not seriously injure the fish. Relevant for those fishermen who profess the “Catch and Release” principle.
It should be noted that inline equipment is the only one allowed in professional sports competitions for bottom fishing, since it does not injure the fish and allows it to be released with relative ease in the event of the rig being torn off.
The disadvantages include the following:
- Relatively difficult to manufacture, so it requires some skills and experience.
- Its installation requires additional auxiliary elements, such as a bead or crimp tubes. Its production directly on the shore will take a lot of time.
- Prone to tangling the leash when casting and when fishing in the current. If it is wrapped around the main cord, then the equipment loses its sliding properties.
- When hooked directly by the feeder, all the equipment comes off and a new one has to be installed.
In general, the equipment is interesting and functional. It remains to consider installation options and the sequence of their manufacture.
The first and most popular option for inline equipment is on a monofilament line. It is extremely sensitive and productive on sluggish, inactive fish that are wary and reluctant to take the offered bait.
- We take the free end of the main line with a diameter of 0.25–0.40 mm. Its thickness depends on the potential size of the prey.
- We put a swivel with a clasp on the fishing line.
- We measure about 15 cm from the free end of the fishing line and fold it in half.
- We fix the formed loop using a Figure Eight knot.
- Next, we form a twist, the length of which should be about 10 cm. It should be as rigid, tight and even as possible. We fix it using the same “Figure Eight” knot.
That's it, the equipment is ready. All that remains is to fasten the feeder to the swivel with a clasp. And a leash of the required length is attached to the loop. This installation itself does not have a self-hooking effect, so the fisherman must clearly record bites and make timely hooks. This option is also in demand when hunting for trophy fish.
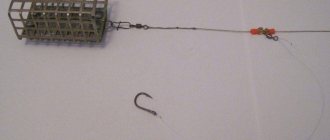
Photo 2. Simple installation through a windbreak.
The second installation option is called inline with tap.
- To make a bend, take a piece of fluorocarbon with a diameter of about 0.28–0.32 mm, onto which a bead is placed.
- We fold the fluorocarbon in half so that the beads are at the bottom of the loop.
- We make a twist around the bead up to 10 cm long.
- Using scissors, we even out the free pieces of fishing line.
- We put a crimp tube on the free ends and bring it to the beginning of twisting.
- We also thread a swivel with a clasp through the free ends.
- Now we pass the free ends of the fluorocarbon through the crimp tube. We stretch the resulting loop all the way to the swivel with the clasp.
- Use pliers to clamp the crimp tube.
- We cut off the free ends remaining on top of the crimp tube. That's it, the withdrawal is ready.
All that remains is to attach the resulting structure to the main fishing line by simply threading it through the hole in the beads. Next, we form a loop on the main line to attach the leash. We do the twist as in the first option. Its length should be 5 cm longer than the outlet.
Photo 3. Installation with outlet.
The second option is suitable for marshy soil. The retraction allows you to increase the time the bait is immersed in the mud, which has a positive effect on the number of bites.
Among the various bottom rigs, the equipment for the inline feeder (Running Feeder) is the most humane and safe, and it is not for nothing that it is allowed in feeder fishing competitions. Even more, on many European paid reservoirs, it is allowed to fish only with such feeder equipment. And all because with this installation, the feeder moves freely along the main line and if it breaks, the fish will leave with the hook in its mouth, leaving the feeder at the bottom.
Feeder equipment and fishing conditions
First of all, there is a division according to fishing conditions. Depending on the reservoir, different fishing rods and equipment are used. It depends on where the angler spends more time. If these are small crucian carp ponds and small rivers, you will need a light rod with a test weight of up to 60 grams, or a picker. On large rivers, such as the Volga, you cannot do without Heavy-level gear, with which you can throw heavy feeders (120 grams or more) at a distance of 60-100 meters. Lighter weights simply will not be able to withstand the force of the current.
A universal equipment option is medium, medium feeder, rods with dough up to 90 grams and a length of 3.3-3.9 meters. This is a good first tackle option for a beginner. This rod will allow you to fish in crucian carp ponds and at distances of up to 80 meters on medium rivers.
After mastering it, you can diversify - buy and equip it, for example, with a picker for short-range fishing and a heavy one for difficult river conditions or targeted flat fishing of large carp with long casting. Therefore, we will continue the conversation about equipment, based on the average medium feeder, making reservations for extra-light or heavy equipment. An article about rods for feeder fishing.
- Advice for beginners is to thoroughly study the theory of the feeder. Store shelves are bursting with a variety of goods. You can buy a lot of unnecessary things, and then it will all be uselessly lying around in the corner of the garage. To properly equip a feeder, not much is required to begin with.
- At a minimum, this is a medium-class rod with a matching reel (a spinning reel with a spool size of 4000 and a gear ratio of 4.8-5.2). The feeder is equipped with a good braid of 0.1-0.14 mm (or monofilament about 2-0.3 mm) with a length of 120 meters or more. The usual distance for a feeder is up to 90 meters plus a margin. The kit also requires several different feeders, 0.25-0.3 mm fishing line for knitting rigs, thin monofilament for leashes and hooks.
- When fishing, you will need groundbait and bait (at least maggots). You can install the feeder on a wooden flyer, and measure the bottom with a working feeder. The entry level is several thousand rubles. This is five thousand for a more or less normal rod and reel plus small things. And these are not tens of thousands for top poles, which the authors of YouTube videos love to praise. In principle, a budget feeder stick is no more expensive than a set of 3-5 donks, but exceeds them in functionality.
- Anglers who are looking for information on the feeder and its equipment are usually not beginners at all, since they have a fair amount of experience in bottom fishing. Therefore, we will not limit ourselves to superficial calls to switch to a feeder, but will take a closer look at how to equip a feeder fishing rod. Having imagined in your head the general appearance of the feeder equipment, its elegance and capabilities, any experienced fisherman will understand the beauty and advantages of the English donkey over the usual one.
More details - reels for feeder tackle.
Inline principle
Sliding installation of the feeder can be done in various options. If necessary, the articulation stroke is limited by a stopper, thus limiting free sliding. Therefore, technically, inline rigs can be of two types - completely free sliding or with a limiter in the form of a stopper for self-cutting.
Unlimited sliding
A fully sliding feeder rig is not limited in any way - the fish will reel in the line until the slack reaches the clutch, if it is set (in carp fishing). In the feeder, the reel is fixed during fishing, so when the fish reaches a certain resistance of the equipment, it will feel it and throw out the bait. Self-hatching occurs with low probability, since the feeling of resistance in the fish during pulling increases gradually due to the flexibility of the quivertype. Therefore, such fishing should be carried out in a sporting way - constant control of the gear and hooking is required, literally with the butt of the rod on your knee. The fisherman needs to choose the right moment for hooking. This inline option is the safest for fish in terms of the possibility of the main line breaking. As already mentioned, if this happens, the fish will calmly free itself from the heavy feeder, completely pulling out a piece of fishing line and a leash from it.
Restriction by stopper
In recreational fishing, inline rigging is often limited to a top stopper. This is convenient - suddenly the need arises to get distracted, take your eyes off the quivertype or move away from the fishing point for a while. If a bite happens, the fish will take the line to the stopper. After this, it will either hook itself or leave the bait. This is a kind of safety net against pulling the fishing rod into the water. The mechanics of the tackle depends on the distance from the feeder where the upper stopper is installed.
This type of equipment is universal. If you move the stopper directly to the feeder, for example, in the running version with a tap, we get a regular blind paternoster. If we move it upward by 10-15 cm, the inline will work on a similar principle with an asymmetrical or symmetrical loop, the free movement of the line will be exactly this distance. In case of active biting, self-hatching will most likely occur. Therefore, this amateur version of inline equipment with a stopper is the most universal - the feeder can be adjusted to the fishing conditions directly on the reservoir, without tying it up. Next, we’ll look at how to connect inline equipment with your own hands for a feeder.
Paternoster (Gardner) equipment
The Paternoster rig (also called the Gardner loop) is considered to be one of the easiest in the context of installation, because it will only take a few minutes to create, provided you have all the necessary gear.
First you need to make a small loop at the end of the fishing line (monofilament or braided), to which you then attach a ready-made leash with a hook and the selected bait. A little higher than this loop (10-20 cm) another one is made, the size of which depends on the method of installing the feeder: if the feeder is attached using the “loop-to-loop” principle, then the loop should be quite large, but if you are going to use a swivel for installation and a carabiner, the size of the loop can be much smaller.
Read the large section on feeder fishing.