What can you do for feeder fishing?
Long gone are the days when anglers made most of their gear themselves. Feeder is an exception. There is enough gear available for fishing this way. You can just come to the store and buy everything you need - from a rod and reel to a seat and a box of feeders. And all this will work without additional modifications. However, much of what is sold is expensive. And much of what you do yourself is better than purchased. Here is a short list of what can be made at home:
- Feeder rod - from scratch or converted from another
- Feeders
- Seats, platforms
- Sieves for bait
- Rod stands
- Advanced Fishing Reels
- cages
- Additional alarms
- Extractors
And many thousands of little things that a fisherman can make on his own and does not need to be bought in a store. In addition to completely homemade things, there are a lot of useful purchases that can be made more profitably in other stores than in special fishing stores. And they are perfect for feeder fishing, performing just as well as specialized ones.
DIY feeder tackle
There are no difficulties in making the gear. You need to purchase the components in the store - feeders, hooks, fishing line, rod and reel. You can make the tackle directly by the pond with your own hands in a few minutes. The only tool you will need is a knife or scissors to cut the fishing line.
The main thing in feeder fishing is to make the tackle correctly.
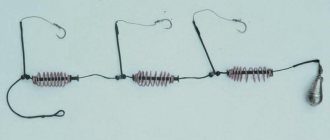
Gardner rig
This is the simplest equipment.
It is done on the main line:
- At a distance of 30 centimeters from the end of the main line, a loop 15 centimeters long is made. A feeder is attached to it.
- A small loop is made at the end of the fishing line.
- A leash with a hook is made from fishing line with a diameter of 0.18 mm and a length of 60 centimeters. It is attached to a small loop using a loop-to-loop method. The tackle is ready.
A symmetrical loop is prepared on a separate piece of fishing line 1.5 meters long and 0.25 mm thick:
- The line is folded in half.
- A small loop is made at the bend for the leash.
- After 10 centimeters from the loop, we tie both ends with a strong knot.
- After another 30 centimeters, we once again firmly tie both ends of the fishing line. The feeder will be attached to the resulting large loop.
- We cut off one end.
- At the second end of the fishing line, 15 centimeters from the knot, we tie a swivel, which is connected to the main fishing line.
An asymmetrical loop is made like a symmetrical one, but point No. 4 changes. One end 35 centimeters long and the other 25 are firmly tied together. A feeder is attached to the long side of the resulting loop. Then proceed like a symmetrical loop.
Equipment with anti-twist
An anti-twist tube is put on the main line, then a bead. A swivel is attached to the end of the fishing line, to which the leash is attached. The feeder is attached to the anti-twist.
Equipment with sliding feeder
It is similar to the previous tackle, only instead of an anti-twist tube, a feeder is strung. A pellet is placed above the feeder to limit its movement.
Homemade feeder tips
Any angler who is familiar with a feeder knows that rod tips are a consumable item. At least two or three break during the season, and you have to constantly buy them in the store. But you can make the ends for the feeder yourself, using cheaper components, and save up to 50% of money! Fiberglass tips are made.
It is better to do this in a large batch, about 20-30 pieces. To do this, you need to buy a semi-finished product in the store - fiberglass whips. The price of such a whip is from 1 to 2 dollars. The whip is clamped from the butt part into a drill, which is installed motionless in a vice. Then sandpaper is applied to it and it is ground down to the desired thickness. When working, it is advisable to water the whip and use leather gloves, since fiberglass can dig into your hands and clog the air. This way you can get tips of any sensitivity.
After processing, the butt is ground down to the desired thickness that is suitable for your feeder. Rings from old broken quivertypes, store-bought or homemade, are installed on the tip. It is desirable that the rings be as light as possible and they need to be placed quite often. If you use a braided cord, it is better to buy rings with ceramic inserts.
At the end it is painted with bright colored nitro paint. The tips can be marked by placing it in the rod and seeing under what load it bends 90 degrees - this is the quivertip test. As a result, you can save up to $2 on each homemade feeder alarm if you buy all semi-finished products in bulk or use spare parts from broken gear. In the same way, you can make feeder nods, which are more used in bottom fishing.
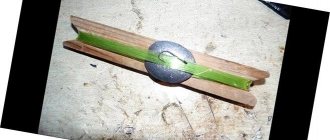
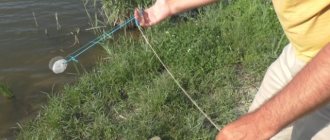
How to make a marker float for feeder fishing with your own hands
A marker float is a fairly useful accessory with which you can study the topography of the bottom of a reservoir. You can buy it in the store. If the measurement is taken in a calm body of water, the shape and size are absolutely irrelevant. A float weighing 30 grams will do. Current is another matter; you will have to load it additionally. It is very easy to make a marker float from a medical syringe. A swivel is glued into the tip, with the help of which it is attached to the main fishing line. The back of the syringe is either painted in bright colors or has feathers attached to it. A good float comes out of a kinder surprise. Due to its significant load-carrying capacity, either liquid is poured inside it or it is surrounded with lead. The scaffolding is attached quite easily: a bead, swivel or other object is tied to it. The item is inserted inside the kinder surprise and clamped.
[custom_ads_shortcode3]
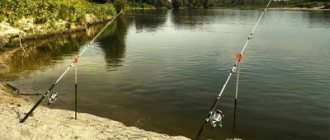
Stands
Many anglers look at feeders and are amazed at how many different supports are used when fishing. This is a pair of stands opposite the angler, so that you can fish several different points with different casting sectors, a second pair under the butt of the rod, another stand on the side to put the rod on it while fishing, when you take off the fish, fill the feeder and change the nozzle, and another pair stands on which ready-made spare fishing rods lie.
Of course, you can get by with three - two for installing an abandoned feeder and one on the side, on which the rod is placed to remove the fish. Many people consider this unnecessary, since they can cut flyers from bushes growing along the banks of a reservoir as weeds. But anyone who has used stands knows that they are much more convenient, and no time is wasted preparing the fishing area.
All these stands have different configurations, and their price in the store is quite high. But you can use cheap flyer stands, which cost a little over a dollar, and then make wide feeder stands out of them, allowing you to move the rod in a large sector.
To make it, take a cheap flyer stand, usually used in float fishing. You can take both short and telescopic ones. It is most convenient to use supports that are screwed into the ground, as they do not warp if you place the rod close to the edge. The flyer from the top is twisted and sawed off. We only need the threaded part that fits into the rack. It comes out carefully.
After this, take a 16-gauge polypropylene pipe and insulation for it of a suitable diameter. The pipe is bent so that the side stops of the stand of the desired shape are obtained - an angle, a ring or a hook. You can bend it by heating the pipe over gas and holding it in welding gloves so as not to burn your hands. Then a hole is drilled in it in the middle, slightly smaller than the diameter of the threaded insert. The insert into the pipe can be placed in different ways - placed on glue, secured with a screw, or, after heating, pressed into polypropylene. The author uses pasted ones.
Then pipe insulation is put on the pipe, and a hole is cut for the insert. A rod placed on such a stand is not injured and clearly maintains its position due to the roughness of the polypropylene coat. The stand is resistant to water, ultraviolet radiation and mechanical damage.
If desired, you can make other stands according to the same principle, using purchased ones or made from other materials - old canes, ski poles, tubes, etc. The main thing is that they are collapsible, light enough, and that the rod does not have direct contact with metal, but lay on a soft lining. Contact with metal and stones when fishing will certainly kill the rod, especially the ringing coal. Cracks will certainly form in it, and the likelihood of failure will increase. For example, if a bent stand is made from wire, it must be hidden in a hose from a dropper before use, so as not to injure the rod while fishing.
How to make catchable feeder gear?
The catchability of feeder gear depends on factors such as the correct choice of equipment, which would take into account all the characteristics of both the reservoir itself and the gear as a whole.
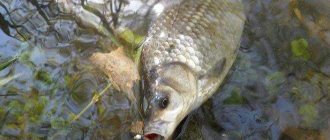
Feeder tackle for bream fishing
First you need to find a catchable place where bream can be found. If fishing is carried out on the river, then you can use heavy feeders weighing up to 100 grams. If it is a pond with standing water, then the weight of the feeder may be less. But at the same time, you should not forget that you cannot throw a light feeder far.
For catching bream, a rod with a length of 3 to 4 meters and a weight of 100-120 grams is suitable. The leash can have a diameter of about 0.18 mm. Hooks are selected in such a way as to use baits such as worms, pearl barley, peas and corn.
Tools such as “paternoster”, “asymmetrical loop”, “symmetrical loop”, anti-twist tube and others are suitable.
Feeder tackle for carp
When configuring feeder equipment for carp fishing, you should take into account the fact that this is a fairly strong fish that can damage both the rod and the reel, not to mention the equipment breaking.
Basically, they choose a rod about 4 meters long and install a reel on it, size 5000-6000, no less. A special carp leash can be used, as can hooks. The thickness of the leash made of monofilament fishing line must be at least 0.25 mm. The thickness of the main line is 0.35-0.4 mm.
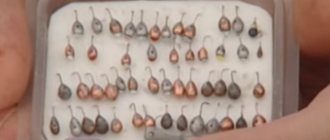
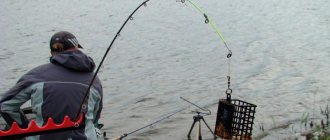
Feeder feeders
Many people know that for feeder fishing you can make feeders yourself from lead and a plastic bottle. These are the so-called “chebaryukovkas”, named after the name of the inventor, which are an oblong lead weight with an eyelet for fastening and a plastic cylinder with holes attached to the top of the weight into which food is poured. The cylinder is hollow on both edges, delivers feed even to great depths and currents without scattering and delivers it satisfactorily. This homemade feeder feeder is best suited for catching bream in the current.
However, not everyone knows that the process of making a chebaryuk feeder can be simplified. For this, thickened plastic from a bottle is used. The bottle is heated over a fire, causing it to shrink slightly in size. The plastic of the bottle becomes much thicker. Feeders are made from this kind of plastic.
Plastic with holes made in it is immediately installed into the mold for casting sinkers, into which lead is poured during casting. Lead is not capable of melting thick plastic, and even if it does, it does not affect the functionality of the feeder. As a result, we get rid of the operation of attaching the sinker, and the attachment itself is more reliable.
The most important question is where to get lead. All the old lead-braided cables have long been dug up and handed over to homeless people, and it’s expensive to buy weights for tire fitting, which are recommended by most authors of videos on YouTube. A simple option is to purchase the largest “hare” shot by weight at a hunting store. It is the cheapest source of lead available to any angler and is sold without a gun permit.
Using this method, you can make many feeder feeders with your own hands and not be afraid to unhook them. It is very technologically advanced and does not involve any precise operations or special tools such as a riveter. The only expensive component that can be recommended is an aluminum casting mold, which can be made to order at the factory. But if you make a lot of feeders, then this expense is justified, and if the angler himself is a miller, it’s not so difficult to do it during a lunch break. Feeder mounts and anti-twist mounts can also be made by the fishermen themselves and are the same consumables as feeders.
Types of feeder equipment
For a small reservoir, you can use a slow or medium action rod with a length of 3.3 meters and a test weight of 40–60 grams.
The fish’s biting activity and catch depend on the correctly selected equipment and the manufacture of the gear.
The rod is specially designed for feeder fishing. It features a large number of rings and a replaceable tip.
But you can also use ordinary spinning rods. The rod is selected depending on the reservoir where fishing will take place.
For a large reservoir and a fast river, a fast action rod with a length of up to 3.9 meters and a weight of 100–120 grams is suitable.
The action will depend on the size of the fish. Slow action is more sensitive to small fish. The reel used is an inertia-free reel, since with its help long casts are obtained, which is important when feeder fishing.
The fishing line is taken with a thickness of 0.2–0.3 mm. It is better to use braid with a diameter of 0.12–0.14 mm.
Leashes with a length of 20 to 60 centimeters are prepared from fishing line 0.18–0.2 mm thick. Bells or electronic bite alarms can be used as a signaling device.
Feeders are available in different types and weights. Its weight should not exceed the second figure in the rod test. Feeders come in the form of cages, spirals, and cones with shifting weights. There are no special requirements for their choice. Each fisherman selects the type of feeder individually.
Before throwing a feeder with fertilizer, it is necessary to study the bottom of the reservoir. Instead of a feeder, attach a lead weight weighing 40 grams, and, throwing it in different places, try to study the bottom. Only after this can you start casting the feeder with bait.
Seats and platforms
Feeder fishing is associated with a fishing platform. This is a special seat for a fisherman, on which the necessary rod stands and accessories are attached. The platform is comfortable, has a backrest, a footrest and adjustable legs, with which you can install it even on a steep, uneven bank. For those who drive a car, the platform is very convenient.
Unfortunately, sitboxes and platforms are very expensive. A fairly high-quality and lightweight platform costs at least a thousand dollars. And good options with accessories are even more expensive. You can make a good platform yourself, using drawings and ready-made components, purchased in medical equipment stores, parts for shelving and other parts. As a result, the platform will cost you two to three times cheaper, plus a little time spent and a couple of tools for work.
A great option is to use a winter box instead of a sitbox. It's convenient, easy to carry to your fishing spot, and most anglers already have one. To install it on a slope, two methods are used - attach a pair of legs to it on one side or install it by digging the bank under it. Both options take the same time, unless, of course, you have to place it on a concrete slope where digging will not work. A metal garden scoop purchased at a garden supply store will help you cope with the task; it will easily fit in the same box along with your fishing accessories.
Another seat option is a regular bucket. By the way, it’s better to buy it not in a fishing store, but in a construction store - it will cost three times less. It's comfortable to sit on the bucket. You can take a couple of buckets nested one inside the other. In one the bait is prepared, on the other they sit and put the fish in it. In order to sit comfortably, the lid is made of plywood and upholstered with soft material. Fish can be placed in a bucket without other fishermen noticing. It is also convenient to store and transport live bait in a bucket if they are caught with a feeder for live bait fishing. Unfortunately, if there is a lot of fish, you will have to make a cage for it, because it will not fit into the bucket.
Fishing table with feeder
In order not to put bait and fishing accessories on the ground, you can make a bait table that will facilitate the fishing process and become useful for outdoor recreation. It is easy to place and keep bait, bait, attractants and other accessories on hand. If we are already talking about such concepts as do-it-yourself feeder fishing, to make a table you will need the following consumables:
- a dining tray that will act as a tabletop;
- PVC pipes necessary for laying electrical cables;
- corners for connecting legs;
- plastic tips.
The frame base for the tray-table top is made from pipe. The base is secured with self-tapping screws, and the legs are mounted through the corners. Of course, you can weld a metal table, but the cost of manufacturing it will increase, and the weight will increase significantly.
[custom_ads_shortcode2]
Other accessories
You can make a lot of other things for fishing - bait sieves, homemade leashes, anti-twisters, flat feeders for the feeder, etc. Also, many fishermen make homemade baits for the feeder, and they work no worse than mass-produced ones. On sale you can find self-cutters for feeders, the drawings of which are offered by a number of craftsmen, for money and for free. The author does not really understand the meaning of such fishing with a self-hook, but those who like it can try it. The main thing in this matter is hands and desire.
After all, the feeder originally began as fishing for the poor, when a feeder was made from curlers, a homemade stand was sharpened from a chair leg, and a fishing rod was used repurposed from a broken spinning rod. And he has great potential for improving his own gear, even those purchased in the store.
Save on purchases
There are a number of items that are used for fishing, and which are purchased in stores not for fishing, but in hardware stores.
- Buckets. It has already been said about their ability to be used as a seat. At the fishing store, the bucket says “sensas” on the bucket and costs five dollars. You can buy it at the hardware store for one or two dollars. If you wish, for two and a half, a milk bucket for food products. There is almost no difference in manufacturing quality. And if so, why pay more?
- Fishing suitcases. They are sold in fishing stores in the form of a box with a handle, which has a couple of compartments inside and small compartments on top where you can put hooks, clasps and feeders. This again can be bought at a hardware store at a price three times lower. By the way, it is very comfortable to sit on it if the shore is flat and the suitcase is large enough.
- Sectional boxes. These are boxes with a lid with a latch, with several compartments. Usually they store hooks, feeders, and other small accessories. In a fishing store, this will cost from three dollars and more. In a sewing store, these same boxes are sold for sewing supplies and cost two to three times less. You can give a lot more examples when you can simply buy the same thing cheaper and use it for fishing. However, the list is far from accurate, because sellers can change prices for their goods. The main thing that can be advised to fishermen is to look and you will find. You need to have a creative view of things and imagination, and you can always find a replacement for something that turns out to be unaffordable.
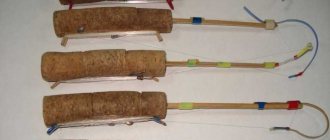
Homemade leashes
When fishing with feeder gear, leashes with a length of 8 to 150 cm and higher are used, and their storage presents a certain difficulty. For each fishing trip, you need to tie several dozen leashes so that you are always fully armed during the session.
Leashes are crocheted at home and loopers and crocheters are used for small hooks. Using such gadgets while fishing is not very convenient, especially if the weather conditions are not favorable, so a supply of ready-made leashes with hooks is made in advance. To transport and store leashes, leash holders of appropriate length and geometric shape are used.
It is not always convenient to use a flat leash, because if the length of the leash is one and a half meters, its fixation becomes more complicated. In this case, round-shaped homemade products, similar to those made for storing leashes for zig-rig fishing, come to the rescue. To make such leashes, penoplex or the same EVA material is used, but you need a thick piece. The easiest way is to make a homemade leash from foam plastic, but as practice shows, such products are short-lived and deformed when winding the fishing line.
A cylindrical workpiece is made from the selected material, and the leashes are fixed using sewing pins with plastic heads. Such a leash holder is enough to store several dozen leashes of different lengths, and they do not lose their physical characteristics. To protect the leash from external influences and, accordingly, from breaking the leashes during transportation, a case is made from a plastic bottle.
It is enough to cut off the neck with a stationery knife, and when making the leash, select its diameter taking into account the diameter of the bottle so that everything fits properly. The material for a round penoplex leash can be purchased at any hardware store, and quite inexpensively. Depending on the thickness of the sheet, several round pieces of the same diameter are cut out and connected to each other using liquid nails or glue.
Please note that Moment glue dissolves the material and its use is unacceptable. In the resulting workpiece, using a stationery knife, grooves are made, which are necessary for better fixation of the leashes. The surface is treated with sandpaper so that no roughness remains. Another processing method is allowed, painting with acrylic paint, this will make the working surface of the future leash perfectly smooth. Fixation is carried out using sewing pins, and the leashes are kept taut.
A homemade anti-twist for feeder installations is made from cocktail straws, ampoules from ballpoint pens and other plastic tubes of the required length. To give the required shape, simply heat the tube over steam and bend it with your hands.