How to increase your fish catch?
Fishing is a process that cannot be rushed.
In order for the activity to be crowned with a good catch, first of all, you should take your time. In fishing, haste is for losers. If you want to get the maximum benefit and results from your time spent on the river, use these simple tips:
- Pheromone additives actively influence fish and attract them in any weather, regardless of water temperature.
- To increase your catch, try increasing the sensitivity level of your rig.
- When choosing a fishing spot, approach it with all responsibility. Make yourself comfortable and don't forget to feed the fish.
- Choose good bait and bait it correctly. Sometimes even the best quality bait is completely useless if it is “presented” to the fish incorrectly.
- A real fisherman does not go on vacation with only one bait. Grab some bait. In some cases, replacing the bait radically changes the bite situation. Include the minimum set of baits: bloodworms, worms, maggots, maggots, pearl barley, dough, pheromone baits, aromatic additives.
- If you are familiar with the fishing spots you are going to, stock up on a minimum set of gear. But if this fishing spot is new to you, collect all the “equipment”. The situation on the reservoir directly depends on the weather, so keep an eye on the forecasts so that you will definitely know what gear will be relevant for the planned date of your trip.
- Use at least simple techniques from sport fishing. Keep an eye on your gear and bait. Don't wait - react quickly.
- When there is no bite for a long time, many fishermen relax and do not carefully monitor the float. They don’t even realize that they are missing a lot of unnoticed bites, missing out on the catch.
Try to change the bait more often and be more active, and then your fishing will be effective, and your catch may be replenished with a trophy fish.
When was the last time you caught dozens of HUGE pike/carp/bream?
We always want to get results from fishing - to catch not three perch, but ten kilogram pikes - what a catch! Each of us dreams of this, but not everyone can do it.
A good catch can be achieved (and we know this) thanks to good bait.
It can be prepared at home or bought in fishing stores. But stores are expensive, and to prepare bait at home, you need to spend a lot of time, and, to be fair, homemade bait does not always work well.
You know that disappointment when you buy bait or prepare it at home and only catch three or four bass?
FishHungry bait
gives the same result that we cannot achieve on our own, especially since it is cheap, which distinguishes it from other means and there is no need to spend time on production - you order it, they deliver it and off you go!
Of course, it is better to try once than to hear a thousand times. Moreover, now is the season! A 50% discount on your order is a great bonus!
Find out more about the bait!
First way
By far the most popular method is using an elastic band.
This casting restriction is done very simply:
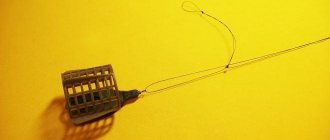
- After casting and determining the optimal fishing distance, we place the feeder on the stand and slightly tighten the line so that the feeder tip is in a bent, taut position.
- We take an elastic band (most often they use a bank rubber band, a stationery rubber band, or any other suitable and durable one) and put it on the spool, making two or three turns. The rubber tension should be strong;
- We insert one turn of elastic into the clip;
- When unwinding the cord or fishing line, the rubber will remain under the coils. And after casting it limits the range. Do not forget that during casting it is better to move the feeder to a vertical position, this will weaken the jerk and contribute to less load on the rubber.
The disadvantage of this method is the inability to use the clutch immediately after hooking a large fish
If you are catching bream, crucian carp or small carp, then this is not so important, but if there is a high probability of catching good specimens weighing several kilograms, then this is already a significant drawback. If such a long-awaited moment has finally arrived, then the main thing is not to fuss!
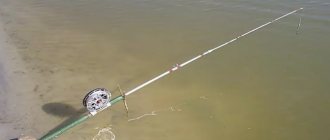
- The most correct thing at such a moment would be to be directly next to the feeder (as it should be in feeder fishing), in this case the rod is picked up and moved towards the fish. That is, you need to try to loosen the tension of the fishing line, and sometimes you have to enter the water. At this stage, we can absorb the jerks of the fish only with the help of a feeder, the position of which is close to vertical. It is precisely in this case that feeder rubber in the equipment or monofilament as a base can help us with depreciation.
- If you feel that there is truly a “monster” at the other end of the fishing line, which is about to tear the leash to the famous grandmother, then with your free hand we find our elastic on the spool and tear it or tear it out of the clip. The clutch immediately starts working, which should already be set to a resistance slightly greater than what the feeder with bait creates.
In order to find our bait point again in the event of a break in the elastic band or loss of equipment, we need to “duplicate” the fishing distance in advance. Most often this is done like this:
- After finding the optimal casting distance, when the rig is cast, the braid in front of the reel can be marked with a marker;
- After fixing with an elastic band, wind up the fishing line and unwind it on the shore, noting its length on objects (suitable if the shore is relatively empty and the fishing distance is short);
- In any case, for accuracy, while pulling up the feeder equipment, we count the number of revolutions of the coil. This method will also help in the future if fishing takes place in the same area of the reservoir.
As you can see, the method is not complicated, and its only drawback is problems with landing large fish. And in this case, it would be better to use fishing line as a base (if possible) and feeder rubber in the equipment to absorb the jerks of the fish.
Second way
A less common method of fixing casting distance, I used it before until I learned about the first fixation option.
The main difference between this method and the previous one is the use of a cut elastic band, that is, you can use a torn bank one or any suitable one.
- After finding the optimal fishing range, we make a ring of elastic around the main fishing line. The ring should be small, about a centimeter in diameter;
- Tighten the rubber ring well and cut off the ends from the knitting;
- We move the ring towards the reel and fix it in the clip.
After casting, the distance is also well fixed, but do not forget to raise the feeder up before splashing down the feeder.
I see one advantage over the first method - it is easier to find the ring by hand and tear it out of the clip, if necessary.
But there are more disadvantages in this method:
- The same impossibility of releasing the fishing line after catching a large fish;
- Extra time for knitting a ring;
- A knot that slightly disrupts the order of the turns of braided line on the spool.
But, despite the shortcomings, you also need to know about this method of fixation; in some conditions it can be useful for a feeder lover or any fisherman.
Add a comment
Manufacturing of feeder equipment “helicopter and two units”
The “helicopter and two units” equipment for the feeder is one of the simplest to manufacture, both technically and in terms of the number of components used in installation.
Equipment “helicopter and two nodes” for feeder
Line selection
It is best to use fluorocarbon fishing line to make a “helicopter”. This choice is explained primarily by its rigidity. In addition, the advantages of these lines are their low visibility in water and resistance to mechanical damage.
If fluorocarbon is not available, you can use regular monofilament fishing line, choosing the stiffest one available.
Braided cords are not suitable for making installations because of their softness - equipment knitted from braid will constantly get tangled. For the same reason, the equipment is knitted separately, and not directly on the main line.
Fluorocarbon line for such equipment
Hook selection
The choice of hook for equipment depends on the fishing conditions:
- the size of the hook for the equipment is selected based on which attachment will be used;
- The shape of the hook may be different. In most cases, feeder hooks with a ring bent outward and the hook point directed along the fishing line work well. Small carp hooks can be used to catch carp;
- the thickness of the wire from which the hook is made should be small to reduce the weight of the hook, since fishing is carried out with a slowly sinking bait.
It is advisable to use high-quality hooks produced by well-known companies - Gamakatsu, Owner, WMC, etc. The use of cheap low-quality hooks can ruin fishing with frequent trips and unsuccessful attempts to hook fish.
Hooks “Owner” 50921 No. 10
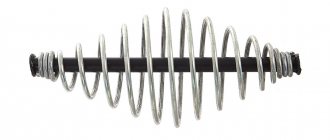
Using a feeder feeder
This equipment usually uses standard mesh feeders. In some cases, you can use cage feeders for maggots or bloodworms. The choice of feeder depends on the strength of the current, the depth at the fishing site and the casting distance:
- in reservoirs with weak, inconspicuous currents, light feeders made of plastic mesh are used. It is advisable that the feeder have stabilizer wings that allow it to float up quickly - this will reduce the likelihood of getting caught;
- For fishing in the middle reaches, cylindrical feeders made of metal mesh are suitable;
- in strong currents, it is better to use metal feeders of rectangular or triangular cross-section, since they are the least likely to be carried away by water;
- the weight of the feeder should provide the necessary casting distance and reliable retention of the equipment at the bottom.
Since helicopter fishing involves self-hooking fish, you need to use feeders weighing at least 40 g.
When choosing a feeder, you must take into account that the weight of an empty feeder and a feeder filled with bait can differ significantly
This is especially important when conditions require the use of heavy feeders, with a weight close to the upper limit of the test range of the rod
Feeder feeders and their varieties
Equipment diagram “helicopter and two units”
As already mentioned, this equipment is one of the simplest. In many ways it is similar to the Gardner loop. The main differences are the solid fixation of the feeder and the method of attaching the leash.
To install such equipment, you must:
- take a piece of fluorocarbon fishing line of a suitable diameter and, fold it in half, tie a loop 10–12 cm long with a double knot;
- stepping back from the knot by 1–2 cm, tie another double knot, after which cut the shorter of the free ends of the fishing line near the knot, and tie a swivel to the second one to attach it to the main fishing line;
- the length of the equipment should be from 30 to 50 cm;
- the feeder is attached using the “loop-to-loop” method directly to the equipment or through a swivel;
- the leash is also attached loop to loop between two nodes, which limit the movement of the leash along the equipment;
- The length of the leash can be from 30 to 70 cm, depending on the activity of the fish - the better the bite, the shorter the leash;
- The diameter of the leader depends on the type and size of fish being caught.
Equipment diagram “helicopter and two units”
Some fishermen attach the leash using a swivel freely rotating on the mounting line, limited at the top and bottom not only by knots, but also by beads. However, this method complicates installation and does not provide any particular advantages. The use of this option is justified only in carp fishing.
Design of helicopter gear for winter fishing
Helicopter gear - consists of:
- a piece of fishing line 15 m long, fixed at one end to a reel.
- the other end of the fishing line is fixed with a swivel in the eye of a pyramid-type sinker weighing 30–40 grams.
- A meter-long leash is attached to the swivel, on which 3-4 hooks No. 8-15 are tied sequentially every 20–30 cm (the number is chosen depending on the size of the fish that is intended to be caught).
- The helicopter ends with an unusual design, shaped like a miniature piece of rail or a block of paper clips glued together. This part of the equipment is made from tin (you can use a tin can). A hole is drilled in one of its sides, strictly in the center; The end of the leash is passed into it, and there it is fixed with a swivel, which is necessary so that the line does not fray.
The “helicopter” design makes it possible to move the leash widely from side to side in a fast current, which makes the bait very attractive, and it is also more easily discovered by the fish. Depending on the fishing conditions, the main line is set with a diameter of 0.2 to 0.25 mm, and the leash with a diameter of 0.1 to 0.14 mm. It doesn’t make sense to use a fishing line of a smaller diameter, because when self-hooking (and this is what Oka anglerfish fishing is designed for), if the fishing does not start immediately, a large fish can break it off.
To catch bream using a helicopter, two or three large bloodworms are placed under the head on each hook. Since bream loves a voluminous bait, a piece of green cambric is sometimes put on the shank of the hook.
To catch roach on a helicopter, you can attach one bloodworm to a small hook, which will make it easier for the fish to swallow the bait.
Nod as a bite alarm
The guard is a smooth willow twig 50–60 cm long, at the end of which a fishing line is secured with a double loop, stretched with a sinker lowered to the bottom. When bitten, the twig bends into the hole. For insurance, the reel is pressed down with something heavy.
Feeder in feeder installations
A feeder is not just a rod with a flexible signaling tip. The concept is broader - it is a different tactic and technique, different from conventional bottom fishing. If you use a feeder rod as a donk, throw it anywhere and forget it before the bite, the main meaning of this fishing method is lost. The main thing in the feeder is a thorough search for a promising point and its constant feeding. Rigging and its variants are the tools to implement this tactic. Article about feeder fishing:
At first glance, the structure of the feeder feeder is simple - a net and a sinker. However, there are many nuances hidden in this simplicity. Cages vary in weight, feed capacity, shape, and rate of feed leaching. The feeder must have a whole range of different feeders, used depending on the fishing conditions, the reservoir and the type of fish. More details - feeders for feeder equipment. You can attach a feeder feeder in a dozen different ways. It all depends on the chosen scheme of feeder equipment with a feeder.
- Paternoster and Gardner's loop;
- Helicopter;
- Symmetrical or asymmetrical loop;
- Flat method;
- Running with and without retraction;
- Carp rigs with or without a clip.
Even in some identical installations, you can tie the feeder feeder in different ways. Sometimes the fastening method is chosen for tactical reasons, in some cases - at the request of the fisherman, if the technical side is not important.
A simple “Helicopter” feeder rig with two nodes is a classic
Installation of the “Helicopter” is quite simple:
- We fold the end of the main fishing line in half - 10-15 centimeters and knit it with a Figure Eight knot - we get a loop that serves to attach the feeder.
- A little higher, 2-3 centimeters, we knit another Figure Eight knot. This distance between the two knots is used to attach the leash with the hook.
Tips for a fisherman: How to equip a winter pole for pike - Tips for a beginner
That’s it, our simple bottom-feeder rig “Helicopter” with two units is ready!
Attention! The length of the leash should be 10 centimeters greater than the distance from the bottom node to the end of the feeder. That is, if you fold the tackle, the hook is located 10 cm below the feeder.
To attach the feeder and leash, a “Stroke” knot is used.
Now let's look at the composition of this gear in detail. The following components are needed:
Helicopter
Structurally, the helicopter rig is similar to a feeder paternoster - a blind sinker (feeder) at the end of the main line and a leash above. The difference is in the way this leash is attached to the base. In a paternoster, the leash is attached to a branch of thick fishing line that goes down below the feeder trough. This was done so that when reeling out the tackle, the leash does not twist around the main line and the feeder. In a helicopter, the leash immediately, without retraction, clings to the main fishing line with a noose. As a result, the leash is hingedly attached to the base - during reeling and rotational movements, it does not wrap around the base and the feeder, as it rotates around it at the attachment point. Hence the name – helicopter, or Helicopter Rig.
The principle of attaching the leash
Rough version on a triple swivel (for donks)
To prevent the leash from moving up or down along the main line of the feeder, its section at the point where the leash is attached is limited on both sides by knots or stoppers. If the stoppers are made movable (for example, from silicone stoppers) and movable, then the height of the leash attachment, as well as the possibility of its movement up and down, can be adjusted. Some functions of an asymmetrical or symmetrical loop are obtained - free movement relative to the feeder lying on the bottom. The result is universal equipment. What is the best way to make a helicopter feeder - on knots or stoppers, what kind of leash to use? The answers to these questions depend on what the helicopter will be used for - in classic bottom fishing or with a falling bait. Conventionally, all helicopter installations can be divided into two types according to the purpose of use:
- For bottom fishing, a classic feeder - any of the many options invented by fishermen, with stoppers, knots or with swivels, are suitable.
- A helicopter feeder rig and two knots with long leads for fishing in the current with slowly sinking bait.
The hinged method of attaching the leash to the noose allows you to immediately attach it to its base - without the use of twists, thick bends made of rigid monofilament or fluorocarbon, designed to protect the equipment from entanglement. Because of this fastening on the feeder mounting, the helicopter and two knots rotate when the leash rotates during reeling, and tangling does not occur.
Shop equipment – Baryshev helicopter
"Helicopter" options
Like any other feeder installation, the helicopter and two-unit rig has its positive and negative sides. Knowing them, you can accurately determine which installation to choose in each specific case.
- The helicopter rig is best used in strong and medium currents. After all, its specificity is that it requires alignment of the leash and the feeder in one line. The necessary tension is created by the pressure of water on the current. In stagnant water, this method will be of little effectiveness, since the feeder will not be able to fulfill its main role.
- The use of this rig on rivers with strong currents requires long-distance casting. Accordingly, all components of the tackle (from the feeder rod to the hook) must have a certain margin of safety.
- A winter helicopter allows you to fish a wide area of the bottom. The hooks, carried away by the force of the current, are carried far from the hole and, moreover, can be located at different depths. This allows you to fish different layers of water.
History is silent about who invented editing. The equipment is quite young, but has already proven itself from the best side and earned the respect of fishermen.
Currently, connoisseurs of bottom fishing use the classic knitting pattern with two knots and variations on it, where instead of tied knots, silicone stoppers, lead pellets, beads are used, complemented by carabiners and swivels. As an example, Baryshev’s helicopter.
In the latter cases, mounting may be faster and more convenient, but some additional elements bothered me a little when fishing.
The equipment visually looks more massive, and there have been many cases when the leash caught on the stopper, the carbine. And this periodically causes dissatisfaction.
Which installation scheme to use is a personal choice, but I prefer the original.
Essentially, the helicopter effect is that a leash clamped between two knots spins freely around the main line with a feeder or a smooth, streamlined lead weight and does not get tangled.
However, no matter how much I looked in clear water, the leash clearly occupies a position “with the flow” and there is no talk of any rotational movements. Another thing is that the freedom of the leash in the fastener does not create obstacles to pulling out the fishing line with the hook in the direction of water movement. Twisting around the main line or loop with the feeder also does not occur.
But what is very useful in helicopter installation is the ability of the equipment to work at different horizons, of course, within the bottom.
The base of the leash, secured with a loose loop, slides between two locking units, or silicone stoppers, at the moment when the feeder is fixed to the bottom. The baited hook is spread along the current, following the path not only of the horizon, but also of the designated vertical segment.
All types of feeder installations:
Paternoster (Gardner loop)
The Paternoster or Gardner Loop rig can serve as an excellent tool when fishing in any type of body of water (both on a river and in still water).
The Gardner loop is a main fishing line with bait, from which a leash with a weight feeder extends. As a rule, the main line should be of a larger diameter (0.2 - 0.3 mm), and the secondary line should not be more than 0.2 mm.
The main line is folded flush with the thin line and a knot is tied at a distance of 40 cm from the end. The stronger the knot, the better; thin fishing line should not slide along the main fishing line. The Figure Eight knot is ideal.
We cut off one end of the secondary fishing line and shorten the second to 20 cm - we get a leash onto which we knit a swivel with a clasp at a distance of 10 cm. The feeder is attached to the clasp. At the end of the main fishing line we tie a leash using the “loop to loop” method. See how to knit this knot.
In the video you can watch the entire process of manufacturing feeder equipment from Alexey Fadeev.
Symmetrical loop
An installation called “Symmetrical loop” is usually made from fluorocarbon fishing line (diameter from 0.28 - 0.31 mm).
The peculiarity of this installation is that it has a self-cutting function, which is not available in a number of alternative feeder equipment.
The manufacturing process is reflected in the video and diagram.
An important aspect is the nuance that the length of the twisted fishing line together with the loop should be longer than the total height of the hanging feeder on the anti-twist.
Installation diagram “Symmetrical loop”
Asymmetrical loop
The fishing line in this type of installation is recommended with increased sensitivity, so professionals give their preference to fluorocarbon fishing line.
First of all, it is practically invisible, and is also a very durable and poorly deformable material, which affects the sensitivity of the bite.
Installation “Asymmetrical loop” is a modification of equipment with a symmetrical loop with the only difference being that the section of the fishing line on which the swivel with the feeder is located is 2-3 cm longer.
Installation with anti-twist tube (Combine)
Installation diagram with anti-twist tube
Of course, the main feature of this equipment is its ability to prevent tangling and twisting of the fishing line.
Although this type of feeder installation does not have a self-hooking effect, an experienced angler can always achieve greater results with just such a result, because it scares the fish less - it practically does not feel resistance when biting.
Quite simple installation - check out the manufacture of this type of equipment, which can be knitted using either monofilament or braided line.
Inline
0.25-0.35 monofilament
The “Inline” installation is very similar to the asymmetrical loop equipment with only one feature: in the inline you can adjust the free stroke length of the feeder
In this case, there is also a section of twisted fishing line near the terminal loop for the leash with bait. It creates a rigid shape that prevents the leash from getting tangled with the fishing line of the rig. The length of this twisted section is approximately 15 cm, which is fixed with a regular figure eight knot.
Helicopter and two knots
Using this installation you can fish both from the bottom and in slightly higher layers of water. Fans of feeder fishing often choose this equipment for catching roach, bream and silver bream.
This feeder equipment is interesting because it is very, very sensitive to fish bite. Works well in fishing conditions with an active bite.
The manufacturing scheme is quite simple.
Tooling Method (Flat Method)
Flat is, first of all, a form of innovative feeder, which has a fairly simple method of attaching the mounting line, as well as such a feature as the ability to distribute the feed itself using tiny air bubbles, which are stored in the feeder while it is charging.
You can see how the Flat Method behaves in water.
What is a helicopter tackle for winter fishing?
The thick cover of ice on the river makes it possible to explore any part of the reservoir. You can walk to any corner that is inaccessible in summer. In order not to spend long hours searching for fish, many amateurs use homemade devices that allow them to quickly catch animals over large areas. A “helicopter” can also be considered such a catchy homemade gear. It is designed to successfully catch peaceful and predatory aquatic inhabitants, such as roach, bluegill, white-eye, bream and perch.
Then, on the reel, you need to assemble equipment, very similar to the one that many people use in the summer when fishing with a donka with a rubber shock absorber: approximately every 50 cm, a leash with a hook is tied to the fishing line. There should be 4-5 leashes in total (photo 3). It is better to take hooks from the thinnest wire so that the bloodworms do not leak out when hooked and remain attractive to bream.
In winter, schools of bream often feed not at the very bottom: depending on weather conditions, they move in the water column, changing the horizons of their sites. It is clear that in such situations, any attempt to catch bream in winter with gear that is configured exclusively for fishing from the bottom is doomed to complete failure. It happens that you sit in a pit for most of a winter day, and the catch is only ruffs. And so is bream hunting! In such a situation, winter gear called a “helicopter” can help out.
Making this winter tackle for bream with your own hands is quite easy. First, cut out a square measuring 6x6 cm, preferably from an aluminum plate. But if you don’t have the necessary material at home, then you can get by with an ordinary can of deodorant or shaving foam, but you should choose a can with thick walls, otherwise the original part will often become deformed and will have to be constantly straightened.
The resulting square after all the manipulations should be bent into something like the letter “P” so that each side of this “letter” has a width of 2 cm. Then a hole should be drilled in the center of the resulting part (photo 1).
Now you need to take a piece of steel wire about 5 cm long. An ordinary paper clip will do for this. At one end of the wire we make a loop into which we insert a swivel, we thread the other end into the central hole and make another loop, but without the swivel. We came out with a so-called propeller (photo 2).
Then, on the reel, you need to assemble equipment, very similar to the one that many people use in the summer when fishing with a donka with a rubber shock absorber: approximately every 50 cm, a leash with a hook is tied to the fishing line. There should be 4-5 leashes in total (photo 3). It is better to take hooks from the thinnest wire so that the bloodworms do not leak out when hooked and remain attractive to bream.
You need to leave a meter of fishing line on both sides of the winter rig and tie a regular swivel to one end, and the one located on the propeller axis to the other.
Next we take a winter fishing rod with a fishing line with a diameter of 0.25–0.3 mm. We thread the fishing line into a sliding sinker, the weight of the sinker depends on the strength of the current at the fishing site, and tie a fastener to it (photo 4). Directly while fishing, you will need to attach a swivel from the reel to this fastener (photo 5). That's it, you can start catching bream.
Tips for fisherman: How to catch perch in winter with a spoon - Choosing the best
When fishing with a helicopter, the hole must be drilled at a slight angle so that the fishing line does not crash into the ice. Having connected all the components of the winter helicopter rig, we begin to lower it into the hole. Once under water, the propeller is wound up by the current and pulls leashes with hooks. Next we lower the sliding weight. When the sinker reaches the bottom, it will be possible to adjust the height of the propeller by releasing the line from the fishing rod.
It would be a good idea to have an echo sounder with you on the ice - with its help it is much easier to determine what depth a school of bream prefers at a given time. But even without an echo sounder, you can experiment and successfully catch bream using a winter helicopter rig.
Well, that's all. I hope that the time spent making winter helicopter rigs with your own hands will result in an enjoyable catch of trophy bream for you.
It is simple and easy to do by hand:
Often fishermen use an ordinary willow twig to which the main line with a reel is attached. When biting, it bends, this is immediately visible, just do not forget to securely secure the reel with something heavy.
Materials and tools
We have already talked about the composition of the gear. Let's take a closer look at the turntable itself. It should not be too large so as not to scare away the fish . The tin is selected from a tin or beer can. It should have good buoyancy and not drag along the bottom. But if you take a very thin sheet metal, it will be deformed by the flow, and rotation will not occur.
Another peculiarity of the tackle is that, rising from the bottom, the spinner will tighten the main leash so that the hooks will be at different heights. In this way, you can calculate those layers of water where fish are more active. Which hook bites more often, such depth and catchability. Having calculated the places where fish gather. You can switch to active fishing using a regular winter fishing rod.
It turns out that to make a turntable we will need strong scissors for cutting tin, pliers for bending it, fishing line, hooks, sinkers and swivels. Another twig for a nod, if you don’t have a factory one.
Manufacturing process
It is simple and easy to do by hand:
Helicopter fishing in winter gives the angler the opportunity to fish a significant area of the river bottom from one hole. There are many advantages to this type of gear. Having found a cool spot with fish, you can study it in more detail with a jig or float rod.
Table for selecting feeder equipment according to fishing conditions
| Fish | Reservoir, bottom character | Catching equipment |
| Carp | pond, silt | |
| river, silt | ||
| river, hard bottom | , | |
| Carp | river, silt | |
| river, hard bottom | , | |
| crucian carp | pond, silt | , |
| river, silt | ||
| river, hard bottom | ||
| Bream and silver bream | pond, silt | |
| river, silt | ||
| river, hard bottom | ||
| Roach | pond, silt | |
| river, silt | ||
| river, hard bottom | ||
| White amur | pond, silt | |
| river, silt | ||
| river, hard bottom | ||
| Tench | pond, silt | , |
| river, silt | ||
| river, hard bottom | ||
| Bleak and Chekhon | fishing near the surface | |
| shallow fishing | ||
| Chub | pond, silt | , |
| river, silt | , | |
| river, hard bottom | , | |
| Vobla | pond, silt | |
| river, silt | ||
| river, hard bottom | ||
| Trout | river, hard bottom | |
| Pike | river and pond, hard bottom | |
| Zander | river, hard bottom | |
| Som | river, hard bottom | |
| Burbot | river, hard bottom |
Peculiarities
Feeder gear “helicopter and two knots” comes in two versions: for winter and for summer or spring-autumn fishing. The first option is intended for ice fishing, the second - for fishing in open water, but both options are always used only in reservoirs with strong or medium currents. Experienced fishermen sometimes use this method in waters where the current is weak, but then the installation of equipment requires significant modification - and still usually shows poor results.
Summer option
In the spring-autumn version of the equipment, the feeder is installed at the end of the tackle, and the leash is located slightly higher. Moreover, the leash is hingedly attached directly to the main fishing line, without a bend. Thanks to this, it does not twist around the line during reeling or other rotational movements, but rotates freely at the installation site. That’s why the name is helicopter (in the original helicopter rig).
The peculiarity of the fastening is that the prey, having approached the feeder, calmly begins to eat the food; due to the movable leash, it does not notice the threat and swallows the bait with a hook.
Winter option
The winter version of the gear is a different design, but is also suitable only for reservoirs with good current strength. At the outermost section of the tackle there is usually a special sinker, and just above it a piece of fishing line (retractable leash) is attached, on which several separate working leashes with bait and hooks are installed. The strong current of water itself aligns the fishing line with the installation in one line, and the hooks with bait at this time sway appetizingly near the bottom, attracting fish.
Types of installations and their purpose
To catch bream, you should choose the right feeder equipment and method of its installation. The most popular methods are the Gardner loop, symmetrical loop, paternoster, asymmetrical loop and helicopter.
Gardner's loop
Due to its ease of installation and good catchability, the Gardner loop is considered the most favorite equipment of many novice fishermen. Its only drawback is the twisting of the main line, which appears after a couple of casts. To solve this problem, you need to slightly lift the feeder and spin it.
To use this installation method, you need to make a loop at the end of the main fishing line to which a leash with a hook will be attached. When tightening, the knot should be slightly moistened to maintain its structure.
Then another loop is made 20 cm higher, into which a feeder up to 15 cm in size should freely pass. The leash is attached to the main fishing line, threaded into the end loop and wrapped around it.
Symmetrical loop
A symmetrical loop is quite simple to make, but its effectiveness is not inferior to a paternoster. It rarely tangles and is often used in still water. To make it, you need to fold the monofilament in half, and then twist it by rotating it. After 10 cm from the twist, a knot is made to which the swivel is attached.
At a distance of 15 cm from the swivel, another knot is made and twisting is performed again. A leash made of fishing line up to 80 cm long is attached to the end of the swivel, to which the hook is tied. Then, using the “loop-to-loop” method, the feeder is attached to the swivel.
Paternoster
After casting, the line tightens and the rod tip bends slightly. When the feeder lies on the bottom, the parthenoster is also in tension, and the hook on the leash lies on the bottom. After the fish takes the bait, it begins to swim deeper and the device immediately weakens. Thus, the bream does not feel the feeder and swallows the bait deeper. With the help of a parthenoster, the tip of the rod will quickly indicate a bite.
Loop asymmetrical
The main difference between an asymmetrical loop is its shoulder. This method is effective when fishing in still water, when calm and stable bites occur.
To make it, you need to fold a piece of monofila about 50 cm long in half. One end of it is attached to the main fishing line using a knot, so that you end up with a circle on which a loop is made and the feeder is secured. Installation of a leash with a hook is carried out on the loop made.
Helicopter
When the bream bites are aggressive and the current on the river is quite fast, then it is better to assemble a helicopter for fishing that can self-hook prey. To make it, you should take a rigid monofilament with a thickness of 0.35 mm. Many fishermen use fluorocarbon for these purposes.
Then you need to fold 25 cm of fishing line in half and twist a knot at a distance of 15 cm from the end. Then the monofilament is folded into a figure eight and a second knot is made 1 cm from the edge. The feeder is secured using the “loop-to-loop” method, and the leash is threaded between two knots and securely attached.
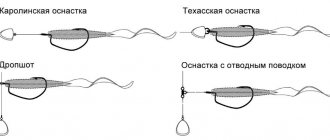
Carp montages
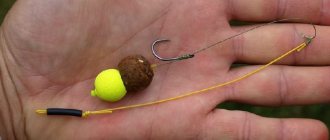
Hair rig
the process of making hair equipment
An original method of carp mounting, in which the bait is attached not to a hook, but to a small leash extending from it. This type of equipment allows you to effectively catch wary fish that may be spooked by a metal hook inside the nozzle.
The production of such installation is carried out in 3 stages:
- A monofilament or braided cord is inserted into the eye of the hook, retracted a short distance and tied with a small loop.
- Then , the same fishing line is used to fix the hook.
- The loop around the hook is tightened so that the additional leash is 3–5 cm long.
The advantage of this installation is that the bait located in the loop is swallowed by the carp, which takes the bait without fear, and with further absorption or when the fish, feeling the fishing line, tries to free itself from the bait, the fish is hooked.
Sliding equipment
It is the most catchy , due to the fact that the fish does not feel the resistance of the sinker when biting and can move away a considerable distance, which allows the fisherman to hook the prey more effectively.
The installation process is very simple and is carried out in the following sequence:
- on the main line .
- to the tube , to which the sinker is attached.
- Then a leash with a hook is attached to the main line.
Such equipment makes it easy to replace the sinker when necessary. When fishing in a significant current, to securely fix the bait in one place, you should use a heavy, flat-shaped lead sinker.
Safety clip
This method of installing carp gear allows the fish to easily free themselves from the sinker or feeder when the main line breaks. The use of this installation in a section of a reservoir with a snagged bottom does not protect the tackle from possible snags. To minimize this probability, it is necessary to use special offset hooks in such places.
Installation of the safety clip is carried out in the following order:
- A sinking tube about 30 cm long is installed on the main fishing line.
- The line is passed through the cone-shaped coupling and pressed into the tube.
- A swivel and a cone coupling are installed on the clip
- Place the swivel on the end of the fishing line.
- Thread the swivel into the clip.
- Install a leash with a hook on the swivel.
The equipment is ready!
Helicopter
A very interesting and catchy type of carp rig. Particularly good results can be obtained by using this equipment in the current.
This installation is carried out as follows:
- A monofilament 70–80 cm long is tied on one side into a loop into which a swivel with a carabiner is installed.
- on the fishing line .
- On the other side, a stopper in the form of a bead is placed on the fishing line.
- A leash with a hook , equipped with a swivel, is installed on the tube so that the entire structure rotates freely around the main fishing line.
- to the carabiner , which is attached to the bottom of the fishing line.
This carp rig allows you to cast the bait over a long distance due to the fact that the sinker is in front of the equipment when casting.
Inline
This equipment allows you to successfully catch carp both with conventional tackle with a sinker and using a feeder feeder. The high catchability of this rig is explained by the fact that the fish do not immediately feel the resistance of the sinker or feeder.
The carp calmly swallows the hook with bait, and when trying to move away from the location of the tackle, a self-hooking occurs.
Installation of this equipment is carried out in the following sequence:
- from monofilament with a diameter of 0.5 - 0.7 mm, on one side of which a loop is tied for installation on the main fishing line. On the other side, a swivel with a carabiner is attached.
- A sinker with two eyes is attached to a carabiner.
- to the other ring of the sinker . The length of the leash is 20 cm.
- In order to increase the number of effective bites on this tackle, the hook is used with a hair rig.
A significant disadvantage of this installation is the low flight characteristics of this gear.