Silicone baits are artificial baits for catching fish, which are considered much more convenient and cheaper than live bait. The first such silicone products appeared on the market for fishermen back in the middle of the last century. They come in different types and sizes, but all of them are equipped with hooks. Proper rigging of silicone baits is a very important topic for effective and successful fishing. We will look at how to properly put silicone bait on a hook of one type or another in our article. For clarity, all installation methods are supplemented with photos and videos with step-by-step actions.
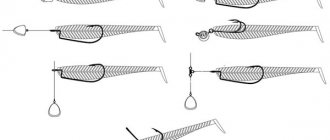
Equipping silicone baits with a jig head
To properly attach a silicone bait to a jig head, you need to perform a few simple steps (see photo below):
- We apply the hook with a jig head to the bait to determine the puncture site in the back, where the sting will be brought out.
- We make a puncture from the head of the silicone fish and begin to put it on the hook.
- We bring the hook tip out, straighten the bait on the hook.
Non-hook jig heads
When fishing for predatory fish in thickets of aquatic vegetation, snags, or near fallen trees, unhooked baits come to the aid of the angler. Some head shapes (spoon, rugby, horseshoe, boot) are less likely to be hooked due to the vertical position of the hook in the fall and the staggered retrieve. Other jig heads have an elongated shape (banana, ski), thereby reducing the likelihood of a side hook.
To give the jig head additional protective qualities against snags, wire “fuses” are installed, which are easily compressed by the fish’s mouth, exposing the hook tip. The number of empty bites increases, but it is possible to keep the bait from breaking off.
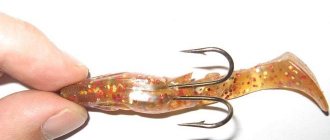
Installation of silicone baits on an offset hook
The most suitable type of bait for offset is considered to be a vibrating tail, the example of which is used to discuss installation. Equipment for an offset hook is made according to the following algorithm:
- First, you need to insert the hook tip into the front part of the bait, which comes out through its middle after 5-6 mm.
- Next, you need to unfold the bait and stretch it along the entire length of the fore-end until the head part rests on the eye of the offset.
- After this, a puncture is made in the belly of the bait, and the sting is removed from the back of the bait.
- After such manipulations, you can also hook the sting to the back to reduce snags during the liner.
One of the disadvantages of such equipment is the possible escape of the fish if it does not have enough strength to bite through the silicone. Pros: the ability to fish in areas of the reservoir that are snagged and overgrown with algae.
Types and techniques of wiring silicone baits
Uniform (straight) wiring
Uniform wiring is the simplest. After casting, we let the bait sink to the bottom, then lift it with a smooth pull and reel in the line at a constant speed. It is important to select the weight of the load so that when the reel rotates normally, the bait goes half a meter to a meter above the bottom. This can be checked very simply: if, when stopping, the load falls to the bottom in the second or third second (as can be seen from the weakening of the fishing line), then the wiring is carried out correctly. If the load “plows” the bottom, it is necessary to change it to a lighter one and vice versa.
Sometimes the fish is not at the bottom, but in the middle layers of the water - that’s where you need to bait.
Wavy wiring
As you know, it is easier for a predator to catch sick and exhausted prey than healthy and active ones. It has been repeatedly noticed that from a school of fish, pike tries to choose the one whose behavior differs from the main mass.
After all, a weakened or sick fish also stands out from others due to its impaired coordination of movements - much like the tapeworm, it rushes about, swims anywhere, and often stops. It is this kind of prey that is most “convenient” for a predator, and this is often used by fishermen using wavy fishing.
This “wave” has three options (Fig. 1). The easiest way is when you constantly and evenly rotate the reel, but at the same time slightly shake the rod tip back and forth. Then the bait no longer moves in a straight line, but along a wavy line with a small vertical spread (Fig. 1a), while changing the pace of the game.
Fig.1. Types of wavy wiring: a) uniform wavy; b) wavy with a stop; c) wavy with “recoil” of the line.
Approximately the same picture is obtained if you simply rotate the reel with short delays without moving the rod.
If we pause for more than one second while rotating the reel, the picture will change slightly - the bait will seem to “hang” when stopped, and then “fall through” - it will smoothly slide forward and downward in an arc until we begin to rotate the handle again (Fig. 1b ).
The effect of “failure” can be specially enhanced if, at the moment of stopping, the rod is moved “from yourself” (Fig. 1c). Then, on a weakened line, the bait can fall down almost vertically. The effect in the vertical plane is the most noticeable and energetic. But there is a significant drawback: at the moment of “recoil,” contact with the bait is broken and you can miss the bite.
In general, the third option is more theoretical than practical. Personally, I try not to be clever unnecessarily and use mostly uniform wiring with small additions of waviness, not constantly, but periodically.
The fact is that although the jumping movements of the bait quickly attract the attention of a predator, it is very difficult to grab such “nimble” prey. Therefore, there are many misses and incorrect bites, which are more difficult for the angler to feel. By the way, it is precisely with uneven wiring that there are cases when a pike “cuts” the fishing line even with a metal leash 10-15 cm long! Why? Probably, the predator takes aim at our bait with anticipation, and when it suddenly stops, it hits the lead, and even the fishing line, which cannot withstand the sharp teeth. Another option cannot be ruled out: if a pike attacks from behind, it simply swallows both the stopped bait and the leash. At least once, a small wobbler was “thrown out” by a pike through the gills and caught it from the outside.
Stepped bottom wiring
This is the most commonly used variant of uneven wiring. The fundamental difference from the wavy one is that during a pause the bait must fall to the bottom.
Stepped bottom wiring is the main one for pike perch and is often used when fishing for perch, especially in the fall; pike are often caught with such wiring.
Bottom reeling is carried out as follows: immediately after touching the bottom, make three to five quick turns of the reel and stop reeling. The bait falls in an arc to the bottom again, raising a cloud of turbidity. A new rise immediately follows, and again a fall. It is “on the arc” that most bites occur. This reeling resembles either a feeding fish or a gudgeon fleeing from danger, which can be visually observed in the summer in small places where these fish bask. Frightened by something, minnows make a jerk forward, raising a cloud of turbidity, and try to hide at the bottom.
There are three basic rules for step wiring:
- Constant contact with the bait. To make it easier to see the fishing line, take a clearly visible, better fluorescent one. The tip of the rod can be raised up 45 degrees, this makes it easier to feel the fall of the bait and sense bites.
- The weight of the load should be such that the free fall of the bait after lifting lasts at least 2–3 seconds. Otherwise, a predator may simply not have time to grab your twister or vibrotail. True, sometimes shorter “steps” of the bait are used, and occasionally even “dragging” along the bottom, of course, if there are no hooks.
- The softest bait is needed; it should play stably even in a short free fall.
The action of the bait on the fall is very important. Therefore, I believe that a vibrotail is more effective than passive baits precisely because of the game. This is easy to verify in practice. Several times I had such cases: with a good bite, pike and pike perch tore off the very tip of the vibrotail, and the bait stopped playing, although it retained almost its entire shape. And what? The bite stopped completely! But as soon as the bait was replaced with a whole one, pike and pike perch began to take it again. Any of you can check this for yourself.
Combined wiring methods
There are several varieties of both uniform and stepped wiring, as well as their combinations.
For example, it is sometimes useful to diversify uniform wiring with smooth twitches and pauses. It doesn’t hurt to lower the bait to the bottom once or twice and check the fishing depth.
There are many options for stepped wiring. Thus, the bait can be lifted from the bottom energetically or more smoothly, to a greater or lesser height, followed by a vertical drop or a fall in an arc. In a fast current, when the bait is “carrying”, sometimes you even have to return the line. It can be useful when the bait falls with short jerks to intensify its play
Similar to the wavy retrieve, the jigging step can theoretically be done with either a reel, a rod, or both. When connecting a fishing rod, the step becomes more pronounced - but it’s not a fact that this is always good. After all, it is more difficult for a predator to grab prey that jumps high and falls quickly. In addition, by raising the rod in one cycle, we will have to lower it in the next. In this case, the line weakens, contact with the bait disappears, and the bait itself falls unnaturally quickly vertically to the bottom. All this is bad.
Therefore, in the vast majority of cases, coil wiring is used - after all, it can also be taken larger and more “revolving”. An additional cast of the rod is only sometimes justified. For example, a predator takes the bait from the bottom - to attract the attention of the fish, we alternate throwing the jig with pauses at the bottom (when we reel in the line a little and at the same time lower the rod, restoring contact with the bait) and further “wiggling” and dragging along the bottom.
And in general, if you use jig heads “boot”, “vanka-stand”, etc., then after falling the bait “stands” on the bottom in an inclined position. It is advisable to take a pause here, because... pike perch, perch, and sometimes pike can be taken directly from the bottom. This means you need to keep the line taut and be ready to hook. Sometimes it is useful to even drag the bait along the bottom a little.
It is quite difficult to fish on shallow, fast riffles, where many predators often go. Due to the strong current here, it is difficult to select the correct weight of the load: a light bait is carried, while a heavy one drags along the bottom, where it quickly gets caught or becomes clogged with debris. In such cases, a “yoke” rig with a lower sinker and an upper hook directly or on a leash can help out. Here, they usually use “driving” wiring, when after casting across the current, the bait is simply carried away in an arc without any rewinding. And if the weight of the end weight is sufficient, then it slides along the bottom, and the hook with the nozzle always goes higher.
Sometimes downstream wiring is used, i.e. a kind of “play on the stream”. It is performed from a boat or bridge and gives good results if the fish is standing in a certain limited place, always with sufficient current. Then they set the boat higher so that the bait reaches the bottom right in the area of the fish stop and the prey is right under the nose of the predator. Strictly speaking, there is no wiring as such here, and the bait is rather “marking time.” To do this, it is gently pulled up and then lowered back. Fishing is reminiscent of vertical trolling, only much lower downstream. Jig heads with a ring in the front part work better in the stream: “spoon”, “banana” and “ski”. By correctly selecting the weight of the load, the thickness of the fishing line and the length of the rod, you can “feel” the bottom already in a small area. And if fishing is done from a boat, then you can simply pull it up and release it on a long anchor rope, thereby increasing the “working path”.
When a predator stays dispersed, you can use slow pulling rather than “treading water.” Everything is done; similar to the previous one, but the load is chosen a little heavier. Then, when you pull up and slowly recoil, the bait does not come back, but takes a small step towards you. So, in mini steps, we pull it along the promising place. The fishing described can be especially successful on edges that are directed along the current, for example, below bridge abutments, on an outgoing stream, on straight sections of the riverbed. If the boat is installed correctly and the weight of the sinker is suitable, it’s not just fishing, but sheer pleasure!
Finally, combined wiring is very often used. For example, in a river, pike stands closer to the shore on a relatively flat bottom, and pike perch stands further away, on a slope in the depths. The fisherman walks along the shore or swims along it in a boat and casts the bait over the lower edge. In the area of the drop there are good chances of catching pike perch with a “step”, but when the upper edge is passed, it is better to switch to a uniform retrieve and catch pike.
Equipping silicone baits with a tee
Installation on a treble hook seems to be more complex compared to an offset or double hook. The simplest way is to pass a piece of thin wire through the body of the bait so that it comes out at the tail, and a swivel with a treble hook is attached to it.
A more complex installation method is carried out in the following way:
- Using a short tube with a diameter of no more than 5 mm and a length of 2 cm, a hole is made in the side of the bait.
- A tee is applied to the hole location so that its eye protrudes from the head part.
- Then one of the hooks of the tee is pulled into the hole so that it ends up on one side. One of the hooks also remains on the other side, and the third is pierced from the inside of the bait.
- The eye of the tee is attached to the eye of the Cheburashka or to the ring of the jig head.
1
2
3
4
5
6
This process is shown in more detail in the video below:
How to attach a treble hook to a silicone fish
Equipping a classic rig with a triple hook is considered the easiest way to increase its mobility. This method reduces the number of fish landings and increases fishing efficiency, which is especially useful for beginning spinning anglers to know, although its installation is difficult for beginners.
Another way to attach a tee is to connect it to a jig head using a metal leash. In this design, you can even attach two or more tees, placing them on the side, bottom or top of the bait.
Also effective can be considered a method with a collapsible Cheburashka and a corkscrew, which is a fixing element of the equipment screwed into the body through the front part of the bait.
In the video below you can more clearly see the process of equipping baits with additional tees:
About
How to attach a vibrotail
In our opinion, the arsenal of a jig spinner must include a whole set of vibrating tails of various sizes and colors pre-equipped with hooks. As with twisters, some of the more catchy lures need to be rigged correctly or a high-end series hook with a vibrator hook will help you on days when the fish are hitting the bait but not getting caught.
We want to pay special attention to how the bait, usually articulated with an eared sinker, behaves in the water during retrieval. Most anglers who started fishing with lures using a regular jig head with a single hook were accustomed to the fact that the bait was positioned with its back up when retrieved.
When switching to an articulated joint, it turns out that the bait, under the influence of hydrodynamic forces, turns 90° in the water and moves as if lying on its side. Many people don’t like this position of the bait, and they usually act in two scenarios: they abandon the swivel joint in favor of the usual jig head with a single jig, or they try to force the bait to move with its back up, additionally loading its belly.
We tried many options for equipping vibrotails on a hook and came to the conclusion that the most effective and most attractive position for fish was the lying position on its side. In our opinion, this position of the bait during retrieving is preferable for several reasons: the action of the bait is similar to the movement of a wounded or sick fish falling on its side, the bait glides more smoothly in the water column. Taking into account this specificity, we began to equip the bait with a double, both hooks of which were specially brought out from one side. In the air, such equipment looks somewhat awkward, but in the water the bait immediately turns its hooks upward. This position is maintained throughout the entire step wiring .
Due to the orientation of the double with the tips up, the probability of a hook is significantly reduced, and the reliability of hooking even increases slightly. Just as in the case of twisters, these baits can and should be trimmed. This is especially useful for increasing casting distance. In addition to trimming, you can modify the operation of these baits by boiling them in boiling water or by melting the material.
The fact is that in general this jig bait is a rather capricious bait compared to the same twister, and sometimes you have to tinker a lot for it to work properly. But this most often, naturally, applies to these nameless lures, and not to their thoroughbred branded counterparts.
sovetprost.ru
In the world of fishing, spinning fishing with a jig head is especially popular. This method allows you to successfully catch almost any type of predatory fish, regardless of the reservoir, climate or other characteristics. Jig baits are very effective everywhere and always. They can attract potential prey from a long distance, at shallow or deep depths, in cloudy or clear weather, in the evening or in the morning, etc. Even if a fisherman is forced to cast into hard-to-reach places, covered with dense thickets of algae, with many obstacles and snags, such a bait will remain relevant there. But in order to achieve good results from the upcoming trip to the reservoir, it is important to fulfill one mandatory condition: correctly attach a vibrating tail, twister or other jig bait to the head.
Varieties of jig heads Today, the following types of jig heads for spinning fishing are widespread: - combined with a hook; -separate; The first variety is the most popular and versatile. It comes straight with a hook, so putting on the artificial fish will be much easier and faster. How to attach bait to a jig head If you are one of those anglers who often ask the question: how to properly attach bait to a jig head, you will find it useful to read this article. Such simple tips will be a good helper for successful fishing. To successfully bait your chosen bait onto a hook, you do not need to have any special experience or skills. It is enough to decide on the size of the hook. on which a silicone or foam fish will be mounted. After installing a vibrating hook, twister or other jig bait, you can take a small amount of glue and fix it near the eye of the hook with a few drops. This simple action will make the equipment more reliable and resistant to aggressive influences. We put the bait on a single hook If you need to put a jig bait on a single hook, it is important to perform the procedure in such a way that the shank goes along the center of the body. This will make its appearance more even and smooth, and accordingly the wiring efficiency will increase significantly. Incorrect baiting can seriously harm successful biting. How to put twisters, vibrotails, silicone and foam fish on a double hook? When using twisters or fish made of foam rubber and silicone, it is important to choose not classic doubles, but characteristic double hooks with an increased forearm length. Before installing the vibrating tail, you need to slightly unclench the hooks, leaving a gap of 3-5 millimeters between them. How to attach bait to a tee? If you have to mount a silicone or foam fish on a treble hook, take a special rod or tube, choose a suitable place, and make a through hole in the bait. The tee must be pulled through the hole with the eye facing forward. How to put bait on offset hooks? This type of hook is often used to create jig hooks that allow you to successfully catch predatory fish in hard-to-reach conditions. We select the optimal hook size and make a highly effective rig by bringing the offset tip closer to the back of the bait. To make sure that you managed to successfully bait an artificial fish on an offset hook with a jig head, do the following: - run your finger along the back of the bait (if everything is fine, your finger will not catch on the hook); - press on the back of the fish (if positioned correctly, it will bend); How to attach a silicone fish to a jig head? If we are talking about installing a vibrating tail, it is advisable to carry out the procedure in such a way that the hook comes out slightly from the bait on the back at the beginning of the tail, but not in the middle. The last option is incorrect, but unfortunately it is used by a significant number of novice fishermen. Because of this baiting, most bites are unsuccessful. Successful installation of a vibrating tail implies: 1. Correct choice of the place where the hook from the bait will protrude; 2. Exit the hook point from the side, near the tail. How to put twisters on a jig head? As with the previous bait, when rigging twisters, it is important that the hook comes out of the back near the tail, and not in the middle or at the rear. Select a place on the bait in advance and mark it with a puncture. The hook size must remain sufficient, otherwise the likelihood of unsuccessful bites will increase sharply. Tying the bait to the fishing line To properly tie the jig bait to the fishing line, you can use the following methods: - installation through a fastener (implies tying using the fastening method); - when using a metal leash; -direct fastening (just choose a good knot and securely fix the bait on the jig head);
If you want to get the most out of your fishing experience, it is better to purchase a full set of jig heads of different shapes and sizes in advance. In this case, you can always choose the appropriate option for the current fishing conditions.
prichal-nn.ru
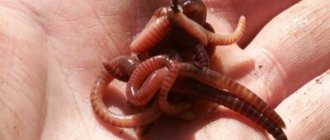
How to put a silicone worm on a hook
In most cases, when installing a silicone worm, they use a “wacky” rig: they pierce it in the middle with the sting of the hook, or put a small rubber ring on the bait with a slight tension, to which the hook clings (the second option is preferable, since this way the worm does not tear and lasts longer serves).
In this case, 2 hanging ends are formed, which attract fish with their movement during wiring. The equipment can be supplemented with a metal peg-weight, which is inserted into one of the edges of the worm. Thus, one end of the silicone worm lies on the bottom under the weight of the peg, and the second begins to play with every pull of the rod. This method of installing a silicone worm can be used for catching perch, pike or even trophy peaceful fish. It is he who can give the long-awaited rich catch, which is beyond the power of other baits.
Photo: How to attach a silicone worm to a hook (4 possible options)
Rigging silicone worms can be done in other ways:
DIY jig heads
Many anglers cast their own jig heads. This is explained not only by the desire to save money, but also by an increase in the range of heads by weight.
The most difficult part is making molds for casting. Some anglers use plaster and matchbox, while others make metal structures.
The mass of the future jig head can be influenced not only by changing the size of the shape, but also by the formation of an alloy of lead and tin. Tin has a lower density, so the head will be lighter than pure lead.
Before pouring metal molds, it is necessary to lubricate the internal surfaces with animal fat or lard. Then dismantling the mold will be much easier and simpler. Sometimes it is necessary to remove the foundry flash with a knife and file.
Rigging large silicone baits
Particularly large baits are used less frequently, in cases where the angler sets out to catch not just a perch or pike, but a real trophy. Such silicones can be used both when casting with a spinning rod and when trolling.
One of the simplest and most effective methods of equipment is the installation of large silicone 15-25 cm long with two tees, which are placed on leads.
This type of equipment is based on a jig head with a fairly powerful hook. All accessories must be selected in accordance with the size of the bait and the depth of the reservoir. It is in this case that you need to choose the largest possible hook size, for example, 10/0 or 12/0. Installation of such equipment is carried out as follows:
- One end of the leader must be attached to the ring of the jig head, for example, using a crimp tube.
- Next, you should measure each leash to the place where the first and second tees will be attached.
- After this, a small loop is created using a crimp tube, to which the first hook is attached. Then the leader is measured and a second eye is created for another tee.
- The jig head is threaded through the tube, and the hooks are stuck into the bait at appropriate distances from each other.
In dense thickets, you can also use treble hooks located on the back of the bait. In this case, the hooks must be placed inside it using wire pins.
How to choose the right hook?
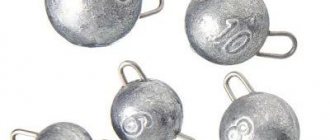
All weight heads for spinning fishing can be divided into two types:
- combined with a hook;
- cast separately.
The simplest option is the head, cast together with the hook. Such models are usually called jig heads. They are large and heavy jigs, equipped with a ring and a lock. The ring is located at right angles to the fore-end, and the stopper prevents the soft bait from slipping and turning.
Jig head clamps can have the following types:
- thorn (needle);
- ball;
- mushroom (umbrella);
- arrow.
Jig heads have one more, not fundamental, but ubiquitous drawback: almost all casting molds are designed in such a way that light heads are equipped with small hooks, medium ones with medium ones, and heavy ones with the largest ones. And this is not entirely correct. Often you need a light model, but with a large hook for pike in shallow water, or vice versa - a heavy one, but with a small hook for catching perch or bass from the depths.
It happens that the hook is too long and comes out right at the tail - this is undesirable, the performance of the bait may worsen. What to do? If the hook is thin and not overheated, you can bend it (shorten the shank). Or at least not push it completely onto the hook - that will be the lesser evil. This is especially true for “skeletal” vibrotails, where the body immediately turns into a thin foretail with ribs.
In this regard, do not go after jig heads with long hooks - they are only good for pike. Pike perch often hits the bait “in the head”, and perch in general usually swallows whole a small twister on a jig head - therefore, here the “extra” length of the hook is not needed, the correct game and tight installation of the silicone nozzle are more important.
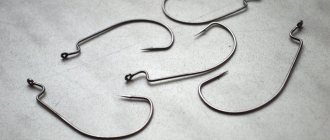
So, the angler has the following types of hooks at his disposal:
- jig heads;
- offset;
- single;
- doubles.
Before planting a silicone bait, you should always mark the expected location where the tip will exit the body. Inexperienced anglers can use a marker for this.
It is very important to understand that not every hook size will fit every type and length of rubber. When it is introduced into the body, the integrity of the fish is violated. Silicone is constrained along its axis by a foreign body.
Therefore, free dynamics and play in the water space are reduced:
- in order not to deprive the vibrotail of the freedom of vibration and the attractiveness of the game, the length of the hook is chosen to be approximately ½ of the body of the fish;
- for twisters, the length of the forend is chosen approximately equal to the belly of the fish. You can leave a few millimeters before the beginning of the curled tail;
- for worms it is better to choose a length half the size of the bait.
Each assembly option has its own uniqueness and advantage over the other method. But there is one common point - hooking. It is worth dwelling on this point in more detail.
Offset hook mount
The sting penetrates the head part (mouth). The point comes out of the fish's neck.
The body of the bait rotates 180 degrees around its axis. There is no need to insert through the entire abdomen. After the puncture, the rubber moves towards the step of the offset press with the head part.
The tip pierces the back or middle part of the silicone and exits outward. Sometimes the released sting can be slightly driven into the body of the bait. Thereby camouflaging and hiding from vegetation and obstacles.
A “Cheburashka” is attached to the eye of the hook.
Jig head mount
The sting penetrates the head part of the bait (mouth).
The silicone body is threaded along the forearm to the intended point where the tip exits the dorsal part.
The head part is fixed on a noticeable technological protrusion of the sinker.
Double mount
The double expands by several millimeters (taking into account the thickness of the bait).
One needle pierces the center of the abdomen. The nozzle is pulled to the eye between two hooks.
The eyelet is carefully inserted into the inner part and pulled along with an exit at the head part.
The hook is attached to the Cheburashka directly or through a winding ring.
Single hook mount
A model with an enlarged eyelet is selected for free play on a hinged connection with the Cheburashka.
The sting is threaded through the head of the silicone.
The rubber body is threaded along the shank to the eye of the hook.
At the intended point, the tip is removed from the abdomen.
General conclusion regarding installation selection
The variety of rubber baits, the features of the bottom topography and fishing conditions have not without reason necessitated the invention of various rigging methods.
So, for twisters and worms, the most successful will be execution using North American technologies. In lures made from vibrotails, articulated and classic mounting deservedly come first.
For modern jig fishing, two types of baits are used:
- Made from foam rubber.
- Silicone products.
If we talk about the first category, it includes many classic baits that are available at a low price in any fishing store. In addition, they are easy to make with your own hands, which is what experienced spinners do. In this case, it is possible to make several inexpensive devices with minimal costs.
In turn, silicone baits appeared much later, but began to rapidly gain popularity, having many advantages. There is a wide variety of silicones on sale in different sizes, colors and shapes. Due to the unique properties of silicone, manufacturers have managed to bring to the market truly catchy jig baits that perfectly imitate the play of real fish, as well as insects or any other inhabitants of the depths.
Also for jig fishing, combined solutions are used, which are created from old, damaged silicone baits. Due to easy processing under the influence of temperature, silicone that has become unusable quickly becomes a new, functional bait. It is enough to pick up soldering equipment, and perhaps you will be able to invent a real masterpiece.
Hooks for silicone baits
In addition to the fact that for successful fishing you need to choose the right proportions of the size of the hook and bait, there are other nuances in selecting these accessories for fishing. An important criterion for effective casting is the sharpness of the hook, due to which most hooks occur.
In most cases, an offset hook is used to catch predatory fish. It is also ideal for its role as a no-hook in dense brush and gnarled terrain.
How to choose a hook for silicone bait
A special point when choosing a hook for silicone is the height of the bend. Low hook deflection is not suitable for silicone accessories, as they will not move/flex when bitten, resulting in little or no hooks.
About
Texas rig
American sports fishermen came up with this installation of silicone bait to easily pass underwater obstacles.
- A weight in the form of a bullet with an axial hole is threaded onto the fishing line. The pointed part is directed towards the rod.
- A plastic or other bead-shaped cambric serves as a bullet stop.
- An offset type hook is attached to the fishing line. It will increase the permeability through vegetation and snags.
- A silicone fish is placed on a hook.
Useful tips and tricks
The following tips will help you get a good catch:
- When mounting a rig with silicone bait, you need to try to ensure that the hook passes exactly through its center. This will help keep it balanced when moving and not cling to snags when throwing.
- Experienced fishermen advise storing silicone fish in plastic or silicone bags, preferably with a zip-lock fastener.
- When going fishing, you should take several baits of the same type with you, as the fish can spoil the only one, and the fishing will end there.
- It is better to catch active fish with twisters and vibrotails, while for passive fish, worms or slugs are preferable.
Carolina rig
This is also an American method of collecting tackle, similar to the Texas version. But the load and the rubber fish are separated by the fishing line by 50 cm (or more) from each other. Thanks to this, silicone baits are endowed with the effect of free movement in the water column. By slowly twisting the coil, the load drags along the bottom and creates a cloud of turbidity. This attracts the predator's interest.
- the sharp end of the bullet is threaded onto the main line;
- using a swivel, two parts of the structure are connected: a fishing line with a load and a leash with a hook;
- the bait is placed on the hook.
When catching sharp-toothed predators, the equipment must be done on a metal leash or homemade wire from a guitar string.
Installation methods
There are several ways to rig silicone baits with an offset hook. Let's look at the most popular and most effective options that are optimally suitable for vibrating tails. Let's start with a basic method that answers the question of how to properly attach a bait to an offset machine. Its algorithm looks like this:
1. An offset of a suitable size is selected for the vibrotail, so that its length is approximately 2/3 of the length of the body of the bait.
Important! The hook point should come out at the back of the bait. It is undesirable that it should be brought out from the side and it is completely unacceptable to place it in the tail section.
2. We pierce the vibrating tail at the end of the head part. We bring the sting out through 3–7 mm from the bottom.
3. We pass the hook completely through the body of the bait so that its head part is fixed on the Z-shaped bend in front of the offset eye.
4. Slightly bend the vibrotail longitudinally and pierce its body perpendicularly.
5. All that remains is to remove the sting of the offset hook from the back of the silicone fish.
6.Now you need to straighten the bait and press the offset tip to its back.
In this way, you can attach a twister to an offset hook, a worm, and a crayfish. This is a universal option that always works.
A simple, but less reliable option is to pierce the head of the bait with the eye of the hook. In this case, the installation looks like this: 1. Take an offset hook that has a suitable size for the selected vibrating tail.
2. From below, in the “chin” area, we pierce it with the eye of the hook.
3. We bring out the eye in the head part from the end of the bait.
4.Next, similarly to the previous method, we remove the hook tip from the back of the “rubber”.
This method is easier to master, but initially the place where the head part of the vibrotail is fixed is torn. When there is a sharp bite, the bait simply flies off the fore-end. Subsequently, the fisherman has to re-mount the equipment, slightly trimming it.
The disadvantages of the considered options are that the bait often breaks at the head. Of course, it can be carefully trimmed with scissors and re-equipped, but it gradually shortens and becomes unsuitable for fishing.
Durable ordinary silicone is quite reliable, so such troubles rarely happen to it. It's another matter if you use edible rubber. An offset hook with a spring can serve as a solution in such a situation. It's quite simple to do:
- We take an offset hook for a silicone bait of a suitable size.
- From thin wire we form a spring consisting of 5–7 turns.
- We securely fix the spring in the eye of the hook, cutting off the excess wire.
- All that remains is to equip the offset with silicone and you can go to the pond.
The presented option is optimal for pike fishing, since it preserves the integrity of the “rubber” as much as possible and gives reliability to the equipment.
Despite the fact that the offset hook was created for difficult-to-pass places, it can always be used. Many anglers do just that, completely abandoning jig heads and swivel rigs with open hooks. A vibrating tail correctly mounted on an offset machine is not inferior in the implementation of bites, but it eliminates accidental snags and unnecessary breaks.
Source: intellifishing.ru
Offset hook - what is it?
Primary sources do not provide precise information about when the offset hook was born. According to one version, Texas fishermen on Lake Ouachita began using it first, and according to another, it “surfaced” for the first time on the lakes of Florida. The Americans themselves call editing with an offset hook Texas rig (or simply Texas rig). In Russia, they didn’t figure out the offset machine right away and it took a long time to get used to us. In 1996, a large batch of blank hooks for the production of jig heads was imported into the country. An unprecedented double bend instead of one was regarded as a defect, but who said that the ring must look up. Jig heads with a ring in front of the sinker were successfully cast and sold, and after some time the domestic manufacturer learned from American fishing publications what hooks of this shape were actually intended for.
Offset machines began to appear in fishing stores, but demand for them did not immediately increase. A whole year passed from that very first accidental delivery until one fine day spinning fishing enthusiasts read an interesting article in a magazine about Texas equipment. This is where the outlandish hooks were swept off the shelves, after which for about a year and a half it was simply impossible to find them. But if there is demand, sooner or later there will be supply. One of the dealers sensed a change in the mood of the fishing fraternity and began to steadily supply overseas hooks. Some uncertainty remained, after all, they are designed for bass, but practice has shown that with their help you can successfully catch the usual predators: pike, perch, pike perch, catfish. A few years later, advanced spinning rod masters could clearly distinguish them by manufacturer and knew all the pros and cons of products from different fishing companies.
How to achieve big catches?
Over many years of practice in catching various types of fish, the most effective methods have been found:
- Use of special activators . This pheromone-based activator attracts fish the most at any time of the year. Reviews and discussions of this bait are here .
- Use sensitive gear . Read these methods in the appropriate section.
- Albumin-based baits . You can read it here .
Difference in Shape
Jig heads can come in a wide variety of shapes. Their names largely explain their appearance:
- ball;
- rugby (ball);
- "digger";
- fish head;
- bullet;
- spoon;
- ski;
- boot;
- banana;
- Vanka-Vstanka;
- horseshoe.
The head weight can be made without a hook. Then a hinge joint is used to connect the sinker and the hook. Individual heads are manufactured in three types:
- eared sinker (“Cheburashka”);
- lentils.
Despite the variety of jig head shapes, the main parameter when selecting is weight. It is the weight of the sinker and bait that determines the horizon of the rig’s passage.
For fishing in standing and shallow reservoirs, heads weighing 1-15 g are used. For river fishing, as well as in reservoirs with great depths (more than 5 m), jig heads weighing up to 40 g are required.
For bass, rubber lures called swallows work well with triangle jig heads. Thanks to this shape, the swallow jumps to the sides when descending, which effectively attracts perch.
Tips for fisherman: How to attach a silicone bait to a jig head - Let's take it step by step
Triangular jig heads are also suitable for walleye. If you're fishing in shallow areas, a good solution is to use lightweight jig heads that won't sink to the bottom too quickly. When searching for pike perch at great depths, where they are usually found, it is worth using heavier options, weighing 15-20 grams.
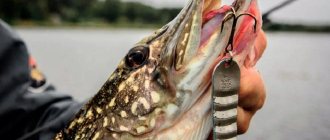
When choosing a jig head for pike, you should carefully look at the shape of the hook. Hooks that have the shape of a flip-over arc are especially effective. Thanks to this, even in the event of severe jamming, the element reliably penetrates the hard tissues of the fish, does not bend and holds well. What is important is that pike also react to colors.
4. Apply a little of the resulting composition to the shank of the hook, where the head is supposed to be secured - in the area of the eye of the hook. We move the head here and press it tightly to the eye of the hook. The viscous composition fills the hole in the weight. If excess glue is squeezed out, remove it. If the hook is thin and the diameter of the hole in the head is very large, you can additionally fill the hole with glue.
06.04.2016 03:51 06.04.2016 03:51:01
How to catch passive trout? On the "rubber". What type of tire can you use to catch trout? For worms and nymphs. What hooks and jig heads should I mount my worm/nymph on? Do it yourself.
Yes, there have already been publications on this topic, but the methods described are, in my opinion, far from ideal. I suggest anglers still evaluate different methods and choose the most convenient for each. Perhaps someone will be interested in the technology I use. Naturally, such micro-jig heads can be used not only for catching trout, but also for catching other fish, for example, perch. So, initially you need to decide on the hooks and the required set of head weights.
Diameter 3mm - weight 0.17g Diameter 3.3mm - weight 0.3g Diameter 4mm - weight 0.44g Diameter 4.5mm - weight 0.8g Diameter 5.5mm - weight 1.3g.
How to connect the hook and head. How to do this quickly and reliably? You will need Poxipol cold welding, a sheet of paper and a toothpick. All! Having tried several methods and types of glue, I came to this particular option. It's fast, reliable, economical, safe. Perhaps some people use two-part epoxy or another brand of glue, but I'm speaking from my experience. I think it’s important to outline the sequence of actions to help avoid some mistakes.
1. Select the desired hook and head weight. I came to the conclusion that I make five heads in one short production cycle - this quantity allows for optimal use of the Poxipol hardening time.
2. Squeeze a small amount of glue from each tube onto a sheet of paper - less than a pea.
3. Mix both components with a toothpick. The result is a viscous composition that will gradually harden within 3-5 minutes.
4. Apply a little of the resulting composition to the shank of the hook, where the head is supposed to be secured - in the area of the eye of the hook. We move the head here and press it tightly to the eye of the hook. The viscous composition fills the hole in the weight. If excess glue is squeezed out, remove it. If the hook is thin and the diameter of the hole in the head is very large, you can additionally fill the hole with glue.
5. It is convenient to dry the heads in a suspended state - in this position the head cannot move while the glue hardens.
6. After 5-10 minutes the glue will finally harden - your jig head is ready!
You can slightly improve the resulting jig heads - several tight loops of ordinary thread are knitted onto the shank of the hook and fixed with instant glue - the resulting “boss” will help hold the silicone bait on the hook. If necessary (for example, the hook has become dull), the head can be removed and used on another hook. To do this, you need to heat the eye of the hook with a lighter until the glue melts - remove the head and we can use it further.
I will also give a few examples of what equipped baits look like.
So, a jig head is a rig for soft baits that combines a single hook and sinker. The connection between the weight and the hook is rigid.
Date: February 19, 2021 | 908
When fishing with soft baits, silicone, it is important not only to choose the type and size of the bait, but also to choose the right way to mount it. One of the most common types of silicone bait equipment is the jig head . This is the simplest and most popular installation, with its advantages and disadvantages. And now I want to share my opinion about equipping silicone baits on a jig head, discuss the advantages, disadvantages and features of this type of installation.
So, a jig head is a rig for soft baits that combines a single hook and sinker. The connection between the weight and the hook is rigid.
The main advantages of a jig head compared to other rigs:
— Good execution of sweeps.
— Slightly less grip on snags (compared to hinged mounting with an open hook).
— The best controllability of the bait, because the bait, hook and sinker are obtained in a monolithic structure, without wobbling. All impulses that the angler makes are directly and unambiguously transmitted to the entire bait.
Main disadvantages of a jig head :
— Not the highest casting range due to the increased windage of the rigid installation.
Tips for a fisherman: How to put a double on a silicone bait - Features of choice
— Limiting the movements of the bait, deteriorating the play of some silicone models.
— The G-head does not allow the buoyancy of some silicone baits to be used very well as an additional attractive factor.
Now let's look at how different types of silicone baits behave on jig heads.
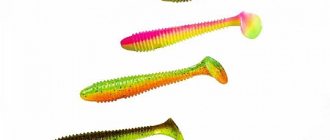
Vibrating tail on a jig head . Vibrating tails and rippers are perhaps one of the most popular baits among our spinning jig players. If we talk about attaching vibrating tails to a jig head, this is the most successful solution and combination! Moreover, there is no other type of soft bait that works so well with vibrating tails.
The essence of the vibrating tail game is, first of all, the vibration of the tail-penny. When the body of a vibrating tail is mounted on a rigid mount, on a jig head, then the tail plays optimally, oscillating relative to the body.
Of course, it’s very good when not only the tail of the bait works, but there is also some interesting play of the whole body of the silicone.
So, if you equip a vibrotail with the lightest possible jig head, then the vibrotail also receives vibrations with some rotation relative to the longitudinal axis.
In addition, you can enhance the effect of such vibrations by using different shapes of jig heads. These can be jigs such as “boot”, “spoon”, etc.
Twister on a jig head . Twisters are also a popular class of silicone baits in the fall. Like vibrating tails, twisters are active silicone that plays when applied evenly.
Slugs and other passive baits on a jig head . Passive silicone baits do not work so well with a jig head. Slugs, silicone worms, crayfish, cuttlefish, etc. - these are baits that need to be set in motion by a spinning rod.
So, if we need to loosen up a passive bait as much as possible, then we forget about jig heads and use a hinge or lead rigs. If we want to achieve maximum controllability of the bait, for example, for clear tracking with short jumps, steps along the bottom, then we can use a jig head for such passive baits.
This is how I see the place of jig heads in equipping silicone baits, edibles of various shapes and types.
You can slightly improve the resulting jig heads - several tight loops of ordinary thread are knitted onto the shank of the hook and fixed with instant glue - the resulting “boss” will help hold the silicone bait on the hook. If necessary (for example, the hook has become dull), the head can be removed and used on another hook. To do this, you need to heat the eye of the hook with a lighter until the glue melts - remove the head and we can use it further.
06.04.2016 03:51 06.04.2016 03:51:01
How to catch passive trout? On the "rubber". What type of tire can you use to catch trout? For worms and nymphs. What hooks and jig heads should I mount my worm/nymph on? Do it yourself.
Yes, there have already been publications on this topic, but the methods described are, in my opinion, far from ideal. I suggest anglers still evaluate different methods and choose the most convenient for each. Perhaps someone will be interested in the technology I use. Naturally, such micro-jig heads can be used not only for catching trout, but also for catching other fish, for example, perch. So, initially you need to decide on the hooks and the required set of head weights.
Diameter 3mm - weight 0.17g Diameter 3.3mm - weight 0.3g Diameter 4mm - weight 0.44g Diameter 4.5mm - weight 0.8g Diameter 5.5mm - weight 1.3g.
How to connect the hook and head. How to do this quickly and reliably? You will need Poxipol cold welding, a sheet of paper and a toothpick. All! Having tried several methods and types of glue, I came to this particular option. It's fast, reliable, economical, safe. Perhaps some people use two-part epoxy or another brand of glue, but I'm speaking from my experience. I think it’s important to outline the sequence of actions to help avoid some mistakes.
1. Select the desired hook and head weight. I came to the conclusion that I make five heads in one short production cycle - this quantity allows for optimal use of the Poxipol hardening time.
2. Squeeze a small amount of glue from each tube onto a sheet of paper - less than a pea.
3. Mix both components with a toothpick. The result is a viscous composition that will gradually harden within 3-5 minutes.
4. Apply a little of the resulting composition to the shank of the hook, where the head is supposed to be secured - in the area of the eye of the hook. We move the head here and press it tightly to the eye of the hook. The viscous composition fills the hole in the weight. If excess glue is squeezed out, remove it. If the hook is thin and the diameter of the hole in the head is very large, you can additionally fill the hole with glue.
5. It is convenient to dry the heads in a suspended state - in this position the head cannot move while the glue hardens.
6. After 5-10 minutes the glue will finally harden - your jig head is ready!
You can slightly improve the resulting jig heads - several tight loops of ordinary thread are knitted onto the shank of the hook and fixed with instant glue - the resulting “boss” will help hold the silicone bait on the hook. If necessary (for example, the hook has become dull), the head can be removed and used on another hook. To do this, you need to heat the eye of the hook with a lighter until the glue melts - remove the head and we can use it further.
Tips for fisherman: How to choose an offset hook for silicone bait - Detailed review
I will also give a few examples of what equipped baits look like.
If fishing is carried out from a boat, then a long spinning rod is absolutely not needed. On the contrary, with a shorter one, catching a predator from a boat is much more convenient. Therefore, a spinning rod with a length of 1.9 to 2.4 meters is suitable for such conditions.
Offset hook sizes
Anglers who prefer to fish with spoons, spinners and wobblers can use small-sized tees, and this will not particularly affect the number of bites. With offset hooks the opposite is true; here the more the better. Many experienced spinners call the starting number 2/0, although the shelves of fishing stores are full of smaller offsets. Beginners have doubts and often ask why put huge hooks on grass pike or pike perch weighing no more than half a kilo. In practice, a medium-sized specimen can easily “eat up” 3/0, 4/0 and even 5/0. The latter, translated into the scale we are used to, is approximately number 18-20, while it does not frighten the fish at all and holds it securely. Well, numbers starting from 1/0 and below are only suitable for “destroying” striped robbers no longer than the index finger. The figure below shows the dimensions of offset hooks in centimeters and numbering.