If you have never fished before and have just decided to start mastering this type of outdoor activity, then a feeder is an excellent choice for a novice fisherman. Although for starters it was better to get acquainted with the basics of bottom fishing.
Well, if you have already fished for donk more than once, then starting to fish with the help of a feeder is like moving to the next level, and most likely, to the last. Fishing with a feeder is the pinnacle of bottom fishing. It is with the help of this gear that you have the greatest chance of catching really large trophies and achieving the highest catches.
Choosing a feeder for beginners
The most important part of the feeder is a special feeder rod. Before moving on to its description, it’s worth writing a few words about why it was actually needed, and why they don’t use a regular fishing rod.
As I wrote above, when casting a bottom tackle equipped with bait, a so-called cloud of bait is created at the bottom. It is this cloud that the fish reacts to and gathers in this place. However, after the bite occurs and the tackle is removed, you will have to repeat the whole process again the next time you cast.
However, the feeding spot is where the feeder was some time ago, and all the fish are there, and it would be very wise to throw your tackle there on your next cast. But since when casting to 30-50 meters or more, which is exactly the distance the bottom tackle is cast, it turned out to be almost unrealistic to cast to the same place with an ordinary fishing rod, a special fishing rod was invented, known today as a feeder rod. This rod will allow you to make accurate long casts.
Another important function of a feeder rod is vole alarm. As I already wrote, bottom gear does not have a float.
And a fair question arises - how does a fisherman find out about a bite? In ordinary donks, a bell with a clothespin is used as a signaling device, which clings either to the tip of the fishing rod or to the fishing line itself. In addition, there is a whole family of different electronic bite alarms, which are more expensive than fishing rods. When a bite occurs, a bell or other signaling device begins to either ring or squeak.
Good to know! There is one serious drawback with such an alarm system. Due to the fact that a regular fishing rod is quite “dumb”, many bites will go unnoticed by you. Of course, electronic signaling devices alleviate this problem a little, but their high price becomes an obstacle. They are usually inaccessible to the average fisherman.
The feeder does not have this disadvantage. Due to the incredibly thin and sensitive tip of the rod, you will detect even the most accurate bite and will be able to react to it, that is, hook. It is precisely because of this feature that the catch on a feeder is many times greater than on a regular donkey, provided that the fishing takes place in one place.
What is the difference between a feeder and a donkey?
In order to understand why feeder fishing is so good, you need to write a few words about ordinary bottom fishing.
The name itself—bottom fishing—contains the type and gear that is used in this type of fishing. When bottom fishing, they fish with so-called donks. Why is this fishing more interesting than the well-known fishing with a float and fishing rod?
When bottom fishing, you use exactly the same rod and reel as when float fishing. This is where the commonalities end. When bottom fishing, a float is not used. And there is a lot of gear for bottom fishing:
Feeders under the top of the tree - “top feeders”;
The makushatnik is a flat sinker with leashes with hooks attached to it. Hooks are usually stuck into the top of the tree, or some kind of bait is attached to them.
Makukha creates a so-called cloud of complementary food in the water. When the fish comes to eat the top, it gets hooked. The top itself on the weight is fixed either with an elastic band or some other fastener. Today, makushkas with plastic clamps are popular.
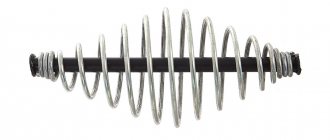
Springs of various designs;
Spring tackle differs from makushka in that it is not makushka that is used as bait, but dry mixtures, of which a huge variety is now sold. From these mixtures, mixing them with water, they create a mass with a consistency reminiscent of dough. The spring is filled with this mass.
The spring itself prevents the mixture from flying off during casting and remains in the feeder for a more or less long time. This tackle is considered more effective than a macho bait due to the fact that a cloud of bait appears almost immediately. The makukha needs some time to melt.
Feeders of original designs.
In addition to the above two main types of bottom gear, there is also a whole scattering of various variations on the spring theme. The most common of them is the so-called “crucian carp killer”.
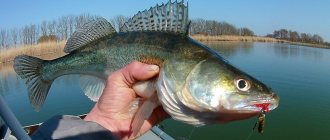
Of course, not only crucian carp can be caught with this tackle. And any non-predatory fish that feeds at the bottom is perfectly caught. By the way, perch can often get caught on a worm. But the topic of this article is not about that at all.
Let's return, in fact, to feeder fishing. The feeder became a logical development of the bottom gear presented above. Only for feeder fishing, not only original feeders were developed, but also a special rod. These features will be discussed below.
End of spring - May
May is the period of spawning and prohibition. Fishing at this time is more of a sporting nature. You must not break laws, fish in permitted places, with permitted gear, and most importantly, protect nature!
Feeder on the Shatura Lakes in May
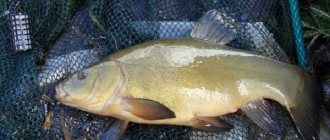
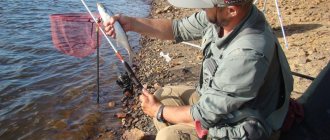
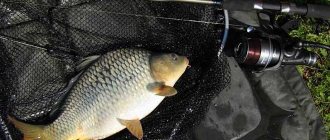
Mikhail Krupinov, a well-known host of many videos about feeders, opens the fishing season early in the spring. Most often in May the weather is the most suitable for fishing; the fish were not active that day, but Mikhail caught his spring bream.
Feederist in May on the lakes
It is interesting that on this day the bite throughout the entire reservoir was very weak, or rather there was almost none. But Mikhail, with the help of dips (walnut, plum, etc.), got several good bream to sit on the hook.
Video of spring fishing on the Upa River
Another river in central Russia. The small river Upa 80 km before its confluence with the Oka (between Odoev and Krapivnaya). The water temperature at this time was already about 15 degrees. And you could count on catching not only roach and silver bream, but also decent bream.
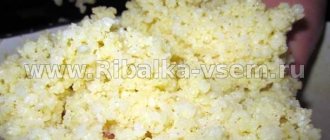
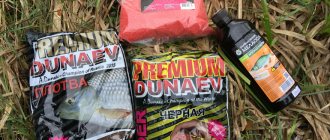
The composition of the feeder bait for May is a mixture of 3 packages of Aquamaster “Bream”, “Roach” and “Feeder”.
Additive : millet and pea porridge.
Aroma - Suneli hops and molasses added to water.
River fishing in spring on video
Fishing on the Volga in Chuvashia
At the end of May, Alexey Fadeev tries his luck as a fisherman on the Volga. Most of the fish have already spawned and are resting after spawning. So you can’t count on a good bite. It will be all the more interesting to watch on video how a sports fisherman finds an approach to the fish.
Despite the fact that it is already quite warm, Alexey advises not to use the nutrient mixture. It is better to take fine-grained bait for cold water. As always, Fadeev recommends Dunaev mixtures.
Alexey Fadeev on the Volga in spring
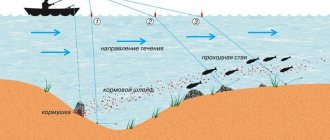
In the spring, you should expect the fish to be closer to shore, where the water is warmer. For the most part this is true. But the author of the video believes that “good” spring bream still stands at depth. The feeding point in this place of the Volga is 40m from the shore.
Feeder rods
Today, a variety of manufacturers on the market offer a huge number of feeder rods at very different prices. The vast majority of fishing rods are made in China. The material used for them is carbon or any composites of plastic and carbon.
Rod length
Typically, the length of the rod ranges from 2 to 4 meters. I would recommend that you focus your attention on rods between 2.5 and 3 meters long. A longer rod will be difficult and awkward for you to handle. And if you use something too short, for example two meters, it will be difficult for you to cast far.
Prices for them start at about 600 rubles, and what’s interesting is that even the minimum priced rods are quite decent. So I wouldn't recommend you overpay.
All feeder rods are plug-in type. There are no telescopic feeders. Usually, the rod kit also comes with three spare tips - quivertips . The tips are the most frequently broken part of the feeder and you will probably need them. Especially at first while you are mastering a new type of bottom fishing.
One more aspect that I would like to draw your attention to. To achieve its famous flexibility, the end of the feeder is made of a large number of sections, they can be seen in the photo above.
Build (flexibility) of the feeder rod
The flexibility of a fishing rod is as important as its strength. When buying a feeder, you can know in advance how flexible your rod is.
Flexibility is divided into:
- Fast - fast formation;
- Slow - slow build;
- Progressive - complex tuning.
Fast type rods are the toughest. Only the top part of these rods is flexible. These rods are very convenient for quick hooking.
Slow is a rod with average flexibility. And, probably, the most balanced from a fishing point of view. It is convenient for hooking and fishing for fish.
Progressive is the softest and quite rare type of fishing rod. It is used by sports fishermen. I don’t think a novice fisherman will appreciate it. Moreover, such rods are much more expensive than rods of the two previous types.
Test components
In addition to length and flexibility, rods are also divided according to tests, like spinning rods. Information about the rod test will be useful to you when choosing a feeder for your feeder. If his test is, say, 40–80 grams, then the weight of your feeder should be within these limits.
A heavier feeder will break the top, but a lighter feeder will react poorly and you will not record bites.
Selection of pass rings
Since most of the fishing rods on the market are Chinese, when choosing a fishing rod you definitely need to pay attention to its quality. And above all, on the rings.
In addition to the fact that all rings must be on the same axis, they must also be securely and firmly fastened.
When buying a feeder rod, tug the rings with your hand. They shouldn't wobble. After this, “aim” at the largest ring. All rings must be in the sight and be on the same axis.
If the rings are not on the same axis, they will rub the line, which will lead to its rapid breakage and a decrease in casting length.
Quivertypes
As I already wrote above, the rod kit also includes interchangeable tips - quivertips. The quivertips included with the rod usually come in different hardnesses.
That is, they are designed to catch different fish. Hard quivertips are needed for catching large specimens, and you will need soft ones in cases where you are ready to catch all the fish that fit your feeder.
Basic parameters characterizing a feeder rod
Length
In stores you can see rods with a length of 2.7 to 4.8 m. The most common are middle class rods from 3.6 to 3.9 meters.
Some models of feeder rods allow you to increase the length due to an additional elbow. Such transforming rods are called multi-feeders. They are more versatile and allow you to fish in different conditions.
Material
Feeder rods are made from:
- fiber - carbon fiber. This is a very high quality and expensive rod. You should be very careful when handling it, as it is a delicate and fragile material.
- Fiberglass . Suitable for extreme fishing conditions.
- Composite (a mixture of “glass” and “coal”). This heavy and rigid rod has a long service life.
Test
To make optimal use of the feeder's properties, you should read its instructions. Which specifies all the maximum loads or weight of the load.
- Light – light class, this is the lightest rod, light, you can use equipment and feed from 21 to 56 g. Mainly used for short distances in still water.
- Medium – middle class “medium” - from 28 to 84 g used in small currents or in standing water. This rod is the most versatile. It is used for a wide range of equipment.
- Heavy – heavy class from 56 to 120 g is used in strong currents, using heavy feeders and weights.
There are also intermediate classes.
How to fish with a feeder on the river correctly? You will find the answer by reading our article.
In this article we will tell and show how to properly catch catfish with live bait.
Feeder stands
For feeder fishing you need comfortable and reliable stands . It is better to purchase one with adjustable angle of rotation.
A long feeder, mounted on a stand with a sufficiently large angle, allows the fishing line not to come into contact with obstacles on the shore.
The less line is in the water, the more precise the hooking is.
How to choose tops
The tip of the rod at the feeder serves as a bite alarm . A typical mistake is when the tip is selected without taking into account the fishing conditions. Strong currents require a stiffer whip. And for standing water, on the contrary, it is soft.
The flexible tip is very sensitive. It responds to the light touch of the fish on the bait. It is advisable to take interchangeable tips with different hardness when fishing.
Feeder lines
It is better to buy a special fishing line - feeder, which has a coating to reduce friction.
When fishing with light feeders, use a mono-thread with a thickness of 0.1 mm - 0.2 mm, with medium ones from 0.16 mm - 0.28 mm, etc. If the thickness is exceeded, you can break the rod, and thin line quickly will tear. Braided line may be required for strong currents and long distance fishing.
Catching white fish on a feeder
There is an opinion in fishing circles that the feeder is a tackle for white fish. It catches a variety of fish, but mostly white. As they say, fishing for white fish on a feeder is unpredictable . If you decide to fish for a medium-sized fish, you can catch a large bream.
They catch white fish on vast reaches. In these areas you can catch good white fish: silver bream, bream, carp, white-eye, blue bream, catfish, roach.
About the technique of fishing with a feeder
Before you start fishing, you need to properly equip your position and position the rod correctly - at an angle to the shore. It’s better to sit a little further from the water’s edge.
It is advisable to make the angle of inclination straight or close to this interval, so the cuts will be more accurate.
How to make accurate casts
Each time you throw the feeder with the same force . Measuring the distance the feeder should fly. You need to secure the line to the reel spool.
Having caught the final phase of the feeder’s flight, you need to lift the rod up and relax your wrist. By correctly performing the casting technique, you can avoid the leash intersecting with the feeder.
Having made the cast, the tip of the rod is immediately lowered into the water and the line is submerged . After that, the feeder should be placed on a stand and the fishing line should be reeled in so that the tip is slightly tense.
How to hook
The best bites are those in which the fish pulls the bait with force. The tip of the rod begins to clearly bend and unbend. Having seen that the tip of the feeder is jumping, you need to slowly take it in your hands and smoothly pull it back to establish contact with the hooked fish. Hasty and sharp hooks cause the fish to escape, and the rod may break.
At first glance, it seems that fishing on a feeder is very simple , but this is not so. A fisherman must be able to analyze well. React instantly to an ever-changing situation. React to bites in a timely manner, and also learn how to make good bait. The reward for this will be solid catches of large fish.
Are you interested in carp fishing with a feeder? Read about this in our article.
This article will tell you about catching crucian carp with a feeder and about equipment for it.
In this section you will find information about bottom gear.
Feeder reels
The feeder rod uses a regular spinning reel, exactly the same as on spinning rods or regular floats. The use of inertial coils on feeders is excluded.
However, the correct feeder reel has one useful feature - the reel must have a casting distance lock. You will need this clamp for accurate casting.
The process of casting a feeder rod with such a reel is as follows. You choose the casting direction and cast, after which you record the casting distance on the reel. Thus, the next time you cast, your feeder will fly the same length as the first time. If you choose the right direction, then your feeder will end up in the same place. And this is very important for successful fishing.
Let's celebrate! But if you don’t have the money for such a reel or you want to use your old reel that is not equipped with this useful function, then it doesn’t matter. Fishermen use a regular rubber band to fix the casting distance. After the first cast, the elastic band is wound onto the spool with fishing line and during subsequent casts it prevents the fishing line from unwinding further than the elastic band.
Feeder reel
One of the key questions for people wondering how to choose a feeder reel should be the quality of the line laying. A high-quality reel winds the line onto the spool evenly and without overlaps, since the casting distance depends on this.
In the feeder, depending on the class of the rod, the following reel sizes are used:
- Spool size 2500-3500 is used on picker and mediums;
- Reels with 4000 spool for medium and heavy class;
- Spool size 5000-5000 for heavy and super heavy class, for fishing at the longest distances, as well as when fishing for large carp;
This combination of the size of the reel spool and the class of the rod is due to the need for proper balancing of the tackle, because if you put a large reel on a light blank, it will make the tackle heavier, and you will not be comfortable fishing. Also, if we put a small reel on a large blank, we will not be able to properly throw heavy equipment over the longest distances (the reel will break down very quickly). In addition, with powerful rods we mainly catch large fish, for which we use thicker fishing line, and the capacity of a small spool may not be enough for casting over long distances.
At the same time, the feeder reel should have a shallow spool, because the closer the line is to the side of the spool, the easier it comes off when casting and the tackle flies further. If you have a reel with a deep spool, this can be solved by winding backing, over which the line you are going to fish is already wound. It is advisable that the fishing line be approximately the same diameter as the one you are going to fish with, because the thicker the fishing line, the less evenly it lies.
The price also depends on the material of the reel spool; in expensive models the spool is made of aluminum, in cheaper ones it is made of graphite or plastic. When fishing with braid, it is desirable that the spool and line roller be coated with titanium nitride.
It’s a good plus if the reel you purchase has a second spool (then you can wind braid on one, and a monk on the second, and quickly change it). True, the price in this case will be higher, but still, it is cheaper than purchasing a second coil specifically for these purposes.
A feeder for beginners is preferable when there is a clip on the reel for securing the fishing line, but do not forget about the disadvantages of such casting.
Feeder reel
The number of bearings is 4 plus one in the line roller, more is better. Remember that cheap Chinese reels have 12 or more bearings, and make no mistake, here the quantity is much inferior to the quality.
The rear clutch is preferable to the front one, although for many this is more a matter of habit. The clutch can be short or long, the short one is when you tighten it a little and the nut is tightened, it is used in carp fishing, for others the long one is better suited.
Fishing with a feeder for beginners with a baitrunner system makes sense only when hunting for a large trophy: carp, grass carp, silver carp; it is not needed for fish weighing 1-2 kg.
As for the gear ratio, feeder reels generally have a value of 4.7:1 –5.2:1, the lower the ratio, the more powerful the reel, but the lower the speed, so for catching purely large specimens, power reels are chosen. For fishing both bream and roach, reels 5.0:1-5.2:1 are suitable. Reels above 5.2:1 are needed only for targeted fishing for roach, rudd, small crucian carp, and bleak.
Main line in feeder rig
After talking about the reels that are used for feeder fishing, it’s time to talk about what to wind on these same reels. That is, about the equipment of the coils.
You can wind both regular fishing line and multi-layer nylon cord on the reel. Nylon cord differs from fishing line in its flexibility. Or rather, the fact that the cord practically does not have any flexibility. And it is used mainly when fishing at long distances, since the fishing line with its flexibility will smooth out small bites and with a large length of equipment you simply will not feel them.
Good to know! At short distances, up to 35 meters, monofilament fishing line will be the best equipment for a feeder reel. This is due to the fact that, having a certain flexibility, the fishing line will smooth out sudden jerks of the fish and it will be easier for you to fish it out. When fishing for large specimens of fish using a line, the chances of the fish disappearing are much higher.
As for thicknesses. For feeder fishing, a fishing line with a thickness of 0.25 to 0.4 mm is used. Due to its high strength, the cord can be used thinner, 0.11-0.2 mm thick.
Leashes
They are made using monofilament, the thickness of which determines the size of the trophy. A catch consisting of roach or crucian carp will allow the use of a monofilament with a diameter of 0.1-0.12 mm. A medium-sized bream will require a line whose cross-section should be 0.2 mm.
- Fluorocarbonate leaders are not noticeable in the water, and their characteristics are not inferior to monofilament threads.
- The quality of invisibility for fish allows the use of options with greater thickness.
The recommended leash length ranges from 15 to 20 cm, with strong currents it increases from 50 cm.
For example, if the target of the catch is sabrefish, the size of the leash should be from one and a half to two meters.
Leashes for feeder
We've sorted out the feeders, it's time to talk about leashes for the feeder. As leashes for feeder fishing, and indeed for any fishing, a special thinner fishing line, 0.15 - 0.1 mm thick, is used. Many people don’t understand why leashes are needed in general? Now I'll try to explain.
The leash has two functions. Firstly, it is designed to make your gear less noticeable to fish. Secondly, he must retain the main tackle in case of a snag.
For me personally, the second function of leashes is more important than the first. In principle, if there is fish in a reservoir, it will bite on leashes of any thickness. But if you hook some kind of snag at the bottom, then not all of your gear will break, of which there is usually not much in a fisherman’s kit, but only the leash with the hook. And you, having attached a new leash, can continue fishing.
Good to know! What thickness of leashes is best to use? There is no clear answer to this question. It depends on the conditions of the reservoir. If the bottom of the reservoir is strewn with shells, then the leashes should be thicker. Since thin leads will often be cut off by the sharp edges of shells. If the bottom is more or less clean, then you will be quite satisfied with leashes 0.1 mm thick.
Feeder equipment
The simplest feeder for a feeder is a paternoster, do it yourself
After all the elements of the feeder equipment have been disassembled, it’s time to talk about how you can independently connect the simplest feeder equipment - a paternoster.
So, to make this equipment you will need:
- Reel with main line;
- Line for leash;
- Cage type feeder;
- Carbine with swivel;
- Fishing hook.
The manufacture of such equipment is quite simple. You take a piece of main fishing line approximately half a meter long. A small loop is knitted at its end to attach it to the main fishing line coming from the reel. About five centimeters from this loop you knit a large loop with a diameter of 20 centimeters. First of all, you will need to insert into this loop either a feeder or a carabiner to which it will be attached.
Let's celebrate! After knitting these loops, you will be left with an end 20-25 cm long. At the end of this end you will need to tie a small loop for attaching the leash. To this loop you attach either a leash with a hook or a carbine with a swivel to which this leash will be attached.
As for the leash, it should be an average length of 8-15 cm.
This equipment is the simplest and, naturally, far from the best. It does not have an anti-twist and this will often lead to the leash getting wrapped around the feeder. However, such equipment is quite functional and you can fish quite successfully with it.
Equipment with anti-twist
Despite the fact that feeders come from ordinary bottom fishing, they have their own characteristics for a feeder.
First of all, the feeder is fixed far enough from the hook. Secondly, the feeder itself is not oval, but square with a weight at the bottom. This was done with a certain intent. When you start to pull out your tackle, it goes immediately to the surface of the water and then goes along the surface.
This is done so that the equipped tackle passes over the surface of the algae thicket. This is a very useful feature because if it gets caught in algae, you risk breaking off the sensitive top of the feeder.
In reality, such gear has another advantage. If you catch a fish, you will immediately see it. Because when the bite is false, an empty hook will stretch across the surface of the water. And in case of a successful bite, you will see the caught fish immediately.
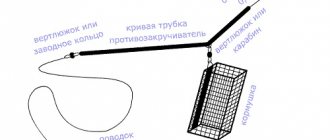
Good to know! Another feature of exclusively feeder equipment is the anti-twist . Yes, yes, this is the same plastic tube bent at an angle. It is this part of the feeder feeder that prevents it from twisting.
In conclusion of the section about feeders, it must be said that there are three types of them:
- light – light;
- medium – average;
- heavy - heavy.
Based on the test of your rod, for example, if it is from 40 to 80 grams. A light feeder will weigh 40 grams, and a heavy one - 80. However, most fishermen use medium baits, which are the most versatile.
In addition to the above gradation, feeders are also divided into:
- feeders for starter feeding;
- feeders for long-distance casting;
- supplementary feeders for standing water;
- supplementary feeders for the current.
Asymmetrical loop
An asymmetrical loop is the main loop used for feeder fishing. But this type of equipment is quite complex and a lot depends on the correctness of its knitting when fishing. You will avoid frequent tangles, overlaps and, as a result, breakage of the gear. How to knit it?
The detailed knitting procedure is clearly depicted in the figure above. In words, it remains to add that for tying this gear, a piece of fishing line 0.25-0.4 mm thick and 60-70 cm long is used. At the end of the fishing line we make a regular loop into which the leash will be threaded. After this loop we make a twist, 10-15 cm long, as shown in the figure. The end of the twist is also secured with a loop.
Let's celebrate! After this, we put a carabiner with a swivel on the remaining line. Then we fix it on the loop, closing it with a standard knot - a loop. We also close the remaining two ends with a loop. This will be a loop for attaching to the main fishing line. Carefully trim the remaining ends with scissors.
The lengths indicated in the figure above are, of course, arbitrary. You don't have to measure all the loops with a ruler, the main thing is to maintain the proportions.
Symmetrical loop
A symmetrical loop is somewhat simpler than an asymmetrical one. In addition, this type of equipment is more effective when fishing on a hard bottom.
The rules for knitting it are very similar to the rules for knitting an asymmetrical loop. Therefore, I will not describe them in detail, everything is visible in the picture.
Feeder equipment
Choosing hooks
Tests show that the hooks intended for the feeder and floats are different. Hooks designed for fishing with floats are often not suitable for feeder fishing. The main reason is the different sides of the hook. In feeder fishing, self-hooking is often used, which occurs in one horizon.
Which ones to choose:
- Saikyo KH 10008 is a hook with a ring that can be used to catch any fish. Cheap and high quality, that's why it comes first.
- Saikyo KH 10006 is a hook specifically for roach or live, small bait. Often these are several bloodworms and maggots.
- Owner 50922 - it is very similar to Saikyo KH 10008, only the company is more famous and the price tag is higher. The hook extension indicators are simply remarkable.
Owner 50922
Saikyo 10008
Mustad (Norway)
Choosing a fishing line
Choosing the correct fishing line thickness virtually eliminates the chance of breakage. Carps up to 5 kg can be caught using monofilament and braided line as thin as 0.30 mm.
Factors:
- How long is the request length;
- Types of fish;
- Parameters of the reservoir itself;
- Fishing skills.
Top 3 rating of feeder lines
Shimano is one of the leading manufacturers of lines and reels at the moment
Shimano Technium
A kind of golden mean between monofilament and braided. Ideal for carp fishing on a feeder. Capable of supporting the weight of even large fish. It is wound on reels of 200 or 300 meters.
Pros:
- Durable.
- The cross section corresponds exactly to the indicated value.
- Various colors, including camouflage.
Minuses:
- If the tension weakens, confusion may appear.
- Often they make copies of fishing line from this manufacturer, since it is very popular. There is a high probability of running into counterfeit goods.
- Expensive.
Mikado have long established themselves in the market as manufacturers of strong and reliable
Mikado
Advantages:
- Good rigidity that meets all requirements.
- Cheap. The price is very low.
Flaws:
- The selection by section is small.
Sufix
Advantages:
- Resistant to wear.
- Normal extensibility.
- Cheap. If you still have little experience in feeder fishing, it is better to purchase it.
When talking about Sufix, we are talking about low price and extremely low wear. Choosing people with character.
Leash
As usual, you need to choose by paying attention to some criteria.
Let's start with the fishing line. In order not to twist and hold knots, the main requirement for it is strength and rigidity. We trust leader lines from these manufacturers:
- Colmic
- Shimano
- Sufix
- Sunline Siglon FC
Use ONLY fluorocarbon lines as a leader.
They are very cheap and have good characteristics. Under no circumstances should you use domestically produced fishing lines for leashes, especially low-cost ones. In addition, domestic fishing lines often contain defects (regular fishing line instead of fluorescent line). How to avoid falling for a fake - read here.
Most novice feeder fishermen are interested in whether it is possible to make leashes from braided fishing line. And the answer is very simple: it is possible, but not necessary. Fishing lines are strong but soft. The second does not allow them to be used for leashes.
Diameter
It is also impossible to say for sure about the diameter. Here the conditions in which the fishing will take place already influence. In some reservoirs 0.15 mm is quite enough, and in others no more than 0.10. For carp weighing over 5 kg, fishing lines from 0.3 mm are used.
Also, the choice of leash depends on the thickness of the rod. If it makes it possible to make a lightning-fast hook, then the diameter should be slightly larger so as not to burst. The choice also depends on the main fishing line. If it stretches perfectly, then when hooking a carp the leash will not be loaded, if on the contrary, then it may break.
If a non-stretchable line is used, use a leash as thick as possible.
Length
I advise you to start fishing with a length of 30 cm, and then observe how the carp behaves and how active it is.
The shorter the leash, the more convenient it is to catch. But there are cases when it is necessary to lengthen the leash. This is necessary in stagnant water, on lakes where there is a muddy bottom.
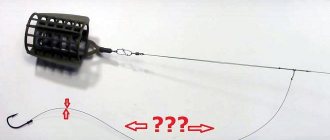
Paternoster equipment
Among feeder rigs, the Paternoster is the most popular; the design is simple and virtually universal for fishing in still water.
11 popular feeder equipment.
It is thanks to her that you can get a very large catch. The secret to catching is self-hooking. If the hook is not done on time, the fish will still not break due to the good design.
Advantages:
- Very easy to knit, without any difficulties;
- Increased sensitivity of gear;
- The tackle can be mounted directly where you will fish;
- Good fishing on muddy or uneven bottoms;
- It can be improved as you please.
Design:
- The main fishing line, which is wound on the fishing rod reel;
- Leash and hook;
- Loop for attaching the feeder;
- A swivel so that the feeder can be attached;
- The feeder itself;
- Leash;
- A special fastening with which the leash is tied to the main fishing line.
You need monofilament or braided fishing line to properly rig the feeder, the cross-section of which is 0.15-0.3 meters. It is influenced by the size of the fish that will be caught and how much it weighs. The leash is made of monofilament with a diameter of 0.08-0.15 mm and a length of 20-30 cm.
The feeder needs to be selected based on the conditions and on what body of water the carp fishing will take place. In case of strong currents, types that have the shape of a square or triangle are used. Plastic - in standing water.
How to knit well
Where the end of the fishing line is, a loop is made with a triple knot. Next, the hook and leash will be attached to it. Before tightening any knot on a fishing line, be it monofilament or braided, it, of course, needs to be moistened with water. This will prevent the structure from being broken.
Tie another loop at a distance of 15-25 cm from the leading one. Select the size so that the entire length of the feeder can fit through it. Often the diameter of the paternoster loop is 10-15 cm. The feeder will not cling or get tangled due to this size. A leash is attached to the main line using the “loop to loop” method. We thread it through the end loop of the tackle, wrapping it around it and forming a loop.
Choosing a feeder
It is the fishing location that influences which feeder will be chosen. Feeders for standing water or for fishing in currents differ in the material of manufacture, shape and weight.
Cage type feeders. Conventionally, they are all divided into 2 types, semi-closed and open. Open ones are used in reservoirs without current. Semi-closed on rivers. In figure “c” we see a obviously loaded feeder.
Although the design of the feeder is very simple, there are still many designs and different varieties. But we will only talk about a few main ones.
Spring
It is suitable for fishing in still water. They are very easy to fill with bait, which will release at the bottom and attract fish. But so that the food does not get lost during the flight, it needs to be made more viscous.
Frame
These feeders are not exactly feeder feeders. The frame of this feeder is covered with viscous bait, and a leash with a hook is sunk into it.
Flat
The feeder has a flat bottom and a hook with a small bottom is attached to it. Its length should be 5-10 centimeters.
Closed
It has a special plug that makes luring out the bait slower. This is very convenient if you have to fish in strong currents or rare casts. The plug is also very useful when the complementary food is weakly sticky and easily washed out, or it contains animal components.
But for beginners it is recommended to use a feeder without a plug.
Feeding troughs. They are huge structures, sometimes deliberately loaded. Used to attract fish from the longest distances.
Feeder bait
Today, a huge variety of baits for feeder fishing are sold on the market. But the best one, of course, is the one you cook yourself. By the way, in terms of price, preparing bait yourself is much more profitable.
So, standard bait is a mixture consisting of a base and additives. The base should give your bait stickiness and prevent the bait from quickly falling off the feeder. Well, the additives should actually attract specific fish.
Good to know! Baits are usually divided according to their intended purpose, or more precisely according to the fish that will most like this bait. There are baits for carp, crucian carp, roach or bream. And, of course, there are universal baits. They are the most popular, since any bottom-dwelling fish is good for such bait.
A successful fish food recipe
Ground waste from confectionery production is most often used as a base. That is, crushed cookies, gingerbread or crackers. Ground makoukh is a very good base; by the way, it is sold in this form in the markets. Plain flour works very well as a base. Moreover, corn or rye will be better than wheat.
Personally, I also add semolina to the base, in a one to one ratio. Semolina will add stickiness, and it itself is very attractive to fish.
Pearl barley is usually used as an additive. Pearl barley, in itself, is a good bait for bottom fish, and in combination with semolina and flour, your bait will become very catchy.
But that is not all. Finally, be sure to add a flavored additive. The best are hemp seeds. They are also sold in markets or fishing stores. In addition to its aroma, which fish loves very much, hemp seeds also deprive them of the feeling of fullness. This just leads to a crazy bite.
DIY feeder bait recipe:
- Corn flour – 1 kg;
- Semolina – 1 kg;
- Pearl barley – 1 kg;
- Hemp seeds – 50 gr.
The cooking process is as follows. First you boil the pearl barley. After the pearl barley falls apart, begin to add flour to it while constantly stirring the resulting composition. After adding flour, add semolina. Well, in conclusion, you flavor it all with hemp.
As a result, you should get a very sticky mass in the pan that does not fall out of the pan even when you turn it over. When you go fishing, you take the bait right along with the pan in which you cooked it.
This bait is, in principle, considered universal. But it will be most attractive for bream.
Feeder feeders
Starter feeders
As you might guess, at the beginning of fishing you need to feed the future fishing spot as quickly as possible. For these purposes, there are feeders for starter feeding. This feeder usually belongs to the heavy class.
It is a fairly large feeder with large windows. It should ensure the fastest possible formation of a large cloud of bait in the water.
Supplementary feeders for standing water
This is also the name of ordinary, standard feeders for feeder fishing, which were described above.
The main principle of such a feeder is the maximum closed volume that would allow the bait to stay on it for as long as possible.
Supplementary feeders for currents
In principle, these are the same feeders as the previous feeders. Small volume, but maximally closed with small windows. The main condition is that it is a flat weight. Very often, feeders made of plastic are used for fishing in the current.
Feeders for long casting
In reservoirs where the depth is sufficiently far from the shore. At a distance of more than 50 meters. Use feeders for long-distance casting. They differ from ordinary feeders in shape and are made in the shape of a shuttlecock. Where the weight is rigidly attached in front of the feeder.
These feeders cannot be called unique to feeder fishing. They are used for any bottom fishing.
By the way, they also have a significant drawback that standard feeder feeders do not have. When taken out after a bite, such a feeder does not go near the surface and collects all the algae that are at the bottom.
Feeder hooks
In principle, there are no special hooks for the feeder. Therefore, in this section we will generally talk about the hooks that are best to use.
Japanese manufacturers are generally recognized leaders among hook manufacturers. Hooks from the companies Owner, Kamasan, and Gamakatsu have become world famous. Of the European manufacturers of this equipment, Mustad is considered the leader. But the products of these companies are quite expensive, so the majority of fishermen use numerous Chinese brands.
As for sizes, the principle is simple. If you only want to catch large specimens, then you will need to use larger hooks. If there are not many fish in the pond and you don’t want to miss a single fish, then the hook should not be large.
I won't tell you the hook number. Since each company uses its own numbering. And the question of which hook to use you must decide visually.
Feeder rig for carp fishing in still water
Carp is perhaps the most popular and desired fish for all feeders.
When fishing for carp, you need to pay attention not only to the feeder but also to other aspects. First of all, this is a fishing rod. Successful borrkers usually use rods with a test weight of 60 - 100g. The leash should also be somewhat thicker than usual. Not less than 0.28 mm. I draw your attention to the fact that many have a main line of this thickness.
Since carp is a strong fish, you can’t skimp on hooks. Successful karpolovs usually do not skimp on this detail and use Japanese hooks.
It is best to use a “Method” type feeder as a feeder.
The hook must be hidden inside the bait. Because the carp immediately turns its attention to the feeder and when it eats the bait from it, it will definitely swallow the hook.
Any carp bait is used as bait, of which there are many on the market.
Carp fishing at different times of the year
How the fish will behave depends on the time of year. They are affected by temperature, how warm the water is and other factors. This also applies to carp.
Spring
March
Feeder bait for carp in early spring should be low in nutrition. If bait is chosen in March, pay attention to the one that has the properties listed above. A worm will work well as bait in March. It is inserted in three turns.
Equipment for catching carp on a feeder in the spring:
- Line: 0.14 – 0.16 mm.
- Hooks with a short shank and a very sharp sting. The hook is attached to the equipment using the loop-to-loop method.
- Feeders: 15 - 30 grams.
- Leashes from OWNER series KARP or FEDER. 8 or 10 numbers. Leash length 40 cm.
- Rod: Medium or Heavy.
- Reel: Match reel.
April
April is notable for spawning, which usually begins towards the middle of the month. The water becomes warm, up to 15 degrees (average temperature in the CIS countries), this temperature is simply ideal for spawning. The main spring bite begins to occur in April-May.
In April, carp are caught better where the water warms up a little earlier, where the food supply comes to life earlier.
May
The water in May is already more or less warm. Therefore, you can start carp fishing in summer places. If you don’t give the fish good bait, the biting place will constantly change, as the fish is constantly moving. The bait should not smell, there is no point in that. If you still want to use flavorings, then pay attention to those that are alcohol-based.
Prepare the place where you will fish in advance. Throw two parts of the bait in advance, and one at dawn. Start fishing during the day when it is warm and finish at dusk.
Bait for carp in spring should be live. Corn and even hominy would be a very good option.
You can also use boilies. In May there is already a lot of natural food on the reservoirs. But if you fish on a pond with a clean bottom, then pay attention to them.
Summer
June and July
During these months, fish as night falls. During the day, the carp hides at the bottom to survive the heat. The real bite starts after sunset and right up to 10 am.
Also, carp becomes active 2 days before sudden weather changes. Let’s say before a cold snap or the start of heavy rains. Large carp bite before and during a thunderstorm. In summer, carp love plant-type baits. Carp also prefer canned corn, which is sprinkled with a special carp flavoring. As well as steamed peas and boiled potatoes. Animal bait includes worms: dung worms, rain worms and maggots. The worm is strung in bunches of several pieces, so that this bunch moves.
Regarding the bait. Again, it’s much easier to buy it in a store; they sell a special mixture with flavorings. But you can cook it yourself. Add sunflower cake and be sure to add a little bait - chopped worms, maggots, etc.
Don't overdo it with flavorings. If the water is warm, strong concentrations can have the opposite effect; they will scare away fish. And you don’t need to use the principle, it doesn’t bite, so I’ll add more.
August
At the end of summer, small individuals gather in schools, and large ones swim in groups of up to 3 fish, or alone. Carp, of course, is a deep-deep fish, but rarely swims away from aquatic vegetation. They live at a depth of 4 meters, go out for food at the same time and have only one route. In August, carp begin to actively feed. It’s easy to find the place where he feeds; he sticks his head out to collect insects.
You can use a lot of things as bait, since carp are omnivorous. The best thing, of course: corn, seeds and cake.
Carp are attracted to spicy smells, so feel free to add honey, sugar, strawberries, vanilla, etc. Either prepare the bait yourself or buy it at the store.
Feeder fishing lessons for beginners
Feeding
In the beginning you will need to use a bait type feeder. You will learn about what it is in the sections above. I draw your attention to the fact that the bait feeder should be as heavy as possible and as open as possible in order to quickly create a cloud of bait.
Many fishermen do their entire fishing on this feeder. And this can be done if you do not need to save bait mixture.
Casting technique
So, before you start fishing, you must find a landmark for yourself on the opposite bank, to which you will have to cast. After the first cast, mark the cast length on the reel. This way you can cast more or less accurately. This is one of the most important aspects of successful feeder fishing.
Fishing process
After the fishing process begins, the main problem is to distinguish a light bite from the case when the hook ends up in the fish’s mouth. The fact is that the fish immediately approaches the feeder and begins to tug at it, which is expressed in a slight trembling of the tip of the feeder. When the fish hooks the hook with its lips, the jerk is much more confident.
These two bites can only be distinguished experimentally.
Feeder fishing in spring
Spring fishing differs from fishing at other times of the year in that the fish are inactive, they do not walk but stand still. Based on this, an important aspect is finding a fishing spot.
In spring, the water is clear, algae has not yet grown and the fish like to stand and feed in places full of shells. You will need to find this part of the bottom in advance.
The search for the desired section of the bottom occurs by casting a feeder and lightly pulling it equipped exclusively with a weight weighing 50-80 grams. In the place where the tip of the feeder will tremble easily and there is a shell rock at the bottom. Record this distance on the reel.
After this, the fishing technique does not differ from that at any time of the year. First, throw in the bait feeder, even without a hook. After several casts, usually three, when a stable cloud of bait has formed in the fishing area, you begin to actually fish.
It is worth noting that you most likely should not expect big catches in the spring. But you will definitely catch 5-10 fish.