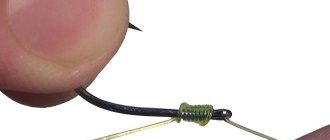
Turtle knot
The easy-to-use knot looks like some kind of baked product, so no one can describe the origin of its name. The design is simply knitted: the fishing line is threaded through the eyelet, forming two adjacent loops. A turn is made around the large loop and the free end is brought into a small ring. The resulting knot is pulled up and raised to the ear of the hook. This knot is especially good for ice fishing. With its help, an additional hook is attached, which is located above the jig.
Second hook
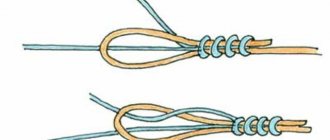
Among float fishermen and feeder fishing enthusiasts, the use of several hooks is considered the norm. We have already figured out how to properly tie a hook to a fishing line, but here’s how to tie 2 hooks to a fishing line, and even more so 3. Let’s talk about it.
There are several options for attaching additional hooks to fishing equipment. You can use leashes, or tie a second hook directly to the main line
. This can be done very simply:
- Tie the second hook to the loop on the main line, making 3 turns.
- When you tighten the loop, you should have a figure eight knot to which you need to tie the leash in a loop-to-loop manner.
- Now all that remains is to tie the hook to the leash using any method convenient for you. For this I use the clinch knot, proven over the years.
Knot clinch
It is quite simple to implement and is considered one of the most reliable among a wide variety of fishing knots. Only its capabilities are limited; due to certain specifics of knitting, it can only be tightened on hooks with a ring
.
Take the free end of the fishing line. Thread it through the eye of the hook, pull it out about 15 centimeters and make 5-8 turns around the main line. Near the ring of the hook you should get a loop (as in the diagram). The free end of the fishing line should be pulled through it.
After this, you should have another loop, but much larger. You need to pull the working end of the fishing line through this loop again, then moisten and tighten the knot. When you tighten the knot, transfer most of the load to the free end of the line.
And again, I suggest moving on to the traditional video on tying the fishing line to the hook.
California Knot
This fastening method resembles a figure eight. It was invented at the end of the last century by Californian lovers of recreation near a pond. To install, you need to fold the thread in half and pass it through the ring. Next, you should make a turn around the cord and insert the point into the formed loop. The knot securely holds both the fishing line and the braid, but it has a small drawback - it is bulky.
Universal knot
This fastening method is suitable for all types of hooks - spade-shaped or with a ring. Despite its apparent complexity, knitting technology is mastered relatively quickly. The advantage is the reliability of fixation, the ability to use fishing line of various thicknesses and roughness.
The order of knitting a knot:
- Thread it through the ring or place it along the forearm.
- Forming a loose loop, the remainder is wrapped around the fishing thread - up to 7 turns.
- The end is passed through the loop, wetted and tightened.
It is important that the turns should be located close to each other, but not overlap. Reliability depends on their uniform tightening. It is recommended to move the knot to the side so that the hook does not change its position when throwing it into a pond. How to choose a good and inexpensive PVC boat for fishing - practical advice
You definitely need to do a reliability check. To do this, you need to tighten the line a little. If after this she does not change her position and does not fall, everything was done correctly. Even a slight shift indicates poor quality. The result may be a fish failure.
Read about which fishing line is best for a float rod here.
Salmon knot
One of the most reliable and effective is a connection that is widely used in fly fishing. The knot covers the hook shank from several sides, so its quality always remains at a high level. In addition, it is almost impossible to untie the fastening; any loosening only tightens it. The free end of the fishing line is passed through the eye, unrolled and made several turns around its axis, running into a loop formed near the ear. Then the top loop is lowered to the hook and the free tip is also passed through it. The knot must be tightened with great care to achieve high-quality fastening. The complex design gives an undeniable result.
Hook with eye
Many fishermen argue about how to properly tie a hook to a fishing line if it has an eye (and most hooks do). Part of the reason for the controversy is the choice of one node or another. But no one takes into account the variety of fishing line and the thickness of the wire from which the hook itself is made, and this is a mistake.
We have selected a rating of 4 of the simplest and most reliable knots suitable for tying an eye hook to regular and braided fishing line. True, there are exceptions among them, so study the material more carefully
so that there are no troubles later.
Give preference to fishing hooks made of thin wire, as they can be tied with almost any knot. Tying a hook with a thick eye can be difficult for inexperienced fishermen.
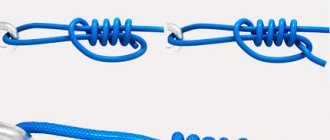
Pitzen node
The Pitzen knot is one of the most reliable and simple knots that are suitable for attaching a hook to the main line or leader. Its peculiarity is that it retains 90% of the strength of fishing line of any diameter.
when tightened correctly. Also, the speed of knitting allows you to make leashes directly on the pond.
- Pull the fishing line through the eye of the hook and then unfold it back, folding it parallel to the main one.
- With the free end, wrap the resulting loop of two lines (3-4 turns will be enough) towards the hook.
- Now pull the free line through the loop that is furthest from the hook.
- Moisten and tighten the knot.
- Cut off the excess line.
Now I recommend that you familiarize yourself with the knitting pattern for this knot and watch the video in order to fully secure and master the technique of tying a hook.
Palomar Knot
The Palomar knot is one of the strongest and simplest fishing knots. Many fishermen say that this is the best way to mount a hook. With some skill, it can be tied even during night fishing in conditions of complete lack of light.
Let's look at a step-by-step guide to learn how to properly tie a hook to a fishing line:
- Take the edge of the fishing line and fold it in half (you should get a loop);
- Now pull this loop through the eye of the hook;
- Tie a regular knot in the loop;
- Place a loop at the end of the hook as shown in the diagram below;
- Moisten and tighten the knot;
- Remove excess line.
The main disadvantage
knot is the need to pull a double loop through the eye of the hook. If you use a fishing line with a thick diameter or fluorocarbon fishing line, or a hook with a small eye diameter, this will not work.
Bloody knot
The bloody knot is suitable not only for tying a leash, but also allows you to tie a swivel to the main fishing line, spinners, wobblers and other baits. Mostly suitable for small diameter fishing line
, when tightening a thick fishing line, certain difficulties may arise.
Some knots are tied based on the basics of installation of the knot described below. The biggest disadvantage of the knot is that you cannot tie the hook to the braided line
. Its strength is quite high, and is 75% of the strength of the fishing line, which allows you to fix the tackle quite firmly and reliably.
Knitting instructions:
- The end of the fishing line must be threaded through the eye on the hook;
- Around the axis of the main line it is necessary to make 4-7 turns;
- A loop should form near the eye of the hook, into which you need to pull the free end of the fishing line;
- The knot must be moistened and tightened;
- Cut off the excess line with scissors or a blade.
This knot can be used to tie a fishing line to the hook of a winter fishing rod.
Universal node
Over many years of fishing practice, anglers have finally found a universal knot
, allowing you to attach a hook with a ring of any diameter to thick and thin fishing line, or braid. It is knitted as follows:
- Pull the line through the eye of the hook, leaving about 10 centimeters free;
- Make a loop at the free end of the fishing line;
- Make 4-8 turns of the line around the shank of the hook;
- Pass the free end of the fishing line through the loop created in step 2;
- Moisten and tighten the knot;
- Cut off any excess line.
Leashed
This type of fastening is used for mounting leashes to the main fishing line. It is successfully used in spinning fishing with spaced rigs, as well as in catching white fish with elastic and bottom tackle. Make a regular knot on the main line and, without tightening, pass the leash through the two lower loops. Thus, a high-quality connection is obtained without unnecessary stress on the material.
For a novice fisherman, it is enough to master 2-3 reliable knots, which can be used in different situations. However, with experience, you will need additional methods of fastening, allowing you to approach the installation of gear more professionally. Each knot must be tightened evenly to avoid twisting. Also, the fastenings are knitted after first moistening them with water, otherwise the fishing line or cord may be damaged or simply not tightened completely. Moisture helps the material fit more tightly, so it is impossible to mount the unit “dry”. Using glue that instantly sets the surface is an unforgivable mistake. Such a knot will break during the first or second fishing trip and fail at the most crucial moment.
Hook with spatula
Many anglers often use eyeless hooks. For example, almost all branded carp hooks are made without it. Let's figure out how to tie a hook with a spade to a fishing line, because the knots provided above will not allow you to do this, with the exception of a universal one.
Never tie a hook without an eye using a Palomar knot.
. If the end of the fishing line is not pulled through the eye, the knot may unravel spontaneously. Tie only using knots described below.
The strength and reliability of such connections have been personally tested by me and I can vouch for the fact that your trophy catch will not be lost
at the most crucial moment. So, let's get started and figure out how to properly tie a hook to a fishing line.
Universal knot for hook without eye
This knot is quite simple, it is suitable for tying hooks with an eye or a spatula
. It is very easy to knit. The strength is quite high and it is not inferior to the Clinch knot. Below you can see a photo illustration of how to properly tie a hook to a fishing line.
Place the edge of the main line parallel to the shank of the hook (if the hook has an eye, pass it through it). Then make a small, loose loop. The working end of the fishing line needs to be wrapped around the forend 3-7 times ( small hooks are tied with 3 turns
).
Lay the line very carefully, making sure that the turns lie close, but do not intersect. Crossing the turns will prevent the knot from being tightened properly.
When you have finished laying the line and are sure that the turns are even, wet the knot and tighten it. Try to pull both sides of the line with the same force
. Usually, the tightened knot is located in the middle of the shank, but it can be easily pulled with your fingers to the blade of the hook.
Please note that if the turns cross, the knot will break at the slightest effort, which is not good. Now the most interesting part - I recommend that you watch a video on how to tie a hook to a fishing line.
Snood node
Hooks without an eye are often tied with a Snood knot, which is excellent for fixations of this kind and purpose. The main advantage of this connection is that it is suitable for thin and medium lines
. Just always remember: the thicker the line, the fewer turns you wind.
It has been proven in practice that you need to use 5 turns and no more.
Now let's move on to the step-by-step instructions:
- Take the free end of the fishing line and use it to make a loop around the blade of the hook;
- Take the hook in one hand and the edge of the line in the other and wrap about 5 turns around the shank of the hook;
- Moisten and tighten the knot;
- Remove excess line.
And again the time comes to watch a video on how to properly tie a hook to a fishing line so that it does not come loose and hangs firmly and securely.