What does donka consist of?
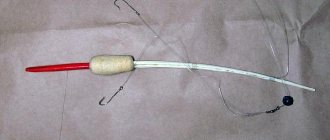
The design of the bottom tackle is extremely simple. The fishing line is wound on a spool or reel, has a large sinker, above which there are several leashes with bait.
The presence of a large sinker is necessary for long casts by hand and holding the bait motionless on the bottom even with a strong river current.
Line for tackle
When casting, significant loads are placed on the bottom tackle, so it is recommended to choose a fairly thick fishing line. The minimum diameter is 0.35 millimeters. Since fishing with bottom tackle primarily involves large-sized trophies, the use of thick and strong fishing line will allow you to confidently catch even large and strong fish.
Sinker selection
The optimal shape of a sinker for a donkey is a teardrop shape, which allows for the longest cast. The weight of the cargo can range from 30 to 100 grams. It should be noted that heavy sinkers are easier to cast, so they are more suitable for fishing in fast-flowing rivers. At the same time, it should be borne in mind that the greater the weight of the sinker, the more noise it makes when entering the water. Consequently, cautious fish may leave the fishing spot for a long time. Therefore, if possible, we recommend using weights weighing 30–50 grams.
Selection of leashes
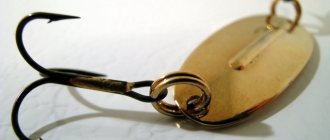
The main trophy when fishing with a donk is a large fish, so the angler must choose appropriate large and high-quality hooks. It is optimal to use hooks with a self-hooking effect; in some cases, even large-sized doubles are used.
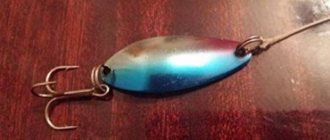
Choosing bait
Bait selection is one of the components of successful fishing. The choice of one bait or another directly depends on the fish you are going to catch and the characteristics of a particular body of water. It is also necessary to take into account the presence of a current at the fishing site. Remember that the best bait will be food that the fish are accustomed to. This is why using expensive feeder attachments on a remote river or lake will not give the desired effect. The fish are simply not accustomed to such a bait, and will refuse to peck at it.
Try to expand the selection of attachments used as much as possible. These can be various cereals, peas, grains, dough or attachments of animal origin. It would be optimal if you use several leashes with different attachments on the donk at once. This way you can significantly increase your chances of catching. Having determined the preferred bait for fish in a particular body of water, you will subsequently be able to catch the largest and rarest trophy specimens.
Yucatan knot
This knot is good for tying different types of fishing lines together. It is named after the Yucatan Peninsula, where it was first used in sport fishing competitions. A good knot option for tying a monofilament or fluorocarbon leash to braid. It is believed that this is one of the strongest knots, its tensile strength is 83% of the strength of the fishing line itself. Many even consider him stronger than Albright, not to mention the rest.
Line FLUOROCARBON Transparent 30 m Helios 310 for 1 piece. Line FC Ultra Fluorocarbon 100 30 m AQUA 115 for 1 piece. Line Profi Fluorocarbon Hybrid 50 m transparent EXPERT 238 for 1 pc. FISHING LINE Fluorocarbon 15 m 100% YGK 580 per 1 piece. Fluorocarbon Hybrid line 30 m transparent EXPERT 111 for 1 pc. Fluorocarbon line DELINE 50 m Hitfish 415 for 1 pc. Line SIGLON FC 50 m fluorocarbon Sunline 707 for 1 pc. Line Carbon MAX Fluorocarbon100% 50 m Yo-Zuri 632 for 1 pc. X-TECH fluorocarbon line 30 m Kosadaka 233 for 1 pc. Line FLUOROCARBON Hybrid 30 m ALLVEGA 175 for 1 piece. Fluorocarbon on a silicone spool 30 m FISHINGLIDER 321 for 1 pc. Line Profi Fluorocarbon Hybrid 30 m transparent EXPERT 177 for 1 pc. Fluorocarbon line 50m (56029) OWFL-50-0.265 OWNER for 1 pc.
Choose fluorocarbon for a leash
We tie the leash using Yucatan:
- Fold the fluorocarbon or monofil in half to form a loop.
- Use the folded line to make a few turns around the thicker line or cord. For monofilament fishing line, 5-6 turns are enough, and the cord needs to be wound 10-12 times. The thinner the cord, the more turns you need to make around it.
- We thread the end of the thick fishing line into the resulting loop.
- We wet and tighten the knot, trim off the excess.
Donk fishing
As a rule, anglers who fish with bottom gear use not one, but several bottoms at once. This allows them to occupy a large area of the shore, which increases the chances of catching.
A donkey reel or a reel with a small spinning rod must be carefully secured to the shore. Since fish can bite sharply and intensely, an unsecured reel can simply be pulled into the water. If possible, it is recommended to braid the fishing line behind bottom snags on the shore or small trees.
When choosing a fishing area, you need to give preference to places without snags and algae. Also not recommended is a rocky bottom, where the likelihood of snags increases. The optimal time for fishing is evening, night and morning. It is recommended to install donks in the evening and check them in the middle of the night.
In most cases, there are no difficulties with casting. It is necessary to swing the heavy load like a pendulum and release the fishing line. Pre-wind the required length of fishing line from the reel and lay it in neat rings. It is quite possible that initially you will have some difficulties with casting, but after a little training you will be able to throw the sinker 50 meters or more.
Using donks with a rubber shock absorber
Many anglers, when using a donkey, have encountered the problem of silent casting. The solution to this problem was the use of special rubber shock absorbers, which made it possible to silently make repeated casts.
Advantages of donks with rubber shock absorbers:
- You can deliver bait to one place you feed.
- Completely silent repeated casts.
- Possibility of the so-called bait game.
- There is the possibility of spot feeding.
- A large number of leashes on the donk increases the chances of success.
Among the shortcomings, it is only necessary to note the fact that the rubber quickly breaks down and needs to be replaced.
This gear consists of:
- Safety line with a cross section of 0.5 millimeters.
- A heavy sinker on a nylon meter leash.
- Shock-absorbing rubber with a length of about 10 meters.
- Lines with leashes at a distance of several meters from each other.
- The main line with a diameter of 0.35 millimeters.
Possible difficulties may arise only when casting the sinker for the first time. In this case, we can recommend that you use a boat that will allow you to silently lower a heavy load to the desired fishing spot. Don’t forget to tie a foam float to a heavy sinker, which will allow you to retrieve the tackle if it breaks. After finishing your fishing, you can safely row your boat to the foam float and take out your gear.
Before you start fishing, you need to properly prepare your gear. A donkey with an elastic band has two reels, one of which contains a fishing line with an elastic band, and the second has a safety rope. It is necessary to place the reel at a distance of 5 meters from each other. Calculate the required number of turns of fishing line that you will need for an accurate cast. It is necessary to lay the turns of the line in such a way that when casting, the upper turns begin to unwind, which will avoid the possibility of tangling the line. Do not forget about the presence of insurance, which unwinds several meters more than the main fishing line with an elastic band.
“Remember that it is necessary to place a fishing line with bait after casting a donkey with an elastic band”
The connection is made using carabiners, and after fishing is completed, the carabiner is unfastened. All you have to do with the help of insurance is to get the cargo out of the water. Store elastic rigs on separate reels. This will ensure its safety and durability.
Recommendations
Try to fish with gear that has retained its original strength. The best choice is stainless steel hooks. Check their serviceability: the reverse hook at the end of the hook, which prevents the fish from breaking away after hooking, must be in place. A hook with a damaged, torn hook must be replaced, because it is of little use.
Use tackle that has retained its original strength. If stored properly (in a dry, cool, well-ventilated place), the fishing line will last for decades. The fishing line on which microcracks or scratches have formed must be replaced.
Do not fish on high rocky shores, in places where the surf is noisy and the water “blooms”. Fishing in bad weather (in stormy or hurricane winds) will not only not bring results, but can also cause damage to your gear. It is highly not recommended to fish in the high altitude and rapid flow of the river. Fishing in a “blooming” reservoir will result in you catching a bag of algae instead of fish.
Leashes that are too long can prevent you from pulling fish caught in an icy lake out of the hole. Leashes that are not occupied by fish often get caught by a hook, and if the ice is very thick and the fisherman cannot reach the hook that is stuck on the other side, then such an incident is fraught with the loss of not only the hook, but also the sinker, since the tackle still needs to be pulled out of the water. When setting the length of the leash, you should not go beyond reasonable limits, otherwise the tackle will begin to get tangled.
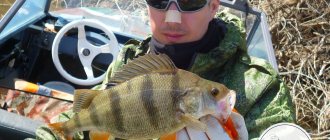
Read Techniques for catching perch with spinners and choosing a location
When fishing in shallow water (for example, it came out in schools) at 1.5 m, it is advisable to place the leashes at a depth of 0.5-0.8 m. Only the sinker will sink into the grass at the bottom, and it does not play any supporting role for the fish, because after diving it becomes motionless.
How to tie a leash to a fishing line so that it does not get tangled, see the video below.
Spinning rods for donkey
Initially, the classic donka was an exclusively hand-made tackle. However, later spinning rods, the reel of which was actually used instead of a reel, became very popular.
With minor modifications, the donkey spinning rod began to be called a feeder. This type of tackle is very popular today and allows you to catch a variety of large fish. The popularity of the feeder is explained by the ease of fishing, the availability of gear and the ability to catch maximum trophies. At the same time, it is necessary to take into account that the feeder is a rather specific piece of equipment, which in unfamiliar conditions on new lakes and rivers may not give any results at all. But in those places where anglers often fish with a feeder, its effectiveness is at a high level.
Using a spinning rod for donkey allows you to significantly simplify the process of throwing bait. In this case, there is no need to use expensive reels, which are necessary for classic spinning. We also note that the process of landing fish has been significantly simplified. If previously, when using a reel, everything actually had to be done manually, then with the use of a spinning rod and reel you can optimally catch even the strongest fish. The risk of fish falling off the hook is reduced, since you can optimally select the line tension when landing fish.
About 50 meters of fishing line with a thickness of 0.3 meters is wound onto the reel. The leashes are attached to the main line using a carabiner, and the heavy weight makes it easy to cast to the maximum possible distance. In total, when purchasing Chinese reels, the total cost of the gear can be several tens of dollars.
Now in more detail about the binding methods:
- The Improved Fishing Knot is the simplest knot, even a beginner can handle it. The two fishing lines are kept level, touching each other, the equipment is wrapped around the main one and held vertically. Its end is pulled into the formed loop two consecutive times. The knot is tightened. All manipulations are repeated with the main fishing line.
- Loop to loop. This method is used to tie a metal cord. The best element for making a loop is a figure eight with a slight nuance. The tip is folded in half. The end loop wraps the body of the cord in half. The tip of the loop is pulled into the first turn. This manipulation is carried out separately on the main line and on the leader line, after which they are connected. The main loop is pushed inside the additional fishing line, then the tip of the additional gear is pulled into it.
- To tie a lead leash using a swivel, it is installed at an angle of 90 degrees to the main line 20 - 30 cm above the sinker installed on it. You can attach a side leash to the main tackle, but to make the lure less tangled, it is better to tie it through a swivel attached to the fishing line.
- Snake knot. The main and additional (leash) lines are folded into a frame. The tip of the main line is made several times around the leash. With the tip of the leader, wrap it around the main line several times.
Read Catching catfish using the liver and attaching bait to the hook
The ends of both ends are drawn towards each other until they are connected through the twist formed. The knot is tightened. The result is a tackle with three tips. If the question arises of how to tie a second leash, the remaining tip of the main line is cut off. And if the question is how to tie several leashes, additional ones can be attached to the main leash using an improved knot or the loop-to-loop technique.
These were the four basic methods for properly tying a leader to a fishing line. Based on the tasks that it must perform at the moment, it is secured. There are many options for tying the leash to the main line. They differ in the complexity of manipulation when attaching and reliability for holding prey. However, it is not necessary to know and apply them all; a fisherman will only need to master a few of them.
Donkeys with a feeder
When casting far, which is practiced when fishing with a bottom, the angler may encounter the problem of baiting fish. How to accurately deliver bait to the site of an abandoned donkey? As a result, the idea was born to modernize the gear, which received a small feeder attached with a carabiner.
Feeder spring
Many fishermen made primitive homemade feeders from small springs. Today, such spring feeders are effectively used for bottom fishing.
The main object of fishing with spring feeders is white fish. Such fish include bream, bream and carp. In rare cases, crucian carp and silver carp are caught using springs. The choice of bait and bait for fishing largely depends on the specific characteristics of the reservoir and the preferences of the local fish.
Feeder container
In specialized stores you can find dozens of different models of feeders, which differ in their weight and shape. They are designed for various fishing conditions and various purposes. However, they are united by the fact that the main purpose of the feeder is to attract fish.
Such feeders are very popular when fishing with a feeder. You can make your own feeder from metal wire and lead. You can also purchase ready-made varieties of feeders in specialized stores. Their cost is not high, but at the same time they are effective and allow you to lure fish efficiently, thereby increasing the chances of success.
Remember to use the same bait on the bait and on the hook. This will allow you to successfully catch even the most cautious and large fish.
Bite alarms for donkeys
Bells
For many years, the most popular bite alarm for bottom rods was a simple bell. It was attached to the sagging main line directly at the reel or rod. We can say that such bells are the best option for gear without a rod.
Electronic bite alarm
As new technologies emerged, mechanical bells began to improve. Special waterproof electronic alarms appeared that emitted a characteristic sound when biting. Also, such alarms were equipped with light indication. The only drawback of such electronic bite alarms is their relatively high cost.
Bells
Bells are a rather interesting version of a bite alarm, which is located at the tip of the fishing rod. The only drawback of such a signaling device is the lack of a bite in cases where the fish, after taking the bait, goes to the angler. In such cases, the bells do not signal a bite, and the line simply sags.
Modernized versions of bells have a special niche for installing light indicators. This will allow you to successfully use them for night fishing.
The tip of the rod as a bite alarm
It is possible to use the rod itself as an excellent signaling device. When a large fish bites, the tip of the fishing rod begins to bend and tremble. At the same time, it should be borne in mind that such alarms are only suitable for daylight hours and require constant attention from the fisherman to the fishing rod.
Donkey rigging
Today there are dozens, if not hundreds of different equipment for donkeys. It is simply impossible to describe them all. Let's focus on the most common and reliable options.
Simple option
Despite its simplicity of equipment, this option is perfect for fishing for the largest trophy fish. In this case, only one node is used, so the strength of the equipment is beyond doubt.
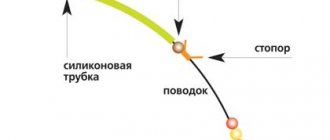
We attach a sliding sinker in the form of a teardrop shape or an olive to the fishing line. To fix the sinker, you must use a silicone clamp. Remember that the stopper must be fixed firmly and rigidly enough. When casting the tackle, a significant load is placed on the stopper, but at the same time it must maintain its position. We can recommend that you use a soft lead pellet, which is clamped on the fishing line, as such a reliable stopper. A hook is tied to the end of the fishing line without a leash. It is also possible to rig it using a leash, which is attached through a swivel.
Equipment with spring
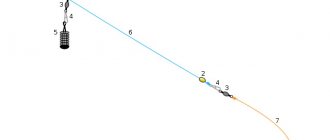
With equal success, a donkey rig with a spring is suitable for fishing with a rod and with hand casting. Equipment with a spring is especially effective when fishing in lakes and rivers with calm water.
The first option is a sliding donkey with a spring. In our case, we replace the sliding sinker of the donkey with a spring. Viscous porridge or peas are easily stuffed into the spring. The choice of bait directly depends on the type of fish and its specific preferences in your pond.
The advantage of sliding equipment is that the fish does not feel resistance when biting, which is necessary for catching cautious and large fish.
In the second version of the rig, short leashes are installed on the spring, which are recessed into the bait located in the spring. In fact, in this case, the bait is used as feeding and bait. The second option is perfect for catching bream and carp. In this version of the equipment, the fish detects itself, and the angler only needs to pull it out of the water. We can recommend that you use braided fishing line with a thickness of 0.1 - 0.15 millimeters for leashes.
If you are fishing in a strong current or there are deep holes and a sharp change in depth, it is recommended to install flat sliding sinkers directly in front of the spring. Such a flat shape of the sinker will not allow it to be carried away by the current.
How to tie a leash to the main line: types of knots
The reliability of attaching the leash to the main line directly depends on the type of knot chosen. Each individual node has individual strength indicators. But in any case, knitting involves minimizing the friction of materials during the tightening process.
There are several proven and easy-to-use knots that even novice fishermen can handle. Let's look at the main node options in more detail.
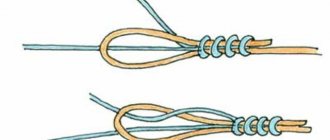
Loop in loop
The “Loop to Loop” connection technique is quick and suitable for different types of fishing. The only drawback of the method is the low final breaking load of the connection (Figure 1).
Figure 1. Loop to loop - one of the simplest knots
The knot is very easy to tie. A loop is formed at the ends of the leash and the main cord. After this, the end of the fishing line with the loop is folded in half and turned twice around its axis to secure it. Next, the loop of the leash is simply inserted into the loop of the main fishing line, and the end of the leash is threaded into its own loop and tightened tightly. The connection is ready, but it is better to moisten the materials themselves with saliva or water before tightening for a more reliable fastening.
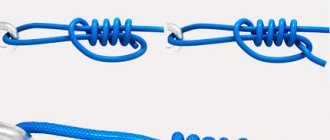
Nail
The “Nail” connection method is considered one of the most reliable, as it is highly resistant to tearing (Figure 2).
This type of connection is recommended for use for materials with the same diameter and density. This will achieve maximum connection strength.
The “Nail” connection is performed step by step as follows:
- A small stop knot is formed on the main line. The leash and the main line are placed parallel to each other, but the leash line should be located slightly lower than the main line.
- Make one turn around the main line with the leash. You need to insert any cylindrical object (about 7 mm in diameter) into the resulting loop.
- Next, the leash is made several turns around the base of the cylinder, and the free end of the leash is threaded along the same object, into the resulting turns.
Figure 2. Knitting pattern for a nail connection
Tightening is carried out as carefully as possible so as not to accidentally damage the location of the loops. After tightening, the long end of the leash is cut off at the body of the knot.
Eight
The Figure Eight knot is ideal for attaching the main line to the leader in the field. This technology is considered one of the simplest, and its tear resistance reaches 80%.
The essence of the method is extremely simple. The main line and the leash are laid out parallel to each other. Using a leash, begin knitting loops in the shape of a figure eight on the main line. As a rule, not one, but several loops are tied at once. The connection is slowly tightened, making sure that the elements of the equipment lie evenly, without overlapping each other. It is better to wet the knot at the final stage of tightening (Figure 3).
Figure 3. Knitting pattern for the figure eight knot
Fisherman's knot
The improved fisherman's knot is another simple type of connection that can be made even in the field. This connection option is suitable for both braided and monofilament lines (Figure 4).
The connection diagram is as follows:
- The main cord and the leash are applied to each other. A leash is wrapped around part of the main fishing line and its end is pulled to the top.
- The extended end of the leash is inserted into the formed loop, but not yet tightened.
- The tip of the leash is wrapped once around the resulting loop, and only after that the resulting knot is pulled together.
Read: Catching burbot with a donk or a line in the fall
Figure 4. The fisherman's knot is one of the best for attaching a leash.
Similar manipulations are carried out with the end of the main cord, forming a mating on the leash.