Stopping unit for a sliding float and everything about it
A fisherman's arsenal includes many floats that vary in weight, appearance and purpose. With “deaf” ones you can catch fish near the shore, and a sliding float is used for long-distance casting.
A group of fishermen revealed the name of the secret bait during interrogation.
Category: regional news.
Purpose and types of stoppers
Sliding floats require stoppers to:
- Determine the required depth of descent for fishing, securely fixing on the fishing line; the fastening should be movable and easily move;
- Pass through the rod guides without interference;
- Do not unravel or “walk” along the fishing line on your own.
Stoppers come in three varieties:
How to increase your fish catch?
Over 7 years of active fishing, I have found dozens of ways to improve the bite. Here are the most effective ones:
- Bite activator . This pheromone additive attracts fish most strongly in cold and warm water. Discussion of the bite activator “Hungry Fish”.
- Increased gear sensitivity. Read the appropriate manuals for your specific type of gear.
- Pheromone -based lures .
- Thread - easy to install, but require constant tightening of the knot;
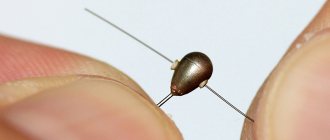
- Rubber or silicone balls or nipple pieces are available for different diameters of fishing line, which should be passed through them twice;
- Locking units are mounted at the fishing site when preparing equipment.
We knit stopper knots
When tying knots, be sure to wet the line so that when tightening it does not burn out from the frictional force of tension.
There are several types of tying stopper knots for a sliding float. Let's look at the 2 simplest ones:
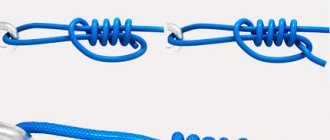
Single stop knot
To tie this knot, you need to make a loop from the fishing line for the stopper, which is placed on the base fishing line. Then thread it through the loop and make 6-8 full turns around both lines. Tighten the knot. Cut off the rest, but not too short, leaving 3-5 cm tails.
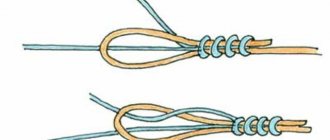
Kremkus – double knot-stopper
Fold the stop line in half and make a few turns around the main line. The next step is to form a loop around which the ends of the fishing line wrap. The knot is tightened, the excess ends are cut off. This type of knot is thicker and holds better.
The remaining ends of the fishing line should not be cut off too much; long tails slip through the rod rings more easily than short, rough ends sticking out to the sides.
Video instructions for tying knots
We bring to your attention video instructions for tying another type of locking knot. You can clearly see how easy it is to tie a simple Clinch stopper knot. Practice tying this knot with your instructor, and you won’t have any problems while fishing.
What is the best material to knit stopper knots from?
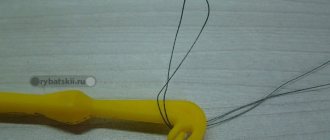
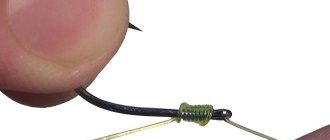
Among fishermen, a locking knot for a sliding float, mounted using a thread with beads, has proven itself well. In this case, the line is pulled through the tube and the stopper is tightened. For better visibility, the threads need to be chosen in bright, contrasting colors; visibility and clear movements along the fishing line are the advantages of this type of stopper. Sometimes the thread can slip or unravel on its own, which is a significant drawback.
Please note that even the best quality stops can slip, so get a waterproof felt-tip pen to mark the length of the trigger. The knots do not cut into the float gear, so the likelihood of slipping is low. A big plus of knots is that they can be tied while assembling fishing equipment without prior preparation. Every fisherman should have a technique for tying stopper knots.
How to tie a spinner to a braided line
When using braid, novice anglers and professionals use several types of knots. In order to carry out each of them smoothly, it is advisable to consider the popular ones separately.
Knot "Palomar"
The terminology “Palomar” means a simple and at the same time reliable knot, which is perfect for all types of braiding. A distinctive feature is the maximum permissible load - up to 10 kilograms. The disadvantage is the significant shortening of the leash due to the folded line. To do it, you need to follow the following sequence of actions:
- Initially, the fishing line needs to be folded in 2 layers. After this, it is pulled through the eye of the spinner and form the first loop.
- Next, you need to pull the loop out of the existing knot so that in the future you can throw it through the bait without any special difficulties, followed by tightening it tightly.
- At the final stage, you need to trim the remaining line at the free end.
In the case of using the Rapalovsky knot, anglers are able to provide complete freedom of play with the chosen bait. The sequence of actions for tying is as follows:
- Initially, you need to form a simple knot on the fishing line you are using.
- At the next stage, you need to pass the end of the fishing line on the loose side of the knot through the eye on the bait and return it inside the loop again.
- After this, the free end must be made at least 5 turns around the main line.
- At the next stage, it is necessary to return the initially formed loose knot back inside, and then immediately thread it into the newly formed loop.
- After this, the knot is tightened as tightly as possible, having previously been moistened or treated with specialized glue. Don’t forget to cut off the excess line at the free end with household scissors.
The only drawback of the method is considered to be a slight decrease in strength indicators. However, this does not have a significant impact on efficiency.
Tie the spoon to the Double Clinch knot
An additional method is the “Double Clinch” , which means a simple and at the same time strong knot with increased efficiency indicators. As a result, this makes it multifaceted and versatile at the same time. The sequence of actions is not difficult and involves the following steps:
- Initially, you need to thread the fishing line into the ring, which is located on the edge of the bait, without tightening it, as a result of which the first loop is formed.
- You need to perform several turns. As a consequence, the action forms an additional loop.
- The fisherman pulls the end of the fishing line through several previously formed loops and then tightens it. It is not recommended to forget to moisturize or apply glue.
The key advantage of the method under consideration is considered to be ease of knitting, as well as the ability to withstand a load of up to 10 kilograms.
However, there is also a drawback - the inappropriateness of using baits with wide ear diameters. Spinning for beginners, assemble a spinning rod and tie a leash
How to increase your fish catch?
Over 7 years of active fishing, I have found dozens of ways to improve the bite. Here are the most effective ones:
- Bite activator . This pheromone additive attracts fish most strongly in cold and warm water. Discussion of the bite activator “Hungry Fish”.
- Increased gear sensitivity. Read the appropriate manuals for your specific type of gear.
- Pheromone -based lures .
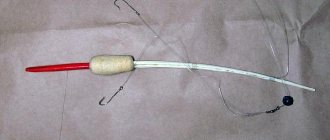
The next step is to put on the sliding feeder, it looks like this
, and after 5-7cm. the next bead (by the way, I make the feeders myself using a device, so as not to waste money). And we continue in the same spirit: bead-swivel-bead-feeder-bead, etc. until you get a garland like this.
We knit a stronger swivel at the other end of the garland to attach it to the main fishing line. Now it comes to knitting hooks. You can prepare leashes of various lengths and knit them through a loop to the swivels; I prefer to knit directly to the swivel. It’s more convenient for me, but everyone has their own habits, the choice is yours. This is what happened
I know from experience that leashes should have a length of 4 to 7 centimeters, but there are cases when leashes can be much longer, although the possibility of getting them mixed up increases significantly.
I use soft fishing thread to tie the hook. Its advantage is obvious: it is soft, does not scare the fish, is quite strong, and fits perfectly.
That's all. We hide the “killer” in a container (if anyone is interested, I can tell you how to make it).
There is also a “killer” option, two larger feeders. I usually use it when catching larger fish, such as carp, carp, where a larger amount of bait is required so that it works longer.
Now about the advantages of this gear:
- The sinker can be changed almost instantly, unfasten, fasten and you're done. Change the weight of the sinker depending on the fishing conditions - current, depth, wind, etc.
- The most important thing is the sensitivity of this gear. Having taken the bait, the fish does not pull the feeder, but chooses the free supply of fishing line (thread) that is between the feeders without feeling the resistance of the weight of the sinker and feeders and is not afraid. Self-cutting occurs when the supply of fishing line (thread) reaches the bead above the hook attachment. Before self-hooking, we can observe the most careful bites and make a hook in time.
Another piece of advice is that the feeder should be filled with groundbait, which is quite loose and washes out well. More viscous bait such as “plasticine” is used under other fishing conditions, for example, “nipple” when it is necessary for the bait to remain in the feeder for several hours.
A catchy combination
When two completely different methods are combined, sometimes something surprising happens. In this case, we will talk about a combination of streamer fishing and the Dropshot method. This combination is very productive when fishing for pike perch.
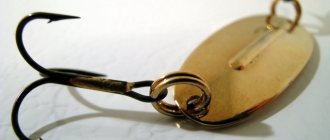
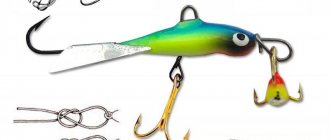
This is how you mount a streamer on a leash
The Dropshot rig for streamer fishing is made from a piece of monofilament fishing line about 30 cm long and 0.20 mm in diameter. A swivel is tied to the upper end, with the help of which the equipment is connected to the main fishing line. At the lower end of the leash, a swivel with a clasp is installed, from which the sinker is suspended. Before tying the swivel, a streamer is attached to the middle (or slightly lower) of the leash, tied on a hook No. 6/0 or No. 7/0. For successful fishing, it is necessary that the fly departs from the fishing line at a strictly right angle. Therefore, the streamer is clamped on the sand between two rubber beads. The fishing line is threaded through the first rubber bead two or three times. In this case, the bead will sit firmly on the fishing line. Then a streamer is put on the fishing line, after which a second bead is placed, which is also secured with two or three turns of the fishing line. The beads are moved together so that they clamp the streamer hook ring. For greater confidence, you can mount one more crimp tube above and below the beads. Then the streamer will remain in place between the two beads even after a powerful bite.
Dropshot is now increasingly preferred when fishing with artificial lures. Fishing with a streamer is from the field of fly fishing. In search of a way to catch pike perch with a streamer at great depths, I combined these two methods, since depths of more than 6 m seem to me always questionable for casting a fly with fly fishing gear. For fishing with a streamer, I make my own equipment. The leash is approximately 30 cm long. The streamer is located in the middle of the leash or slightly lower. If you want to vary the depth of the bait a little more during fishing, a special sinker is mounted at the end of the leash. The fishing line is pinched into it and can be moved if necessary. Most often I secure the sinker motionless on a swivel with a clasp at the end of the line. At the same time, I rely on that. that the streamer is always at the correct distance from the sinker.
Stay on the bottom
Fishing with a streamer on a Dropshot rig is somewhat different from regular vertical fishing for pike perch. The rig is lowered under the rod tip. When the sinker reaches the bottom, it is not lifted immediately, as when fishing in a plumb line, but is held at the bottom for some time and made sure that the line is taut. Then the line tension is slightly reduced, but not so much that the line sag. This slight change leads to the desired action of the bait when fishing with a streamer, especially when using monofilament line. The streamer can rotate under water and shrink and fluff with pulsating movements. At the same time, it seems that the fly is hovering above the very bottom. Her slight movements are quite enough to tempt the pike perch. The measured movements of the bait floating in the water is the secret of the catchability of the equipment.
The slower the better
Moving the streamer too quickly can ruin your best chance of getting a bite. If a bite occurs, it is much harsher than with conventional wiring. In order for the line to be properly tensioned, the sinker with this method must be quite heavy, several grams more than is usually used when fishing vertically. In this case, the rig will be more sensitive, and the sinker will not overload the bait, since it is located below it. No matter how much the equipment for the Dropshot method differs from other equipment for fishing with artificial bait, special equipment is not required for this. You can easily fish with the same rods and reels that are usually used for vertical or casting walleye. Therefore, you can try this combination in action without extra costs and effort - it’s worth it!
The best knots for fishing line
Experienced fishermen recommend the following methods:
Universal
— these knots are knitted easily and firmly, and withstand active resistance and shocks of the predator when fishing.
Step-by-step instruction:
- Thread the line through the eye.
- Make a loop from the free end.
- Make 4-5 revolutions.
- Thread the remaining end into the loop, moisten and tighten.
Simple
- they are easy to knit and good for beginners, but the downside is that they are not suitable for all types of fishing line.
- Pass the fishing line through the eye and connect it to the main line.
- Make 7-8 turns.
- Insert the end of the fishing line into the window between the spoon and the fishing line.
- All that remains is to secure the knot; to do this, pull the end through the formed loop.
- Dampen the remainder and trim off the excess.
Deaf
— the bait plays and moves well, but the knot requires a high density of fishing line.
- Take the fishing line and tie a simple knot in it.
- Pass the tip through the eye of the spoon (leave at least 10 cm).
- Then insert the end into the middle of the first knot; it should be brought out above the main fishing line while slightly pulling it together.
- Insert the tip into the hole between the curls.
- Wet and tighten the knot tightly.
Self-tightening or tight loop
— this knot allows the lure to move easily and does not hinder movement during animation.
- Make a loose knot in the fishing line.
- Thread the end into the hole of the bait.
- Pass the tip through the loop and do 6 - 8 twists.
- Thread it through the loop again, moisten and tighten.
Homer
- reliable and universal fastening.
- Thread the fishing line into the eye of the bait, leave 10 -12 cm, form a loop.
- Wrap the tip of the main line and make a simple knot.
- Using the tip of the fishing line again, make 5 - 6 turns around the main line.
- Pull the end through the first loop, moisten and tighten.
- Trim off excess.
Grinner
- a simple and reliable unit, it is universal, and can withstand a lot of weight.
- Thread the line through the eye of the bait and make a loop.
- Wrap the main line over the top and bring the end through the resulting loop.
- Again, with the remaining end, wrap the main line with 5 - 7 turns.
- Moisten and tighten the knot.
Lindemann
- a strong knot, which is mainly used on monofilament.
- Pass the line through the eye of the spinner 2 times, you should get a loop.
- Then do this again to make a double loop.
- Insert the end through the loop and make 4 - 5 turns.
- Moisten and tighten the knot.
Often, on a spinning rod, they use braid to tie spinners to it or a cord to a leash; the following knots are more popular:
Palomar
- also suitable for monofilament, durable and reliable, can withstand a weight of 10 kg. It comes in different complexity: standard, double, triple. They quickly and conveniently tie a leash to a braided line.
Standard
- take the end of the cord up to 30 cm in size and fold it in half, then pass the resulting loop through the eye of the spinner. Take the bait and insert it into the loop. Tighten and press the tip.
Double and triple palomars require larger eye diameters, since the cord will be passed through them six times.
The Rapal knot is used to attract an inactive predator. It allows the spinner to play freely with any retrieve.
Clinch
- has many variations. Used on bait with a small eye, for tying leads and connecting to swivels. We'll tell you how to properly tie a spinner using a single improved clinch.
- Thread the swivel through the end of the line.
- Wrap it around the main line.
- Make 4-5 turns.
- Thread the end through the loop that your swivel goes through.
- Wet the line, tighten and cut the tail.
Read DIY boat motor
A simple clinch is tied, but for an improved one, you need to thread the end into the last resulting loop and only then tighten it.