Table of application of knots and their strength
| Knot/Fortress | Knot/Fortress | Knot/Fortress | Knot/Fortress | Knot/Fortress | |
| Line to line (leash, braid) | Fisherman, waterman 75% | Grapevine, 80% | Centaurus, 85% | Nail, Albright, loop to loop, 90% | Surgical, weaver, clew, 70% |
| Fishing line with hook | Palomar, double palomar, blood, 80% | Uni knot, 75% | Sheet, 70% | Snud, regular leash, 95% | Sliding snood, loop, stupid leash 90% |
Albright node
When fishing, an Albright knot is often used. In most cases, it is used when fishing with spinning rods. The technique is performed like this: one line is folded into a loop, and the second needs to be pushed into it and twisted 5-10 times.
Next, you should push its end into the small loop that remains. After which the knot is tightened and you can start fishing. This method is very popular among fishermen, because even when tying thin lines, it retains good strength.
How to tie fishing line to fishing line
The simplest knot. You will need two fishing lines, preferably braids:
- lay side by side, one to one;
- make a loop up to 7 turns around the fishing line;
- shape into a knot, tighten;
- trim off unnecessary ends.
Thus, the main and auxiliary lines are connected, or fixed to each other.
Fisherman's knot
The best fishing line is braided. Monofilament slips a lot and you shouldn’t even experiment with it. For the bundle:
- align the ends of 2 braids;
- make a loop of 8-10 cm at the base of one fishing line, which is thinner;
- pass through the previous line around the circumference;
- twist up to 5-6 turns on a thread from a thin fishing line around the one that is thicker;
- tighten the connection or the place where the knot is formed;
- pull the end of each line one by one;
- fix the knot;
- trim off excess ends. The fishing knot is ready.
A more advanced fishing knot can be made from braided wire to avoid breaks:
- connect 2 fishing lines to each other;
- twist one around the other, forming a loop;
- with the fingers of one hand, take the 1st loop received;
- pull the free end up;
- skip the first loop behind the second;
- repeat the steps with another fishing line;
- Pull the loose ends and tighten the knot.
Vine
Suitable for tying two lines or tying a hook. It is considered a fairly strong knot, unlike, for example, a “fisherman’s” knot, but is not suitable for tying connections of 2 lines of different diameters. The knot will look weak. Only monofilament thread is suitable for use. Output strength is 80%. The number of turns must be made taking into account the thickness of the fishing line. The thinner it is, the more revolutions you need to perform, up to 8. Grapevine for tying two fishing lines. Installation:
- fold 2 fishing lines together;
- bend the end of 1 fishing line back;
- take the fold with your fingers to make a loop;
- pull one end to both lines;
- make 5 turns inside the resulting loop;
- take the ends of the fishing line with your hands on which the knot is made;
- pull in different directions;
- tighten into a single knot;
- the same must be done with the 2nd fishing line;
- pull the long ends of both knots;
- trim off excess edges. The “Grapevine” knot is usable.
Centaurus
For tying a spinner, sinker, hook to braided or monofilament, regardless of diameter, Centaurus is the best universal knot. Tensile strength – 85%. Sequence of work:
- take a hook with a ring into which to thread the fishing line;
- pull the end of the main line to the hook, winding it 2-3 times around the main line;
- pull the short end;
- tighten the knot tightly.
This is the best and most durable knot among all known. You can make the following version of the knot with both monofilament and braid:
- take 2 fishing lines. You can use different diameters;
- wrap one around the other up to 5 times;
- First insert the wrapped thread inside the first fishing line;
- tie both ends of one thread;
- carry out similar actions with another fishing line;
- pull the long ends, tighten 2 knots;
- trim off excess. The Centaur node is ready.
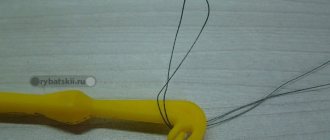
Nail
As a knot it is suitable for firmly tying two lines of different thicknesses. Braid is suitable. The output is a fairly compact unit. To make it you need:
- pick up any object in the form of a tube like a nail to obtain this node;
- place two lines parallel to each other;
- lean the pipe against the first line;
- wrap around up to 10 turns, thereby connecting the tube with the first fishing line;
- stretch along the tube;
- pull both ends of one thread to obtain the first knot;
- carry out the same actions with the second fishing line;
- pull the long ends;
- pull the nodes towards each other;
- trim off excess edges.
Scheme:
This is a good knot if you have braided lines of different diameters, and you can connect a fly fishing line in this way to an extension cord or to a leash. As an alternative, you can use a thick needle instead of a nail.
Water
This is a simple knot and beginners will quickly learn how to do it. You can use either braided or monofilament line. The knot is suitable for fishing in winter if the main line breaks:
- place the fishing line on the panel;
- take with both hands and turn clockwise to form a loop;
- holding the double end with one hand, thread the short end into the loop with the other hand;
- make a turn around both lines;
- tighten the knot by pulling the long ends in one direction and the short ends in the other;
- trim unnecessary edges to avoid tangling.
Scheme:
Surgical knot
This knot is more often used to attach a leash to a fishing line, rather than for the purpose of quickly securing two fishing lines. According to the principle of knitting, the knot is similar to the “water” knot. You can use braid or monofilament. At the break it will be up to 70%. Knitting sequence:
- Place 2 fishing lines parallel to each other;
- form a loop from both at once;
- skip the loop, making 2 turns around the circumference;
- moisten the resulting node;
- pull off.
This is a quick, easy and reliable way to tie two lines together to connect them together.
weaver's knot
Also suitable for attaching a hook to a fishing line:
- thread the line through the hook or eye;
- make 1 turn with the tip of the thread around the axis;
- return to original place;
- tighten the knot.
Thin synthetic fishing line is not suitable for tying, although the knot is simple and quite strong. You can tie a hook to a shoulder blade in this way.
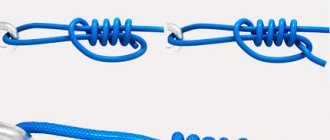
Albright node
Albright is more applicable when fishing with a spinning rod for the purpose of connecting fishing line and leash, also when it is necessary to obtain high sensitivity of the tackle for balancing. Albright is a fairly popular knot, done as follows:
- cross 2 fishing lines with each other;
- make a loop at the cross point;
- pass 1 end of the fishing line through the resulting loop;
- wrap around yourself and the loops up to 10 times;
- thread through a nearby loop;
- moisten the end of the fishing line with water to ensure a strong connection;
- tighten and trim the edges.
The strength of the knot is high even when made from thin fishing line. You can also lengthen the leash in this way.
Loop in loop
It is more of a connection than a node. Used with monofilament line.
- fold the thread in half;
- wrap the tip of the second thread around the resulting ring from the first thread several times;
- fix the loop by bringing the tip of the thread into 1 turn.
So fasten 2 monofilament fishing lines or attach a leash by inserting the tip of the thread into it.
How to make for different types of fishing
Each fishing method involves the use of its own variants of loops and for different purposes. But there are no ways in which loops could not be used.
For spinning
Attaching spinning tackle to the main line cannot be done without loops. Even hard leashes with spinners are attached in this way and are also easily replaced.
Loops also work well when using a retractable leash. True, swivels have recently become fashionable, but many people prefer to knit the fastenings themselves the old fashioned way, without relying on more complex designs.
For a float rod
The loop here is necessary for attaching the leash. At the same time, you don’t need to think that leashes are used so that the fish is not afraid of a thick, visible fishing line. Most ichthyologists today are inclined to think that fish do not connect bait and fishing line together. But a leash is indispensable when hooking or fishing for large predatory fish, which can bite through the main line in the absence of a leash.
In float fishing, loops are actively used for fishing with two hooks. This way you can experiment with different attachments or hook sizes.
For the donkey
Here, so-called asymmetrical and symmetrical loops are used for feeder fishing. The principle of their operation is based on the fact that the feeder and bait do not get tangled and are at a certain distance from each other. First, one large loop is made from the main fishing line, and leashes are attached to it to the feeder and hook with bait.
For winter fishing
Loops on the fishing line are rarely used in this type of fishing. But some fishermen specifically thread the jig into the loop during reelless fishing in order to improve the performance of the rig.
3. We pass the end of the fishing line into the resulting loop (we get a knot)
In many types of fishing it is necessary to make a loop on the fishing line. Loops are used in various types of fishing equipment and rigs. The main advantage is that even a novice angler can easily make a loop on a fishing line of any diameter. This unit is extremely simple and reliable.
Another important advantage of the loop is its versatility. Having tied the loop, you can attach a leash or main line to it. Alternatively, you can connect two fishing lines using the loop-to-loop method. Using two loops of fishing line, you can create swivel joints, which is often used in feeder and marine installations.
Let's take a closer look at the diagram on how to make a loop from fishing line
1. Fold the fishing line in half to form a loop
2. We wind the end of the loop to form a ring
3. We pass the end of the fishing line into the resulting loop (we get a knot)
4. Once again we pass the end of the fishing line into the formed loop (we get a double knot)
5. Tighten the knot evenly and cut off the excess end of the fishing line
And using the same principle we make a loop for the leash.
Next, we tie the leash to the main fishing line by connecting two loops.
This knot is also known as the surgeon's end loop and is widely used in float, spinning and bottom rigs.
QUESTION: How to tie a side leash to the main line?
Knots for diverting leash to fishing line
You cannot do without such knots if you need to tie a leash to a fishing line. Here are the best options:
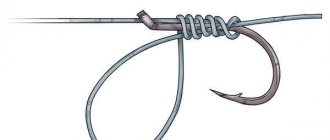
Bloody Knot
A universal bloody knot, simply irreplaceable if you need to tie hooks or a spatula when fishing with a spinning rod. You can use monofilament or braid, or in combination: braid and monofilament, just make 3 turns. The strength of the fishing line is maintained up to 75%, and if the fishing line is thin, then you need to make a larger number of turns (up to 7-8 times):
- take 2 fishing lines of the same diameter;
- pass the tip of the thread through the eye of the hook or around the shank;
- make a loop from the fishing line, holding it with your hands;
- make 5 revolutions around the forend with the free end;
- press the fishing line to it, while trying to ensure that there is no intersection of the turns with each other and they are located exactly 1 opposite the other;
- make a twist with your right hand;
- pull the free end of the thread into a coil;
- moisten and tighten the edges of both ends of the fishing line at once;
- if necessary, move the resulting knot to the eye or blade of the hook;
- Tighten well again.
To install a bloody knot, braided or monofilament is suitable. Tensile strength reaches 70%. The knot can be used to tie a leash to a bottom (float) fishing rod, and also to tie together two different fishing lines: braid and monofilament.
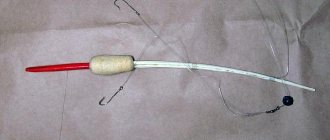
We tie the side leash through the swivel
How to tie a side lead to the main line? When installing a diverter leash, the sinker is placed at the end of the main (usually braided) fishing line, and the leash is tied to it 15-30 cm higher. The lateral diverter leash does not hang parallel to the main fishing line: it is located perpendicular to it at some distance. Thanks to this, the equipment gets tangled much less frequently when casting and when retrieving the bait.
The side lead can be tied directly to the main line with a suitable knot, but it is better to use a fastening through a swivel: with this installation option, the likelihood of tangling the equipment is reduced to almost zero.
Installation of the “bend” through the swivel looks like this::
- A swivel (2) is attached to the main line (1).
- At the end of the main line there is a sinker (3).
- A retractable leash made of monofilament or fluorocarbon with a hook at the end (4 and 5) is attached to the second eye of the swivel.
There is also an alternative reliable way of tying a diverter leash without a swivel , in general, watch the video.
How to tie a leash to a cord or fishing line
To tie the leash to the main fishing line, the steps are simple and even a beginner can do it. But the result is a reliable and easy to untie knot. You can do it like a “surgical” one, tying it in a simple way, stepping back from the edge of the fishing line up to 25cm. Further:
- fold the end of the fishing line in half;
- pass through the resulting loop;
- tighten.
The folded end of the thread should form a loop. To attach the main line to the leash, you need to pass the free edge of the leash through the loop.
Loop in loop
It is made as follows:
- fold the main line in half;
- tie a regular knot at the fold to make a loop;
- at the end of the fishing line, trim off the excess ends;
- make the same loop on the leash;
- tighten the knot.
In the same way, you can tie a swivel, attach a fishing line to a leash using a carabiner, or simply thread the loops through the swivel ring. The device allows you to quickly change hooks as needed. A fishing line or fluorocarbon will do.
To perform a simpler and stronger version of a loop in a loop for the purpose of attaching leashes and other metal devices (hooks) you need:
- step back on the main line 8 cm from the edge;
- bend the measured size back;
- attach another thread so that you get 2 threads that do not intertwine;
- moisten the fishing line with water to make the connection stronger.
The result should be a loop of sufficient diameter so that your thumb can easily pass through.
Blitz tips
- To tie the leash to the fishing line, you can use a simple loop-to-loop method.
- To prevent the main line from tangling with the leash , it is recommended to use swivels with carabiners.
- Swivels with carabiners can be tied using a fixed knot.
- It is possible to attach up to three leashes to the main line .
- To tie three leashes , it is better to use a “snake knot”.
- For the “snake knot” it is better to leave long ends of fishing lines and leashes if you plan to attach two additional leashes.
- Each knot has its own specific strength (a list of all knots given in the article indicating their strength will be given below).
- Absolutely everyone, even the most inexperienced fisherman, can cope with any knot. The main thing is patience and perseverance.
- A correctly tied leash to a fishing line plays a huge role in fishing: if the connection between the gear is weak, then the fish can easily tear it off and leave with the hook.
- Each knot, having its own specific strength , at the same time partially weakens the fishing line and somehow increases the chances of breaking by several percent.
How to tie a hook to a leash or line
For tying a hook to a fishing line or leash, the following knots are suitable: figure eight, bayonet, step, roller, salmon, tuna, blind. To get a simple version of the node you need:
- make a loop at the end of the fishing line and leash;
- pass the tip through the eye of the hook;
- throw around the circumference to obtain a blind loop.
Double palomar
Palomar is a well-known knot among fishermen for tying a hook or spoon to a fishing line. Braided thread is rough, so it is not suitable for knitting. Although sliding fishing line can be used if necessary, tied to a swivel, hooks or monofilament. For light knitting, it is better to use monofilament while maintaining the tensile strength of the fishing line up to 80%, and you should not use a thick thread, it is better to use a medium in diameter. For production:
- fold 2 threads parallel;
- tie a knot from the first braid;
- bend the tip parallel to the other thread;
- insert into the eye of the hook, holding the resulting loop;
- weave with leading braided thread;
- wrap around 3 times;
- insert the hook into the loop;
- wet the knot;
- tighten, trim the excess ends of the braided thread with scissors.
Uni knot
To knit this knot you need to practice a little:
- pull the braided line through the eye of the hook;
- make a loop;
- wrap the end of the braid around the main line 2-3 times;
- make a second loop;
- pass the end of the fishing line through the 2nd loop;
- make up to 7 turns around the double line;
- moisten the braid;
- trim off excess edges with scissors.
The Uni knot is best used when the fishing line is at least 60 cm long.
Shkotovy
The knot is designed for tying a hook and fishing line. Tying - step by step:
- thread the fishing line through the hook (eye);
- make 2 turns around the forend;
- moisten and tighten the ends.
In this simple way you can quickly attach a hook to a fishing line.
Knot Snood
Snood is a universal knot for tying a shoulder blade or hooks. Both braided and monofilament thread are suitable. The output strength reaches 95%. For knitting:
- take the hook with the sting of everyone with your left hand;
- make a loop;
- attach to the hook so that the tip moves towards the sting or pass through the ring;
- hold the edge of the loop near the ring of the shoulder blade with one hand;
- make turns with the other hand, winding it around the fore-end near the bend 2-3 times;
- throw a loop;
- Pull the long end of the line while holding the hook with your other hand.
Sliding snood
To tie this knot, there is no need to use the end of the fishing line; you can make a knot anywhere, which will become indispensable if you want to connect a hook, for example, with monofilament. Output strength. quite high. Moreover, additional fishing line can be used as fastening. So, for installation:
- take a piece of cord with one hand;
- with the other hand - a hook with the fore-end bent upward;
- make a loop from the cord, attaching it to the fore-end so that the tip points towards the sting;
- make 3 turns around the forend;
- attach working thread;
- make 2 more turns;
- tighten by pulling an additional loop;
- trim off excess ends.
Sliding snood
Loopy
To tie this knot, it is necessary to take into account that the main line must be tight. The method is suitable if the hook does not have an eye or for connecting the leash to the fishing line. The knot is quite reliable and the degree of strength will depend on the number of turns made around the main thread. For work:
- pull the end of the fishing line through the eye of the hook or ring of the leader
- place the loops along the ring, holding with the fingers of your left hand
- with your right hand, wind the free end up to 7 times
- thread the end of the fishing line into the resulting ring
- pull and tighten the knot.
Palomar
This is the most famous knot among anglers and is best suited for monofilament. The braided thread, due to its roughness, will not tighten the knot tightly. Tensile strength – 80%. Thanks to Palomar, you can tie a hook to a fishing line or a spinner to a fishing line. So, for installation:
- fold the fishing line in half;
- pull the resulting loop into a ring of another fishing line folded in half;
- tie a ring around the circumference, making several turns;
- take the hook in your right hand, and both ends of the fishing line in your left hand;
- place the end of the loop over the shank of the hook;
- tighten the knot in this way;
- trim the ends. The Palomar knot is ready.
Blood
This is a simple knot for tying a hook, despite the terrible name, when sailors used to tie the knob in this way to a whip, which they used to beat slaves, leaving bloody marks on their backs. You can attach a sinker, jig, hooks, or spinner to the monofilament line. Tensile strength – 70%. If you have a monofilament thread with a cross-section of no more than 0.6 mm and a metal leash, you can use a locked blood knot. Tensile strength – 80%. For work:
- pass the line through the eye of the hook;
- wrap the tail around the circumference of the forearm up to 8 times;
- insert the tip of the thread through the resulting loop turns;
- make a knot, tighten;
- trim off excess ends.
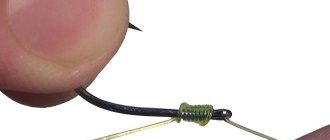
Stupid leash
A monofilament thread or braid of average thickness of 0.2-0.3 mm is suitable. This leash is similar to a simple leash, but its name is not as stupid as it seems. The point is that the winding should be carried out not inside, but outside the monofilament. Eventually:
- insert the tip of the cord between the winding and the forend;
- tighten the knot and move it to the eye of the hook;
- trim off excess ponytails.
The silly leash is ready.
Regular leash
This is a good strong and versatile option for tying two thin monofilaments or fishing line to the eye of a hook or spatula. Tensile strength – up to 95%. If there is a bent ring on the hook you need:
- pass the fishing line through it, bringing it to a bend;
- turn towards the ring to form a loop;
- make 7 to 10 turns around the hook with the end of the main line;
- take the fishing line by the ends;
- pull in different directions;
- tighten the knot.
Using swivels, carabiners and clasps
When using swivels, carabiners and clasps, it is best to use a knot called the Improved Clinch . The strength of this unit reaches 95%. The process of knitting it is not difficult:
- The free end of the fishing line must be threaded through the swivel of the leash.
- Now we wind the line around its axis 5-6 times, but it’s too early to tighten the knot.
- Now it needs to be threaded through the hole that has formed near the swivel ring.
- Now you can wet it and tighten it using the classic method.
It is very important to correctly tie the swivel itself to the fishing line:
- We thread the swivel.
- Part of the leash folds in half.
- The folded part is folded in half again.
- Before reaching the bend 2 cm, you need to fix the fishing line with your hand.
- Now 3 turns are made around the fishing line.
- A double fishing line is threaded into the resulting loop at the end of the leash.
- The knot can be wetted and tightened.
- Trim the remaining line.
This is a fixed type of knot.
To tie a carabiner, you must perform the following steps:
- You need to hang a weight on the end of the main line.
- The leash should be tied approximately 20-30 cm above the load.
- Now you can attach a swivel with a carabiner to the main fishing line and attach a leash to it.
To fix the fastener, use the following method:
- The cord folds in half.
- A loop is formed that passes through the clasp.
- Next, you can knit the fishing line with an ordinary knot.
- It is very important that the hook is located inside the loop.
- Now it is passed through the top of the loop and tightened.
This latch fastening is very reliable.
How to tie a fishing line to a fishing rod
For tying fishing line to a fishing rod, a connector is the most profitable option, but you don’t need to choose from cheap models in stores. It is worth paying attention to the lock, which should not have easy movement. It takes some effort to move. Requirements for the nozzle - full compliance in size with the whip or the tip of the fishing rod, smooth surface, absence of burrs to avoid rapid chafing of the fishing line, fairly tight fit in the fishing rod or along the surface of the circle.
Using a connector or blind attachment
Stages of work:
- make a loop at one end of the fishing line, without tightening it too much;
- attach a hook or leash with a sinker to the other end of the fishing line;
- open the connector lock;
- loop the hook, pull the edge slightly;
- secure the resulting structure with a lock.
Use plastic connectors, but not too fragile ones that will break quickly. The most reliable are metal, but over time they become rusty from water. Although due to them you can quickly and easily change equipment.
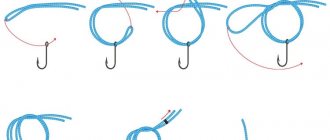
Blood Knot for tying the leash to the main line
It is used to tie fishing lines of different thicknesses.
Take the two ends of the fishing line and connect them to each other. Loop one end of the line around the other. It is necessary to make at least six careful turns, then return to the beginning of the winding and thread the end of the winding end between the fishing lines. Then we wind the second end of the fishing line around the first. We return to the beginning of the winding, stretch the end between the fishing lines. The knot is ready, all you have to do is tighten it.
A very strong knot and great for tying fluorocarbon line to monofilament or braided line. The games being linked can have completely different diameters.
Shock leader knot “carrot” – a knot for a shock leader
Used to tie monofilament to shock leader.
Start by tying a simple edge knot on the monofilament thread. Pull the braid into the middle of the knot. Tighten the knot all the way, leaving about 15 cm. Make about 8 turns, bring the end of the line back and pull it between the two lines. Pull the braid into the loop formed, moisten it and carefully pull it off. Pull the lines in opposite directions.
Suitable for tying fishing lines of different diameters. You can also use it when tying a fluorocarbon leader to a fishing line.
Detailed article about this node.
Additional Information
I'm sure you learned how to tie a leash to the main line thanks to my article. But there are some moments in it that I worry about. For example, what if you don’t know how to knit a Figure Eight knot or don’t know how to crochet a crochet hook correctly? Therefore, to be sure that my article helped you understand the issue completely, I will also add information about tying hooks and the Figure Eight knot.
How to tie a hook to a fishing line
I think that the site ryba4ok.ru is simply obliged to show you the most reliable and simple ways of tying a hook to the main fishing line or leash. I often notice that fishermen, especially beginners, tie their hooks with a regular knot. This is very unreliable and can end badly, especially when biting large fish.
To be sure that my readers know how to crochet correctly, I am posting this video. My personal recommendation is the Palomar knot. Very reliable, quite simple to implement, and simply my favorite. In general, any of the examples in the video are very good and certainly better than a simple knot.
Kinds
There are not so many of them, if we highlight the main ones (we will look at each type more specifically below):
- simple loop; made from a regular knot;
- perfect; made from two loops, large and small;
- loop from the main fishing line; used for bottom fishing to attach several leashes;
- There is also a sea loop , a loop for a round stone, tying leashes to a donkey and others.
However, many fishermen prefer the first 3 species on this list, rightly believing that simplicity of tying is of great importance during the fishing process, when it is necessary to quickly replace gear.