The use of a feeder in fishing is becoming increasingly popular. This fishing method has proven effective. Sometimes the use of a feeder allows you to achieve success where other fishing options have shown insufficient effectiveness. To master this technique, it is important to study the equipment well, master fishing tactics, and learn how to knit various feeder rigs. In the future, you will need to practice a lot and work on your improvement.
Feeder as a method of fishing appeared in England. A tackle with a feeder is used. The essence of this fishing method is to create an abundant feeding table for the fish and, at the time when it loses caution, hook it.
Feeder fishing involves using a feeder to create a feeding spot at the bottom of the reservoir.
The optimal feeder set for beginners - what you need for feeder fishing
Feeder gear has the following components: rod, main line, reel, equipment and feeder. Each of these elements will be discussed in more detail.
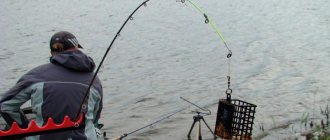
An example of feeder equipment on a method feeder
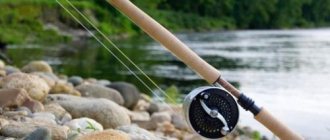
When choosing a fishing rod, it is preferable to use plug-in models. A carbon blank is a better material.
Sometimes, if finances are tight, a beginner takes products made from glass or composite. It must be taken into account that they represent raw, heavy passion. Despite their relative cheapness, this would not be the best choice.
When choosing a fishing rod, it is important to understand that you cannot make a universal choice that is suitable for all cases without exception. In various situations, it is recommended to be guided by the following:
- For the river, a rod 3.9-4.2 meters long with 120 grams of dough is often chosen.
- When fishing on the lake, the requirements will be different: length 3.3-3.6 meters with dough 70-90 grams.
- If a child is fishing, a rod 2.7 meters long is selected for him.
When fishing in currents, heavier rods are used, and for fishing in calm water, lighter ones are used.
When choosing a rod action, you need to consider the following. With a fast or very fast action, the rods are rigid and durable. Their disadvantage is their relatively weak casting range. On the other hand, they are more sensitive to bites.
When catching a large specimen, slow action rods can bend into a parabola. The advantage of this gear is the ability to make long casts. This rod has poor accuracy and insufficient sensitivity to bites.
To take advantage of the strengths of both options, you can choose a medium-fast action rod. Here all the indicators are average, but this form has all the necessary properties. It is long-range, sensitive, accurate and moderately tough.
Rod build
When a beginner is just starting to master feeder fishing, it is recommended that he start with a fast or very fast action rod. In this case, he will be able to take advantage of their advantages, which will help him distinguish even a gentle bite when fishing at a short distance.
When choosing reels, you need to choose ones that allow you to cast long distances and are able to provide enough traction for feeder fishing. For example, a reel with a Shimano index of 4000 is suitable.
For feeder fishing, it is customary to use spinning reels with a rear friction brake. It is important to choose the right gear ratio, which will determine whether the reel is speed or power.
The first category includes those with a gear ratio of no more than 4.6-5. Reels with this parameter exceeding 5 are considered high-speed. For feeder fishing, those with average values of 4.8-5.5 are suitable.
Some fishermen find this reel to be a little heavier than is usually necessary when using light feeders. However, when choosing, you should take into account that most of the time the rod is located on a stand.
When fishing on a river where the current is strong, it is better to use a heavier reel. In this case, using Shimano or Daiva brands with a size of 4000-5000 is suitable.
For feeder fishing, in the vast majority of cases, braided lines are used. However, for beginners at the stage of mastering the basics of this method of fishing, it is better to take a monofilament line first. When using it, the following restrictions must be taken into account:
- When using thin diameters up to 0.3 mm, you cannot make high-quality casts further than 40-60 meters.
- The fishing line has less sensitivity compared to braided cord.
- The line is too stretchy, but this disadvantage is not felt when fishing at relatively short distances.
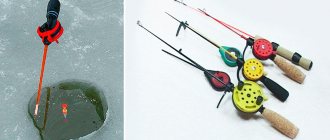
Minimum set for feeder fishing
The disadvantages of using cords are that they get tangled more easily than fishing line and that they are more expensive. For beginners, a fishing line with a thickness of 0.25-0.3 mm or braid around 0.2 mm is suitable. After experience comes, it will be possible to use four-strand braided wire with a diameter of 0.15-0.18 mm.
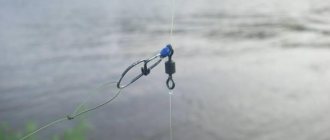
When fishing, you need to use a simple and reliable feeder installation. It is convenient for beginners to start mastering feeder fishing by using a Paternoster rig or a Gardner loop. This installation combines ease of manufacture and high sensitivity.
Those who engage in sport fishing prefer Inline equipment. Its distinctive feature is that when the fishing line breaks, the fish takes the leash and leaves the feeder in place.
Feeder installations
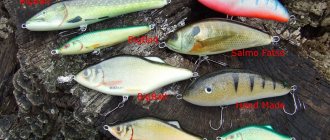
There are a large number of feeder feeders. They may vary in color, shape, size and design features. It is necessary to choose an option in which the feeder, when cast, will not leave a wide trace of the feeding, but will deliver it to its place safe and sound.
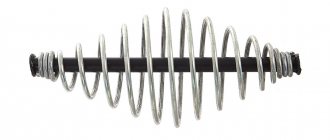
Metal feeders
One successful option is to use metal mesh feeders. They sink well to the bottom and retain food well. However, when fishing on the edge, it is more convenient to use plastic structures, as they more easily overcome the unevenness of the bottom.
If you plan to cast over long distances, then you can use Puli feeders. They come in plastic and metal. Using feeders with a bottom is less convenient, since food does not spread out well from there. In this case, it will not be able to effectively attract fish.
Feeder filled with bait
For fishing, a leash is used, which is thinner than the main line. Its diameter should be between 0.08 and 0.18 mm. Depending on the fishing conditions, it can be chosen thinner or thicker.
For passive fish, good efficiency is shown by choosing a more sensitive wiring. If it is active, then it is preferable to use a stronger one. The leash is made approximately 30-40 cm long. For inactive fish it can be longer.
When fishing in strong currents, its length can reach up to 70 cm. If you are fishing for passive fish, then use leashes up to 2 meters.
Feeder installation with a long leash
If during fishing it turns out that the bite is weak, the length of the leash is slightly increased. If this does not help, then it is made even longer. An experienced angler takes with him several leashes of different lengths, since he does not always know in advance which one will be the most effective.
Leash storage box
When choosing a hook, you are guided by what kind of attachment you plan to use. It is also important to consider what kind of fish you plan to catch. Most often, hooks of sizes 10-14 according to the European classification are used.
For fishing, it is preferable to use very sharp hooks. This will increase the number of successful strikes. If animal bait is used, thinner hooks will be suitable. Such choices will help her stay alive longer. If plant bait is used, the thickness of the hook is not critical.
When choosing a hook, its sharpness can be checked in the following way. The tip is drawn along the nail. If hooks form, this confirms the good sharpness of the hook. Another method of control is to pierce the maggot. If this requires almost no effort, then this indicates that the hook is sharp enough. You can sharpen it using any stone.
Feeder fishing for beginners, feeder fishing encyclopedia from A to Z - training video for beginners:
Feeder rigs for fishing in the current
There are constant debates on forums about which feeder equipment is better on the current. Each fisherman defends his point of view. Any classic installation works - paternoster, Gardner loop, asymmetrical loop, anti-twist tube. These are universal ties that can be fished both on a riser and on a pull. There is no special feeder equipment for the current - we work with classic ones that we can fish with. There is no magic pill - you need to experiment with installations on a pond, select the length of the leash and the size of the hooks. Article about feeder installations:
The best feeder rig for the current is the one with which the angler successfully fishes. On the line, due to the inflatable loop of the main line, sometimes it is not immediately possible to adapt to detecting a bite. Here you need to select. The bait gets eaten up without any bites - we put the leash shorter, and vice versa. There are no bites - we try to use long leashes, sometimes up to 1.5 meters. Sometimes the fish stays lower in the feeding trail and does not approach the feeder. For example, a helicopter feeder rig and two units for fishing on currents in the water column implies the use of leashes generally up to 3 meters long - if the length of the rod allows such a cast. The bait on such a long leash sinks to the bottom for a long time, counting on the fish that feeds in the depths. Even bream takes this kind of bait in the spring, although it is considered a purely bottom-dwelling fish. Read more about rigging a bream feeder for currents.
Gardner's Paternoster
Running
Asymmetrical loop
On average, the length of the leash for a feeder in a current is longer than when fishing in still water. Even a long leash will still stretch from the feeder down in the direction of the pull. This can be 60 cm, in other conditions – up to 1.5 meters. The working length is selected during fishing each time - the behavior of the fish differs at different times. Typically this range is 0.6-1.2 meters. Peculiarities of biting change depending on the activity of underwater inhabitants. You can’t predict in advance what length of leash to put on the feeder during the current - it’s better to keep prepared bundles in the leash so that you can quickly change them on the pond without tying them. We knit leashes from soft monofilament or fluorocarbon with a diameter of 0.1-0.14 mm for small and medium fish, up to 0.25 mm for carp or large chub and ide. Article about leashes for the feeder:
How to choose a feeder for a feeder
The fisherman’s task is to choose a type of feeder so that the structure lies on the bottom and cannot be carried away by the current. After casting the feeder, you can check whether the feeder lies motionless on the bottom.
To do this, after installing the rod on the stand, check how stationary the tip is. If it does not move, this means that the feeder has a strong grip on the bottom. When it is removed, the rod tip periodically bends smoothly. This means that the feeder was unable to secure itself to the bottom. In this case, you will need to choose a heavier model.
Bullet reel with a plastic body
Using a heavier model allows you to cast more accurately even in windy conditions. If you use a plastic feeder, when you unwind it, it will float up easily and will not be able to catch on grass or snags.
The following classification of feeders is used:
- For starter feeding A mesh with large cells is used. This feature contributes to the rapid loss of food at the casting site and the effective creation of a feeding spot.
For starter feeding - Cormac for long casting uses a load. It allows you to increase the distance by 40% more compared to conventional models. Such a query has higher accuracy.
Feeder for long casting - There are special supplementary feeding options. With their help, complementary feeding is continued at the selected point. In this case, the design details are not important.
Feeder for supplementary feeding - The design of the feeder for live food has a special shape. It is a cylinder with small holes. This form allows live food to remain active for a long time. Feeders for live food
- Flat method the feeder has a continuous bottom and a semicircular mesh that limits the bait. Used for fishing in weak or absent currents. Well suited for use on muddy bottoms.
Flat method feeder - The frame feeder is used primarily for carp fishing. It is seasoned with method paste or other viscous bait. Used in standing water or weak currents.
Here are the most popular types of feeders. In addition to those listed, other varieties are also used.
Feeder fishing for beginners, typical mistakes:
How to prepare for feeder fishing
You need to choose a suitable place for fishing. An area where the fisherman will not be disturbed by bushes and trees behind him is suitable. There is no need to choose a place where there is a lot of tall grass.
It is better to use places where you have already fished before. If fishermen have already been here, then this can be easily determined by traces of bait, balls of attached foam and other similar signs.
After a suitable place has been chosen, you need to prepare the bait. You can make it yourself or use a store-bought one. The second option is more preferable for beginners.
If the fisherman decides to use purchased material, then he must follow the preparation procedure, which is given on the package. To prepare the required volume of the mixture, use 2-3 approaches. At the same time, gradual moistening is carried out.
Before fishing, the gear is assembled. This can be done during a break between preparing portions of bait. The tip of the rod must correspond to the presence and characteristics of the current. It is important to consider how strong the wind is. The top should be stronger if the wind gusts are more significant.
When assembling the rod, you need to pay attention to the location of the rings. They should be located evenly and coaxially in relation to each other.
It is necessary to fix the reel in the reel seat, the rings should be located at the same distance from each other and ensure that the fishing line passes through them freely. If the assembly was completed with errors, you will have to do it again.
Next you need to determine the fishing point. It is recommended to consider the following:
- In cold weather, good places would be the edges of underwater holes or slopes.
- If fishing takes place on a lake, you should choose solid ground plateaus. It is desirable that they have a smooth rise with no sudden changes.
- If you are fishing on a river, you need to pay attention to places where the current slows down. It is worth paying attention to the backwaters.
Before you start fishing, feed the fish.
How to properly assemble feeder tackle
Assembling feeder gear involves choosing a rod and reel so that they fit together. Among experienced feeders there is a concept of whether the tackle lies in the hand or not. This is due to the comfort of constant casting, reeling and all other aspects of fishing technique. It’s better to assemble the feeder right in the store, or try different options tactilely. And order later, via the Internet.
In the feeder world, a common term is tackle balance. It consists in matching the weight of the rod and reel relative to the location of the latter. It is easy to check - a balanced feeder with a reel installed, if you place it on your palm (at the point in front of the spool), does not tip forward or backward.
It is a common opinion that the weight of the reel should be approximately equal to (or slightly more than) the weight of the rod - so that the center of gravity is exactly at the attachment point or shifted slightly towards the butt. With such tackle it is simply more convenient to make constant casts and reels over a long period of time, fatigue does not accumulate.
In the store, it’s better to assemble a feeder rod, put a reel on it (bring your own), and shake it with your hand. Experienced miners already at this stage understand whether the stick is suitable or not. Of course, this is a purely subjective question - each angler selects the tackle for himself. Avid feederists collect feeder gear for each fishing condition separately, having several options in their arsenal. For beginners, it is better to try one stick.
If the main fishing spots are ponds and small rivers, then you need a picker or a medium test. The medium is more universal - such a feeder is suitable for both small reservoirs and fairly long casts. It is better for inhabitants of the Volga, Don, Oka and large Siberian rivers to immediately master the heavy or extra heavy classes. Accordingly, the reels are selected depending on the caliber of the gear. You need to assemble the feeder rod carefully so as not to spoil the rod and fishing later with inappropriate loads. Next, we will touch on the issue of arranging gear for fishing on a feeder.
Using additional equipment elements
The structure of the gear was described above. In addition to the main ones, there is a need to use additional ones. The following will detail the main elements.
The quivertip is a part of the rod - the tip, and is sold complete with it. Typically, a fisherman uses several tips. Usually 3-5 pieces are sold with a fishing rod. They vary in hardness. The choice is mainly determined by the weight of the feeder used. The larger it is, the stronger the quivertip will be needed.
Quivertypes
The size of the dough is often indicated in ounces. In order to convert this value into grams, you need to consider that 1 ounce is equal to 28.3 grams. Most rods have 1, 2 or 3 oz quiver tips. More expensive models additionally provide those that have a test of 4 or 5 ounces.
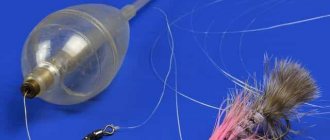
The bite alarm will help you immediately see that the fish is touching the bait. It is attached to the fishing line. Usually this part is brightly colored. When a bite occurs, the alarm should jerk sharply, at which point the fisherman needs to make a hook.
Sound alarms can also be used. If two or more rods are used, then visual control of the bite becomes more difficult. In this case, the use of bells and bells will help you quickly navigate the situation.
In the dark, it is convenient to use luminous signaling devices. Devices that transmit bite information to a pager carried by the fisherman have also become widespread. In this case, you can simply be nearby to receive the signal.
Bite alarm
Another important part that a fisherman needs to have is a stand . Sometimes you have to wait a long time for a bite. In this case, the tackle is placed on a stand and they wait for the bite to occur.
The use of such devices is also beneficial in cases where several fishing rods are used for fishing. In such a situation, the fisherman will install them on stands and wait for a bite.
Such designs can be homemade or purchased. In the first case they will be cheaper, in the second they will be more convenient.
The principle of operation of the gear
Surely, before mastering the feeder, you have seen more than one video where experienced fishermen carry kilograms of fish onto the feeder. The principle is that when fishing, you choose a certain point, throw bait there, and the fish flock to it.
It seems that everything is simple, an ordinary donka with a feeder can handle this, but when fishing with an ordinary donka, you will just sit and wait for the bell to ring. There is a whole system in the feeder that is why anglers carry so much fish.
The first thing to note is the use of a special, sensitive rod, thanks to which you will be able to notice even a blade of grass catching on the fishing line. The second important factor is the use of braided fishing line, that is, cord.
Well, the third factor is the equipment, which transfers all the touches of the fish directly to the rod. So, we have an ultra-sensitive fishing rod, which is connected to the bait with an inextensible cord, everything ingenious is simple.
Best time for feeder fishing
With the onset of early spring, the best opportunities for feeder fishing can be found on small rivers. Immediately after the ice melts, long-term bait will be needed to attract fish - it usually takes at least an hour. Bites will not occur quickly at this time.
With the onset of summer after the end of spawning, the fish will become more active. At this time, it usually prefers to be in the depths, but in the morning and evening hours it moves closer to the shore.
When fishing at night on a feeder, you can catch trophy specimens. Casting begins after the sun has set. For fishing, they come in advance, taking into account the time needed for preparation. The casting point should be chosen with a depth of up to 3 meters, closer to the shore than during the day. A sloping muddy or sandy bottom is suitable for fishing.
The most productive period begins from sunset and continues until midnight. The frequency of re-casts should not exceed one within 15 minutes.
The time before 3 a.m. usually brings a small catch. After this, until dawn it is time again to get a good catch. At this time, it is necessary to gradually increase the amount of bait.
Supplies and accessories for feeder fishing
The minimum feeder kit is ready-made and equipped tackle, a slingshot for installation, a nozzle and bait. You can already catch it. However, you gradually need to acquire various secondary items. When using thin leashes, you need a landing net - even a two-hundred-gram roach will break off a 0.08 mm leash without it.
Special chairs, rod stands, boxes - this is at the discretion of the fisherman. When fishing at night, you can use fireflies for the feeder or bells, just like on donks. You can measure the bottom with a working feeder, but it is better to have a special marker weight for the feeder for this. The set for feeder fishing is created by the angler himself. All these features are disclosed in various articles on the site.
Subscribe to the channel:
YouTube channel RYBAFAN
We are VKontakte
Feeder fishing technique
Feeder installation is a complex technical system consisting of several elements.
Feeder tackle consists of the following elements:
- Braided or monofilament fishing line is chosen as the basis of the feeder tackle. A loop is made at its end, to which a leash is attached, the length of which depends on the fishing conditions.
- There is a hook on the leash. It is desirable that it be very sharp.
- The main line has a swivel with which the feeder is attached. Below and above the attachment point there are stoppers that limit the movement of the swivel along the fishing line.
- The feeder is a metal or plastic mesh filled with bait. Usually it contains a weight in order to speed up the dive when casting and reduce mobility on the bottom.
Installation of a feeder with an anti-twist
Fish are attracted by an abundance of food. She swims up and swallows the hook. It is important that the bait does not wash out too quickly. If this happens, it will lose its attractiveness to fish.
For the first cast, it is recommended to use the largest size feeder. It is filled loosely so that the food easily falls out into the water. In this case, do not use a leash with a hook. The main function of the first cast is to attract fish. Typically, 5-10 such casts are required before you actually start catching fish.
Feeder ready for casting
Other methods can also be used to attract fish at short distances. For example, create a food spot by throwing bait from a special slingshot. In some cases, fish are attracted by throwing bait with your hands. At long distances, special types of feeders are used, which are called rockets.
Rocket feeder
Fishing on a feeder 2021 new videos:
Catching bream with feeder gear in the 2021 season - video from the shore of the reservoir:
The technique for fishing with a feeder is as follows:
- You need to throw the feeder in exactly the same place where the bait was made . In order to hit it exactly when casting, measure exactly the same length of fishing line as the one that was used to cast the bait. To do this more accurately, you can make 3-4 test casts. Or use clipping.
- After immersing the feeder, you need to ensure tension in the fishing line ; if it is loosened, the bait alarm will not work correctly.
- The feeder form must be fixed on the shore . Since fishing usually continues for a long time, the rod is difficult to hold in your hands for a long time. Therefore, a stand is equipped for it, where it is held most of the time.
- When installing, try to install the form in a horizontal or close to it position . The line is then wound onto the reel until the quiver tip is bent downwards.
- Next you need to wait until the bite occurs . This usually takes no more than 15 minutes. The fact that it has occurred is signaled by a change in the position of the quivertype. It is convenient to determine the presence of a bite using a special signaling device.
- It is necessary to make a hook immediately . The sharper the hook, the higher the chances of catching a fish. For hooking, choose the moment when the quiver tip bends. At this moment, they lift the rod from the stand and begin to lead the fish to the shore.
- The equipment is being unwound . At the same time, the feeder is refilled with food and a new cast is made to the baited place. If there was no bite before, then the nozzle used needs to be changed.
It is important to remember that hooking during the first movement of the quiver tip is not always effective. If it happens too early, the fish may fall off the hook. Sometimes you have to wait to be sure to hook a fish.
Nozzle when fishing on a feeder
At the beginning of summer, baits such as:
- steamed pearl barley and wheat (two or three grains per hook),
- maggot (from two to five larvae on a hook),
- small red worm (up to three pieces per hook).
- Sometimes they are successfully caught using various water larvae (goose, babka, etc.).
The bait of animal origin should move on the hook - due to this, the number of bites increases sharply.
Read also: Semolina is a killer of white fish
Feeder bait
For universal fishing of white fish, you can prepare a mixture of this composition. This bait is well suited for feeder fishing on the river in summer .
- breadcrumbs (30%);
- steamed millet (60–65%);
- ground oats (5–7% - if the millet is too crumbly);
- fresh cake;
- maggot (3–5%).
The bait should be mixed immediately before use, using river water.
Read also: The best bait for bream in the spring with your own hands
Often, instead of cake and breadcrumbs, anglers use one of the suitable mixtures that are sold in fishing stores.
For example, the bait “Red Fighter”, “Sabaneev” and others proved to be very catchy. Of the more expensive ones for catching various fish, we can recommend baits that are designed for different fishing conditions. So, from the wide range of baits from this company, “TURBO CARROYER” (the difference is black) is good for clear water. When the water in rivers becomes cloudy during the rainy season, it is better to use light-colored SECRET bait.
Sometimes, to increase the viscosity of the mixture, anglers add ground oats or other ingredients to the bait. But some baits already include heavy and viscous particles. With their help, it is convenient to regulate the viscosity of the entire volume of the mixture. Among viscous baits, we can recommend “RECORD ZILVER BRAS EM”. Then to the composition of this mixture you can only add millet 60-80% of the total volume and sometimes 5-10% of large ingredients (steamed pearl barley, steamed wheat or maggot), which should be used to fish.
How is fishing done?
When using a feeder, you need to pay attention to the correct execution of landing fish. Using a complex fishing system requires the use of thin and delicate components. Fishing begins immediately after hooking. It must be done using smooth movements.
To ensure that fish are caught, you need to use a flexible and durable form. When working with small fish, fishing is done by evenly winding the fishing line.
For large specimens, rod movement is mainly used. At the same time, they make movements at an angle of 70-80 degrees and at the same time pull up the fish. Immediately after this, the form is released a little, while simultaneously reeling in the fishing line. These actions can usually be carried out rhythmically. This must be done until the fish moves close enough to be caught in the landing net.
Fishing
Choosing a place for feeder fishing on the river
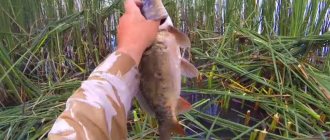
When choosing a fishing spot, you need to make sure that there are no overhanging branches above your head that will interfere with casting. You also need to pay attention to the area behind you, because when casting, a long lead can easily catch a snag or a stem of grass. It is also advisable that there are no snags or a thick carpet of algae in the water in front of you, which could interfere with landing the trophy.
Fishing with a feeder on the river is successful in areas where there are various eddies and reverse currents, they indicate that the bottom in this place is heterogeneous and there are edges and drops that fish love so much.
Basically, having come to an unknown body of water, the fisherman looks for the edge and fishes in its lower section. What an edge is, in simple terms, is a steep descent to depth and adjacent areas; in front of the drop, as a rule, there is a flat terrace, table or irrigation. The area where the terrace (table, watering) turns into a dump is called the “upper edge”. Gradually, the descent on the edge becomes gentler and smoother, or even almost even - this is the “lower edge”, this is the area that the angler needs to look for and fish on it. If the river is wide, then the lower edge can turn into another dump to a greater depth. It is not recommended to fish on a dump, otherwise all your bait will roll down, and in cases of fishing on rocky dumps, you will definitely leave more than one feeder on it. In spring and at night, fish can go out to the shallows and stay near the upper edge.
When choosing a fishing spot, you should navigate not only by the bottom topography, but also pay attention to the river bank. So, behind the shore ledges and capes, a return flow forms if the current is strong or calm water if it is small. In such places, holes often appear and food carried by the current accumulates. In addition, the fish does not need to make excessive efforts to fight the current.
A feeder on a river can be effective when fishing in places where the river borders a tributary or an oxbow lake, and depending on the speed of the current, one bank may have shallow water, while the other may have channel pits in which food accumulates.
Promising areas are the entrance and exit from the riffle, especially if there is a hole at the exit of the riffle. The riffle itself is not suitable for feeder fishing, since the current here is very intense and there is a high probability of getting caught, as a result it is very difficult to create a normal feeding spot.
In spring, during high water, you need to look for shallows and pumps; here the water warms up faster and the fish bite quite actively.
Ideally, first study the river using an echo sounder. The disadvantage of this method is that you will need a boat and an echo sounder itself. True, the result will please you not only with knowledge of the bottom topography, but will also give you the opportunity to see whether there are fish here at all and in what quantity. As you know, it is much easier to keep the fish at the fishing point than to lure it to you with a large amount of bait.
But for most fishermen, a feeder on a river does not involve the use of an echo sounder. Take an ordinary weight and braided fishing line, throw in the tackle and begin a leisurely reeling, so that the weight drags along the bottom. If the load hangs or falls through, it means there is a hole or changes in the bottom; if we feel resistance while fishing, then we have found a rise. Areas where there are differences in the bottom and the lower edge is located are quite promising and we need to mark the distance to which we will cast our tackle; for this, the fishing line is clamped into a clip or a mark is made with a marker. At the same time, a landmark is selected on the opposite bank, in the direction of which we will cast. It is better to control the casting distance with a marker than with a clip, because in case of a strong bite, the clutch will work and the line will begin to reel in, it will quickly reach the place where it is clamped by the clip and will break. Therefore, it is better to use a clip when catching small fish, but for bream, carp or chub, make marks on the fishing line with a marker. In addition to the bottom topography, we also determine its type: on hard ground the load moves easily and evenly, if the bottom is muddy, then the wiring runs with little tension. On a rocky and shell-covered bottom, the weight moves with a noticeable tremor. You can also measure the bottom topography using a marker float.
Feeder gear installation options
There are several options for installing equipment elements. The following describes each of them.
Paternoster
When making it, one of the following two options is usually used. At the end of the main fishing line, prepare a loop measuring 3-4 cm. Approximately 30 cm from the edge, make another small loop. A feeder feeder is attached to the latter. A leash with a hook is attached to the end of the fishing line.
Another option is also used. A loop about 30 cm in size is made at the end of the main line. It is cut in such a way that pieces with a length ratio of 2 to 1 are formed. A feeder is attached to the short part, and a hook with an attachment is attached to the long part.
Feeder installation Paternoster
Symmetrical loop
You need to measure 1 meter from the end of the fishing line. In this area it is folded in half. This will create a loop 50 cm long. There is no need to tie it. Where the fold is, make a small loop measuring 3-4 cm.
A swivel with a carabiner for the feeder is placed on a free piece of fishing line 50 cm long. On both sides of it, at a distance of 10-15 cm, knots are tied that limit the movement of the swivel along the fishing line. A leash is attached to a small loop.
A symmetrical loop is one of the best types of installation for standing water
Anti-twist tube
A lower swivel is put on a piece of fishing line 50 cm long. Its movement is limited by a stop bead. The line needs to be pulled through the anti-twist tube. You need to attach the top swivel to the second end. This end must be attached to the main line. The lower swivel is used to attach the leash, and the feeder feeder is attached to the upper one.
Installation for fishing with anti-twist
Sliding feeder
For installation, you will need a piece of fishing line 60-70 cm long. A loop 3-4 cm in size is made at the lower end. Then a stop bead is installed. A carabiner is put on the fishing line to attach the feeder. Make another loop at the other end and install a stop bead. It is attached to the main fishing line. A leash with a hook is attached to the first loop.
Asymmetrical loop
Installation begins by tying a one and a half meter piece of fishing line with a swivel into a ring. On one side they retreat 50-60 cm and make a twist-and-retract loop 10-15 cm long. At its end a loop 3-4 cm in size is created. A leash is inserted into it. A feeder is attached to a part 60-70 cm long.
How to make feeder tackle correctly
To properly equip feeder gear, you need to understand the specific conditions of the reservoir. Experienced feeders knit rigs directly while fishing, selecting the nuances for this specific case. Schemes for assembling feeder gear are discussed in detail in the article on installations at the link above. Here we will outline the general approach.
The final adjustment of the feeder gear takes place on the pond. Depending on the type of fish, depth, current and many other nuances, a specific installation, hook size, length and diameter of the leash are selected. In addition, often, in order to find the keys to the fish, you need to change something in the online installation, right in the process. This is part of the feeder tactics. For example, if bites are hard to see, we shorten the leash. Drops and empty bites - experimenting with hook size, installation, etc. It is possible to finally prepare the feeder tackle and sharpen it to suit the conditions of the reservoir only during the process.
Some tips for feeder fishing enthusiasts
Having mastered the basics, the fisherman improves through practice and gradually develops his own approach. In the process of improvement, an understanding gradually arises of what you need to pay attention to in order to make fishing more effective:
- Beginners should not immediately start fishing on several forms. to start mastering feeder fishing with one rod .
- When choosing a tip, you need to take into account the fishing conditions . Particular attention should be paid to wind strength and current speed. The stronger they are, the stiffer the tip should be.
- You can make your own bait. There are various recipes for this. However, it is better for beginners to start with using commercial bait. This will allow them to improve their fishing skills more effectively. As they improve, they will be able to pay more attention to different aspects of fishing.
Flavorings for bait can be natural or chemical - When assembling the rod, the rings must be located in the same plane, one opposite the other . After the reel is installed on the holder, the line must be pulled through without missing a single ring.
- Using a bite alarm allows you to find out about a bite in time. There are various designs of such devices. Feeder fishermen usually avoid using audible alarms in order to reduce disturbance to other people.
Alarms on alert - For fishing to be effective, casting must be done regularly . Their frequency depends on the weather conditions. In cold weather, this is done every 15-20 minutes. In warm weather, casts are made more often - every 5 minutes.
- When feeder fishing, it is important to pay attention to which baits are more effective . Among animals, the most popular are worms or maggots; among plants, pearl barley or corn are the most popular. When a beginner gains the necessary experience, he can choose other options if he considers them successful.
Using the tips given here will allow the fisherman to increase his catch when using a feeder.
Feeder fishing may seem complicated at first glance, but it is known for its high efficiency. Having mastered this type of fishing, the fisherman will be able to regularly get a good catch.