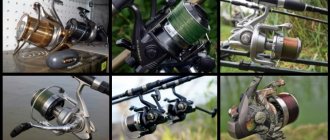
The spinning tackle must be correctly selected to solve specific problems, in other words, it must be harmonious and balanced. When choosing the model of reel, spinning rod, model and diameter of the fishing line (braided cord), many fishermen do not attach importance to the correct winding of the fishing line on the reel. This guide will discuss the nuances of winding fishing line, which will allow you to avoid unpleasant moments while fishing and disappointments from the gear (dropping loops, “beard”, casting range, shooting). You will also find here step-by-step instructions for winding, setting up the reel and a diagram of the nodes for tying the fishing line to the spool.
Many aspects have been discussed, so it wouldn’t hurt to share the outline of the article:
- Adjusting the winding profile (taper)
- Using Backing
- Tying the fishing line to the spool
- How to spool fishing line correctly
Adjusting the winding profile (taper)
Each reel model has its own winding profile. There are:
- cylindrical profile (photo 1);
- reverse cone, where the profile of the wound line expands towards the front side of the spool (photo 2);
- straight cone, when the profile of the wound fishing line tapers towards the front edge (side) of the spool (photo 3);
- chaotic profile inherent in cheap Chinese coils.
Spinning anglers use a cylindrical or light reverse cone . The winding geometry is adjusted using adjusting washers.
The adjusting washers for reels with a front friction brake are located on the axis on which the spool is mounted, above the ratchet sprocket. The reel kit usually comes with 2 to 6 washers of varying thickness. As the thickness of the washers increases, the winding profile changes towards a straight cone, and when the thickness of the washers decreases - towards a reverse cone. If the package does not contain shims, it means they are already installed on the axle. This point must be taken into account.
To remove (install) washers you must:
- Unscrew the spool by rotating the clutch counterclockwise.
- Remove the spool from the reel axis (rod).
- Remove (install) the required number of washers. There were cases when it was necessary to remove even the sprocket to achieve optimal winding geometry.
The adjusting washers for reels with a rear friction brake are usually located in the spool itself. The principle of adjusting the line winding profile is exactly the opposite of reels with a front friction brake. Increasing the thickness of the washers leads to a reverse cone, decreasing - to a straight cone.
To remove (install) washers you must:
- Remove the bobbin.
- Unscrew the special nut on the front of the spool.
- Remove the shim retainer.
- Remove (install) the required number of washers.
Winding fishing line onto a spool: methods
There are several different ways in which the fishing line will be wound. Let's look at each method.
Flat (cylindrical)
The cylindrical method is quite universal and the most common among fishing enthusiasts.
If there are no manufacturer's marks on your spool, then the gap during winding should be left from one to one and a half millimeters.
The cylinder is the most optimal form of installation for the feeder reel. This applies to cases where the thrown load varies in the range from 50 to 150 g. This can be used both in a spinning rod and in a mast.
With slope (trapezoid)
This type of winding is characteristic of exceptionally good reels. In this case, the turns are superimposed equally, one to one, which is very important during all fishing.
When winding fishing line onto a spool, it is also necessary to leave a gap of one to two mm to the edge. The largest gap will lead to spontaneous reset of the loops, and we certainly don’t need this.
This winding method is a sign of a cheap reel made in China.
This method will create you many problems and inconveniences, as a result of which you will definitely not enjoy your vacation. It is better to refuse this kind of methods immediately.
Using Backing
Backing is a layer of something wound under the main line to increase the diameter of the spool so as not to wrap kilograms of line on it.
The multitude of line diameters and different unwinding volumes on the market do not allow us to produce reels with a spool capacity for each type of line used. If the volume of the purchased fishing line is less than the capacity of the spool, then use rewinding under the main fishing line - backing. For backing, it is best to use an old braided cord (braid) or nylon thread, however, many people prefer just electrical tape. The volume of backing can be determined “by eye” with a margin, but in this case there is a high probability of “extra” volume of the main expensive braided cord appearing. It is preferable to add backing to the wound main line to the required level and then rewind it back. To connect the backing and the main line, you can use the following knots: “blood ties”, “grinner”, “Peter Minenko knot”, “shok leader knot”. It is necessary to wind the backing onto the spool very tightly (with force) in order to avoid the main line falling between the turns of the backing.
How to store line on a reel spool
At the end of the season, the old monofilament is usually thrown away - not a big loss. If you fish infrequently, you can leave the spool with monofilament stored in a dark bag, but be sure to test it for strength next season.
The “braid” should be completely unwound, dried and again, but with weak tension, wound onto the spool for storage. Next season, rewind it more tightly. A good cord lasts for several years and fails due to inevitable snags and breaks, but not due to “old age.”
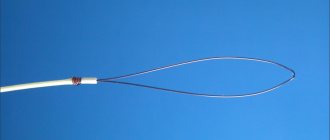
Tying the fishing line to the spool
Let's find out how to tie the fishing line to the spool.
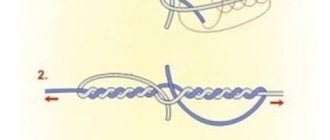
The first rule is that tying the fishing line or backing to the spool is mandatory . You don’t know what kind of trophy you will come across, and it will be a shame if during the process of fishing the entire main line and backing unwinds, and there is no last line to hold the fish.
The fishing line can be tied with various knots: “arbor knot”, “self-tightening double loop”, “clinch”. On the first turn of fishing line or backing on the spool, you must additionally glue a piece of electrical tape or adhesive tape in the direction of winding. This will prevent the line from spinning on the spool, both during winding and when landing fish.
How such knots are tied in practice can be seen in the video:
Reverse taper
It is possible to manufacture spinning reels with variable pitch, which decreases towards the side of the spool. In this case, the angle of convergence of the line is slightly smaller than that of a straight cone, which will be discussed below. That is, the far turns will rub less against the near ones.
In a reverse cone, the turns located closer to the body always have a smaller diameter, which minimizes the formation of beards and spontaneous removal of the line from the spool. However, the disadvantage of such winding is that the line experiences more friction when it touches the side of the spool, and, as a result, the range of the tackle is reduced by about 10-15 percent depending on the angle of the cone itself, when compared with a straight cone.
One of the advantages of such a winding line is that it is considered the safest, and even a beginner, making mistakes, can fearlessly throw the equipment without fear of the formation of beards. In addition, spools with similar geometry are now available for sale. It is excellent for uneven wiring, when the line is reeled in with varying tension.
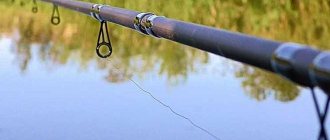
How to spool fishing line correctly
- You need to install a reel on the first leg of the spinning rod and remove the spool. The main line must be threaded through the spinning ring and tied to the spool. Don’t forget to open the line handle before installing the spool on the reel. The line must pass through the line roller. If you have a spare spool, then it is better to carry out this action with it when determining the volume of backing and the initial winding profile.
- The fishing line spool has a central hole, so it can easily be attached to a pencil or pen. To avoid twisting, the line should come off the bobbin as it unwinds, and not come off in coils when the bobbin is stationary. We ask a partner (children are the best helpers) to hold the spool of fishing line on a pencil. If there is no partner, you will have to adapt by holding a pencil with a spool between your knees. You can use special devices for unwinding fishing line from reels. They can also regulate the force of winding the fishing line onto the spool.
- Using one hand through a rag or wearing gloves, so as not to cut yourself or burn yourself on the fishing line, we clamp the fishing line above the first ring. With this hand you can regulate the force of winding the fishing line onto the spool (as tightly as possible, but without fanaticism). With the other hand, we begin to turn the reel handle at low speed.
- The volume of the fishing line being wound should be such that the fishing line does not reach the edge of the spool collar by 1-3 mm. If the volume of the fishing line is not enough, then we tie the backing to the fishing line and continue to wind it to the required volume. Winding the fishing line to the edges of the bead is fraught with loops coming off and “beard”.
- After winding the line and backing to the required level, it is necessary to rewind the line from the spare spool to the main one. If the line winding profile is unsatisfactory, you can adjust it by removing or adding the necessary adjusting washers. If there is no spare spool, then for the final winding of the fishing line you will have to rewind the fishing line either to another reel, or first to one reel, then from it to the second reel. This is necessary to turn the line over. For these purposes, you can use a drill by attaching bobbins to the spindle.
- After the final winding of the fishing line onto the spool, we attach the edge of the fishing line to the clip, which is located on the side of the spool.
Next is a video from a spinning fisherman, which describes and shows the process of winding fishing line onto a spinning reel.
Compliance with simple principles: the use of backing, the correct force, profile and volume of winding will allow you to obtain optimal use of the gear and ensure working with it at a high level of efficiency.
Backing extension line
Or, if the length of the main line is still enough for fishing, reel down the extension line - “backing”. Usually, the remnants of monofilament are used as backing, which are theoretically as strong as the main fishing line (in case a large fish unwinds the entire “working” stock).
Backing may also be required when there is not enough fishing line on the reel to fill the entire spool - and this is almost always when braid rather than monofilament is wound on a regular spool.
After all, if instead of mono you take a cord of similar strength, then it, even taking into account the ovality of the cross-section, will be approximately 1.5 times thinner. Taking a large unwinding of braid is expensive and irrational. It’s easier to reel in the required amount of extension monofilament. How to do it?
If our reel has two identical spools (or there is another reel with a spool of similar line capacity), rewinding is carried out without problems. We rewind the working line from the main spool onto an additional spool and add an extension line to the normal height (1-2mm below the front side of the spool). Now all that remains is to rewind the entire line onto the main spool - in this case, the backing will be at the bottom, and the working part, as it should, will be at the top.
The only question is that these lines need to be tied with the correct knots. The knots must not only be strong, but also preferably neat, because all the protruding tails interfere with the line coming off the spool.
Particular care must be taken when tying the monofilament line to the cord - due to the softness and “slipperiness” of the braid, a special, more complex knot is needed on its side.
If there is only one spool, winding the backing becomes more complicated; we will need two more empty spools from under the fishing line. First, a working line is wound onto the reel, then an extension line is wound to the desired height. The entire unwind is then manually rewound onto an empty spool (or onto the free spool of another suitably sized reel). But since in this case the working part of the fishing line is at the top, and not the extending one, you will have to rewind the fishing line again onto another free reel and only after that onto the reel spool.