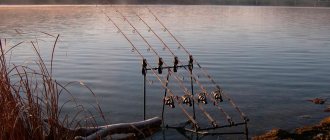
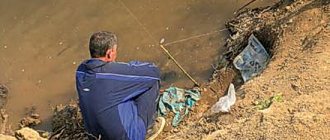
The correct feeder equipment allows you to fully realize the potential of the gear along with the right fishing tactics. A feeder, compared to a standard donkey, is a subtle tool that is difficult to master, but ultimately gives the angler one level more opportunities. The tactics of such fishing, based on precise long-distance casts to one baited point, are inseparable from a properly equipped fishing rod.
Feeder equipment is selected depending on the conditions of the reservoir and ensures the implementation of the angler’s original plan. In this article we will analyze how to knit feeder tackle, consider the nuances and important points of equipment.
Features of feeder fishing
- To rig the feeder correctly, you need to understand the importance of the overall balance of the gear. You can tie the feeder installation to the donkey - perhaps this will give results. This does not mean that a fishing rod made this way is a feeder tackle.
- Everything in the feeder is interconnected. Depending on the range and strength of the current, the operating weight of the feeder is selected, and this affects the choice of a rod for such fishing - a heavy class for rivers with strong currents, a picker for close range and working with light weights. Accordingly, gear of different calibers is equipped differently.
- A feeder is a delicate tool, and specific gear is designed and adjusted for narrow fishing conditions. However, in these specific conditions, with correctly selected equipment, the feeder has no equal in terms of catchability. Donka is a general-purpose weapon, and feeder is a high-precision modern missile. In order to properly equip a feeder rod, you need to clearly understand the conditions for which the gear is set.
Basic article about feeder fishing tactics and techniques:
How to properly assemble feeder tackle. Schemes and drawings
In this article, we will analyze everything about how to properly assemble feeder gear and give recommendations on setting it up and even fishing.
Let's look at the components of the feeder gear. Any feeder tackle includes:
First, you need to decide on the main fishing spot for this type of gear. After all, there is no universal model that would be suitable for a reservoir with standing water and a river with a current. It is best to choose a fishing rod for feeder equipment under the supervision of a specialist or an experienced fisherman. Since it will not be easy for a beginner to cope with this task.
There is a pattern. For fishing in strong currents and when making long casts, it is worth choosing a rod with a large test load. For example, the classes medium-heavy, heavy and extra-heavy.
If we talk about the cost of a feeder rod, it can be different. It all depends on your financial capabilities and the number of fishing trips per year. After all, you must admit that there is no need to purchase an expensive feeder if it is constantly collecting dust in your pantry. If you love fishing and try to pay a lot of attention to this hobby, you need a professional feeder rod.
When choosing a rod, take a good look at each of its legs. The guide rings deserve special attention, more precisely, their smoothness, the thickness of the form and, of course, the comfort of the handle. If you don't like something about the rod, ask for it to be replaced. If the external inspection is over, positively assemble the feeder and shake it in your hands.
Feeder equipment and fishing conditions
First of all, there is a division according to fishing conditions. Depending on the reservoir, different fishing rods and equipment are used. It depends on where the angler spends more time. If these are small crucian carp ponds and small rivers, you will need a light rod with a test weight of up to 60 grams, or a picker. On large rivers, such as the Volga, you cannot do without Heavy-level gear, with which you can throw heavy feeders (120 grams or more) at a distance of 60-100 meters. Lighter weights simply will not be able to withstand the force of the current.
A universal equipment option is medium, medium feeder, rods with dough up to 90 grams and a length of 3.3-3.9 meters. This is a good first tackle option for a beginner. This rod will allow you to fish in crucian carp ponds and at distances of up to 80 meters on medium rivers.
After mastering it, you can diversify - buy and equip it, for example, with a picker for short-range fishing and a heavy one for difficult river conditions or targeted flat fishing of large carp with long casting. Therefore, we will continue the conversation about equipment, based on the average medium feeder, making reservations for extra-light or heavy equipment. An article about rods for feeder fishing.
- Advice for beginners is to thoroughly study the theory of the feeder. Store shelves are bursting with a variety of goods. You can buy a lot of unnecessary things, and then it will all be uselessly lying around in the corner of the garage. To properly equip a feeder, not much is required to begin with.
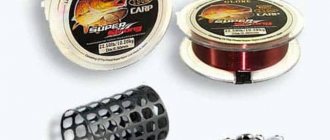
- At a minimum, this is a medium-class rod with a matching reel (a spinning reel with a spool size of 4000 and a gear ratio of 4.8-5.2). The feeder is equipped with a good braid of 0.1-0.14 mm (or monofilament about 2-0.3 mm) with a length of 120 meters or more. The usual distance for a feeder is up to 90 meters plus a margin. The kit also requires several different feeders, 0.25-0.3 mm fishing line for knitting rigs, thin monofilament for leashes and hooks.
- When fishing, you will need groundbait and bait (at least maggots). You can install the feeder on a wooden flyer, and measure the bottom with a working feeder. The entry level is several thousand rubles. This is five thousand for a more or less normal rod and reel plus small things. And these are not tens of thousands for top poles, which the authors of YouTube videos love to praise. In principle, a budget feeder stick is no more expensive than a set of 3-5 donks, but exceeds them in functionality.
- Anglers who are looking for information on the feeder and its equipment are usually not beginners at all, since they have a fair amount of experience in bottom fishing. Therefore, we will not limit ourselves to superficial calls to switch to a feeder, but will take a closer look at how to equip a feeder fishing rod. Having imagined in your head the general appearance of the feeder equipment, its elegance and capabilities, any experienced fisherman will understand the beauty and advantages of the English donkey over the usual one.
More details - reels for feeder tackle.
Two types of attachment points
The whole variety of feeder feeders can be divided into two groups: with the usual installation method and inline, where a through channel is provided for installation for the passage of the vein. If fishing is done in the classic style, then ordinary cages are used, and in method fishing - inline feeders.
Types of inline equipment:
- The thread is pulled directly through the flat feeder. Its use is especially effective when fishing in still water, when hunting for crucian carp and crucian carp.
- The line is passed through the ring of the swivel, to which the feed container is mounted. This is a universal equipment option; it can also be effectively used for fishing in reservoirs with moderate currents and calm water.
- Installation of the feeder is carried out to the outlet, which is previously fixed on the swivel of the main fishing line. This type of execution is appropriate when fishing is planned on a fast-flowing river.
Read more about equipping a flat feeder and fishing with it.
Regardless of the fastening methods, the principle is the same: the food container is not fixed, it must move freely along the fishing line so that the prey does not feel a single hint of tension.
Inline feeder tackle has many advantages, including:
- prospects for spot hunting;
- in the event of a break, the fish needs to free itself only from the hook, and not from the entire tackle;
- use in any reservoir and at different flow speeds;
- prey is especially evident when using the “Method” feeder (there is a spiral on one side and lead on the other);
- self-clipping (clipping occurs due to a heavy feeder).
Sliding installation is performed in different ways. If necessary, the hinge stroke is limited by a stopper. From the technical side, inline rigs can be either completely free sliding or with a limiter for self-hooking fish.
The feeder can be mounted on the feeder tackle in a standard way, using loops, a swivel with a clasp, and knots. When using loop equipment, the feeder feeder moves along the loop, and the leash is mounted to the twist-out. The feed container is located away from the “line of communication” between the prey and the fisherman, although to a lesser extent than in the paternoster.
Loop equipment is in demand due to the high probability of self-notching. When the fished object picks up bait from the bottom, it often deviates slightly downstream to leave the school to feast on it. But since free sliding is limited by the size of the loop, at the moment of contact with the feeder, it rips it out of place and hooks itself, falling on the hook. In most cases, this moment is visualized as a bream bite in the current, and a nod is played out. Depending on the location of the leash outlet, a symmetrical or asymmetrical loop is selected.
A symmetrical loop better presses the leash to the bottom surface, and an asymmetrical loop has higher sensitivity indicators; there are similarities with a paternoster, when the feeder is attached to a twist by means of a swivel and a carabiner that wraps around the loop.
We recommend reading
Interview with the manufacturer of feeder feeders Sergei Kovyrkov Tips from an expert on choosing feeders and how you can save on their purchase.
Set of accessories
As already noted, it is better to use a feeder in certain reservoir conditions that correspond to the caliber of the gear. However, this aspect does not make the feeder highly specialized. In this niche of reservoir conditions (a certain casting range and weight of feeders), you can create various installations for completely different local fishing conditions - a pond or a river, crucian carp or roach. There are even surface floating rigs for catching sabrefish and bluegill in the water column or from above.
In its domain, each feeder tackle is universal. The correct equipment of the feeder in specific fishing conditions is finely adjusted to the characteristics of the place, the tastes of the fish, and allows you to fish when the usual rough rocker arms with a spring are silent. One and a half kilograms of bream on a 0.1 mm leash from a distance of 70 meters - please (subject to the correct tactics, technique and equipment). But he doesn’t take it on a donkey with 0.25 mm leads. And you can’t throw a Chinese telescope with a spring at such a distance.
The basic equipment for fishing with a feeder is the same - a rod, reel and cord. But the elements of the working part - the actual installation - can be configured in completely different ways. The same for picker or heavy. With a set of three rods (picker, medium and heavy), almost 100% of the water bodies possible for fishing in our country are covered. Only for some very specific places (sea, mountain rifts for fly fishing, etc.) these tackles are not suitable.
Main line
Equipping a feeder fishing rod with the main fishing line is an important stage of equipment. Here you cannot use any thick-diameter and mediocre-quality braid that comes along. This cord is suitable for donkeying - frequent casting is not needed. Working with a feeder means constant, accurate and long-distance recasts. The requirements for the cord are no less important than for the spinning rod.
The feeder needs a high-quality thin cord for the equipment. This is necessary for good release from the spool when casting. In addition, it must withstand intensive use, including heavy feeders. In principle, there are not many options for equipping the feeder with fishing line. For most cases, braided line is used, less often - monofilament line.
Braided cord
To equip a feeder rod, 4 or 8 core cords are suitable, designed specifically for feeder or spinning jerk fishing - jig, twitching, jerk. The braid should slide well along the rings and at the same time withstand the jerks of the feeder when casting or reeling from afar. Typically a diameter of about 1-0.14 mm is used.
The thinner the cord, the better it flies out when casting. However, braids that are too thin are weak. Feeder professionals recommend using braids with a diameter of about 12 mm. If there is no need for long casts and the desire to buy an expensive cord, a thickness of about 14-0.16 mm is suitable for short distances (up to 60 m).
Equipping your feeder tackle with a cord is an important part of preparing your fishing rod for fishing. You constantly need to work with the cord - clip it, make casts. This point is directly related to the balance of the gear. The right rod, reel and line work as one unit. This gives the main advantage of the feeder - the possibility of frequent and accurate casts to one point.
The braid has no stretch - this allows you to clearly record a bite over a long distance. However, in some cases, this is a disadvantage - then monofilament fishing line is used. Read more about feeder cords.
Monofilament
Monofilament is used on pickers when fishing at short distances. Due to the short distance, even a stretchable fishing line shows the bite quite well. Equipping feeder gear with monofilament fishing line is necessary when catching large fish from a short distance. Braid does not absorb shock, and when playing, you can lose your treasured trophy.
On braided lines, this problem can be eliminated by using a feeder in the rig (more on this below). When the air temperature is below freezing, monofilament is also used, since the braided line freezes in the cold and becomes sticky and tangled. The diameters used are about 2-about 25 mm. For catching large, thicker fish – from about 3 mm. However, it should be taken into account that the thicker the line, the shorter the possible casting distance, especially for light feeders. Read more about the fishing line for the feeder.
It is common practice for the feeder to keep a supply of monofilament on the spool for use when needed. Accordingly, the spool with monofilament must match the reel. The cord is wound onto the original metal spool. It’s good if the spool is small, match spool – just right for 120+ meters of thin braid. You will have to wind backing onto a deep spool. The fishing line is wound on a spare plastic spool.
Shock leader
To reach distant points - distances of 80 meters or more - a careful approach to equipment for feeder fishing is required. To make such a cast, the rod test must correspond to the weight of the feeder being cast. Experts say that a feeder that has 80% of the rod's test weight flies best. The tackle should have a good reel installed that winds the cord evenly. The cord itself needs to be thin and high quality, 0.1-0.12 mm.
Here lies the rub - for distance you need a power cast, but the tackle uses thin braid, which can simply come off when jerked by the weight of a heavy feeder. To properly make equipment for feeder fishing in such conditions, a shock leader is used. This is a piece of thicker monofilament (0.3 mm) or braid (0.19 mm) at the end of the main line.
The length of the feeder shock leader should be enough for the overhang for casting, the length of the rod and several turns on the spool. Then, during a power cast, the load goes not on the thin main cord, but on the more powerful shock leader. To tie the braid together on the feeder (and the monofilament as well), a carrot knot is used. Such a knot has the shape of a cone, with a sharp end along the flight direction, which does not interfere with its passage through the rings when casting.
Shock Leader Knot
Carrot knitting pattern
Spool winding
To tie the cord to the feeder reel, conventional knots are used to attach the fishing line to the spool. It is better to make the knot closer to the base so that it does not initially affect the quality of the winding. High-quality winding of fishing line with a reel is a necessary condition for a feeder. This affects the throw when casting. The cord is wound so as not to reach the edges of the side by 1.5-2 mm.
If the spool is too deep, backing is wound under the main line. The backing on the feeder is wound from a thin braid so that the surface before winding the main cord is uniform. If the rig has a shock leader, then several turns of it should be located closer to the outer edge of the spool (see diagram).
Small (maichevaya) spool for thin braid
Spool attachment points
Diagram of winding cord on a spool with backing and shock leader
Feeders
The central element of the feeder's working equipment is the feeder. There is an important point in feeder tactics - all fishing is based on feeding a specific point. During the process, the feeder is constantly filled and additional feeding is carried out. At the beginning of the journey, a novice feeder can use one feeder for measuring the bottom, starting feeding, and further fishing. Over time, you need to stock up on various feeds.
For initial feeding, there are special large-volume feeding troughs. With their help, the starting feeding is carried out - the first 10-20 casts. Then you can use a smaller feeder - so as not to overfeed the fish and not frighten it with splashes on the water when casting. Sometimes large fish, especially in shallow water, avoid places where the equipment is constantly splashing into the water.
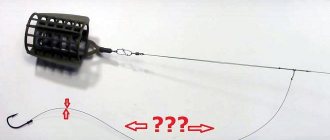
The actual working installation of the equipment is built around the feeder. This is a kind of bunch of main fishing line, a feeder and a leash with a hook. Depending on the fishing conditions and the type of fish, different rigs are used. There is no best feeder equipment - each of them is designed for certain conditions.
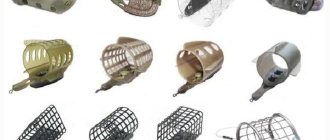
The feeders themselves in the equipment can be of completely different configurations - barrels, cubes, plastic or metal, bullets and glasses, with lugs or flat. The feeder is concerned with two characteristics - weight and feed capacity. These are the concepts that need to be used.
Read more about feeder feeders.
How to tie a feeder to a feeder
Unlike casting feeder fishing, feeder fishing is distinguished by particularly sensitive and, accordingly, more complex equipment, which includes not only feeding devices and leashes with attachments, but also all kinds of rocker arms and an element such as an anti-twist, which can prevent tangling of rigs in the process of casting and playing fish. Also, to form the connections that make up the installations, it is necessary to use all kinds of combinations of ties from scaffolding material, the main design of which is a variety of nodes and loops. Further, in the course of the material, we will dwell on the basic technologies that allow you to tie a feeder to a feeder.
Paternoster
Paternoster is the simplest and most common type of mounting connection, which can be safely classified as a universal option applicable for most fishing conditions. The technique is based on branching the main cord at the end of the equipment into a short branch, to which a feeding device is attached using a carabiner fastener or simple tying. On the continuation of the cord, a leash is mounted in a loop in a loop or using a miniature metal fastener.
Important! To prevent tangling of the equipment, the length of the leash is always an order of magnitude higher than the length of the outlet.
The outlet on the main cord is formed by twisting the fishing line and fixing it with a knot, or for mobility of use and speed of production, instead of tying a knot, a triple swivel or paired carabiners are installed. The advantages of this knitting technique are the speed and simplicity of the design. The disadvantages of this method are low sensitivity to small bites, especially when using equipment in reservoirs with medium and fast currents.
Gardner's loop
The Gardner loop is an improved type of knitting of the paternoster presented above. The method was invented by an American fisherman, after whose name this method of feeder installation is called. Cunning anglers have been encouraged to move away from forming a cast-off and using a carabiner or directly tying the feeding device to the cast-off line.
Instead of a short branch, a blind loop is knitted, first into which a feeder can be attached to the fishing line through a swivel or subsequently using a winding ring. The leash with bait is attached to the cord without changes compared to the paternoster, through a loop or carabiner. As a result of the innovative approach, tying has become even more simplified without changing its initial functionality, and its formation does not take the fisherman even a few seconds of time. These factors are the main advantages of the connection. The disadvantages are comparable to the paternoster and these are the relative roughness of the equipment and the insufficiently efficient operation of the installation on currents.
Symmetrical loop
You can tie the feeder to the fishing line in a more sensitive way using the principle of forming a symmetrical loop on the cord. Within the main cord, at a distance of 30–40 cm, a symmetrical loop is formed using two surgical knots along the edges of the structure. A feeding device is inserted into the loop, which should slide freely along one of the arms of the connected loop. In the upper part a carabiner is placed for fastening with the main fishing line; in the lower part, a 10 cm twist is made from the two sections remaining from forming the loop, to which the leash with a hook will be attached.
Important! Installation is considered a specialized method of equipment for feeder hunting in a body of standing water.
The advantages of knitting are high sensitivity. This parameter gives the sliding principle of operation of the feeding structure, the weight of which is not felt by the fish trying the bait. The disadvantages are the specificity of fishing conditions, depending on the type of reservoir and some of the difficulties when tying a loop construct.
Asymmetrical loop
You can also tie the feeder to the feeder using the antipode of the previous connection option - an asymmetrical loop. The absolutely similar principle of forming the main knitting design differs only in the size of the loop arm.
Important! One of the arms of the loop is made two or three centimeters shorter than the second, and it is on this short part of the mounting connection that the feeding tool is placed again, using the sliding principle.
Fishermen recommend the presented tying especially for fishing on currents, because the advantages of the rig are the ability to clearly transmit even the slightest bite to the quivertip, and the disadvantage is only the relative complexity of tying.
Flat method
There are two principles for tying a method-type feeder onto a fishing line, using sliding and blind connection technology. Using sliding technology or the so-called inline method, the device, due to its design features, is mounted on the main cord. The movement of the feeder is regulated by two stoppers. A leash with a hook is attached behind the feeding tool.
Using blind technology, we tie the feeder to the outlet from the main cord, which is similar to the paternoster technique, mounting the leash in the classic way behind the bait device. A more innovative method, the so-called helicopter and two knot type, places the leash on a sliding carabiner in front of a feeder mounted at the end of the cord. It is more effective to use open-type feeders in weakly flowing and stagnant waters, and the direction of how to tie the equipment, sliding is more sensitive in its principle, gives the activity of the fish.
Harvester equipment
This type of equipment is equipped with anti-twist tubes, on the side of the long arm of which a leash is connected to the main line inserted through the cavity of the tube, and a feeding tool is attached to the break between the components of this element using a carabiner. Easy to assemble, recommended for novice feeders due to the low tangling of the gear and versatility of use. The disadvantage of this method is its roughness and low sensitivity when fishing for passive fish.
Montages
There are many types and types of feeder equipment. A separate article is devoted to specific feeder installations on our website:
Here we will examine a more general question - which feeder equipment is better in certain conditions. Ready-made mounting bundles can be prepared in advance. Some fishermen prefer to knit feeder rigs with their own hands right on the pond. If the angler has decided to start using a feeder, he needs to understand the various schemes and equipment options.
Feeder fishing technique is a constant experiment with equipment in different conditions. Often the working connection needs to be selected experimentally on a reservoir. This is the flexibility of the feeder - you can almost always find something that works well for this particular fishing. You can store ready-made feeder equipment on reels or in boxes like a leader. A good solution is not to prepare the entire assembly, but only the twists and loops themselves. But feeders and leashes are installed on the equipment already during fishing.
Standard feeder
By ordinary feeder we mean standard fishing with ordinary feeders. Such equipment works in any conditions and is adjusted according to the situation. These are fishing loops for the feeder, anti-twisters and other systems for attaching the feeder and leash to the main equipment:
- Gardner loop and feeder paternoster;
- Symmetrical and asymmetrical loop;
- Installation with anti-twist;
- Sliding rigs inline, running (Running Rig);
- Helicopter and two knots.
Paternoster and Gardner loop are non-self-cutting feeder equipment. The fisherman needs to choose the right moment to hook. However, this division is very arbitrary. Loops (symmetrical and asymmetrical) are self-cutting feeder equipment, since at the beginning of the pull the line is freely pulled by the fish. But when the free descent ends at the loop node, the fish are caught from the heavy feeder.
On the inline (running rig in the carp version), amateur anglers install a stopper that limits the free movement of the fishing line for self-hooking. In such sports feeder equipment such a stopper is prohibited and therefore is not installed.
Paternoster
The fisherman’s job is to select the rig depending on the fishing conditions. Current, activity or passivity of fish, bottom topography - everything can affect the realization of a bite. The loop on the feeder does not work - install a paternoster. No again – let’s try online. In deep silt, it is better to use options in which the feeder hangs on a branch - for example, a paternoster, a Gardner loop, an inline (running) with a branch.
There are many feeder equipment schemes, and all of them are derivatives of the indicated basic ones. At first, it is better to adhere to the generally accepted sizes of loops, twists or bends. With experience comes your own understanding of these issues. To properly assemble feeder equipment, you need to not only learn the installation options, but also learn how to apply them depending on the situation.
The paternoster is very sensitive, but in some cases it does not indicate a bite - when the fish moves towards the shore, towards the angler. Loops and running rigs do not have this drawback. The best and catchiest feeder equipment is the one that the angler has learned to work with.
Asymmetrical loop
You can tie the feeder tackle to the main line using a loop in a loop or through a swivel. The loops themselves are made with a regular figure eight or surgical knot. When making feeder equipment for the outlet to the leash, a twist is made that is longer than the outlet with the feeder. This prevents the leash with the hook from getting tangled or tangled due to the tightness of the twist. In this way, exactly the same thing is done, for which a rough plastic anti-twist tube is needed.
Helicopter and two knots
Anti-twist tube
What fishing line should I use to make feeder equipment? The best option is a rigid 100% fluorocarbon or clear leader material. But in the absence of this, a regular monofilament line with a diameter of 0.25-0.3 mm will do. The main condition is its rigidity, since a twist of soft fishing line will not normally remove the leash from the feeder. Fluorocarbon is ideal in this regard - it is invisible in water, hard, and resistant to microdamage. And the coil just runs along it, and besides, the installation is susceptible to the influence of shells, pebbles on the bottom, etc.
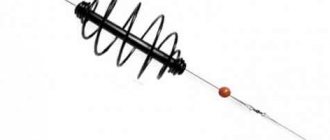
Inline (Running Feeder Rig) with bead outlet
Inline with tapping on a bead and twisting (diagram)
Installation - a kind of bundle of fishing line with three loops - for the feeder, leash and connection to the main cord (shock leader). To make a feeder rig for the first time, it is better to practice in advance, before fishing. Sometimes it takes a while. But then this skill is honed and is performed automatically, like tying a hook. Detailed installation diagrams and knitting order are in the relevant articles on our website.
Inline
Some anglers believe that the most sensitive feeder equipment is inline, that is, the end-to-end passage of the main line through the feeder (flat, spring). This is somewhat incorrect - standard installations, especially asymmetrical ones, are no less sensitive. Nothing absolute can be said about this - any equipment can work better or worse in different conditions. Simply, historically, In-Line is a carp fishing rig. And now she has successfully taken root on the feeder. In carp fishing, fairly powerful spod rods are used, without a quiver tip. And such equipment transmits the bite to the signaling device when the baitrunner is working - and it is simply clearly visible even without a flexible tip, like on a feeder tackle.
Carp inline on a sinker
Flat method inline
Inline with spring
Amateur bottom montages
Nothing prevents fans from using the usual bottom varieties of feeder equipment - rocker arms, outlet leads on a blind feeder, springs. The spring on the feeder is our Russian flat method. A set of springs and several hooks with short leads - the so-called crucian carp killer, also works. Any equipment for the feeder with your own hands, if they catch fish, is justified (except for poaching twitches).
Methods and methods for equipping the feeder are chosen by fishermen based on need. In sport fishing there are certain rules, in amateur fishing there is only a limit on the number of hooks by law. Cork tackle in a feeder rig for carp or crucian carp (nipple, makushatnik) works great in the south, where these fish species are the main object of hunting for amateurs.
Killers of crucian carp and others
Nipples (plugs)
Special installations
Popular feeder rigs for catching crucian carp, carp, and carp in standing waters are the method and the flat method. This installation consists of a special sinker-feeder attached to the main fishing line using the inline method or tightly with a special mount with a swivel for the leash (for self-hooking). A sufficiently sticky bait is stuffed into the feeder with a special silicone mold or by hand (method), which can withstand casting and hitting the water.
The bait is presented in different ways - simply on a leash, in a floating version (Pop-Up) or pressed into the bait. Over time, the bait falls apart under the influence of water, releasing the hook with bait. In this setup, a hair rig with boilies or corn on a hook works well. More details - feeder flat method.
Flat with leash fixation in the feeder
To catch large carp and carp on a feeder, specialized carp rigs with or without icecore are also used. Ledcore is a special line used in carp fishing. Any installations of the inline type, safe clips for carp and others are also applicable in the feeder for pond fishing. The feeder also allows the use of floating equipment. This is useful when fishing for silver carp, sabrefish, blue bream and other riding fish. The equipment uses special Floating Feeder type feeders.
Carp running on icecore
Carp safety clip
Floating feeder
Hair rig
Simple inline
Sliding feeder rigs are the only ones allowed in feeder fishing competitions. This is explained by the fact that in the case of a dead hook, a break in the leash or working line will not lead to the fish swimming away with a heavy load in the form of a feeder, and therefore will prevent the death of the underwater inhabitant.
In this installation, the line passes through the body of the feeder or a loop at one of its ends. This could be a spring with a plastic core or a more modern “method”.
At the upper and lower ends, the movement of the feeder along the fishing line is limited by locking elements made of soft materials: rubber or silicone. The leash is attached to the end of the working line using a loop-to-loop method or through a carabiner.
Twisting can also be used in inline editing.
Inline with bend
This modification makes the equipment more sensitive. The main difference from the previous installation is the presence of a short, 5-10 centimeters, line outlet with swivels at the ends. The working line is passed through one of them; the feeder should be tied to the second correctly: with a knot, a loop or through a carabiner.
Inline with a tap combines the properties of several montages:
- separation as in the paternoster and Gardner loop;
- free sliding as in loop rigs.
Advice! In this equipment, it makes sense to attach the leash not immediately after the stopper, but to twist it or tie a rigid bend of 15-20 centimeters in size to prevent overlaps.
Inline with retraction.
Helicopter and two knots
Imagine the previous montage, in which it’s as if the feeder and leash have swapped places. This will be a helicopter with two knots, so named for the free rotation of the branch with a hook around the main line. In this case, the feeder has an end fastening as in the equipment for the donkey, discussed at the beginning of the review.
This installation makes it possible to vary the depth of the working horizon by moving the leash with stoppers up and down along the working cord. Fastening is carried out using swivels or a slip-on loop.
Equipment: helicopter and two units.
Carp montage
In carp fishing, much attention is also paid to the fish, and the harm caused to it during the fishing process is minimized. To prevent the possibility that the feeder feeder will harm the carp if the gear breaks, it is installed using a safe clip, which allows you to easily remove the heavy load.
The sinker is on a safe clip.
In this case, the carp equipment is not as sensitive as that of the feeder rigs listed above, but the strength of the trophy is such that it can easily pull a heavy feeder and sinker from the bottom. It is almost impossible to miss a bite from a strong fish.
When fishing for carp, use a reel with a baitrunner or do not lock the reel bail. This will help protect the tackle from sudden powerful carp bites.
Leashes
To finally equip the feeder tackle, a leash with a hook is added to the installation. This is the last link of equipment between the angler and the fish. The leads in the feeder, depending on the installation, are used in different lengths and thicknesses - from 10 cm for flat to 1.5 meters for current. The fishing line is usually used thin - from 0.08 mm.
For large fish, accordingly, more. It all depends on the fishing characteristics. The leads are usually prepared in advance; a loop is formed on them using standard feeder knots (figure eight, surgical loop) for attachment to the installation outlet. Leashes are convenient to store and transport in special leash holders. Read more about feeder leashes.
Hooks
The most popular feeder hooks are ordinary ones, with a standard bend and a medium-length shank, thin, No. 8-12 according to the international classification. These dimensions are for a standard feeder. Accordingly, for flat fishing you need larger hooks, with a short shank, and carp hooks. Their size is selected according to the bait and the size of the fish. An article about hooks for feeder gear.
Accessories
Simple feeder equipment does not require additional elements, except for a swivel with a carabiner for the feeder (and this is not necessary). To tie a swivel to the feeder braid, the loop-to-loop method is usually used. But anglers are constantly improving equipment, experimenting with their own options.
Rubber stoppers for fishing line, beads, and cambrics will come in handy. For high-quality running rig equipment, it is better to launch the feeder not directly along the fishing line, but through a plastic bead - this way the glide is better and the fishing line is less injured. To form twists and bends from fluorocarbon, you can use special crimping tubes - for greater accuracy.
Crimping tubes
How to equip a feeder rod with a reel and equipment
Coil
To equip the feeder, specially produced reels are used, but if one is not found, a regular spinning reel will do. Below are the recommended parameters that your reel should have:
Reels are divided into high-speed and power types, according to gear ratios. We need something in between. A reel with a gear ratio up to 4.6 is a power reel, and a reel with a gear ratio above 5.5 is a high-speed one. Reels with gear ratios ranging from 4.6 to 5.5 are just right for us.
Let's move on to the bobbin. Usually the universal size is 3000. For us, from 2500 to 4000 is suitable. By the way, when choosing a reel, inquire about the presence of a spare spool in the kit; if it is not there, ask which models are on sale separately and buy it, believe me, it will come in handy.
When fishing with a feeder, the probability of a sharp jerk is very high, and, accordingly, the line will break. We don’t need this, so we make sure that our reel is equipped with a friction brake. The clutches are front and rear. The rear clutch is less sensitive and is easier to use in feeder fishing, while the front clutch is more often installed on spinning reels. There is not much difference - who is more comfortable working with what.
The reels use ball bearings, some models can have up to fifteen of them. There is no need to chase quantity - those with 5-6 bearings are quite suitable for us, but no less, because the device has at least 5 elements that are very susceptible to abrasion.
We can recommend the following models:
- Shimano BAITRUNNER 4000 D up to 5000 rub.
- Okuma LONGBOW BAITFEEDER 50 to 2000 rub.
Okuma LONGBOW BAITFEEDER 50 with baitrunner - budget quality reel
Let's move on to the issue of choosing fishing line
The debate about which is better - monofilament or braided line - still continues. Let's look at the advantages and disadvantages:
- Braid has an advantage that there is no point in arguing with: it is very sensitive, tapping the bottom to determine the location of future fishing, transmitting a bite - in this it is better. But since very often fishing occurs in places where shells accumulate, on the edges, the likelihood that the line will be “cut” increases greatly. And just the braid has a much greater chance of being cut off. But good fishing lines have abrasion protection, for example, Salmo Elite Braid 0.13, we recommend.
- Monoline - It may not be as sensitive, but it is less susceptible to the chance of being cut off by barnacles or anything else. Plus, stretching plays an important role if you catch large and strong fish. Good fishing lines are produced by Salmo; they have a Feeder line.
If you haven’t decided on your own which fishing line to choose, take monofilament if you don’t catch crucian carp. Braid is still better for him because of his very weak touch to the bait. Choose a monofilament line with the lowest stretch and preferably a dark color (this is used by carp fishermen for good reason, it is not visible at the bottom).
For leashes, use high-quality fluorocarbon fishing line that is invisible in the water.
Equipment is the heart of the feeder
The simplest equipment with which to start studying a feeder is a paternoster. It consists of a loop into which the feeder is threaded and a leash on which the hook is attached.
The equipment is made as follows:
- We take the main fishing line and tie a loop for the leash at the tip.
- Next, place your palm along the length of the first loop and knit a second loop at the end of the palm. The size of the second loop should be such that the feeder fits into it.
- We attach the feeder - we pull a large loop through the swivel and throw it on the feeder itself. We fix the line on the swivel itself. Using the “loop-to-loop” knitting method, we attach a leash with a hook to the second small loop.
- "Paternoster" is ready.
Video for clarity:
Now let's talk about feeder rigs for catching bream in the current, carp and crucian carp.
Fidergam
Feeder gum, or feeder gum, is used when catching large fish, especially when braid is used as the main line. A spacer is mounted from feedergam between the leash and the mounting, which absorbs the jerks of large fish. Feedergam is useful, for example, when long-distance fishing for large bream from under a deep edge. Without it, the number of failures during fishing is very large. Read more about feeder rubber.
Feedergam in a snap
Working equipment for fishing on a feeder is a very flexible and experimental question. In any case, a wide range of tools is open to the feederist, which is learned as a result of experience on the reservoir. It is useless to argue about the best equipment and installations - this is a very conditional criterion, which entirely depends on the conditions of use and the skill of the fisherman.