Throughout their lives, absolutely all people encounter one type of knot or another. And in fishing practice, the ability to make knots and loops is simply necessary. The inability to assemble equipment correctly can become a serious problem for a novice fisherman, because even such a small thing as the correct loop on the fishing line sometimes “makes” the whole fishing trip.
Before you begin to study the art of knitting loops, you should first understand in which fishing designs these elements are found. It’s worth noting right away that when starting to study the art of fishing, you should forget about the skills of tying fasteners that you used in everyday life.
Float fishing
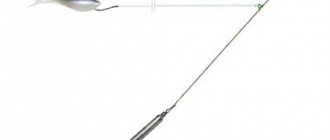
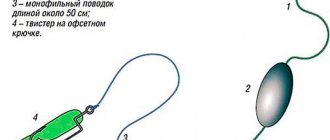
It is not uncommon among floaters to become interested in fishing in tandem using different baits. To do this, the float is equipped with several hooks on a single main thread. There are two options for attaching an additional hook: it is fixed on the main fishing line, clamping it at the top and bottom with locking knots, or a leash with a hook is attached to a loop on the main fishing line. The latter option is considered more convenient, since in this case the second leash can be removed at any time if the angler decides to change fishing tactics. A loop is also made directly at the end of the leash itself, or the fishing line is simply tied to the loop.
Using loops in knitting float leashes
Spinning
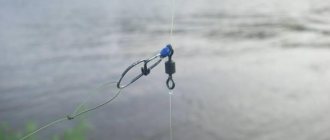
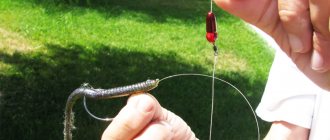
Non-tightening loops and an indispensable attribute of spinning fishing. Here rings of thread are used on leashes and for attaching them to the main line. If a fisherman uses special metal leashes, then most often he also attaches them through a loop to the main fishing line. To secure baits (wobblers, spinners), spinners knit self-tightening thread rings, better known as a “Clinch knot.”
Spinning fishing, which uses a retractable bait, also involves the use of loops. They can be replaced with swivels, but many use the old-fashioned connection through loops: one is made on the main line, the second on the end of the lead.
How to knit loops?
In order to make a loop on the fishing line, you can use a special device - a looper. This is a hook with which you can make a simple loop for a leash in a few steps.
Review of “helicopter” feeder equipment
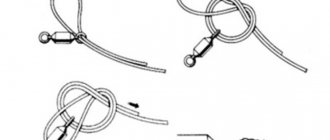
Without the use of special tools, a simple loop on a fishing line is made as follows:
- The fishing line is folded into two threads.
- The place of the bend in a particular case will be the end of the fishing line.
- We wind the double fishing line around our fingers and thread the free end into the resulting ring.
- Tighten and align.
An ordinary loop can also be knitted in another way. The fishing line is also split in half, the free double end with a bend is the working end. They need to make several turns around the main line and pass into a temporary ring. Before tightening, the diameter of such a loop can be adjusted.
The principle is the same as the “eight”
The self-tightening loop requires special attention. It is created on the main line, and with its help you can quickly tie a lead or tandem leash. The tying scheme is as follows: a “ring” is formed on the main line. Then the fishing line is taken above the ring and passed into the loop in a loop. Then it slides along the main line and tightens spontaneously. Such a tightening loop is also called a sliding loop, or a noose. It is used not only in fishing practice, but also in everyday situations.
Remember that before tying a loop on the fishing line, you should prepare a small amount of liquid. Before tightening, any loop should be slightly moistened.
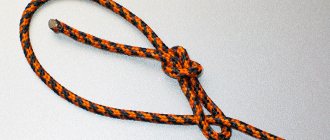
Description of the sliding knot and its purpose
The slip knot is quite simple to make and is a self-tightening loop that is formed by a simple connection tied around the root end of the rope. Because the root end is free to move within the simple, the slip is used to tie rope around objects, another rope, support, or tie objects together and then wrap the root end around it.
Under load, the sliding assembly covers the object, held by the force of its friction. When you relax your efforts, it easily unravels.
Connections of this type are used for:
- Creating additional thickness from regular rope, which allows you to increase the strength of the connection.
- Attachments to rings and lugs.
- Tying around the support.
- Tying and transporting things.
- Easily and quickly lift heavy loads.
- Tying several ropes without problems with connection strength.
- Forming a separate loop on the rope.
- To be on the safe side.
Advantages and disadvantages of the node
The slip knot or noose is well known to sailors and fishermen. Its main advantage is that such a loop is easy to loosen and untie after use. However, it can crawl under variable loads or on slippery cables, which are among its disadvantages.
There are several types of this design:
- Direct (simple)
, which is the most durable type of connection. When wet, it only becomes stronger, which is its main advantage. Among the disadvantages are the need to control the correct tying (position of the free ends, correct overlap), as well as the need to tie two control knots or one double knot on the lace, which requires a lot of rope consumption. - Flat
– designed for connecting ropes and other durable materials. It is also a fairly reliable type of connecting several laces or leashes to each other. - Rybatsky
combines several elements.
This is interesting: The nuances of equipping a winter girder depending on fishing conditions
Node diagram
To tie the simplest slip knot, follow the diagram below:
- Prepare ropes whose strength depends on the purpose of use.
- The rope (rope, cord) is folded in half so that one end is long and the other remains short.
- Form a small loop at the short end of the rope.
- The long end of the leash is completely threaded through the resulting loop.
- The size of the loop is adjusted by relaxing the connection.
- The noose is tightened by pulling the end of the rope.
Figure 1. Traditional connection diagram
By the way, this type of connection is often used in crocheting, when it is necessary to temporarily connect several elements (Figure 1).
Application area
The slip knot is widely used in everyday life. For example, for lifting various weights, transporting things tied together, when making jewelry, catching animals, in fishing and during tourist recreation.
It is widely used as a rescue vehicle, as well as for belaying and lifting people and equipment. The sliding type is widely used on small sailing ships and in theatre, surgery and construction. In addition, this type of connection has found wide application in the most unexpected areas: in crochet, macrame and even in the construction of sliding structures for gartering cucumbers.
Feeder "thing"
The Gardner loop is the know-how of feederists. This is not just a fixation option, but the name of one of the types of feeder installation itself. This is a rather complex knitting technique, several types of loops are used in it:
- First you need to make a loop at the end of the fishing line. To do this, you can use any of the instructions described above for tying a blind loop.
- Then step back 10-12 centimeters from the end loop and make a large diameter loop to which the feeder will be fixed.
In feeder rigs, tying a loop is often used to divide the main thread into two ends. In this case, tie a large loop at the end of the fishing line and cut it down the middle. You can tie a feeder to one end and a hook, for example, to the other.
Gardner rig is a type of rig based on two loops
Slipknot
A person, in the course of his life, uses a diverse set of various knots and loops. Some of the most popular fasteners are simple sliding devices and various variations based on them.
They are widely used both by people of specific professions - sailors, rescuers - and by ordinary people in everyday life. The article talks about the features and purpose of one of the most popular knots - the sliding knot, reveals its advantages and disadvantages, and also gives advice on its use.
The best loop
According to many fishermen, the loop connected with the figure eight is the strongest. To do this, you need to grab the fishing line with your fingers in the place where the equipment will be, and pull the large ring to the side, twisting it in the form of a figure eight. Then the upper crown of the figure eight must be bent and passed into the lower loop through the bottom, as shown in the picture. After this, the loop can be tightened. It is very durable and immovable.
Tying loops and various knots is an integral part of fishing. It is best to prepare the tackle at home, and tie all the fastening elements on the fishing line at home, without fuss. Storing finished leashes is easy using special containers that you can make yourself or buy in a special store. Boxes for leashes are equipped with fastening mechanisms on both sides, which allows you to always keep the finished equipment elements straightened.
Basic types of sliding knots
There are several types of connections that form a tightening loop. They all differ in the degree of complexity and application features. For example, the simplest is the running simple, and the most reliable is the sliding eight.
In everyday life, a sliding blind loop will be useful, which is used to tighten various packages when packaging. The running bowline is well known to sailors, and the snare bowline is well known to bird catchers. But the names “scaffold” and “shackled” speak for themselves. In addition, sliding models are used in handicrafts, hunting and fishing, as well as in many other branches of human activity.
For bracelet
The sliding knot is widely used in the manufacture of jewelry items, for example, for bracelets or beads to regulate the length of the product. This sliding fastening acts as a fastener that allows you to change the size (Figure 2).
Figure 2. Sliding connection of the cord in the bracelet
The end of the cord (fishing line) on which the product is strung is folded into a loop, after which the second part of the rope is applied to it. The first tip is wrapped completely around the loop and the second end several times. The remaining piece of cord is inserted into the loop from the wrong side and the resulting connection is tightened. You can also use two knots that are tied on both sides of the bracelets.
Fishing knots
In fishing, the sliding knot is used for various purposes:
- For tying the ends of fishing lines in marine or fishing;
- To secure material to the reel spool;
- For tying a load, hook, bait or leash;
- To create stoppers for sliding equipment.
Figure 2. Sliding joint options
Among the most popular knitting techniques are: “Clinch”, “Grinner”, “Stepped”, “Gripper”, “Eight”. Having mastered the listed techniques, you can begin tying more complex patterns (Figure 3).
Chinese
A Chinese knot is a plexus of threads that was previously used to record events. Nowadays it is used for talismans and amulets. It supposedly protects against negative energy and helps the owner find peace and good luck (Figure 4).
To weave Chinese joints, threads of bright, cheerful colors are used - red, yellow, green, brown. Moreover, most of them can be tied with either one or two threads. And yet, double weaving looks much more impressive.
Figure 4. Stages of tying a Chinese knot
There are about 20 weaving techniques in total. We present to your attention one of the simplest diagrams that will tell you how to tie ropes quickly and efficiently.
It consists of the following sequence of actions:
- Creating a basic knot, the ends of which cross at the bottom.
- Creating a pattern on the left, through the eyelet. To do this, place a new loop under the loop, bringing the end down.
- Repeat the steps for the right side of the product, which must be turned over so that the sides switch places.
This is interesting: Camping fire pot