Homemade sleigh for children and adults
You can make a sled at home using various materials. It is better to discuss the design of a children's sled with the child for whom it is intended, if the child is not very small. After all, he should like such a thing. The sled can have elements needed for certain activities, a high back, a wide armrest, wide runners, or in the Finnish style, where the seat is in front with a high back, the handle is behind the seat at the back, on runners from the rear of the foot platform. It is imperative to discuss what material to make from.
Snowmobile sled
If you have a snowmobile, then you also need a sled. Many fishermen have become convinced that a sled is a useful thing. The main thing is to determine which design is more suitable for specific fishing conditions. It can be a drag sleigh or a classic sleigh with two runners.
As mentioned above, such sleds can be made at home. By the way, if you try, you can make a snowmobile. There are a lot of interesting and simple designs on the Internet that can be easily replicated at home.
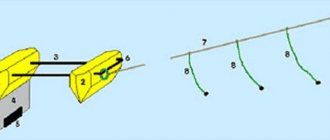
Purchased sleds, as a rule, require some modifications, although not significant:
- To prevent ice from collecting on the inner surface of the sled, they should be treated with a silicone-based lubricant or with a special ski wax.
- For driving in the dark, reflective elements should be attached to the sides of the sled.
- It wouldn’t hurt to attach a folding chair to such a sled to make fishing more convenient.
Materials for making sleds
- The main material for making sleds is wood. It is advisable to have boards made of coniferous wood. This material is most resistant to temperature fluctuations. You can also use multi-layer plywood, although a product made from such material can quickly become unusable. A sled with runners, 2-3 centimeters wide, can be made from a board of the required length and width, cutting out the sides with runners in two parts, similar to the sides of chairs, which are then connected by transverse strips that form the seat, at a height of about 20 centimeters, as well as the back and in front of the footrests, on the runners themselves. Markings must be applied to the board corresponding to the length and height of the sled, indicating the runners, armrests and back elements. Having cut out the sidewalls, we connect them with transverse strips, secured in the grooves of the sidewalls, using glue and fastening them with self-tapping screws for guarantee. To strengthen the sled, we cover the runners with metal strips, the seat can be “insulated” with any insulation, or a cushion can be made from foam rubber.
- Modern technologies do not stand still. Craftsmen considered such an interesting material for creating various designs as polyvinyl chloride pipes, used in everyday life for water supply. If you have corners and plugs, tees and adapters, you can assemble anything from them. The main thing is to make preliminary sketches so that it is clear where and what to fasten, which parts to solder. Such designs are more suitable for small children. For insulation, you can use foam rubber, a piece of faux fur or natural rabbit skin.
- The third, more adult option is the option of making sleds for adults and teenagers from steel pipes. Using bent pipes instead of runners, jumpers must be attached to them by welding, forming the main frame of the sled. On top of it you can put wooden planks for the seat, strengthening them with self-tapping screws. You can use the Finnish sled option. It is essentially a chair mounted on skids, with attachments at the back of the chair for a second rider. A powerful frame made of steel pipes will allow this design to be used for adults.
To make such a sled at home you need the following tools:
- electric jigsaw,
- soldering iron,
- screwdriver,
- roulette,
- self-tapping screws of different lengths,
- wood glue,
- wood varnish or paint,
- welding machine,
- materials for insulation.
The skillful hands of homemade “homemade” people amaze with their imagination. The design and shape, as well as the materials from which the sleds are made, their design depend on the skill of the master.
DIY sleigh: ideas, photos and drawings
Winter always comes unexpectedly, even if you are really looking forward to it: one morning, waking up and looking out the window, we will see the long-awaited snow, which so attracts the kids to frolic! And adults are usually not averse to cheerfully throwing a couple of snowballs, enjoying the clean frosty air and squinting at the sparkling white, still untouched snow cover.
It would not be a mistake to say that the main attribute of winter games for children (and often adults) is a sled.
Parents who have to take their children to kindergarten cannot do without a sled; An important help in the household is a sleigh, adapted solutions for various tasks. As a rule, any sled can be bought in a retail or online store: the choice of models is huge, the price range is very wide, the range of materials used and colors is also, as they say, for every taste. But what if you are a creative person, and your skilled hands miss the tools? Of course, get down to business! And the money saved, the feeling of satisfaction with the result and the child’s pride in his father, who “can do anything!” will be a well-deserved reward.
So, before you get down to business, you should choose the type of sled, think about its design and structure, and also decide on the materials. Let's be honest, you can assemble a classic-type sled on your own (“on your knees”)
or Finnish sleds, which are distinguished by the presence in the front of a seat with a backrest and elongated runners with small anti-slip platforms for the feet.
As an option, you can consider a snow scooter with a front turning ski and steering wheel, but this is somewhat beyond the scope of this article and, in the strict sense, is not a sled.
The design and construction of children's sleds can be very diverse - from simple ones, aimed at solving strictly utilitarian problems, to carved ones, using openwork elements and parts made of bent wood, usually in a pseudo-traditional style. It will not be a secret that every home craftsman chooses a design according to his capabilities and technical skills, often based on the materials available.
Read also DIY chestnut crafts
There is not much to say about the materials used to make homemade sleds: first of all, it is, of course, wood. Experienced craftsmen advise using the wood of resinous coniferous trees as they are more resistant to external influences (cold, moisture); special impregnation and painting often save the situation. Multilayer plywood is also often used as one of the most affordable materials, but active skating gives reason to believe that the next season will again have to start with the manufacture of another sled. You can give free rein to your imagination by using for our purposes thick tree branches, large and strong parts of rhizomes of a suitable configuration and modified accordingly.
Frequently related materials:
- metal strips for finishing runners and extending their “life” under conditions of intensive use on different surfaces (snow, ice, areas of frozen soil or even asphalt),
- leather or leatherette for upholstery of a soft seat, if it is included in the design (fabrics are not suitable for this purpose due to their wetness and low wear resistance),
- foam rubber or other suitable materials to provide softness to the above-mentioned seat.
An exotic material for making sleds can be considered PVC pipes of different diameters, which are used in arranging apartment water supply systems. However, it is precisely the exoticism, as well as the availability and relative cheapness of this material that is so loved by many craftsmen who have a special device for soldering (welding) such pipes. And the use of various connecting elements allows you to build the required configuration (numerous tables, chairs, armchairs, shelving, etc. are an example). The plastic frame combines well with other materials - the seat is usually wooden, covered with leather.
In conclusion, I would like to remind you that nothing in this world is impossible for a passionate person who strives to make his life and the lives of loved ones more comfortable and interesting. Therefore, try it, feel free to take up your tools and be proud of your little masterpiece!
Read also: Flat Christmas trees on the wall. Original tips, 45 photos
Here are some ideas on how to make your own sled:
DIY sled
As soon as the first snow fell, it turned out that the house did not have such a necessary winter cargo vehicle as a sled. Children's sleds have long since been "sent" to a well-deserved rest in a pile of scrap metal, and they would have been rather weak for carrying heavy loads.
I had to take up the production of new sleds, so to speak, household ones - stronger and more suitable for transporting goods (Fig. 1).
In the far corner of the yard, under a shed in a scrap metal warehouse, I found arms from the headboards of steel beds and some thinner pipes that had been prudently stored just in case.
As the production of these sleds progressed, a whole set of structures for similar purposes swarmed in my head, and not universal ones, but specialized ones. But more about them later.
When designing the sled, I provided for such solutions.
Firstly, given the rather small size of the sleds themselves, they can be used to transport not only massive, but also oversized loads. To do this, their platform must be made in the same plane with the front jumper - the traverse. However, as the work progressed, I decided to install the traverse a little higher than the platform so that it would serve as a front support for the cargo box. And if necessary, lowering the jumper to the level of the platform will not be difficult.
Secondly, the platform must be quite high in order to transport overhanging loads on the sled. Thirdly, it is not advisable to make the platform solid, but it is better to make it lattice to make it easier and more reliable to attach loads to it, passing the rope not only along the edges, but also in the middle. To transport bulk cargo (snow, sand), you will still have to use a box or box.
And one last thing. It is advisable to also bend the rear ends of the runners a little - then, if necessary, you can easily take the sled back.
Here, perhaps, are all the “little tricks” that I tried to provide when making cargo sleds. The process of making them, as they say, is a matter of technology. First, I prepared individual parts: runners from a pipe with a diameter of 30 mm - from metal beds, rack-portals - from a 20 mm pipe. It is important that the racks are as identical as possible to each other, and that the runners are mirror images. I bent the tubes of the portal stands in a vice, and therefore in the places where they were bent they were slightly flattened and weakened. For reliability, these places had to be reinforced with struts, also made of pipe, but with a smaller diameter - 14 mm. Although, as an option shown in the drawing, this can also be done with scarves.
How to make a fishing sled with your own hands
Anyone can create a winter sled with their own hands. You just need to first select the desired homemade option.
If you are interested in a high-quality transport mechanism for delivering fishing gear in the winter, you can make a wooden, plastic, aluminum or metal sled. It all depends on the materials you have.
Metal sled with runners
This kind of metal sled can be either non-collapsible or foldable. Literally a couple of decades ago, only such units existed. This mechanism has a large load capacity, its design is very rigid and powerful.
In this case, fishing gear can be laid out on a cargo area made of wooden boards, plastic sheets or chipboard.
How to catch more fish?
The negative side of using this kind of winter sled for fishing is their poor movement in snowy areas. The skis are designed to be quite narrow, and with a large thickness of snow this causes inconvenience. Whereas the surface of a reservoir with a low layer of snow or just ice is ideal for moving this unit.
Plastic sled
Plastic sleds, made in the shape of a trough, performed well during fishing. They have frost-resistant characteristics, transport fishing gear through the snow without any interference, and do not cost that much. Everything depends, naturally, on their size and the quality of the base material used.
Although most fishermen advise making their own plastic structures for winter fishing. They claim that it is not difficult.
Wooden sled
A wooden sled will be a good choice for your trek. They will be able to deliver all the gear to the right place without any difficulty and will serve you faithfully for many fishing trips.
Required materials and tools:
- boards, preferably pine;
- wood glue;
- sandpaper;
- jigsaw;
- drill and more.
Step-by-step instructions for making them:
- Take two boards that will later act as runners. Using a compass, draw semicircles on them and cut them out with a jigsaw.
- To secure the cross bars, holes are drilled on the runners. It is recommended to connect them using round tenons using the gluing method.
- To strengthen the resulting structure, transverse strips on spikes are placed in front and behind the runners.
- To make the structure aesthetically attractive, it is necessary to trim off the excess after everything has dried.
- Grooves are cut out on the board, which will later act as a seat, and at the site where the tackle box is mounted, for their further connection to the runners.
- Bars are also glued to the back of the skis for reinforcement.
- At the bottom of the rounding point of the runners, a strip of aluminum or steel is screwed with screws.
- Before proceeding with the final assembly of the structure, it is best to examine its individual parts for the accuracy of the connection. Plus, all spare parts are sanded and coated with waterproof varnish.
Types of homemade sleds for snowmobiles
In general terms, a sled is a universal vehicle. There are several types, but they all simply attach to any snowmobile. To decide on a suitable model, you need to take into account a number of factors:
- the complexity of the route along which you have to navigate;
- thickness and quality of snow cover;
- terrain features of the site;
- type of cargo transported;
- travel distance;
- driving style.
Initially, it is worth finding the answers to each item. After this, it will be easier to choose a sled for your snowmobile, and all models are divided into three types:
- Volokushi are considered the simplest type of sled. In the factory version, they are often made of plastic and resemble a rectangular trough in shape. The drags do not have skis. While driving, the bottom slips on the snow. The weak point of the drag is considered to be the front part. It is most often destroyed. However, such a product is inexpensive, it is easier to buy it than to make it yourself. The drags are shaped like a rectangular trough, and the bottom is not equipped with skis
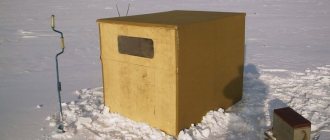
- Passenger sleds are extremely rare for sale. This is due to low demand. The design is a covered booth mounted on skis or a skid. There is one or more seats for passengers inside. Advanced models have heating and lighting. In such a booth it is convenient to go fishing together or just relax. Most often, passenger sleds for snowmobiles are assembled with their own hands, which significantly reduces the cost of the design. Their main disadvantage is their heavy weight. You can only attach it to a powerful snowmobile. Passenger sleds are convenient for going fishing or relaxing in winter, but they can only be attached to a powerful snowmobile
- The cargo sled took all the best qualities from previous varieties. They are more resistant to drag due to the presence of skis. With small dimensions, they are lighter than passenger sleighs, although they can withstand several times more load. Due to the presence of skis, maneuverability and maneuverability on difficult terrain are improved. The main purpose of the sled is to transport goods. However, people can ride them with success. Devices in the form of springs are usually installed between the skis and the bottom of the cargo sled to increase the load capacity.
How to make a snowmobile sled
Assembling the sled is not that difficult. There are many simple designs that you can create in your garage. It is important to immediately determine their purpose. This will determine what type of sled to assemble for your snowmobile: passenger, cargo or drag.
Tools and materials
The choice of material will depend on the design of the sled. Basically, plywood, boards, and metal profiles are suitable for such work. Skis are made from stainless steel sheets or use thick-walled plastic pipe.
A universal set of tools will help you work with different materials
The list of suitable tools depends on the materials used for the work. However, when assembling a sled, a combination of wood, metal and plastic is often used. It is optimal to have a universal set of tools that allows you to process all materials. From complex equipment, the list must include a welding machine, an angle grinder, an electric drill, and a grinder.
How to make a fishing sled with your own hands
Anyone can assemble such a structure. The main thing is to decide what kind of sled you need and with what functionality. If you need a sled to deliver fishing equipment to a fishing spot, then it can be made from wood, plastic, aluminum or iron. It all depends on the capabilities of the fisherman and the purpose of the sled.
Metal fishing sled
Metal sleds can be made either collapsible or non-collapsible. More recently, other designs simply did not exist. The metal structure is a rigid and durable base, on top of which there is a platform made of wooden boards or plywood. This is the so-called cargo area, which is used for transporting cargo. Their only drawback is the difficulty of operating in snowy areas. Due to the fact that the runners are narrow, they sink in the snow and a person needs to expend a lot of effort to move them, and even when loaded.
Plastic fishing sled
Similar plastic sleds are made in the form of a trough. They have good performance characteristics. They move without problems both on ice and snow. In this case, you should pay attention to the dimensions of the structure and workmanship. Although many argue that such a design is not difficult to make on your own.
Wooden sled
Wooden sleds are very popular. This is the most affordable and easily processed material, and structures made from it will last for many years. The main thing is to have the following tools and materials on hand:
- pine boards;
- wood glue;
- sandpaper;
- jigsaw;
- electric drill, etc.
Manufacturing technology
- You need to take two boards from which two runners will be made. The appropriate shape should be drawn on them and cut out with a jigsaw.
- The runners need to be fastened together. For this, cross bars of the appropriate size are used. The connection may consist of glue and round tenons.
- To strengthen the structure, additional transverse strips are attached to the front and back of the runners, mounted with glue and spikes.
- For a more aesthetic appearance, all excess is cut off and cleaned well.
- The board, which will serve as a cargo platform in the future, is prepared for subsequent fastening by cutting out all the necessary grooves and drilling the corresponding holes.
- An additional bar for fastening is attached to the back of the 2 runners.
- The places where the runners are rounded are reinforced with strips of aluminum or iron. This is necessary so that various obstacles do not damage the runners of the sled.
- Before final assembly, it is better to check all parts for proper dimensions. At the same time, you need to make sure that all elements are sanded and coated with waterproof varnish.
After the sled is assembled, it should be tested for strength by placing on it all the equipment that is used in winter fishing. Only after this does it make sense to take them with you.
Homemade snowmobile sled made from plastic pipes
Polypropylene or PVC pipes can serve as material for sleds. The design will be lightweight and suitable for any snowmobile. The connection of individual elements is carried out with a soldering iron. The load-carrying capacity of the structure will be small, since the plastic tubes will not withstand heavy loads.
Pipe blanks are cut to size according to the drawing
First you need a drawing. It's simple. The design consists of two curved runners that act as skis. Vertical posts extend from them, which support the main platform.
According to the dimensions of the snowmobile sled indicated on the drawing, blanks are cut from the pipe with your own hands. Prepare shaped elements for soldering. Heat up the soldering iron. From the shaped elements you will need tees and 90° angles. On skis you will need to bend the edges. This can be done by soldering 45° corners. However, the disadvantage of this method is that the soldered fitting has an edge with which the skis can cling to obstacles on the track. You can go another way. Avoid soldering the corners and bend the PVC tubes to the desired angle, after heating them with a hairdryer.
You can give the pipe the desired angle using a hair dryer, heating the area required for bending
After cutting the tubes, begin soldering. First, clean the edges of the workpieces. Nozzles are inserted into the soldering iron. Install the fitting and pipe section. When the plastic softens and begins to melt, the blanks are removed from the hot nozzle and joined together. All elements are collected in a similar way.
The fittings are joined to the pipe using a soldering iron.
The skis are assembled first. They consist of three paired pipes. Tees are soldered at equal intervals along the runners. Racks made of pieces of pipe are attached to the central outlet of the fitting. Their upper end is connected with jumpers using tees and pipes. They form the platform of the future sleigh.
Stands with jumpers are soldered to the runners from pieces of pipes and tees, forming a sleigh platform.
A rectangle is cut out of plywood according to the size of the platform contour. To make the seat soft, the blank is upholstered with an old blanket or foam rubber, and covered with leatherette on top. The platform is secured to the jumpers with overhead clamps or bolts through pre-drilled holes in the tubes.
DIY children's sled. Instructions
- How to make a sled with your own hands to please your child? It turns out that this is not at all difficult: it is enough to purchase PVC pipes with a diameter of 30-40 mm. Usually the size of such sleds is small (85x45 cm), but can also be designed for an adult (180x75 cm). Cut the pipes into pieces of the required length. Sand the cut edges with sandpaper.
- Connect the pipes at right angles using a soldering iron, metal angles and screws or fittings.
- Similarly, make 5-7 crossbars and install them perpendicular to the long sides of the frame.
- Mark the long sides of the structure for the posts that will connect the frame to the runners. The optimal number of racks is 5-7 pieces on each side. Install them in increments of 10-15 cm. The length of the parts should be about 20-30 cm.
- For runners you will need a pipe of a larger diameter (110 mm) and a longer length (150-220 cm). Using an angle grinder, cut it lengthwise into 2 pieces. Heat the workpieces with a technical hair dryer and give them a flat shape. Bend the front parts of the runners at an angle of 60°. To ensure a strong connection, use metal corners to mount skis.
- Cut a seat from plywood to the shape of the frame, sand it and secure it with self-tapping screws.
- Equip the sled with sides. They, like the runners, are mounted on small racks and connected in the same way as the frame.
DIY sled on skis for a snowmobile
When a snowmobile is supposed to transport cargo or adults, the sled is made durable and can withstand heavy loads. For cross-country ability they are placed on skis. Good runners will be made from a thick-walled plastic pipe. You will need only 7 m of it. The pipe diameter is 230 mm, the wall thickness is 25 mm. A piece 3 m long is cut off for the skis. The pipe is unraveled lengthwise with a jigsaw or grinder. It turns out two stripes.
From a sawn piece of pipe 3 m long, two runners for skis are obtained
The remaining 4 m of pipes are cut into pieces 1 m long. These will be the jumpers between the runners. Part of the body of each pipe needs to be cut out, and rings left on the sides. They will act as shock absorbers.
The runners are connected by jumpers cut from a similar pipe
The runners are given the curved shape of skis. To do this, the edges of the pipe are heated over a fire and bent to the desired angle. The jumpers are fastened to the runners with furniture bolts, and they are placed with the cutout downwards so that while the sleigh is moving they do not cling to obstacles.
A metal frame with a towbar for a snowmobile is installed on top of the plastic platform.
When the plastic platform is ready, a frame is welded to its size from a profile pipe. It is equipped with jumpers. A towbar is welded at the front for hooking up to the snowmobile. The metal frame is bolted to a plastic platform. To ensure that the curved ends of the skis retain their shape, they are also bolted to the end of the frame. The metal frame is covered with plywood on top. You can lay thin boards.
DIY snowmobile sled. Instructions
- Find a suitable drawing. The design of the sled must meet your requirements for strength, capacity and maneuverability.
- A homemade snowmobile sled consists of a frame, runners and flooring. A metal pipe 20x20 mm with a wall thickness of about 2 mm is suitable for the frame. For runners - steel strips 20 mm wide. For flooring - plywood with a thickness of 15 mm.
- Using a welding inverter, make a frame by welding 4 metal pipes. To make the sled gain more speed, the front part of the frame can be rounded. The larger the width of the frame, the more stable the product: usually it is 70-80 cm. The length affects cross-country ability and maneuverability: long sleds overcome obstacles more smoothly, but are less controlled when cornering. The average length of the frame is 170 cm.
- To give the frame strength, weld several cross members to it.
- In the same way, attach vertical posts to the bottom of the structure to which the runners will be attached. The number of racks depends on the length of the sled: usually 2-5 on each side are enough. The length of the parts should not be too long: the lower the center of gravity, the more stable the structure. The optimal height is 20-30 cm.
- Take the metal strips that will serve as the runners and bend them. Use a pencil to draw a fold line on the part, place the strip in a vice so that the clamps are exactly along the line, and bend the strip with light blows of a hammer. To avoid leaving marks on the surface, use a copper or brass pad. The bending angle should be about 60° or more.
- Weld the skids to the posts.
- Attach a drawbar to the front of the structure. You can make it yourself from the same pipe that you used for the frame. However, it is better to take a finished product with a damper: it will dampen jerks during fast driving. To strengthen the fastening, weld a steel sheet into the place of the hitch, then cut a sleeve of a suitable diameter into it.
- Transfer the dimensions of the frame onto the plywood. Cut the sheet with a hacksaw or circular saw, then sand with sandpaper or a sander. Attach the decking with self-tapping screws.
- Calculate the height of the side. Weld posts of the required height to the top of the frame. The number of racks depends on the length of the sled. There can be at least 7 of them: 4 are installed in the corners, and the rest - between them. The fourth side in this case is not closed by the side.
- Weld the crossbars that form the side to the posts and check the quality of all welds.
Cargo homemade sleds for snowmobiles
A special feature of cargo sleds is their resistance to heavy loads. This is achieved by using durable materials, such as metal. Skis are made wide. Due to this, the runners do not fall into the snow. Improves maneuverability and stability when the snowmobile moves at high speed. Shock absorbers are sometimes provided between the runners and the platform frame. They smooth out impacts on bumps. The sled bounces less, which reduces the likelihood of damage or loss of cargo.
Shock absorbers smooth out impacts when riding a snowmobile on uneven terrain, thereby improving cargo safety
The snowmobile sleds shown in the photo are made from metal with your own hands. The platform is covered with plywood. The sides are welded from tubes. They won't interfere with cargo sleds. It is convenient to secure the transported cargo with straps over the sides.
How to make your own snowmobile sled from metal pipes
In general terms, the assembly of metal sleds follows the same principle as in the case of plastic pipes. The only difference is the technology for connecting the workpieces. If plastic was soldered, then in order to make sleds for a snowmobile from steel tubes with your own hands, you will have to weld them.
All elements of the metal sled are welded by electric welding
First, a rectangular frame is welded from the tubes. It consists of racks and a platform. Skis can be bent from a thick-walled plastic pipe or a stainless steel strip with a width of 20 cm or more can be used. The runners are attached to the frame posts. A plywood sheet is laid on the platform. A drawbar is welded to the front of the frame for hooking onto the snowmobile.
What types of winter fishing sleds are there?
Large Sport 1630
- they are durable, but at the same time not heavy (10.4 kg);
- very large (165×81×43) cm and roomy;
- frost-resistant;
- have high sides;
- good for transportation on slippery winter surfaces.
Having caught 237 kg of fish, the poachers were not punished!
During interrogation, the detained fishermen revealed the name of the secret bait.
Mini Sled 1110
Weighing only 3.6 kg, these sleds are perfect for hand towing. The main material of manufacture is polyethylene, which has proven itself to be frost-resistant. Thanks to the presence of a wide supporting surface and a low center of gravity, the sled is able to pass through any snow-covered areas.
Children's
Very often, ordinary children's sleds are used as fishing winter sleds. There is no need to make or buy them, since they can be found in any home. But there is also a small drawback of this design: with a huge volume of snow cover, it gets under the jumper, which makes it difficult to move.
Inflatable
Structurally, these sleds are presented in the form of cylinders, securely attached to the runners. There is a little space between the cylinders and the cargo itself. For convenience, there are handles on the sides. This design is easy to transport, as it folds neatly and compactly into a case.
Sled-drags
A drag sled is a very capacious design designed for transporting not only fishing equipment, but the catch itself. The base material for making drag nets is considered to be plastic, which is highly frost-resistant. You can easily roll the sled by simply holding the rope.
Since there are no skids in this case, the design is characterized by a low center of gravity. And this is an additional plus - good stability. Due to their width, drags are able to easily plow almost all the uneven surfaces of the reservoir. The height of the sides allows you not to worry about the safety of the cargo; your gear will not fall out.
Plastic itself is not a heavy material, so the structure can be moved independently or attached to a self-propelled vehicle. Which is very convenient. If the hike is expected to be long, it is better to give preference to larger portages. Their length can reach almost two meters.
How to make a drag sled with your own hands
You can create a drag sled with your own hands without much effort. Since there are a huge number of different variations.
They can be made in the form of a wooden frame made of beams. And then securely fix any sheet material on it, couple it and everything is ready.
If this method is not to your liking, please consider a metal-only design, where sheet metal is used as a consumable material. In this case, the connection of individual elements occurs by spot welding.
How to make an attachment to a drag sleigh
- Make holes around the entire circumference of the sled.
- Insert steel cables with special fastenings into each individual hole. In this case, it is worth additionally using rubber bands. They will allow you to securely fix the contents of the structure.
- To make it convenient to move the structure, you need to attach a rope. Eye bolts can be used as fasteners. Moreover, the rope folds four times, and its total length can reach 20 m. The fastenings are ready!
Finnish fishing sled
In our country, such sleds are not very popular, while Scandinavia has always preferred them. They are chairs on high metal runners. Their operating principle resembles a scooter. In general, this is a good option for delivering equipment and gear, plus you can sit on it while fishing.
How to make them yourself
Materials for production:
- Sheet steel;
- bars from wood (oak, pine, birch and other hardwood).
- metal rod with double-sided thread;
- linings made of metal or steel;
- tires;
- bolts;
- screws.
Stages of creating a sleigh:
- Sheets of steel are bent with their ends towards the top, and a smooth arc is created.
- In front of the newly formed runners, two holes are created for the rod.
- On the other hand, where the foot will rest in the future, handmade rubber pads are installed. The latter are designed to prevent metal from sliding.
- You can choose any design dimensions. But it is still necessary to maintain proportions. The width of the top bar should be much less than the distance between the runners.
- Stepping back about a meter from the curved edge, the strips are welded on both sides using the spot welding method. The latter should be fastened with a beveled block and self-tapping screws.
- Horizontally located posts are welded to the rod in the middle of the metal sheets.
- The back and seat are mounted from wooden blocks. Plus, you can additionally use hooks, various motor parts, etc. Everything depends solely on your idea. The sleigh is ready!
Do-it-yourself wooden sled-drag for a snowmobile
It is difficult to make drag sleds from plastic at home. The easiest way to use wood for these purposes. In particular, you will need multilayer plywood and edged boards. To assemble a sled-drag for a snowmobile with your own hands, you don’t need drawings. It is enough to cut a rectangle measuring 3x1 m from plywood. The bottom is formed from it. The edges of the plywood blank are bent and heated in a steam bath.
Wooden drags do not have skis
Skis are not placed on drags. The sled will move through the snow with a plywood bottom. The sides are formed from boards. The plywood is attached to their ends with self-tapping screws. On the inside, the joints are reinforced with overhead metal plates. When finished, the drags resemble a deep wooden trough.
Advice from professionals
Experienced snowmobile owners say that there is no universal sled. In the snowy northern regions, this transport is used to perform various tasks. If you need to frequently transport cargo, want to go on vacation, give rides to guests, it’s best to get several sleds.
In the snowy northern regions, a snowmobile with a sleigh is a popular means of transportation.
The material for the sled is chosen taking into account the terrain on which it is intended to be ridden. Plastic is good for deep snow. To ride over bumps, you need a sled with wide metal skis. Passenger models are equipped with shock absorbers.
When transporting cargo, it is important to stow it correctly to achieve load balance. To protect luggage from getting wet, it is optimal for such transportation to have sleigh boxes.