How to choose an installation location?
The demand for echo sounders is growing, and so is the number of sales. And an increasing percentage of buyers remain dissatisfied. The echo sounder does not work as it should and does not show the required parameters. And often the problem is not in the device itself (most often everything is fine with it), but in its installation. A few wrong decisions and the device becomes useless.
How to properly attach an echo sounder to a PVC boat? Three basic conditions must be met:
- Strictly horizontal location of the water surface sensor.
- No bubbles under water near the sensor.
- The transducer does not experience even the slightest vibration.
Important nuances in choosing a mounting location
Special attention should be paid to cavitation or the amazing process of formation of cavitation bubbles, which are harmless only at first glance. They appear due to a local decrease in pressure in the water, for example, when speed increases or when an intense acoustic wave passes through. Under these conditions, the cavitation bubble collapses: this is how a shock wave is emitted. It is cavitation that has a destructive effect on the surface of propellers; it is precisely this that is the enemy of the echo sounder!
The fish finder transducer is often mounted on the boat transom. This is not to say that this is wrong, but there is one point: the air bubbles that move along the bottom surface significantly scatter and absorb ultrasonic waves, which is why your valuable device “goes blind”. This is easy to check: run your palm along the bottom of the sensor. If everything works, the successful operation of the echo sounder is counteracted by those very small, but very strong air bubbles.
It is important to consider that cavitation varies among different housings. Few people can determine exactly where to place the sensor. There are few specialists who will provide real assistance in this matter; you can try contacting workshops/repairs. There is another way out: mount it so as to move the sensor in height. Or first make a temporary fastening, and after determining the best place, fasten it “tightly”.
With regard to the horizontal position of the sensor, it is also important to remember that the boat position is not always the same when moving at different speeds. We advise you to determine the position of the vessel when planing and running quietly, and mount the device so that it is as horizontal as possible in such positions.
Now let's look at how to attach an echo sounder to a PVC boat using different methods. By the way, in a separate article we presented a rating of cool echo sounder models.
Echo sounder
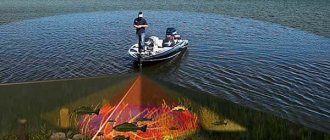
The echo sounder has become an indispensable assistant for navigators. Designed as a fishing and depth-finding device, it allows you to assess the situation under the boat. In this article we will briefly touch on the topic of using an echo sounder on high-speed vessels and methods for installing an external sensor-emitter.
Getting to know the echo sounder, or the specifics of sonar
With the advent of inexpensive echo sounders, navigating the water has become much easier. Previously, the main tool of the “small size” was the pilot, which often had not seen the corrector’s hand for years, and therefore did not take into account changes in the structure of the bottom. Today, a picture of the bottom in real time will no longer surprise anyone.
- For fishermen and diving enthusiasts, there are expensive structural scanners that show a color picture of the bottom with amazing accuracy.
- Travelers have access to chart plotters that combine the functions of a navigator, echo sounder, and engine control panel.
- Owners of slow-moving yachts are helped by forward-looking echo sounders. For high-speed vessels in shallow depths, these devices are not relevant, since they differ little in functionality from a conventional sonar. After all, the sensor is capable of “looking” ahead at only 2-3 depths.
- The most popular segment is inexpensive single- and double-beam echo sounders. They are used by fishermen, tourists, and even ice fishing enthusiasts.
Even the simplest device is capable of measuring the temperature of sea water, reporting a drop in voltage on the on-board network, and also informing with an audible signal about a sharp decrease in depth. We will not consider the “fish” indication, because today we are talking about the benefits of sonar for navigation in conditions of insufficient depth.
Focusing on sound
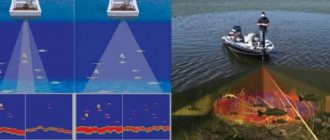
The principle of operation of an echo sounder has not changed over the last hundred years. The size of the devices has been reduced and signal processing algorithms have been optimized. But the transceiver still sends a high-frequency signal deep into the water and waits for it to return, reflected from the bottom topography.
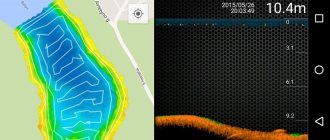
Depending on the density of the soil, the reflected signal weakens. To obtain depth data, the device analyzes the signal return time. The structure of the bottom is characterized by signal weakening. Thus, on the echo sounder screen we see the bottom topography of various shades - from black (rock) to light gray (silt).
Indication of “fish” is based on identifying air inclusions in the water column - swim bladders of the supposed fish. While this option may be of some interest to fishermen, for navigation it is absolutely useless and distracts attention.
In the process of controlling a high-speed motor boat on the navigable rivers of central Russia, the absolute values of the depth are not so important as the dynamics of its change. If there are 5-6 meters under the keel, and the picture of the bottom suddenly creeps up, this is a reason to correct the course - most likely, we have lost our way and are heading towards a landfall. In Karelia, it is quite possible to break a motor gearbox even at a depth of more than 5 meters. Pitfalls often stand alone and do not come to the surface. Coupled with fluctuations in water level in such reservoirs with a rocky bottom, you need to be especially careful.
It’s a different matter when the depth is 30, 50, or even more than 100 meters. In this case, the echo sounder readings do not have priority. However, do not underestimate the importance of this device - after all, sooner or later you will have to walk in the coastal strip, where there may be submerged piles, hulls of large ships and rock spits.
In order to avoid chaotic changes in readings at the speed of a planing vessel, it is enough to manually limit the depth range. Almost all devices allow you to do this. Thus, harmonics that are multiples of the actual depth are eliminated.
Installing an echo sounder with your own hands
Have a good time improving your boat. Installing a fish finder is a rewarding activity. Therefore, arm yourself with knowledge and begin installation.
There are not many options regarding the display. We install it on top of the horizontal part of the panel or on the inclined one facing the boatmaster. It is important that the screen does not block the view when moving under the awning and does not glare in sunny weather.
The situation with a remote sensor is much more complicated. Since it houses not only the receiver and transmitter, but also a temperature sensor, it is important to ensure reliable contact with water. By design, sensors differ in external (outboard) and built into the bottom. Each of these options has its own disadvantages.
The outboard sensor installed behind the transom has many disadvantages. When deep enough, it creates a fountain of spray during planing. When mooring stern to shore, the sensor mount is easily damaged. This installation method (2 screws and one hole for the cable) is the simplest; it is described in detail in the instructions for the devices.
The built-in sensor requires installation in the bottom. There is a rule that if you can avoid unnecessary holes below the waterline, it is better not to make them. The exception is the forward-looking echo sounder sensor. But it is placed closer to the bow (in the first third) of the bottom; in this case, it is better to entrust the installation to people with experience and the appropriate tools.
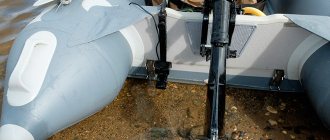
Factory method, official
This method is quite expensive, and now you will understand why. At the same time, it is reliable, and the process of installing and dismantling the sensor on a boat will not take too long, and for fishermen, every minute counts!
What you will need:
- A stainless steel clamp with a rubber layer for good fastening to a hard boat surface.
- A bracket or tube, thanks to which you can change the depth, and in advanced models, the rotating angle.
- Mounting unit to press the sensor to the bracket.
What to do with all this:
- Press the clamp well against the transom. If the boat has a motor, remember that maneuvering should not create any problems. To do this, the mounting location is moved closer to the side.
- Securely attach the sensor to the bracket and lower it to the selected depth.
- Attach the bracket to the clamp with a bolt.
- Adjust depth and angle.
- Secure the entire structure.
- Place the device screen on the bottom or bench and go test your work!
Remember that this design is quite rigid. If you hit an obstacle, the transom will be damaged. Therefore, drive carefully.
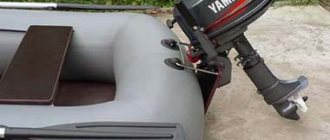
Installing an echo sounder on a motor boat
In the case of a powerboat with a fixed transom, proper transducer installation has an even greater impact on image quality and accuracy, as well as the ability to operate at high speeds. The sensor must be placed in such a way that the transom line roughly divides it in half. Mounting is carried out on a special bracket, which allows the sensor to tilt back when an obstacle appears. To do this, you need to tighten the fastening nut moderately. The sensor bracket must be equipped with long slots for sliding up or down. Its initial position is at the midpoint to ensure subsequent movements.
As for the consequences of improper installation of the sensor, they differ somewhat for different types of devices. So, for sonars (2D sensors) the main thing is complete horizontality. After all, tilting forward or backward distorts the image and depth measurement. Tilt to the right or left is not very critical. Scanning sensors are even more sensitive to horizontal installation. Sensors equipped with side beams require installation without lateral tilting. Otherwise, the useful image area on the tilt side is greatly reduced, narrowing the view.
Installing an echo sounder sensor inside the boat hull
A very convenient option is to mount the sensor to the inner surface of the boat bottom. However, this is only possible in the case of plastic watercraft, since only plastic does not interfere with the normal operation of the emitter. The sensor is attached by gluing it to epoxy resin. Moreover, it is advisable to cut out the floating material under it along with the inner shell, so that there is a minimum thickness of plastic between the sensor and the water. At the same time, this location should also ensure maximum perpendicularity of the water surface sensor, both in case of drift and when planing. After installing and testing the sensor, it is best to fill the cavity obtained for its installation with epoxy resin.
Sources:
https://www.prospinning.ru/ekholoty/224-ustanovka-ekholota-na-motornykh-sudakh.html https://lowrance-spb.ru/instrukciya-po-ustanovke-totalscan-lowrance https://proboating. ru/articles/howto/eholot/ https://okafish.ru/lodki/eholotr.htm https://winter-fishing.ru/fishing-tackle/tech/ystanovka-eholota/
DIY methods
It's cheaper to do everything yourself. Usually the sensor is mounted on the transom or bottom. There is also a more exotic remote method in the “range”.
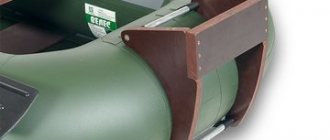
To the transom
What you need to have:
- Metal-plastic pipe, 1 m long.
- Stainless steel tube.
- Clamp (sold in construction stores). If you don't have a clamp, use bolts and a drill. The bracket is secured through the transom holes. Of course, this option is not as convenient as removable holders, but the signal quality should not suffer.
- Bolts with washers, rubber gaskets, clamps, cotter pin.
Step-by-step instruction:
- Using clamps and gaskets, we secure the metal pipe (about 0.4 m) to the clamp.
- We put metal-plastic inside and “flatten” the bottom.
- We make a couple of “holes”.
- We fasten the sensor using bolts, washers, and nuts.
- We attach the sensor and run the wire into the pipe.
- We put the clamp on the transom.
- We set the length of the metal-plastic part with a cotter pin and holes that were drilled.
- We attach the screen to the upper end.
Fasteners must be installed securely!
Useful video:
To the body
The method is completely different, as it is based on gluing:
- Near the keel, remove the layers on the bottom (right up to the outer one).
- Use epoxy glue to glue the sensor to the surface.
- Also seal the remaining cutout area.
The method may seem strange, but some fishermen, especially those using one boat, will appreciate it.
Remote method
And here everything is quite simple:
- Attach the transducer to the middle of the bottle (half-liter or liter plastic). It is better to secure it with electrical tape or tape.
- Also secure the sensor wire to the neck of the bottle.
- Place the screen on the bench, connect the wire.
- Pour water into the bottle until you reach the desired sensor immersion depth.
This is an option for fishing where there are no creeks or currents.
Fishermen are people with imagination, so the listed methods for attaching an echo sounder to a PVC boat are not the only ones. You can travel on forums and borrow experience from others. Do you have your own way? Share in the comments. And come to our friendly store where they sell excellent inflatable boats!
Question answer
Question: What is the best way to secure the echo sounder on a PVC boat so that it doesn’t fly off?
Name: Roman
Answer: This can be done using a factory or homemade method. The first method is highly reliable and expensive, but the design is rigid, which is dangerous if the boat hits an obstacle. Doing the fastening yourself is cheaper.
Question: How to properly install an echo sounder on an inflatable boat with your own hands?
Name: Ivan
Answer: It all depends on the mounting method: on the transom or the hull of the vessel. There is also a remote method. If the echo sounder is mounted on the body, epoxy glue is used to glue the sensor to the prepared surface.
Question: How exactly can you attach an echo sounder sensor to a PVC boat?
Name: Ivan
Answer: There are three rules to follow. The first is only a horizontal arrangement of the water surface device. Secondly, there should be no bubbles under water near the sensor. Third, the device should not experience vibrations.
Question: How to securely install the echo sounder transducer on the transom of an inflatable boat?
Name: Timofey
Answer: You need to attach a metal pipe to a clamp, put metal-plastic inside, attach the sensor and run the wire into the pipe. Then place the clamp on the transom, set the length and secure the screen. These are the basic steps.
Share link:
Types of holders and design features
The device consists of two functional parts:
- housings with a liquid crystal screen;
- emitter sensor or transducer.
To obtain adequate readings and achieve a clear bottom relief pattern, several conditions must be met when attaching sensors for boats:
- The signal emitted by the transducer must be strictly at an angle of 90 degrees to the surface of the water.
- There should be no air bubbles near the transducer under water.
- Even slight vibration of the transducer should be excluded.
It is recommended to use one of three fastening methods:
- transom;
- fastening to the bottom;
- remote method (homemade).
The device screen does not require special installation conditions, and it can be fixed:
- on a stand (bench) in a convenient place;
- on the lateral surface;
- at the bottom of the boat.
Mounting methods for holders are selected individually. Available options include a bracket, special couplings with locks, glue, and a vacuum suction cup.