Bait for catching bream on a feeder
The first thing fishing begins with is bait. The composition of the bait mixture also depends on the choice of place where the fishing will take place.
Bait for catching bream on a feeder on the river
The river requires heavier bait to keep it at the bottom. Many manufacturers produce bait not only for specific types of fish, but also for the conditions where fishing will take place. If you think that the bait is not very heavy, then you can even add soil. You can buy soil for bait in the store, or you can dig it up yourself and sift it through a sieve to separate out excess particles in the form of grass stones and other things. You will be very lucky if you find molehill soil; it is considered to be the best soil.
Bait for fishing in still water
For stagnant bodies of water or bodies of water with slow flows, you don’t need to make it heavier. As I already said, the manufacturers thought of everything for us; if fishing is planned on a reservoir without a current, then you either buy bait without the inscription “river”, or slightly under-water the river bait.
DIY bait for bream
Many fishermen still remember those times when we cooked various porridges, added various flavorings in the form of ground seeds, vanillin and other goodies, and went fishing. But fishing used to take place either with donks or with float gear, and such crumbly bait was not required as is required for fishing with a feeder. And in the summer, such homemade bait very often turned sour in the middle of fishing, which of course was very frustrating.
Salapinskaya porridge
But about 10 years ago the so-called “Salapin porridge” was developed. This is bait that is made at home, but has almost the same physics as that of famous brands.
A very serious drawback of this bait is that, like all porridges, it quickly turns sour, since it needs to be cooked in the evening.
Otherwise, it can be used both in its original form and with the addition of various flavors or ready-made aromatic mixes.
Salapin porridge recipe
Compound:
- pearl barley
- millet
- unrefined sunflower oil
- vanillin packet
- barley grits
- corn grits
For proper preparation, we need a measuring cup, and the larger it is, the more bait you will get.
Pour 3 measuring cups of water into a saucepan and bring to a boil. After the water has boiled, pour in half a glass of pearl barley, reduce the heat and cook until it begins to swell and is almost ready. After this, add millet, unrefined sunflower oil and a bag of vanillin. Place on low heat and cook until the millet has absorbed almost all the water. Next, we remove the pan from the heat and let the porridge brew a little. We then add the remaining ingredients such as barley and corn grits. We mix all this and we get excellent bait for the feeder.
Groundbait with lifting effect
You also need to take into account the fact that usually in places where bream lives, there are a lot of small fish. Therefore, you should not use bait that produces a column of turbidity when falling and which has a lifting effect.
Lifting is when small particles are washed out of the bait and begin to either float or hang in layers of water.
Adding a live component to bait
For the same reason, in order not to collect small fish from all layers of water, you need to be careful with the addition of live maggots. While in the feeder with food, he begins to crawl out and break the bait. The bait may begin to fall out of the feeder on the way to the water or when it hits the water. Thus, our feeding will not be effective. To avoid this situation, you can use feeders with double walls or glue the maggots with special glue. Recessed maggots show very good results. It no longer moves, but still attracts fish just as well. Now I will tell you what else can be added to the bait and what brings phenomenal results:
- chopped maggot
- sliced worm
- stern bloodworm
Boiled porridges and grain mixes
If there is supposed to be a lot of small stuff at the point, and theoretically it can grab all the bait, you should add a large fraction to the bait, namely boiled porridge and canned grain mixes.
Porridges and grain mixes for bream:
- peas
- millet
- millet
- linen
- hemp
- corn
But you should not mix bait with these mixes and porridges, as we can over-moisten and stick together the finished bait mixture. It is better to have separate bait and separate porridge. And add a little porridge to each feeder along with the bait.
With these actions we will lure the bream to the point and force it to feed on it.
Groundbait on molasses
If you plan to fish for a long time, it makes sense to use bait with molasses; it activates the digestion process in fish and has a laxative effect. Bream also responds well to the addition of food bloodworms.
Add molasses to the bait
Choosing a fishing spot
After you have decided on the bait and done the initial wetting, you should move on to studying the bottom and choosing a fishing point. In order for bream fishing on a feeder to be successful, you need to choose the right fishing location. Measuring the depth and studying the structure of the bottom can be done in two ways:
Using an echo sounder
It is advisable to have a separate rod, which will have a great test for casting the bait and is equipped with a strong cord so that the echo sounder sensor does not shoot off when casting. And after you have found a promising place, you should wind a few meters from the spool and fix the distance using a clip on the reel. And then, using pegs, transfer this distance to the main rod.
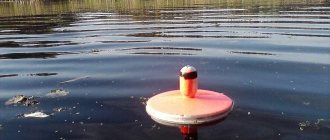
Using marker weight
We determine the structure of the bottom by dragging a marker weight along the bottom. By the behavior of the rod tip and tactile sensations, we understand what is at the bottom.
- If you feel blows to your hand, then it is most likely either a stone or a shell
- The load seems to be sliding along the bottom, it is either sand or clay
- If the load sticks at one point and, when tensioned, breaks away from its place, and this is repeated time after time, then it is most likely silt
- An edge can have the same effect, but without frequent repetitions as on a muddy bottom.
marker loads
for bream in muddy areas, as it digs there in search of food, but this does not mean that it does not feed in stones or shells. Ideally, we need to find either an area with a transition from a soft bottom to a hard one, or fish under the edge, since the entire food supply is washed away under the edge.
Now we need to determine the depth and relief at the fishing spot. This is not a quick process, but it is extremely necessary. With its help, we will know about every drop, we will know where the riverbed, lower and upper edge is located.
What is needed for this if there is no echo sounder:
- Throw the marker weight along the landmark on the opposite bank as far as possible and calculate how long it will take the weight to fall to the bottom. It is better to count very quickly, in one breath, this will give us a more accurate indicator than if we count with pauses.
- Let's say we threw a load and it fell on the count of 12. We remember this number, make 2 turns of the reel and clip it. We reel out the tackle, while counting the revolutions of the reel. Let's say it turned out 40 revolutions.
- Again we throw the weight into the water at the clipping distance (40 revolutions) and count how quickly the marker weight falls to the bottom. Let's say this time the load fell on the count of 15. Remember, we wind 2 turns on the reel and clip it.
- We cast, count and understand that at 38 revolutions of the reel the load falls to the count of 14.
- We repeat the same steps over and over again.
All data can be entered into a notepad and the bottom topography can be visually assessed.
That's it, now we know both the bottom topography and the structure in each specific place.
After choosing a fishing point, we proceed to the starting feeding.
Starter feeding
Usually it is recommended to first throw 5-10 feeders, without even hanging the leash; we simply send the feeder to the fishing point, wait 10-20 seconds and reel in the tackle. For some, this process is tedious and they try to speed it up by changing their working feeder to a larger, more feed-intensive one. On a stagnant body of water with a shallow depth, this is not particularly critical, but on a river we can simply ruin our fishing, since the trajectory of their dive will be different. We can feed well from the start, change the feeder to a working one and end up in a completely different place on the bottom.
Next comes the most desired moment for every angler - casting the finished gear and waiting for a bite. But we don’t have time to meditate on the water; we didn’t come to catch donkeys. Our work is just beginning. Those 10 feeders that we threw in are a drop in the bucket. We still need to collect the fish, interest them and, most importantly, keep them on point. And in the process of all this action, you still need to pick up the “key” for what she will peck at.
So, we continue fishing, transferring the tackle at least once every 1.5-2 minutes. We must set a good bait table for the fish. And we don’t just throw in bait, but select the composition to which it will respond more.
For example, we make a series of 10 casts with different additives:
- porridge and grain mixes
- chopped maggot
- stern bloodworm
- cut worm
- concentrated aroma
Baits for catching bream on a feeder
The most commonly used baits for catching bream and their combinations:
Bloodworm
- Bloodworms are the scarcest and best bait. Works both solo and in tandem with maggot. Usually a bunch of 3-10 bloodworm larvae is planted.
- Maggot is also a very popular bait. Moreover, unlike bloodworms, it can be used both live and dead. There are several ways to kill maggots: knead them between your fingers, drown them, and boil them.
- Worm - it is better to use small worms, literally a little larger than a bloodworm. And you need to plant them by piercing them in the middle. If you put on 2-4 worms in this way, they will form a very attractive moving ball.
Also, during all fishing you have to experiment and select bait. One bloodworm, two, three, with replanting of maggots, etc. Having bloodworms and maggots in several colors, you can come up with a hundred combinations.
But fishermen don’t stop there either.
If you cast your rig, you can clearly see the bites and the fish are detected, then everything is fine with you, you are doing everything right.
But if you are reeling out the tackle and the bait is chewed and you haven’t seen a bite, you should reduce the length of the leash and reduce the size of the hook. As they say, it’s good that fish are interested in your bait; catching a fish is a matter of technique.
But if no one is interested in your bait, perhaps your tackle is too coarse. The fish are simply scared of this type of tackle. The length of the leash should be increased and its diameter reduced.
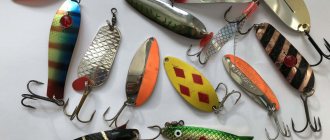
Baits and lures
Animal origin
Among the baits used for feeder fishing for bream are the following:
- Bloodworm;
- Maggot;
- Muckworm;
- Shell meat.
Vegetable origin
Of the vegetable baits widely used in feeder fishing, the following are used:
- Canned corn;
- Steamed peas;
- Pea mastyrka;
- Pearl barley;
When the bite is weak, they often make a combination bait, of which the combination most often gives results:
- 2-3 maggots + bloodworms;
- 1 large grain of corn + 2-3 maggots;
- 1 large corn grain + dung worm;
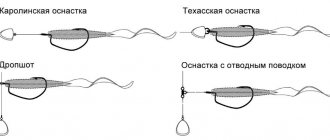
Installation of feeder gear for bream
Since we're on the topic of hooks and leashes, let's talk about rigs. The most common ones nowadays are:
- Gardner's loop
- In-line
- Asymmetrical loop
Gardner's loop
Gardner's loop, the simplest, most efficient and my favorite installation. Knitted on the main line or braid. Two loops and the installation is ready. One loop is for the leash, the other is for the feeder. This installation is less sensitive than In-line, but it has the ability to self-hook fish.
In-line
In-line, it’s a little more complicated, you need to do some homework so that it doesn’t take much time on the pond. But you will be rewarded with amazing sensitivity. You will see a bite no matter which way the fish pulls the bait. And if you are going to join the sport of fishing, then this is your choice.
Asymmetrical loop
Since bream is a fish that feeds from the bottom, in the current it makes sense to use not a Gardner loop, but an asymmetrical loop. Since, unlike the Gardner loop, where the leash can float in the water column, an asymmetrical loop presses the leash to the bottom. The asymmetrical loop also has a self-cutting effect. The disadvantage of an asymmetrical loop is that it is better to prepare the installation in advance at home, so as not to waste time fishing.
Feeder installation for spring bream
In spring, bream is careful, stands at depth, casting is often long, so the feeder equipment must correspond to the fishing conditions.
You can read more about spring bream camps here - “Catching bream in the spring. Behavior.” The information is very useful, highly recommended for study.
Before moving on to the equipment, let’s discuss a number of equipment requirements for the feeder:
Now to the installation itself
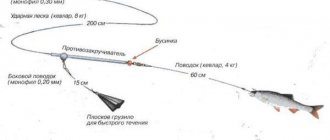
Running rig for bream in spring
Explanations for installation
- The outlet for the feeder is always somewhat shorter than the twisted anti-twist. This eliminates entanglements.
- A regular swivel can serve as a replacement for the sliding bead.
- The outlet under the feeder guarantees free movement even on a soft bottom.
- A monoleader is the same shock leader, only made from monofilament fishing line. Fluor is also suitable, but it is somewhat more expensive. The length of 8 meters is optimal for beginners. But with enough experience, you can reduce it to 5 m, thereby slightly increasing the casting range.
- The length of the leash is tested on a pond. For neat, uncertain bites from 60 to 90 cm. For better detection (implementation), take a leash shorter than 40-60 cm.
Tips for fisherman: What jigs to use to catch bream in winter - All the nuances
Shock leader diameter (mono)
| Shock leader | Feeder weight |
| 0.35 mm (17.5 lb) | 60 gr |
| 0.4 mm (20 lb) | 80 gr |
| 0.5 mm (27.5 lb) | 100 gr |
In European countries, fishing line is measured not in diameter, but in pounds, tensile strength (lb). 1 lb is about 474 g. or 0.4535 kg.
Main line diameter
| Main line | Shock leader |
| 0.25 mm | 0.35 mm (17.5 lb) |
| 0.3 mm | 0.4 mm (20 lb) |
| 0.4 mm | 0.5 mm (27.5 lb) |
Attach the shock leader to the main line
The Carrot knot not only holds well under heavy loads, but also passes freely through the feeder rings.
The shock leader in the figure is highlighted in dark color. The figure shows that the tips of the knot point forward. This means that they do not interfere with casting in any way.
Leash and hooks
Since bream in the spring is often neat, and the resistance when fishing is not strong, we equip the feeder delicately.
The diameter of the leash is from 0.14 to 0.18 .
Number hooks - 12, 13, 14.
By the way, it is the length of the leash that characterizes feeder fishing well. It is difficult to give exact recommendations on its size, since it varies from 10 to 150 cm. Feeder fishing in a strong current forces you to shorten the length of the leash. Also, a short leash of 5-10 cm has a flat feeder and a method that we wrote about in the article “Feeder fishing: budget tackle, trophy catch.”
Leash for feeder for bream
Regarding the thickness of the leash, I will say one thing: the thinner the leash, the more careful fish we will catch. It happens that you catch at 0.12 - there are no bites, if you set it to 0.1 - bites appear. But you shouldn’t overdo it here, if you fish with a braided line without a shock leader and feeder, and at the same time you also have a fast-action rod, then offensive breaks are possible when landing large fish.
I also want to talk about the length of the leash. Since different sources provide different information, some fish with a 20-centimeter leash, others with a two-meter leash. And all this has the right to life. If you prepare leashes at home, I recommend that you make them 1 meter long and when fishing, depending on the conditions, you can always either shorten or lengthen them using a fishing line insert.
Lately I’ve been starting fishing with a number 12 hook on a 0.12 fishing line 65 centimeters long. Because I bought ready-made leashes from Owner))
And if something doesn’t suit me during the fishing process, then I change certain elements of the equipment.
Feeder equipment
Read our great article about making 11 of the most popular feeder equipment with your own hands.
Asymmetrical loop
Very sensitive equipment for the feeder when fishing for bream. Correct installation of such equipment guarantees high catches of this fish.
To make a loop, take 0.5 meters of rigid fluorocarbon fishing line, from which a main loop 15 cm long and a small loop for the main fishing line are tied. A feeder is installed on a loop of a larger diameter, which moves freely along the fishing line.
A leash with a hook is also attached to the same loop. The length of the leash should be slightly longer than the length of the feeder; with this arrangement, maximum sensitivity of the gear is achieved, and the fish does not feel resistance or movement of the feeder when biting.
Paternoster
When fishing in snags, and it is in such areas of the reservoir that you can find large bream, this type of equipment is unrivaled. For installation, a fishing line of different diameters is used - the main one, larger in diameter, and an additional one of smaller thickness.
At the end of the main fishing line, a small loop is knitted into which a leash with a hook is inserted and also tied in a loop. A little above this area, a feeder is installed on a leash made of thin fishing line. The advantage of this design is that large bream, after biting, tend to go as deep as possible into the cluttered bottom of the reservoir.
In such situations, the feeder often gets caught on snags, which leads to the inability to possess trophy fish and the loss of all gear. Using a “paternoster”-type equipment allows you to tear off only the feeder when hooked, and the fish remains on the hook.
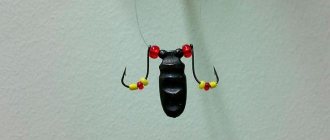
Helicopter
This equipment has proven itself well in the current.
To make this installation, you will need a piece of fluorocarbon fishing line with a diameter of 0.25 mm and a length of 1 meter.
The fishing line is folded in half and one knot is tied at 15 centimeters. Another one is knitted at a distance of 1 cm from this knot. A feeder is attached to the resulting large loop, and a leash with a hook is installed between the nodes using the cape method. Thus, during the current, the leash rotates, and when biting, the fish can hook itself.
https://www.youtube.com/watch?v=b44dlz5LebE
Choosing a feeder rod for catching bream
By and large, we choose a feeder rod not for the fish, but based on the fishing conditions. After all, we go fishing for emotions and pleasure.
And if we fish at a short distance - up to 30 meters, in a section of a reservoir where we can get by with weights of 40-50 grams, then we can, of course, use a feeder 3.9-4.2 meters tall with a test of 120 grams, but it will be much more pleasant to fish onto a more delicate stick.
But if we are fishing at a decent distance, in the wind, and even under a steep edge, then it is more advisable to take a longer rod with a larger cast, so that we can cast further and safely land the fish, lifting it immediately above the edge.
In addition to length and test, each feeder rod also has a structure:
- Fast
- Average
- Progressive
Fast action rods cast the feeders further and bites are better visible on them. But such rods do not absorb well the jerks of large fish when playing.
Medium action rods may cast a little worse, show a little worse bite, but they hook fish much better.
Progressive rods include all the best from the two previous classifications, but they also cost an order of magnitude more.
Tips for catching bream on a feeder
In conclusion of the article, I would like to highlight some of the features of catching bream on a feeder depending on the time of year, as well as answer frequently asked questions from novice anglers.
Bream fishing in spring
In the spring, when the ice on the reservoir has melted, you can start fishing, namely catching bream on a feeder. But fishing at this time brings some inconvenience to the fisherman, since it is not clear where the bream is standing. It may be in wintering pits, or it may have already entered shallower, warmer areas. I recommend having two rods and feeding two distances. A wintering hole is not difficult to find. As a rule, in winter, in such places on the ice, entire tent camps are organized for those who like to catch winter bream with jigs.
Also in the spring there are some restrictions on bait. In winter, spring and autumn, the bait should not be too sweet and flavored, since the fish at this time are very cautious and timid.
But if you caught bream from under the ice in winter, and it responded well to some kind of aromatic additive in this place, you can try adding it in the spring. You can also add molasses to the bait.
Molasses activates digestion and helps keep the bream at the point.
After the bream spawns, it begins to feed very actively, but it feeds anywhere and everywhere, for this reason it is difficult to keep it on the spot.
Bream fishing in summer
As soon as the bream moves away from spawning, more stable summer fishing begins. It reacts well to the smells of spices in the bait and sweet fruity smells, which can be used to permeate the bait, or you can additionally spray the bait.
You can also find bream in more familiar places, on the lower edges or, if there are none, then at the transitions from a soft bottom to a hard one.
Bream fishing in autumn
As the water temperature begins to drop, fall feeder fishing for bream will begin to resemble spring fishing. The bream becomes less active, timid and begins to slide into wintering pits.
Why doesn't bream bite on the feeder?
Please note some mistakes due to which catching bream on a feeder may not be effective.
- The fishing point is not chosen correctly, the distance should be changed
- The bait mixture is not suitable, you should try adding a coarse fraction, a live component or another flavoring
- The bait is not suitable. I recommend constantly changing bait combinations.
- Rough tackle, reduce the diameter of the leader, increase the length of the leader and reduce the hook
How to properly land bream on a feeder
If you are lucky enough to get a bite from a bream and on that side of the fishing line or braided line you feel a pleasant resistance, then you are doing everything right. All that remains is to bring the bream ashore.
If you are fishing under a steep edge, then you need not to be lazy, get up from your seat and raise the rod as high as possible so that the fish does not hit the edge and an offensive derailment does not occur.
Further, when fishing near the shore, a landing net with a long handle will be of great help to us. You should put it in the water away from the shore and bring the fish onto the landing net. Otherwise, if you catch bream with a landing net like a butterfly, it may get scared, shake its head and break the leash. After all, the closer we get to the shore, the less shock-absorbing properties our gear has.
Feeder rod equipment
Choosing a fishing line for bream
In feeder fishing for bream, both monofilament and braided fishing lines are used, each of which has a number of recommendations for use in certain conditions:
- When feeder fishing at distances of up to 25-30 meters, it is best to use monofilament with a cross-section of 0.2-0.25 mm. With such a casting distance, it ensures good transmission of the bite to the tip of the rod; The stretchability of the monofilament absorbs the jerks of the fish.
- To make long feeder casts, braided fishing line with a cross-section of 0.12 to 0.18 mm is used. – unlike monofilament fishing line, braided line is stiffer, does not stretch and transmits bites better from a long distance. In a feeder equipped with braided fishing line, in order to eliminate the main disadvantage of this type of fishing line - its inextensibility, and, accordingly, the lack of shock absorption of fish jerks - the equipment (shock leader) is mounted on a piece of monofilament 3 to 5-6 meters long tied to the end of the braid. .
Selection of hooks
Hooks are selected depending on the attachments used:
- Bloodworms - small hooks made of thin and strong wire with a long shank No. 16-14;
- Maggot – hooks No. 10-14;
- Worm - hooks for fishing with this bait, as well as for bloodworms, should have a long shank and size No. 6-10;
- For vegetable baits (corn, peas, barley), hooks No. 8-12 are better suited;
Among manufacturers, the best quality hooks used for feeders are from the following brands:
- Gamakatsu – LS-5314N, LS-1010B,LS-1040R;
- Owner – series 50922, 53157, 50152;
- Kamasan –B532;
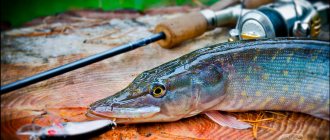
Feeder for bream
When fishing for bream on a feeder, the most common are mesh metal and plastic feeders of open and semi-closed types.
Open feeders on the end sides do not have plugs, due to which the bait spills freely to the bottom after casting - they are used in reservoirs where there is no current.
Semi-closed type feeders have a plastic cap at the bottom at one of the ends, which prevents the bait from freely pouring out of the feeder - they are used on rivers and flowing lakes with currents of varying speeds.
In addition, when choosing a feeder feeder, it is worth considering that this element of the gear must be resistant to drift by the current - rectangular or square-shaped feeders with a weight located on the rear wall are best able to resist the movement of water.
The choice of feeder weight depends on the casting distance and current speed:
- If the range is short and there is no current, the lightest feeder feeders weighing up to 40 grams are used;
- On rivers and flowing reservoirs with medium flow, feeders weighing from 60 to 90-100 grams are used;
- For very long casts, as well as on rivers with strong currents, the heaviest feeders weighing from 100-120 to 150 grams are used.