Published: 07/27/2016 00:58
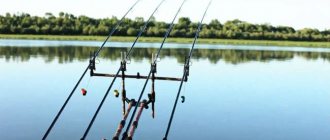
Even in the recent past, when fishing with a “battery” of bottom rods, the question of choosing a specific fishing point was less pressing, if at all. Five tackles were simply thrown at different distances - at least one would hit a promising point. Then, based on the presence of bites on certain gears, appropriate adjustments were made.
In feeder fishing, one, or maximum two, rods are used. And the approach to fishing is different - in most cases, the selected point is first fed, and only then fishing begins. Accordingly, the entire success of fishing depends on the choice of a specific point.
Reading the Bottom with a Marker Sinker
This method allows you to quickly “break through” the structure of the bottom, the presence and position of zebra mussel colonies and identify rises and falls in the bottom topography without accurately measuring the depth.
The essence of the method is that a marker sinker is tied to the end of the cord, and the structure of the bottom is “read” by dragging it. An ordinary “olive” or spherical sinker will not work here—you need a marker sinker, with a pronounced influx in the lower part and characteristic protrusions (horns). The weight of the load is selected depending on the feeder test and generally ranges from 50 to 100 grams.
Since braided line is not resistant to abrasive damage, on a rocky bottom and in the presence of shell colonies it is better to use an insert made of fluorocarbon or monofilament line . Dragging the load along the bottom is done by pulling the rod, in which the tip of the feeder clearly conveys everything that happens with the sinker.
The peculiarity of this method is that to correctly understand the structure of the bottom, certain skills are required, which are acquired over time. But there is nothing particularly complicated here. Using the examples below, we will look at how the marker weight behaves when moving along various bottom elements.
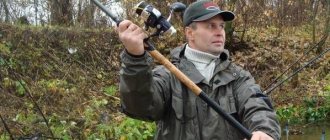
Rod
Mainly for standing reservoirs, light (picker) class rods are used, designed for feeder weights of up to 25 grams, and medium (middle class) feeder weights of 30-50 grams. Only when it is necessary to cast over the longest distances, should you use rods of a heavier class.
Here it is worth remembering that accurate casting can be achieved when fishing at a distance of up to 50 m, and after that, the further we throw the tackle, the greater the scatter we will have and the worse the feeding spot. The reason for using light-test feeder rods is because there is little or no current on the lake and we don't need to put out heavy feeders to fight it.
And here's what you need to know: How can you fish legally?
At the same time, the lighter the feeder, the more sensitive the tackle, which will respond to even the weakest bites.
Rods with a length of 3.6-3.9 m are considered universal; they allow you to cast quite far, and at the same time do not hinder the angler when fishing in areas overgrown with vegetation. Rods longer than 3.9 m should be used when you need to sharply lift the feeder from the bottom and move it over the edge or make a long cast.
Rods less than 3 m long (mostly pickerel) are used when there is no need to cast far or you fish under overhanging treetops and from a boat.
Feeder on the lake reel selection
Depending on the range of feeder fishing on the lake and the class of the rod, we will need reel spools of different sizes. For fishing close to the shore with pickerel and mediums, we will use reels with a spool size of 1500-2500.
When fishing at medium distances up to 30-40 m, the spool size is 2000-3500. When fishing at a distance of over 40 m, it is better to use larger reels with a spool size of 4000 and above.
It’s good when the reel comes with a second spool; you can wind braid or a monk of a smaller diameter on it. A good reel must lay the line evenly and evenly, since unevenly laid or overlapping line significantly reduces the casting distance.
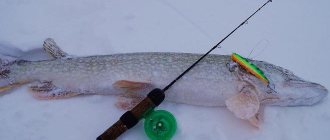
Muddy bottom
The marker weight runs smoothly along the bottom, without knocking, but with sufficient tension. If the layer of silt is large and the silt itself is very soft, then the load may fall into the silt during a pause. At the same time, at the very beginning of the pull, the tip of the feeder will bend strongly, and then a soft but heavy pull will follow.
Colonies of the toothless mollusk may be found on the muddy bottom. The encounter with them is characterized by short blows with a short weighting of the stroke of the weight.
Fishing with a feeder on a muddy bottom, how to fish?
HomeContentBlogs (photo reports, diaries, notes, videos) Blog entry
Starnak
Blog entry date: 05/04/2021 Blog entry date: 05/04/2021
3
A question that I get asked very often is related to the peculiarities of feeder fishing on reservoirs with a muddy bottom. In this video I will try to tell my thoughts on this topic.
A small layer of silt won't hurt us. When the layer of silt is large, 30 cm or more, problems may arise with the availability of bait and bait for fish. And it is these problems that we will try to solve in various ways. Ready? Go!
Relief
You can completely eliminate all issues related to silt by finding a section of solid bottom. In addition, such an area against the backdrop of the surrounding silted bottom will be simply an excellent place for fishing. Therefore, we are not lazy and carefully study the bottom. This should always be done, but in this case the importance of this point increases significantly. Having found such a place, we fish on the border with silt (but with a shift towards the hard bottom, of course), or in the center if the area is small. Now what to do if we haven’t found anything like that, no matter how hard we tried.
Lure
The moment with bait is very important. If we correctly attract fish to the fishing point, then it will rummage even in deep mud in search of food and, in the end, will find our hook. We need to do everything to make it easy and convenient for her to do this.
We make active dusting bait. It is worth looking for such bait among roach mixtures. If, due to fishing conditions, we need a different bait, then we mix the composition that we want to use with part of the roach mixture to increase activity. The dusty column will certainly go beyond the boundaries of the bottom silt and attract fish to the fishing point.
In any case, we make the bait semi-dry, and even fairly inert compounds will be more active. And one more thing that is worth taking into account is a jerk right before the feeder hits the bottom. The purpose of this action is to release the bait from the feeder BEFORE the feeder falls to the bottom. The bait will settle on the layer of silt and sink more slowly and, possibly, in separate particles to a shallower depth.
Nozzle
Floating variations can be used as a nozzle. These include artificial ottomans, perhaps even boilies (it all depends on the target fish), folk foam, puffed wheat, maggots or worms pumped through a syringe with air, and so on. It makes sense to dip all baits that sink so that smell detection works for the fish.
Feeder
What can we do about feeders? It would be great if the feeder sank very slowly into our layer of silt, rather than sinking like a stone to the bottom. A simple trick will help you achieve this. We take a piece of polystyrene foam and tape it to the feeder. By experimenting underfoot, we ensure that the feeder slowly sinks.
Leash
It is worth making the installation with a long leash. Moreover, the length must be selected taking into account the layer of silt. First, the feeder will fall to the bottom, then the leash will slowly lower. When using floating nozzles, we can generally raise the nozzle above the layer of silt, so we also select the appropriate leash length. But even with sinking baits, a long leash will help the bait stay longer in the upper layers of silt and, perhaps, linger somewhere halfway, rather than falling like a stone to the bottom into less accessible layers.
If all else fails
Now a very important tip. If none of the above helped you, put the feeder aside, take a float rod and blow towards the reeds. This is not a joke, this is really one of the solutions to the problem. We make the same dusty active bait, and select the depth experimentally above the layer of silt and catch, perhaps more effectively than with bottom gear.
Tags: feeder pond
3
See also: 04/29/2021 Spinning during the spawning ban. // Mikhail Bondarev (mikebond) 05/02/2021 Daiwa Windcast Spod&Mark QDA after four seasons of operation. // Mikhail Bondarev (mikebond) 05/08/2021 Mercury 15MH 294cc. First launch and start of running. // Mikhail Bondarev (mikebond) 05/12/2021 ADAPTER for the waggler match float. // Andrey Pivovarov (Andrey240884)
Register or log in to comment.
Stepanych
-> Blog post
Fishing with a feeder on a muddy bottom, how to fish?
04.05.2021 15:02:01
Right about my BabarykThe waters are 30-40 cm, and cows that go to water are immersed up to their bellies.
Major
-> Blog post
Fishing with a feeder on a muddy bottom, how to fish?
05.05.2021 08:54:22
You need to open a business there to supply Ural bloodworms to Moscow.
Rocky bottom
The passage of cargo along a rocky bottom lined with large round stones is characterized by heterogeneous, intermittent movement of the cargo. Frequent hooks, including dead ones, are possible.
If the bottom is lined with small stones, then the behavior of the load resembles the passage of zebra mussel colonies, but softer. You can distinguish where the load passes over a small stone and where through the zebra mussel colony by the general bend of the feeder on the broach. On a colony, it will be harder to pull the load, and accordingly the tip will bend more. Plus, a small stone will never be on a steep slope.
Aquatic vegetation
When entering thickets of aquatic vegetation, the load travels with great resistance, but without impact. Sharp jerks are possible, which are caused either by a break in the vegetation or by the release of cargo from individual thickets. Since even after leaving the thickets, tufts of vegetation remain on it, further measurement will not be informative.
At the same time, everyone needs to take into account that the movement of a load up a slope will always occur with greater resistance than when moving along a relatively flat bottom. At the same angle of rise of the dump, its influence on zebra mussel colonies will be more significant than when rising along a clay bottom.
In order not to repeat the painstaking process of studying the bottom on subsequent fishing trips at the same point, it is advisable to write down all measurement results in a notebook. To record the distance after the first cast, the line is inserted into a clip on the reel, and during the marking process you need to constantly count the number of turns of the reel.
In this way, you can quite accurately study the structure of the bottom along the entire casting line. If it is known in advance that the channel or edge of interest to the fisherman is located in the selected area, then by studying the structure of the bottom it is easy to calculate it. If the place is new and there is no information about it, then additional study should be carried out to the left and right of the selected point by performing a series of fan casts.
If, in the case of an edge, a rise in the bottom topography is also observed in lateral measurements, then the fact of detection of the edge is confirmed. Otherwise, the anomaly found may be a local “navel”, which in some cases can also be a promising point, especially when it comes to high-speed fishing for small roach and silver bream. To catch bream, it is still advisable to find a linear anomaly associated with the main bottom topography.
Studying the relief using the method of counting the time of the fall of a load
The method described above gives a clear picture of the bottom structure, but does not allow for depth assessment. This method, on the contrary, allows you to quickly find differences in depth, without studying the structure of the bottom.
The method is based on measuring the time the bait falls from the moment it splashes down until it touches the bottom. The information it provides is quite relative, but it allows you to probe holes, depth changes, edges and other elements of the bottom.
This also includes the jigging method. For all its simplicity, it allows you to very quickly probe the desired edge or fall into a hole. When jigging, it is important to pull with the same force each time to lift the load to the same height from the bottom. If the time the load falls on two pulls (steps) remains unchanged, then the bottom is level. When entering the dump, the time will decrease; when lowering into the pit, it will increase.
The methods of studying the bottom described above complement each other perfectly, so fishermen often use a combined method.
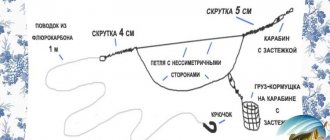
The main differences from the main feeder fishing
The main difference between feeder gear and carp gear is the presence of some free play of the fishing line relative to the sinker lying on the bottom.
In any feeder installation, the fish has the opportunity to take the bait and make a movement without lifting the load. As a result, the tip of the feeder moves, and the angler makes a hook. This kind of fishing allows you to catch not only large fish that can pull a load from the bottom, but also smaller ones. You can also use this method of fishing in the current with a heavy sinker. A lot has been said about the equipment on forums and in videos on YouTube. The most detailed information could be gleaned from seminars with Sergei Popov. The simplest installation, similar in appearance to carp, is inline on the leadcore. Leadcore makes the fall of the feeder more horizontal, since it has some weight, and it does not stick into the bottom with an edge. The hook can be stuck into the feeder or left free, as with conventional feeder fishing. The free hook additionally allows you to diversify your fishing using a long leash. The bait is located in the water column, attracting active fish from great distances. This helps when catching roach, which often looks for food not at the bottom, but in the water column. Usually, only a hook with a boilie is stuck into the feeder; placing a hook with a regular attachment inside is not so effective.
On currents, a flat feeder is rarely used and only on weak currents. Mainly due to the fact that the flat feeder itself holds the food very weakly, and it will be instantly washed out of it. This forces the use of more viscous baits, which behave differently in the water column than usual. Due to the peculiarity of the feeder, the feeding spot will be strongly extended along the current, since already during the fall the feed will begin to be washed out and it will be carried down. The author does not practice this method of fishing in the current, but those who use it prefer a paternoster for the current with a flat feeder. Apparently, this is how it should be caught.
Reading the Bottom with a Marker Float
This fishing method gives the most complete picture of the structure of the bottom and the depths in the fishing area, but it is not without its drawbacks. Firstly, using a marker float you can study the bottom only in areas of reservoirs without a current. Secondly, the method is labor-intensive and time-consuming.
To study the bottom you will need a marker float, a special marker sinker and a fishing rod. In carp fishing, a special rod is used for these purposes, but there is no special need for it - a feeder will do. The only thing you need to do is put marks on the rod blank corresponding to a distance of 0.5 and 1.0 meters from the reel.
When installing the marker equipment, the fishing line is freely inserted into the swivel ring on the marker sinker. Next, at the end of the fishing line, a float is tied to the bottom ring with a blind knot. Since during the marking process this knot will constantly hit the swivel on the sinker, it is useful to place a bead between them. That's it, the marker equipment is ready. It remains only to note that it is knitted exclusively on monofilament fishing line. If the reel is equipped with braid, then you will have to use a monofilament shock leader .
Next, the equipment is thrown to the required distance. After the sinker touches the bottom, this can be seen by straightening the tip of the feeder, you can begin to study the bottom. First you need to do a small stretch, moving the feeder to the side in a horizontal plane. This will already give an idea of the structure of the bottom and is guaranteed to bring the float to the sinker.
If the reel is equipped with a baitrunner system, then you can turn it on, otherwise you will have to open the line handler and release the line by hand along the meter marks until the float appears on the surface of the water. The depth at the point where the marker is located will correspond to the amount of cord removed. To increase the accuracy of measurement, a half-meter mark may be required.
After fixing the depth, the cord is again wound onto the reel until the float rests against the sinker. After the next pull, the process of releasing the line and measuring the depth is repeated.
As with other methods, it is useful to make a series of fan casts, which will allow you to measure the depth to the left and right of the fishing point.
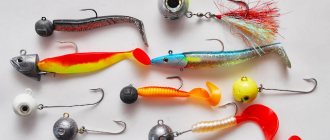
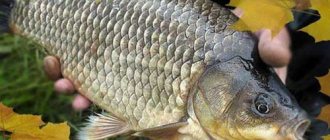
Options for feeder equipment for crucian carp
When fishing for crucian carp on a feeder, equipment is important, especially in heavily silted reservoirs. Let’s look at the three most popular montages, tell you which ones will be relevant and which ones won’t. The following types of rigs can work well for crucian carp:
- paternoster;
- InLine;
- running feeder rig;
- asymmetrical loop.
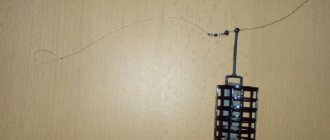
Paternoster
Let's look at the Paternoster, this is a classic feeder rig for crucian carp, the easiest to use, and you can tie it in a few seconds right on the pond. At the same time, it works well on muddy bottoms. Suitable for catching passive fish when it is not yet so active and spruce bites are noticeable. At the same time, the paternoster cuts fish well on its own, thanks to the shoulder on the main line or cord.
Sports installation In-line
Let's move on to the In-line sports montage. The installation is as versatile as the paternoster, but there are slight differences in use. I would not use In-Line in heavily overgrown and silted ponds and lakes, but if the classic In-Line is modified with an outlet for a feeder, our problem will be solved instantly. I recommended placing a twist made of beaded rubber into the sports montage; it will be relevant. The twist will perform two roles at once: it will retract the leash and absorb strong jerks of the fish, which will allow you to fish with more delicate leashes.
Asymmetrical loop
Next, the asymmetrical loop: this installation is a more modified Paternoster. To be honest, I would not recommend this installation for beginner fishermen. An asymmetrical loop will perform its functions poorly if you make a mistake with the size and material of the equipment, but the performance is no different from the same Paternoster, but that’s just my opinion. And on a pond, asymmetric mating is not a quick task.
The feeder in this installation moves freely between two nodes. This trick gives the fish time to eat the bait and not feel resistance from the pull.
We conclude that if you are looking for a simple installation, choose Paternoster or In-Line, but if you are ready to try something new, we knit asymmetrically, here is everyone’s choice.
I use all the options, but to a greater extent I have to use the In-Line, since it is the only permitted and safe installation when fishing in competitions.
Loading …
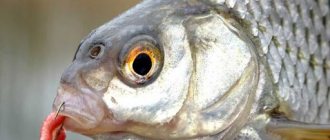
Selection of leashes and hooks
In general, I believe that installation is not the main part in bottom fishing. It’s worth doing more about selecting leashes and hooks. Let's talk about them. When choosing a leader material for catching crucian carp, I recommend paying attention not only to large diameters. In my personal experience, I had several fishing trips when the crucian carp was very careful and the bites were only on leashes of thin diameters (0.10 - 0.12). You shouldn’t put less; when hooked, the crucian carp immediately begins to go wild and can easily break the leash.
By the way, sometimes crucian carp breaks off the leashes even when biting, the rod simply flies off the stand. He can do this too, so prepare carefully. So we conclude that we use leashes from 0.10 - 0.12 to 0.18 in diameter, depending on the size and activity of the fish.
We select hooks to match the bait and partly to the size of the fish. You shouldn’t use a very thin wire, the crucian carp is a powerful fish, it will straighten the hook, and you will miss the long-awaited trophy. I would look towards small carp hooks, with an active bite, and if the crucian carp is small or passive, then a universal hook for all types of fish will help, Owner 53100, 53101 in numbers 12, 14, 16.
We recommend reading
Interview with the Master of Sports about feeder hooks and the secrets of their selection We talked with the Master of Sports and 2021 Russian Champion in feeder fishing Alexey Romashin, who shared...