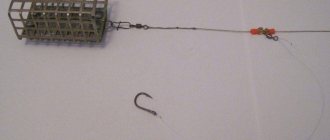
One of the main advantages of a feeder over other gear is the presence of a flexible rod tip - a quiver tip, which signals when a fish is biting. After casting the tackle, the angler places the rod on the stand and tightens the line so that the tip of the rod is bent. But there are situations when the quiver tip cannot fully “work out” the bite, and feeder bite alarms come to the fore. They will be discussed in our article.
The simplest sound and visual alarms
Mechanical sound bite alarms are the most common.
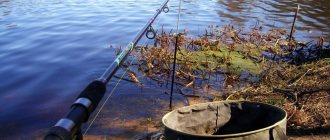
Such devices are distinguished by their simple design and low cost; many fishermen make them themselves from improvised means - various metal tubes, spent cartridges. There are a lot of options for attaching bells and bells to the feeder. In the simplest version, the bell is simply hung closer to the tip of the rod, but such a feeder guard has a number of disadvantages. However, this type of signaling device for the feeder is extremely inconvenient, especially in the case of biting and fishing - the bell can either stop the line or simply get lost during fishing. A more convenient option would be to install a bell on a rubber band. The harness is attached to the rod stand, and a hook is attached to the bell, with which it will come into contact with the cord or fishing line. When a bite occurs, the line tightens and the bell begins to ring. The bell does not get lost and does not fly off when casting, since the signaling device is installed after casting.
Photo 1. The simplest bell.
For donks, you can assemble a signaling device from improvised means, for example, from foil. Although such donkey guards are not particularly sensitive, in the absence of other indicators this can also be used. Any foil is suitable for making an alarm - from chocolate wrappers, cigarette packs, etc. The foil is twisted into a tube around the main fishing line; it is desirable that the tube is at an angle of about 45 degrees in relation to the rod blank.
The simplest devices
A donkey alarm is a must. The easiest way to place it is to find a small piece of sedge, split it on one side and attach it to the fishing line between the rings. Under its own weight it will make a slight sag. When there is a bite, the weight will either rise or fall - at this moment you need to hook.
What kind of supports are there for the feeder?
Improved devices are used on the same principle:
- A wine bottle stopper, drilled along the axis and cut with a thin blade on the side to a hole. It glides freely along the rig when casting and reeling, does not damage the rod blank during sharp hooks, and provides a good signal that the fish is taking the bait.
- Aluminum chocolate foil rolled into a ribbon and wrapped around fishing line.
- Clothespins. The linen is hung so as not to pinch the fishing line. But before hooking, you need to have time to remove it, otherwise there is a risk of damaging the rod body. There are special clips that only need to be slightly secured to the fishing line. From below they are tied to the fishing rod stand and when the form is lifted, they freely disengage.
How to install a bite alarm on a feeder
For feeder hunting to be successful, you need to properly attach the bite controller.
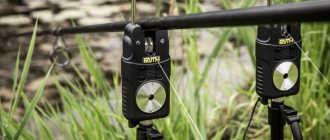
Installation of an electronic alarm
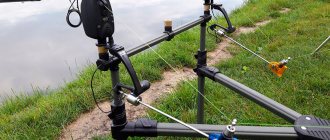
It is convenient to use the rod-pod system to place gear. It is better to install bite indicators on a stand using a threaded connection. The working thread must be passed through the roller of the electronic device. If the reel is equipped with a baitrunner, then the clutch should be released.
The device is configured using specific buttons, adjusting the tone and volume of the alert, and the degree of sensitivity of the device to bites. The length of the brace will depend on gusts of wind, its direction, and hunting conditions.
Attaching the bell to the feeder
You can fix the bell on the rod using any household clamp. A more reliable option is to mount the device by combining a hook with wire/jute. The bite alarm should be installed 20 cm from the top of the fishing tool.
Using special devices to control the bait makes fishing more comfortable and productive. The trading network has different options for devices, including light, beepers, and electronic, which makes it easy to choose the best model for specific fishing conditions.
The easiest way to make a bite alarm with your own hands
All fishermen know how important it is to notice a bite in time and prepare for hooking. Today the market offers a very large selection of different alarms and floats. But, if you make a signaling device with your own hands, you can get a very high-quality product without spending a cent
Making the alarm is quite simple and the work, besides, does not take much time to make it
But, if you make a signaling device with your own hands, you can get a very high-quality product without spending a cent. The signaling device is quite simple to make and the work, moreover, does not take much time to make.
Bite alarm. Manufacturing.
In order to start making a bite alarm, you need to prepare the following materials:
— Wire. — Cambric (2 pcs.). — Pliers. — Stationery knife or scissors.
It only takes 15 minutes to make a bite alarm.
Now you need to take the cambrics. This is necessary so that this design holds well and the fishing thread does not get stuck in the alarm. By the way, you don’t need to buy cambrics in a store, because this is exactly the thing that you always have quite a lot on hand.
For example, you can take any cable you have at home that will fit in diameter and remove part of its insulation. For this homemade product, it would be best to take a cable from a satellite or television antenna. Now you need to cut off part of the cable with scissors or cut the insulation with a stationery knife and remove it.
The positive thing about making a signaling device with your own hands is that no money is wasted in its manufacture. At the same time, you have a really high-quality alarm device of your own production, which is enough for many fishing trips. Due to the fact that this signaling device was made of aluminum, there will be no corrosion or breakage.
Perhaps many fishermen have encountered the fact that plastic analogues from stores cannot withstand a long period of use and quickly break. If you make a signaling device yourself, you don’t have to spend a lot of time and effort, and it turns out much better than a store-bought one. This kind of alarm works well when fishing with bottom rigs. Even the smallest bite will be noticed and you will be able to react in time.
When hooking and removing fish, the alarm will not interfere. The same will happen during long-distance casting of bait. In addition, there is no need to prepare the alarm for casting a fishing rod, because everything will always be ready for perfect operation. Source
Receive a selection of new homemade products by email. No spam, only useful ideas!
*By filling out the form you agree to the processing of personal data
Purpose and varieties
In a short session when fishing with one rod, no additional alarms are needed, bites are clearly visible, and it is not difficult to respond in time to the vibrations of the quiver tip. At the moment of a bite, the line tightens, or vice versa, it gives slack, and the tip changes its position, acting as a kind of signaling device. The fisherman can only hook the fish and successfully bring it into the landing net.
But this applies more to feeder athletes, but amateurs on regular fishing use not one, but two rods, thus trying to increase the chances of a decent catch. This applies, for example, to fans of feeder fishing, or the flat method, who also have to re-cast the equipment every 15–20 minutes.
In such a situation, it is inconvenient to monitor two rods at once and an additional device is needed to act as a bite alarm.
When fishing at night, it is also advisable to use warning devices, since it is still difficult to sit all night near the rods, carefully observing the behavior of the quivertype.
Fishing on a feeder should be a pleasure, therefore it is necessary to create favorable conditions and feeder alarms help with this.
A bite alarm is a device that can notify the angler of a bite visually or through sound signals.
Today the market offers a wide range of such devices, divided into mechanical and electronic.
The main characteristics of the feeder alarm are:
- sensitivity;
- functionality;
- reliability;
- durability;
- price.
Mechanical bite alarms for the feeder react to changes in the position of the fishing line and complement the “work” of the quiver tip. They differ in design, but have a similar operating principle and are used when fishing with more than one rod.
A striking example of a mechanical signaling device is a swinger, which is fixed on the fishing line and by its position and vibrations the fisherman receives information that the fish is interested in the bait, or has already been detected and is “sitting” on the hook.
The disadvantage of such alarms is that the fisherman has to constantly monitor their position and, being distracted from this process, you can miss the bite.
Electronic bite alarms for feeders do not have this drawback, as they are capable of emitting sound signals to help the fisherman navigate the situation.
The design of an electronic signaling device is more complex, but among the devices capable of producing sounds there are also more primitive gadgets, such as bells or bells.
In general, the use of bite alarms for the feeder allows you to:
- provide comfort during fishing;
- free the fisherman from the need to constantly monitor his fishing rods;
- catch with two or more rods and always be aware of what is happening;
- respond to a bite in time and increase your catch.
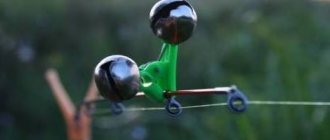
Feeder alarm (Swinger)
Unlike a conventional pendulum, such a feeder alarm does not hang on the rod's guides, reducing casting distance and creating the likelihood that the tackle will get tangled. And they don’t sway that much in the wind.
Swinger
The design of these alarms is as follows: one edge has a passage ring, through which the swinger is attached to the rod post. The stand must be collapsible. The rod is removable, and at the bottom there is a tube into which we thread the edge of the swinger, then we insert the rod back into the rack. Well, this is ideal, there are a variety of racks and some provide another mounting option, the main thing is that your swinger is firmly fixed. Then on the opposite edge we have a clamp through which we pass the fishing line. The clamp has a nut, with the help of which we can regulate the clamping force of the fishing line. Also, most swingers are equipped with barrels where you can insert a firefly. Some swingers have a weight to adjust the weight of the alarm; if the weight is moved closer, then light pulls will be unnoticeable, thus we cut off false bites; if we move the weight close to the stand, then our tackle becomes more sensitive.
Swinger
For convenience (so as not to stand and look at it all the time), a bell, a bell is attached to the swinger, or it comes in conjunction with an electronic feeder alarm.
Read Fishing site
DIY swinger
It’s very easy to make a homemade bite alarm for a feeder (swinger). For this we will need a barrel from a broken alarm we have, you can also take a yellow barrel from a Kinder Surprise and make holes in it at the top and bottom. Then, we take a piece of wire, bend it in half and insert it into the central hole of the barrel, so that on one side we have a small loop, and on the other two protruding edges of the wire 1 cm long. We put two beads on them. We attach a piece of nylon thread to the loop.
Homemade swinger
The operating principle of such a feeder alarm is simple. We rigidly attach the free end of the nylon thread to the rod stand or fishing platform. Then, after throwing the tackle, we take our barrel and hook it onto the fishing line, passing it between two beads. When we bite, we hook, the nylon thread is stretched and the feeder alarm flies off the line, so we can safely reel in the tackle. Having recasted, we again hooked it to the fishing line. You can attach a bell to the loop, and our alarm, in addition to being visual, will also become audible, and if you also insert a firefly ampoule into the side hole, then it will be very difficult to miss a bite at night.
How to properly use feeder bells
Blog entry date: 08/25/2014 Blog entry date: 08/26/2014
Feeder bells are hollow metal balls, inside of which solid small metal balls are freely placed, which create a characteristic sound when moving. The bells themselves are mounted on a spring suspension, which ensures their sensitivity. There is also a mounting device.
It is best to choose bells with fasteners such as a clip or a clothespin. It is the most convenient to use. There are screw-on options, but they are not suitable for us; we will not install this device on the top of the feeder.
A freshly purchased bell needs to be modified immediately. We choose a day with a fairly strong wind, hang the bell on a stand, and stretch the spring so as to increase the sensitivity of the device. At the same time, it should not react to the wind, but must voice the slightest movement, especially sharp ones. The more the spring is stretched, the more sensitive the bell is. We achieve the sensitivity we need.
The use of bells requires their use on a stand and not on a feeder. Attaching it to the feeder will not lead to anything good. The top of the feeder is thin and relatively flimsy. The bells overload her very much. When casting, there is a high probability of the line getting caught behind the bell, and then the minimum is shooting, the maximum is goodbye to the tip. Even if you take them off when biting, it’s a waste of precious time when you have to hook and fish, and you’re running back and forth along the feeder taking off the bells. At this time, the fish will leave, scaring away all its relatives.
Even if you don’t break the feeder, you are guaranteed to blow your mind and your neighbors’ minds from the incessant ringing. This is especially true at night when everything around is quiet. Even if half a kilometer away someone is working with a bell attached to a fishing rod, everyone in the area knows about it, and all the time it seems that it is ringing right above the ear.
A bell on the stand will perfectly indicate a real good bite. Of course, we won’t see any micro movements or small pulls, but we should take into account that the bell is just an additional bite indicator, and not the main one. The main one is the tip of the feeder. The bell complements it and allows, for example, to eat or look away from the tip while fishing. For example, I always use it when I shoot videos. While you're talking to the camera, it won't take long to miss all the bites. And all the same, if you move away from the tackle for a long time (or far), then I recommend removing the feeder from the water.
The stand should move freely in the direction of the line, at least a little. Then the bells will show any slightest bite. If the stand is tightly fixed or, for example, a tripod is used, which is very stable, then the bells are practically useless, because no force is transmitted to them.
On a very subtle note, the feeder should be placed on the stand no further than 1/3 of its length from the top, again, so that the vibration is normally transmitted through the stand to the bell. If the stand stands under the butt and the feeder, for example, looks up, then even fairly strong bites may not affect the bells.
Please use bells wisely, do not blow your mind and those around you
How the indicator reacts when biting
Commercially available indicator models may work differently.
Before you install them on your bottom or feeder rod, you need to figure out how to use them. If we talk about the Megatex Jay 3 model presented above, then when it bites, it makes a characteristic sound, as well as a light signal. A diode with light is located on the body and lights up for 2 seconds, after which it turns off, and then lights up every five seconds for a more accurate bite detection. The sound signal is emitted for no more than four seconds.
A similar invention is fixed directly on the rod, as a rule, on the first leg of the blank, because at the moment of hooking, it automatically turns off in order to preserve battery charge and relieve the fisherman from annoying signals. Therefore, you have to constantly make new casts and place the rod on the stand with the indicator on. According to experienced fishermen, the model has faithfully served its owner for 5 years without showing any problems or failures.
The model is equipped with an electronic board that ignores the effects of wind and waves.
Homemade sound devices
Option 1. Simple circuit of an electronic signaling device
The line tension sensor is made from a contact group from the RPU-2 relay
It is only important to set the relay to open at the slightest movement of the fishing line, but this can be done very easily during assembly
Option 2. Simple circuit of a waiting sound and light alarm
A very simple scheme. The sensor is based on the same RPU-2 relay or any other analogue. The fishing line is wound behind the sensor and connector SA1 is closed manually. As soon as the fishing line is tensioned during a bite, it will pass through the sensor and the chain will allow the speaker to signal the bite. You can also install an LED in parallel for light signaling.
Option 4. A more complex circuit of a waiting bite alarm
All devices that monitor the bite on a donk or fishing rod are divided into audio and visual. Some mechanical devices and modern electronic alarms can combine both notification methods.
Most fishermen use visual alarms to detect bites.
Electronic bite alarms are divided into the following types:
- visual;
- sound;
- combined
Visual alarms
These alarms work according to this principle:
- the float is attached to the fishing line;
- when he gets into the water, he begins to balance on its surface;
- when a touch or any other movement is applied to the bait, the float will notify the fisherman about this.
In addition to the float, a visual indicator also includes a “nod”, which is attached to the fishing rod or fishing line, in the space between the reel and the first ring of the fishing rod.
Sound alarms
The simplest sound alarm, which has been used by fishermen for decades, is a small bell, which is attached to the end of a fishing rod or fishing line when fishing. Most often, the bell is used on spinning rods when casting over a long distance.
Electronic rod bite alarm
An electronic bite alarm for a fishing rod is a special stand for a fishing rod, to which a special holder is attached.
This alarm works like this:
- The stand is installed on the shore near the water.
- A fishing rod with tackle is attached to this stand.
- The line from the tip of the fishing rod is wound through a roller, which controls all its movements.
- When a fish bites, a shaft with a built-in gear moves together with this roller, which is located under a light emitter that controls all movements.
These mechanisms are very effective and can operate in different modes. In addition, they allow you to classify the degree of fish bite and the bite time, which is very practical.
Electronic bite alarm for feeder
This device is very similar in operation to a fishing rod alarm. The sound signal is provided as a result of the curvature of the infrared rays of the mechanism, a special wheel through which the fishing line is pulled.
To use the electronic signaling device correctly, you need to follow the following procedure:
- place several fishing rods on the shore of a pond using a rod-pod stand (you can use other types of stands, but this is the most convenient);
- attach a bite alarm to fishing rods;
- release the friction brake so that the fishing line can be secured in the desired position;
- the length of the line used mainly depends on the fishing conditions and wind direction;
- install a swinger between the rod and reel so that the signal in too windy weather is extremely accurate.
- connect the power supply to the alarm and set it to operating mode. At the first bite, the device will notify the fisherman of this.
The operating principle of the alarm looks like this:
- The fishing line is threaded through a special wheel and makes it move when biting.
- These movements are recorded by a light emitter and transmitted through an audio signal.
The general operating circuit is a bit like a computer mouse, because it also transmits a signal.
Universal devices
Electronic bite alarm for feeder
This type of bite alarm informs the fisherman not only with sound, but also with light. The principle of operation is to open and close an electrical circuit using a working thread when biting.
Materials for making your own electronic device:
- housing made of plastic box;
- LED as an indicator, it is mounted on the housing;
- sound capsule, it is attached to the wall inside the case;
- battery, it is installed inside the same housing;
- corner, it is placed in the inner part of the housing for mounting the spring;
- small ring for attaching the spring.
One more nuance: you will need additional fishing line; it will need to be secured at one end to a small ring, and the free part taken out through the opening on the body.
A clip (clothespin) located on the outside of the body is mounted to the free part of the fishing line. The electronic components of the device must be installed inside the housing. The radio component (reed switch) must be fixed to the free edge of the spring using strong threads.
A magnet on a metal plate must be mounted to the side wall of the housing on the radio component side. During operation, the electronic device must be mounted on the rod. The clamp is hooked onto the working thread. When the fishing line is tensioned, the reed switch approaches the magnet and the device is brought into working condition. The light comes on and the sound capsule turns on.
The simplest bite alarm
Operating principle
Simple sound bite alarm devices for the feeder are a combination of a mount in which the device is attached to the top of the feeder, and a direct sound alarm itself. It could be a bell, or it could be a rattle, and so on.
In the event of a bite, the top of the feeder to which such a device is attached begins to vibrate, and, consequently, the bell or rattle begins to make a corresponding sound. Let's take a closer look at the bell.
The right bell
To make the right bell for the feeder, let’s immediately make a reservation that it will not be the bell itself that will be made, since there are a lot of them on sale and there is no point in spending time and effort on making it. Here we will talk about the method of attaching it and stopping it on the feeder.
Read Types of floats for float fishing
The simplest and most classic way is to attach the bell using any clip to the top of the feeder, but this is not entirely correct or practical. Another method seems to be the most correct. To do this, take a small piece of rubber band and attach it to the feeder stand at a distance of about 20 cm from the top.
We attach a bell to this harness, to which we also attach a small wire hook. After casting the feeder and installing it on the stand, take the bell hook and attach it to the fishing line next to the reel so that the elastic pulls the fishing line back a few centimeters.
Until recently, the most common signaling device among domestic fishermen was the “monkey”. It is not difficult to guess the reasons for its popularity - it is simple and cheap to manufacture.
To make a “monkey” with your own hands you will need: pliers, a drill, wire cutters, drills, a knitting needle, wire, cambric, a ball (in our case, a case for a Kinder Surprise toy), two large beads, baguette clothespins.
Sequencing:
- Drill a hole in the clothespin. The diameter of the hole should be such that the spoke passes freely, but does not dangle.
Insert the knitting needle into the hole and bend it.
Wind steel wire onto a knitting needle. As tight as possible. Make approximately 12 turns. After this, remove the wound wire without unwinding.
Place the cambric on the knitting needle. Place a plastic ball on the cambric, in which a through hole should be made.
Take the wire with 12 turns again. Shorten the ends so that their length is 2 cm greater than the height of the ball. Heat each end of the wire with a lighter and string a bead onto it.
Place the resulting structure on the free end of the knitting needle. Bend the end of the knitting needle. Ready.
Information about alarms
When and where is it needed?
These truly indispensable assistants for any fishermen are necessary at the moment when the angler is going to hunt for a fairly large fish: bream, catfish or carp, for example. After all, such a large fish can swim away in an instant, taking with it both the hook and the bait and breaking the tackle.
However, if you install a bite alarm on the feeder, you will always know when the fish is biting and can proceed with further actions.
So, such a device is simply irreplaceable during night fishing. Fishermen may doze off, or sit not on the shore itself, but, for example, warm themselves by the fire, but your assistant in the form of an alarm is guaranteed to inform you: a fish has been caught on the hook!
Below we will look at what types of alarms there are and which one is better to choose in order to save yourself from constantly watching the tackle and tugging every time the fishing line fluctuates.
Specifics of nods and their types
The same thing is a guard for a bottom fishing rod; there are no fundamental differences in its operation. It is a plate (or wire) made of flexible material, with a ring for fishing line at the end. Sometimes elastic components are not required. They are also made from coiled springs of varying stiffness. The nods are painted with a bright reflective varnish of green, red or yellow so that the angler can see the fact of the bite from afar. Sometimes additional sound alarms are hung on them, for example, small bells. This is a good help for those fishermen who cannot constantly look at the gear.
Lodges are used for both winter and summer fishing. They have four types:
- soft nods;
- intermediate (medium hardness);
- hard alarms;
- heavy guards.
The first type is used on lakes, ponds, backwaters and other bodies of water where there is no current. Suitable for catching any type of fish. The second type should be used on quiet rivers. The rigid nod copes with its task both in places with strong currents and during windy conditions. The latter type of alarms is used for deep (from five meters) fishing, including with live bait.
It is best to place a hard or heavy plate guard on the bottom (depending on the depth and the target fish). For the feeder, spring devices are needed, because they do not imitate a bite during waves or wind. They are used mainly for winter fishing.
Experienced fishermen advise bending the feeder nod spring down slightly so that the alarm does not react even to increased water vibrations.
Based on functionality, nods can be divided into the following groups:
- bendable;
- rotating (inflexible);
- sound;
- with automatic cutting;
- combined (when one device includes several characteristics).
Bendable guards bend when signaling a bite down, rotating guards rotate, and sound guards ring. Self-hooking alarms work like this: the fish pulls the bait towards itself, the mechanism is triggered, sharply pulling the line towards the fisherman.
Sound alarms
This category of alarms includes various devices that signal a bite with sound. Their design is quite simple and are:
- Bells on a clothespin;
- Rattles;
- Bells.
Such indicators are used on bottom gear at night. Sound alarms are also installed during daylight hours, when it is difficult to visually monitor a large number of gear. They are usually mounted on a fishing line or the tip of a donkey rod. (Pictures enlarge.)
Classic bell pendant
Bells pendant
Signaling bells from the company Salmo
Very often, the factory fastening of the bell is difficult to remove during hooking from the fishing line. This interferes with the normal rewinding of the tackle when fishing. Therefore, you can modify the alarm holder yourself. For this you will need:
- Thin-walled rubber hose, approximately 3 cm in diameter.
- A small bolt with a nut that will go into the bell ear
A ring 1.5 cm wide is cut from the hose. An incision is made on the ring and shaped into a hook. You need to make a hole in its long part. Through it, the bell is attached to the elastic band using a bolt.
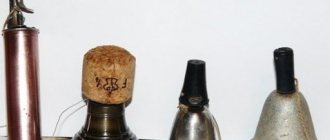
You can make the bell yourself. For example, from decorations on the backs of old iron beds. They look like a cylinder with conical tips.
For production you will need:
- Saw the cylinder in half;
- Make a hole in the top;
- Attach a nut to the self-tapping screw, tying it to a fishing line. This will be the tongue of the bell;
- Self-tapping screw, screwed into the hole from the inside of the bell;
- A wine cork is placed on the tip. An incision is made in the cork to attach the indicator to the fishing line of the fishing rod.
You can make a bell from an old telephone bell. We analyze the call, we get two cups. In the upper part, through the hole, a tongue is fixed. You can use a nut on a fishing line for it. To install the alarm on the fishing line, you can use a cork.
Hand-made bells differ from factory-made ones in their special sound. This allows you not to confuse their sound while fishing with their neighbors.
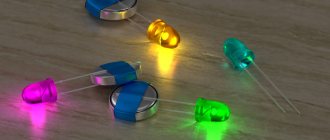
Light signaling devices (firefly)
Basically, signaling devices produced by the manufacturer have the following forms:
- In the form of a nail or stick;
- In the form of a light bulb, which increases the lighting area.
According to the principle of operation, such devices are divided into three types:
- Collapsible capsules with small batteries and LED. These fireflies are reusable, thanks to the replacement of batteries.
- Light accumulative signaling devices. The principle of their operation is the accumulation of light during short-term illumination. For them to work you need to have a good flashlight.
- Disposable chemical fireflies. They consist of a plastic flask with component A. Inside of which there is a capsule with reagent B. Under mechanical action, components A and B are mixed, and a reaction occurs - glow.
Signal lights can be of different colors. For chemical species, the most popular is a yellow-green glow. It's a pretty bright color. It is calm enough not to irritate the eyes. There are also light and sound bite alarms. They will be discussed below.
Fireflies are attached:
- On a float, inserted into their silicone antennas. Or use rubber bands to place them on the tops.
- To the tip of the rod, using silicone rubber bands. Special plastic fasteners are also sold. Several fireflies can be installed in such mounts.
The main brands that can be bought at a fishing store: Ocean Sun, Kostal, Balzer, Salmo, Rodinson, Liman Fish, Strike Alert.
Do-it-yourself light signaling device
As mentioned above, light signaling devices have proven themselves well when fishing at night. Regardless of whether you buy them in a store, you can easily make such an indicator at home. To make it you will need:
- Cocktail straws;
- Crocodile clips;
- Glue gun;
- LEDs;
- 3 V coin cell batteries;
- Heat shrink, according to the size of the battery.
A piece of straw 3–4 cm long is filled with a glue gun. An LED is inserted inside. Its legs protrude by 0.5 cm. A battery is inserted into a heat-shrink tube, 2 cm long. A piece of straw with a pin attached is inserted into one end of the heat shrink. It shrinks tightly using a lighter. A straw with an LED is inserted into the second end. The LED legs are located on different sides of the battery (+, -). It fits so that it can be pulled out.
This homemade device is enough for the entire fishing season. Manufacturing does not take much time, does not require soldering or high costs.
Sound alarms
A universal model that can be used both day and night. Very often, sound devices can be found in combination with luminous bite indicators. This group may include both mechanical and electronic devices. The first group includes bells and bells, and the second category includes devices that use batteries/sound buzzers to sound.
The most primitive version of a sound bite alarm is a product made from a pair of hollow tubes. The main thing here is that when two elements touch, a characteristic noise is created. The tubes are tied with a thread at the ends and thrown over a cord. At the moment the tension of the working line changes, the tubes touch each other and notify the angler that a fish has been hooked.
Bell
This is a classic version of an audible alarm. It is presented in the form of an ordinary miniature bell made of copper/brass. The bell is installed on the cord between the first pass ring and the coil through the use of special clamps. You can also use fragments of rubber with slots here.
To simplify the task when disconnecting the bell while reeling in the cord and fishing the prey ashore, you can additionally secure it with a piece of fishing line to the stand. You can also attach the bell to a peg driven into the ground.
Expert opinion
Anton Timoshin
Feeder fishing expert
Ask a Question
I believe that in classic feeder fishing, bite alarms are not needed, except for the quivertip itself. Even when fishing at night, you can get by with a good flashlight. I would use bite alarms when catching burbot and catfish on donkeys.
Expert answers to questions
What if you are fishing on two feeders at the same time?
Similarly, we determine the bite by the quivertype of the feeder
If a beginner doubts the correctness of bite detection, should he start with a bell, for example?
Absolutely not. It is not right. It’s better to learn how to fish correctly with a feeder right away.
Bells
Bells are closed-type signaling devices; they consist of 2–3 spherical hollow bodies. They have slots for sound, which is produced as a result of movement inside the balls. In most cases, such bite indicators are mounted on a rod stand. It is unwise to attach them to the feeder without any support. It's not practical. If you fix the bells to the top of the rod, it will be overloaded, which is not desirable.
Read Goblin shark (goblin shark)
Swingtip
The original signaling device is a separate additional tip with two passage rings and a small weight. Attaching to the form is carried out using a flexible tube. The fishing rod should be placed on the shore at a slight angle to the water's edge - this makes it easier to observe the guardhouse.
A donka equipped with a swing tip has one significant disadvantage - it is difficult to cast the tackle. However, once you gain the proper skill, fishing with such a signaling device will bring real pleasure.
The swing tip is attached to the form using a silicone adapter and is slightly weighted
At night, visual alarms must be equipped with so-called “fireflies” - tubes made of luminous plastic. It gives a light signal about the movement of the guard.
Production of more complex versions of electronic signaling devices
There are also more advanced homemade products, the manufacture of which will require some experience and knowledge of electrical engineering and electronics (however, you can always try to find a radio amateur among your friends who will make a bite indicator for a nominal fee).
To make one of the relatively more complex bite indicators you will need:
- Cheap Chinese alarm clock (provides both a housing for the device and a speaker).
- A resistor from an ordinary computer mouse.
- A nod (a bicycle spoke will do, or just a metal wire of sufficient diameter).
The two extreme contacts of the resistor must be soldered together; later they will be connected to the battery. To the middle one you need to solder a wire that will be attached to the alarm clock board. Next you need to choose a place in the case for the resistor. After the location has been chosen, you need to use a heated awl or nail to make a hole in the body through which the nod will pass. The resistor is fixed with glue. The nod is attached to the hole in the resistor. The finished product should be attached to the rod, the line should be wound by the nod so that it is taut. When the nod is deviated in any direction, this device emits a fairly loud sound signal, which notifies you of a bite towards the shore or away from the shore.
For the option with a reed switch you need:
- The body of the future device.
- Spring plate for reed switch, plate for attaching magnet.
- Sealed contact with magnet.
- Battery and indicator light.
The sealed contact is attached to a springy metal plate, at the end of which there should also be a ring for tying the fishing line. The plate with the reed switch is mounted inside the housing, and the optimal distance for attaching the magnet is selected experimentally. The case also contains a board with the radio components necessary for the bite indicator to operate, as well as a toggle switch and a battery of the required power.
Important! The toggle switch is necessary to ensure that the electronic alarm does not go off when transporting the device to a reservoir. This option is much more convenient than opening the case each time to remove the battery.
The housing also needs holes for a light indicator, a speaker that signals a bite, and also for the line to come out
The fishing line is attached at one end to a plate with a reed switch, and at the other to a clip, which in turn is mounted to the main fishing line and transfers the biting force to the plate with a sealed contact. Such a bite alarm is usually installed on a rod stand, and not on the form itself
The housing also needs holes for a light indicator, a speaker that signals a bite, and also for the line to come out. The fishing line is attached at one end to a plate with a reed switch, and at the other to a clip, which in turn is mounted to the main fishing line and transfers the biting force to the plate with a sealed contact. Such a bite alarm is usually installed on a rod stand, and not on the form itself.
Using a sealed contact, fairly sensitive and reliable homemade bite indicators are obtained, but the manufacture of such devices requires some experience.
Features of the electronic bite alarm
What type of fishing is it suitable for?
These bite alarms are universal devices that have their own classification based on the principle of signal transmission, which allows you to select the most suitable variety.
Their use becomes relevant for any fishing method in poor visibility conditions, when it is visually impossible to notice the beginning of a bite, which is why anglers miss the right moment to fish for prey.
Let's celebrate! Most modern models have additional protection and increased resistance to low temperatures, which allows them to be used in ice fishing.
Advantages
Despite the presence of a large number of analogues with different methods of operation, the electronic type has firmly secured its leadership position, since it has a number of advantages:
High sensitivity levels, allowing you to record the lightest bites or contacts of fish with bait. Reliable protection of the working board with a sealed case that protects it from precipitation and low temperatures. High mobility, allowing you to transport the device without much difficulty. Ease of operation and quick transition to operating mode. Duration of operation without replacing the power source
Moisture resistance and the ability to work with the device with wet hands, which is especially important when fishing
Swingers and bahts
The most common visual indicators are swingers and bats. These devices are similar, but fundamentally differ in that the swinger has a rigid structure in the form of a bar, and the bat is connected to the rod stand using a chain.
The attachments to the fishing line are almost identical and come off easily after hooking. The internal cavity of the body of the swinger and bat is empty, and during night fishing a firefly is inserted into it to enhance the visual effect.
To tension the fishing line after attaching the swinger, a freely moving weight is provided on its rod, with the help of which the sensitivity of the device is adjusted. The batt does not need additional weighting, since it itself has enough weight to tension the fishing line.
When a fish bites, both the swinger and the bat move in a vertical plane, and the angler makes a hook.
Swingers and bats are small in size, easy to transport and have high sensitivity, sufficient to register even the most “gentle” bites. The disadvantage of the baht is that due to the flexible chain, it is inconvenient when fishing in difficult conditions when a strong wind blows.
The swinger has advantages in this regard due to the rigid rod, which provides the necessary stability. The cost of both the swinger and the baht is not that high, but if you need several of them, the costs increase and therefore many bottom fishing enthusiasts prefer to make a bite alarm for the feeder with their own hands.
Is it possible to do it yourself
Any experienced fisherman will confidently tell you that there is practically no equipment that cannot be made with your own hands at home. The same applies to bite alarms. Some of them are generally simple, some are relatively complex, like Shcherbakov’s nod. But if you buy certain components or even find them in old gear, the result can be quite successful. A homemade alarm can be more effective for the following reasons:
- real handmade work is always better than industrial work;
- sometimes complex store gear of this kind is quite expensive;
- any fishing tackle is adjusted to a specific body of water, weather conditions, and the preferences of the fisherman himself - often store-bought alarms do not fully meet these requirements.
So we will try to consider how and with what materials and tools you can make them yourself.
How to choose a bite alarm
Let's consider the main selection criteria that beginners should adhere to.
Mechanical devices
They have some significant advantages:
- do not require batteries;
- inexpensive;
- simple and reliable;
- easy to make with your own hands;
- can be used in conjunction with electronic indicators.
When choosing a mechanical device, you should give preference to products that are easy to distinguish in the grass and on the surface of the water. An indispensable condition is stability in the wind.