Every bottom fishing enthusiast has his favorite places for this exciting activity. They have already been well studied and fished, and here, as a rule, the fisherman clearly knows the nature of the surface and the structure of the bottom, catch points and unfavorable areas where they should not cast due to the presence of hooks.
Upon arrival at an unfamiliar body of water, many inexperienced fishermen immediately begin installing fishing gear and try to start their favorite exciting activity as quickly as possible. But if you hurry, you will make the fish laugh.
Choosing a fishing spot
First of all, you need to evaluate external signs, such as remains of traces of fishing by previous visitors:
- traces of the use of bait and lures;
- trampled grass;
- fire pits;
- remnants of bait and food packaging.
One should only regret this behavior of fellow hobbyists, but it occurs quite often.
Having chosen a place based on external features, you should find out the nature of the bottom and depth at the intended fishing site.
How to find out the nature of the bottom
For this purpose, a specially shaped marker weight is used. Its weight can vary, from 30 to 100 grams or more. The choice depends on the strength of the current in the reservoir; the stronger it is, the heavier the marker should be.
The marker sinker can be equipped with a metal rod, which allows for free wiring in silty areas overgrown with aquatic vegetation.
Otherwise, it will be carried away by the force of the current, and the result will not correspond to the place being tested. The general rule is that the marker weight should be close in weight to the weight of the main gear.
The first cast of the marker sinker is carried out to a maximum distance, which is determined depending on the size of the reservoir.
After the marker tackle falls into the water, you need to count the time from the splash of the sinker to the weakening of the line, indicating that it has reached the bottom of the reservoir. The counting interval should be approximately a second; the counting number quite accurately corresponds to the depth of the reservoir at the measurement location.
Sinkers for carp fishing
The bottom topography can be determined by slowly fishing the control gear by the nature of the movement of the load. In this case, the rod is held approximately at a right angle to the casting direction:
- If the load moves jerkily, as if sticking to the bottom, and significant force is required to break it, it means that the bottom in this place is muddy.
- Smooth movement of the marker without jerking means that in this place the bottom is clay or sandy.
- If the load moves with a knocking sound, which is felt even by the hands holding it, it means that there is a colony of shell rock in this place.
- When moving a marker load through thickets of vegetation, its behavior can be defined as a uniformly loaded movement. The shape of the marker weight allows it to not get caught on it when moving in the grass.
The most promising places for catching bottom fish are the boundaries between the muddy and clay-sandy bottom cover. To more accurately determine its location, you need to perform several control casts and install a limiter on the reel.
Measuring the depth in a promising fishing location can be determined with sufficient accuracy by the time of deepening the control load by keeping a count. And to get more accurate data, you can use a marker float.
Basic principles of bottom sounding with a marker weight
Bottom measurement is an important component of feeder fishing. Any experienced fisherman will not be too lazy to spend an extra hour determining the bottom topography and a good fishing point, since in the future this can bring a good catch. The average fishing distance on a feeder is 30-60 meters, but many fishermen cast gear up to 80 meters. At such a distance it is quite difficult to determine the depth, much less find out what is at the bottom.
If you are going to fish on a pond with still water, it is best to use a weight weighing 60-70 grams. It will be approximately equal to the filled feeder used in such areas. On reservoirs with high currents, it is better to use weights of 90 grams or more. They will not be carried away much to the side, so they will sink close to the intended fishing spot. Also on the river it is better to use a marker weight with a large number of spikes, for the same reasons.
Muddy bottom
When placed in silt and with good tension, the marker weight will move smoothly and without knocking. If you stop for a moment and stop pulling the load, it may fall into a layer of silt. After the next tension, the tip of the feeder rod will bend, a soft pull will be felt, for which you need to apply a little effort. At such a bottom you can stumble upon toothless colonies. When a load hits this mollusk, quick, short impacts may be felt and its passage along the bottom becomes heavier.
Method of successive deposits into the account
This is one of the easiest ways to explore the bottom, suitable for beginners in feeder fishing. The method is aimed at determining the bottom topography by several throws of cargo at different points in the reservoir. This must be done sequentially, and after each cast, count the time it takes for the load to reach the bottom. Based on the results obtained, it is possible to approximately determine the bottom topography and study its changes.
The method does not require any special skills; it is enough to count the time it takes for the marker weight to reach the bottom. After each cast, it is necessary to reel in the line and rethrow the load to a new point. It is better to explore the terrain not only closer to the intended fishing location, but also further than it. This will help to accurately determine the nature of the bottom.
There are several disadvantages for which experienced fishermen do not like this method:
- Low accuracy, since it is quite difficult to remember the exact location of the previous cast in order to correctly make the next one.
- Impossibility of determining the complete picture of the bottom topography. The method allows you to determine only the general patterns of its changes.
- It is impossible to identify the best places where fish are likely to be found: holes, tubercles, etc.
It is best to use this method in conjunction with others in the initial stages. This will give a general idea of the chosen fishing location and will allow you to identify the most interesting places for subsequent research in other ways.
Rocky bottom
A rather dangerous type of bottom, where “dead” hooks often occur. If it is represented by a large stone, when pulling the load there will be characteristic shocks and an ambiguous move.
When the bottom is represented by a small stone, the sensations when pulling are similar to the passage of zebra mussels. The top of the feeder will bend, and a feeling of heaviness will appear when pulling the marker weight. It is important to remember that on a steep descent, representing the bottom topography, there are usually no stones.
Still have questions about assembling gear or fishing tactics? Feel free to ask our expert questions and you will definitely get an answer from a professional. Ask a Question
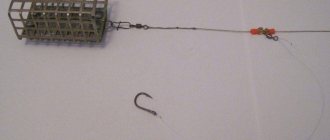
Dragging the sinker along the bottom
An excellent method that is popular among fishermen. It can be used to determine the structure of the bottom, so it is better to use it after determining the depth and identifying a promising fishing spot. At the final stage of determining a good point, dragging will allow you to find out the exact nature of the bottom: pebbles or shells, small branches or driftwood, sand or silt, whether there is algae or not, and so on.
To explore the bottom in this way, you need to perform the following steps:
- After casting, wait until the marker weight drops to the bottom.
- Take your time to move the load along the bottom, without lifting it from it, so as not to miss anything.
- You need to carry the load all the way to the shore in order to reveal the entire picture of the bottom topography.
In this method, you can use a marker in the form of a ball or pear made of lead. But a full-fledged marker weight for checking the bottom is best suited. Thanks to its shape and studded surface, it is able to convey the character of the bottom much better. This device can be secured using a swivel or clasp.
We recommend reading
Interview with Svyatoslav Smirnov - about feeder gear and rigs and fishing strategy Sportsman fisherman Svyatoslav Smirnov, in an interview for readers of our portal, shared his experience about collecting feeder...
Depth measuring gear
Fans of float fishing measure the bottom with overloaded tackle, monitoring the position of the float in relation to the surface of the water.
Accurate determination of the topography of the bottom of the reservoir at the fishing site can be done with fly gear with an overloaded float by step-by-step wiring.
Experienced fishing enthusiasts use specially made marker gear to determine the bottom topography. They can have a different structure with a blind or sliding float.
In the first case, the depth is determined by the position of the float in relation to the loads located at certain distances from float to float.
Marker tackle with a sliding float allows you to reliably identify promising places for fishing from the bottom.
More accurately, the depth at the intended fishing location can be determined using a sliding marker float. You can buy equipment for this at any specialized store or make it yourself.
Types of marker cargo
It’s okay if you don’t have a special marker sinker. You can use a regular olive or a bullet with a soldered ring or swivel to secure it to the equipment. It is necessary to select the weight of the sinkers in accordance with the fishing conditions. For the near zone and picker - up to 40 g, for the middle sector - up to 80. For the far zone, sinkers of 100 - 120 g are suitable.
Read! Fishing for bream in early autumn on picker
According to marker manufacturers, it is their sinkers that are the most reliable and ultra-sensitive, but this can only be considered a myth. The only thing that is important when taking measurements is to have your own feelings about the usual equipment. In the process, it is important to have personal experience in using this equipment.
The markers from the store are standard weights with side horns. According to the manufacturers, they are super sensitive. This purchase is unlikely to bring technical benefit, but is only suitable for replenishing a full-fledged feeder arsenal. In reality, long casting weights with wings may be necessary. The standard marking distance in the feeder does not exceed 80 m and only sometimes up to 120 m. A standard load can also be thrown at 80-100 m.
The use of special markers for long casts can be convenient when long-distance carp fishing at a distance of more than 120 m. However, this applies more to carp fishing.
It is possible to make marker sinkers yourself. In this case, you will need to cut the desired shape from plaster, caulk, or other material that can withstand molten lead. This is not tactically necessary, but only if there is a desire to make something. In real measurements, you can use a standard marker weight of the required weight.
Detailed method for measuring depth
In this case, intermittent movement of the test equipment along the bottom is provided. The amount of each advance can be controlled by the number of turns of the coil. The smaller the step, the more detailed image of the relief can be obtained. Let's say that the reel removes 10 centimeters of line in one revolution of the spool. Consequently, when moving with 5 turns, the marker load will approach the shore by 50 centimeters.
Before starting test casts, you need to prepare a marker rod for measurements. To do this, at a certain distance from the handle or reel mount, a certain distance (40-50 centimeters) is measured and a mark is applied to the form with a marker.
The marker weight for the feeder is moved during the tests until the line is fully tensioned. After this, the line is released step by step from the reel until a float appears on the surface of the reservoir. By counting the number of times the line is dropped and knowing the distance to the marker, it is easy to determine the height of the float, which will be equal to the depth of the reservoir at the measurement site. But the main thing in this case is not the determination of the true depth, but the nature of the change in the bottom topography, in order to know where the feeding table, perspective slopes, upper and lower edges, and natural depressions are located.
To accurately hit them when casting, the line on the reel is clipped. If the relief and cleanliness of the coast allows, the line of the marker and working fishing rods is stretched on it and clipped at the same distance from the reels.
Advice! On an overgrown bank, you can use pegs driven 2-3 meters from one another. The fishing line from the marker and working gear is wound parallel to them and clipped at the same distance from the end.
Similar measurements are carried out several times at different angles relative to the coastline.
In this way, a true picture of the fishing area is obtained, since feeder fishing uses from 2 to 4 rods at the same time.
Marker and its work
11/21/2013 The most important thing is to find the point. For the last seven years this has been my motto in sport fishing. Success in fishing does not depend on the quality and quantity of gear, not on bait, no matter how good it may be, but on the correctly chosen fishing point. Each of my fishing trips begins with measuring the depth and determining the structure of the bottom - knowing these characteristics, I am never left without a catch. The question is how to do this quickly and efficiently.
MARKER RODS AND ITS EQUIPMENT
At competitions, I don’t choose the fishing sector for myself, I get it by lot. And this lot does not always suit me. To show maximum results, I must study my fishing area thoroughly. A special marker rod equipped with a special sinker and float helps me with this.
A marker rod with a length of 360 cm is always two-part. This is a specialized rod, so it is always marked “Marker”. He has his own, special system. The first two thirds of the blank have a fast action, the last third, the tip itself, is parabolic. It is thanks to the softness of the tip that information about the structure of the bottom is transmitted to us through the form. Large diameter guides, designed to work with large reels, for unhindered power casting to maximum distance.
There are two marks on the form, which determine the depth at the fishing site. The first mark is 15 cm from the reel, the second is 30 cm (I made an additional third mark of 50 cm on my marker).
The marker rod is equipped with a large reel with a baitrunner system. A baitrunner makes it easier to release line when working with a float to determine depth. A braided line with a diameter of at least 0.22 mm is wound onto the reel. I always use weights of 100 g or more, and throwing such weight over a distance of 60 meters or more on thin braid is not at all easy. The cargo is also not quite ordinary. It is pear-shaped and has massive spines. There may be four or more thorns. When dragging a load along the bottom, it seems to bite into the ground, due to which more complete information about the nature of the bottom is transmitted along the cord to the tip of the rod.
To measure depth we will definitely need a marker float. It is better to take floats with maximum lifting force. They float up easier and faster, thereby transmitting information more accurately. Some models are equipped with removable tips of different colors for better visibility of the float in different lighting conditions.
A rubber bead should be installed between the float and the weight. This is a buffer that softens the impact of the marker sinker on the float during casting.
HOW IT WORKS
We assemble and equip the fishing rod. First of all, we put a marker weight swivel on the cord, then a buffer bead, and tie a marker float to the end of the line. The result is a sliding installation when a fishing line with a marker float tied at the end passes through the hole in the marker weight swivel. As you can see, there is nothing tricky in this installation.
We make the first cast at the maximum distance - that's what a strong braided line is for. We need to know the structure and topography of the bottom in our fishing sector, even if we do not fish in the place where we are casting. The load sinks to the bottom, followed by the float. We take out the slack in the fishing line until the float touches the load. We turn on the baitrunner on the reel and begin to drop the line, marking the length according to the marks on the rod blank. The float begins to float. Let's say that by the time the float floated to the surface, we had 12 discharges of 50 cm each. We multiply and get a depth of 600 cm in this particular place. We remember this value, reel in the fishing line, and pull the float back to the load.
The next step is to drag the load along the bottom. Slowly, using only the rod, we drag it along the bottom. A heavy load with spikes clings to the bottom and quite accurately provides us with information about its structure. Whether it is silt or sand, stones or zebra mussel shells - we will understand all this by the tactile sensations coming from the blank. The distance over which we drag the load is no more than three meters. Then we begin to release the line again and count the segments until the float appears on the surface. This time we got 15 drops, which corresponds to a depth of 750 cm. Again we pull the float to the load and again drag the load along the bottom.
Thus, we go through the entire fishing sector from the farthest point and almost to the very shore. Having discovered something interesting at the bottom (a colony of zebra mussels, a hole and a way out of it, a table near this very hole, or something else that is strikingly different from everything else in the area), by repeated casting we again find these promising places and, with the float raised, fix the line in the clip reels. We unwind the tackle and, already knowing both the depth and casting distance, prepare the bait and choose the feeder that most closely suits our conditions (if you only have one, it doesn’t matter - there are fewer problems with the choice).
It should be taken into account that studying the depth using a float is only possible on reservoirs without a current and on slowly flowing canals and rivers. In a strong current, the float will drift too far from the original measuring point. In such conditions, the depth is determined by the time the load falls to the bottom: by counting from the moment the load touches the surface of the water until it touches the bottom. Focusing on the bottom anomalies, we select a fishing point, add the approximate depth at this point and also clip the fishing line. By repeated casts, we determine the accuracy of hitting the place we have chosen, and adjust the casting distance, increasing or decreasing the distance using a clip.
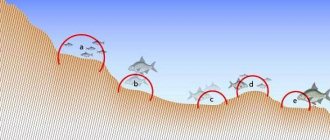
The best places to fish are:
the lower and upper sections of the dump with the same depth of at least a couple of meters;
shell rock - this is where both large and small fish feed;
flat areas - irrigation in front of river beds;
a harder clayey area among marshy silt.
If there is nothing similar in the sector, you can tie to a single stone on the bottom or to a section of underwater vegetation. With the help of a marker rod and with sufficient experience in using it, it is quite easy to find such places.
After the fishing point is selected, we need to transfer the fishing distance from the marker rod to the feeder rod. There are two ways to do this.
The first one is the simplest. We place the marker rod and feeder side by side on the ground or on the stands, loosen the clutch or turn on the baitrunner, pick up the marker weight and feeder and begin to move away from the rods. The lines run off the reels until the line on the marker rod reaches the clip. We put the weight and feeder on the ground, return to the rods and clip the line onto the feeder reel. It is clear that this method requires a free and flat section of the coast.
For the second method, only a few meters of free space is enough. We take two posts and tie them with a rope of a certain length (usually three meters). We stick the posts into the ground at a slight angle to each other at a distance of the length of the rope. Place the marker weight behind the post and begin winding the fishing line around the posts, counting how many turns it takes to reach the clip. We remember the number of revolutions and mark the place where the tip of the marker was at the end of the winding, after which we do the same procedure with the feeder. If the line breaks during fishing, we can easily restore the original length of the line by using the stands again.
Studying the bottom and depth in the fishing area is not only useful, but also very educational. Having completed this not-so-complicated procedure, we no longer catch blindly, throwing it anyhow and hoping for chance, but consciously. A marker rod is the same echo sounder with the difference that in this case we don’t need a boat.
We are on Google+ Fisherman-Fisherman
| Author | Andrey Dumchev, Moscow |
| Issue number | 47/2013 |
| Read the article | 18743 |
Rating: 3.41
Cool places
When the necessary research has been carried out to determine the relief and composition of the bottom, you can begin fishing using the data obtained. In our recommendations, we will look at the example of bream fishing, since its habits are most characteristic of other species of this family.
Approximate diagram of the reservoir and the most promising fishing spots.
For a marker rod, a heavy action feeder blank of the maximum available length is used, at least 4 meters. Usually it is not used for fishing, but only for surveying the area.
The current in the river carries with it a lot of nutritious objects for feeding. They naturally settle in the depressions of the bottom, where fish find them.
The natural deepening of the bottom ends at the edge, where turbulences of water are formed and numerous whirlpools are formed and a reverse current can even occur. All this actively erodes bottom sediments containing large amounts of biologically saturated plankton, which is a nutritional mass for fish.
Most fish of this species have a body shape close to an oval, which suggests feeding with the body tilted forward, so searching for food objects on slopes is most natural for them.
Having received an idea of the bottom topography in the place chosen for fishing, the angler is already able to suggest casting points to promising places. Now you can start hunting.
Associated fishing factors
But measuring the depth and establishing the bottom topography is not enough. You also need:
- Choose the right gear depending on the strength of the current. Obviously, light assemblies with little weight can simply be carried away from the chosen place with tangled leads. And the demolition of gear begins from the moment it enters the water during casting.
- In moderate and strong crosswinds, the same consequences are likely to a large extent, and the leashes can become very tangled.
- The correct selection of bait is of great importance. Its composition depends on the time of year; if in the spring animal components are required, then towards the end of summer and autumn it is better to use plant compositions. And, of course, all kinds of fragrances are effective.
- Baits and baits are also used according to this principle. Bloodworms, maggots, and small dung worms in a bunch are effective at any time.
- When fishing on a muddy bottom, there is a danger that the bait will sink into it. To avoid this, you can use foam balls, which are placed on the leash a few centimeters from the hook. When fishing, they lift the bait, making it accessible to the fish.
It becomes obvious that the success of fishing depends on many factors that directly affect the behavior of the fish. One of them is weather conditions. The activity of the fish is affected by atmospheric pressure, or rather its stability during the several days preceding release. If the weather forecast expects a pressure drop, fishing can most likely be cancelled. One sign of a change in pressure may be a dramatic change in wind direction.