Advantages of a knotless fastener
- The “Not a knot” clasp allows you to tie baits to a braided fishing line and no longer worry about the braided cord fraying and breaking over time on a large fish or hook.
- Tying baits/changing one for another has become faster than ever. Removing one lure and tying another takes about 10 seconds, and the tying procedure is very simple.
- No knots - no weak points. The line breaks anywhere, but not in the place where the bait is tied to the line.
Advantages and disadvantages of a knotless fastener for braided cord
One of the serious problems for fishing enthusiasts has been the unreliability of connections on the equipment. The tensile strength of the fishing line declared by the manufacturer is significantly reduced at the knots. In order to maintain the breaking force as much as possible, fishermen have come up with many knots with minimal kinks in the thread. A knotless braided clasp can be a useful tool. This element will preserve the technical parameters of the cord and will also speed up the installation process of the equipment. What is a “Not a knot” clasp?
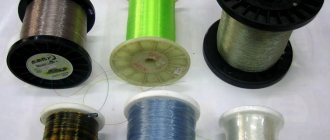
A knotless connection helps reduce the number of bait breaks and prevent large fish from leaving. Thanks to the simple and compact part, there is no need to remember the intricacies of new knots in order to tie the bait to the fishing line. The connector is a wire device with special bends at the ends. For the manufacture of this element, stainless steel wire is most often used. Knotless fasteners are now offered to fishing enthusiasts by many specialized stores. It’s easy to make a wire device with your own hands.
But it’s not enough to purchase or make a clever fastener. It is important to learn how to use this part when connecting braided line with artificial baits.
In some cases, the use of a connector impairs the performance of the gear. Therefore, before installing a new accessory on a fishing rod, you should familiarize yourself with the strengths and weaknesses of a knotless line connection.
There are two ways to attach a leash or bait to the main line. Some anglers continue to use knots, while others prefer a knotless fastener. Each of these methods has its own area of application, which is determined by the strengths and weaknesses of the compounds.
The advantages of conventional nodes include:
- the ability to tie different fishing lines and braids;
- breakage of equipment most often occurs at the node;
- There are no additional elements on the equipment.
As for the weaknesses of nodal connections, it is necessary to highlight the inconvenience of forming a node and low strength.
Knotless clasps have their advantages and disadvantages.
- One of the important advantages of the “Not a knot” connector is the prevention of fraying of the cord when fishing for large fish.
- The wire device allows you to quickly change or tie baits or equipment. It takes any angler 10-20 seconds to install. Athletes especially value time during competitions.
- The absence of knots makes the equipment very strong, since weak points are eliminated.
How to tie a knotless clasp to fishing line
How to use a knotless fastener:
- To begin, place the eye of the bait behind the rounded part of the knotless fastener.
- Loop the end of the main line over the hook of the fastener to create a double line.
- The double line must be wrapped around the fastener at least 4 times.
- And the final stage: put the fishing line behind the latch.
- The bait is tied, all subsequent baits will be tied even faster.
Multiplier reels for spinning rods - a guide to the selection and proper use of multipliers in spinning fishing.
Rating of the 5 best budget and premium spinning reels on the next page.Poppers for pike and techniques for catching pike with surface lures.
How to make a knotless clasp with your own hands
You can make a knotless fastener with your own hands; moreover, it is even advisable to do this if you are a fan of ultralight fishing. It is not so often that you can find fasteners with thin wire on sale.
Materials and tools that will be required:
- guitar string of the required diameter (0.13 is just right)
- needle nose pliers for bending strings
The manufacturing process is described in detail in the following video:
The knotless fastener is very helpful with constant changes of bait, and it also does not impair the performance of wobblers, which can be negatively affected by the use of swivels with a fastener.
primanki.com
Knotless clasp for braiding: how to make and tie
Hello friends. Knotless fasteners, or simply “knotless” clasps, have recently become increasingly common in fishing equipment. This is understandable. The connection is stronger, even than on Palamar. Knits up in seconds. There are, however, some disadvantages. However, while using the knotless connection with braid, I didn’t even think about them. The tackle is slightly heavier (a debatable issue) and the braided cord, if properly applied to the hook, breaks not at the connection point, as when using knots, but in the gap between the spinning tulip and the bait. What to do? There is no need to take it to extremes.
I made my first knotless fasteners for braided fabric myself. I took pieces of wire about 0.3 - 0.4 mm thick. At best it was nichrome, and usually whatever came to hand. There is enough material if you look for it. And using bench tools he bent it. Compared to store-bought ones, it turned out a little clumsily, but the knotless one fulfilled its function.
Now I do such things only out of necessity or if I have the time and desire. It's easier to buy. Of course, they are not always available in online stores, but if they come across them, I order 5 packs. For a season or two, it’s enough, even if you tear them off periodically. But this still does not happen.
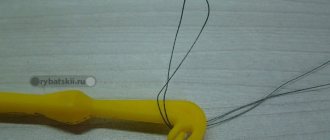
But in order to save money, you can make a knotless fastener yourself. If you intend to constantly tinker, then you can make a machine. We make a template on a wooden block or a cut from a board. For convenience, we apply a ready-made knotless piece and hammer in three window nails in the right places (these are used to nail glazing beads). Of course, we remove the caps and remove the burrs.
Then, using wire, you can even use a paper clip, we bend the structure. We remove the excess and, if necessary, process the sharp edges with a needle file.
I agree that the task is painfully painstaking and time-consuming. But if it is necessary, then it is necessary. Or to the store.
A knotless connection made in this way (or bought in a store) can be used to tie braid to a wobbler if you are fishing with ultra-light tackle, or through a leash. I use my own fluorocarbon leaders. On one side there is a knotless strap, on the other there is a carabiner.
When fishing with a rotating spoon, I remove the knotless connection and install a swivel; with a spinner, I leave the fastener in place. The fact is that a knotless knot promotes twisting of the braid, since a spinner, unlike a wobbler, has the habit of rotating around its axis.
How to tie a knotless clasp
First, let me note that there are some nuances. If you are fastening a knotless fastener with braided braid, it is advisable to wet the cord. This makes the connection stronger. Maybe I forgot something from the physics course, but when wet, a braided cord suffers less from the effects of friction. But this is until the moment the bait, along with the knotless hook, is in the water.
I used a knotless clasp with monofilament once. Did not like. There was an unfortunate loss of bait.
So.
The technique of connecting a knotless cord and a braided cord is simple.
- Fold the end of the braid in half.
- Throw the resulting loop onto the hook of the fastener.
- Next, we wind the double end of the braided cord towards the bend of the fastener.
- We lay it evenly, ring to ring, all over the knotless body.
- At the very end, we place the remainder under the latch and, if necessary, remove the excess tip.
That's it, the braid and knotless clasp are ready to go. And don’t worry about the safety of the bait. Believe me, I throw expensive wobblers as hard as I can, twitch, pull pikes out of bushes and snags - there were no problems. I tell all my friends and acquaintances that a knotless fastener for braided fabric is what you need.
Good luck, colleagues. Regards, Oleg
There is no such thing as too much information
How to tie a knotless clasp?
The knotless braided clasp is very easy to tie. You just need to have basic knowledge about tying knots and follow the instructions. This is done as follows
:
- First, select the required size fastener. The size of the fastener is influenced by the thickness of the braided line, as well as the size of the bait. Choose a fastener that will exceed the diameter of the braid by a few tenths of a millimeter.
- Now you need to insert the eye of the equipment inside the eye of the fastener.
- Now you need to put the fishing line on the hook of the fastener, which protrudes, so that a double thread is formed.
- Now the fishing line is wound onto the connector 3 to 6 times.
- All that remains is to insert the braid into the fastener - the second eye of the fastener - and tighten it.
- Remove excess line.
The braid does not stretch, so knitting a fastener for such material will be optimal. You can tie a fishing line, but you won’t be able to achieve the same effect as with a braided thread.
Knotless clasp
It is not known for certain who and when invented a knotless clasp for attaching baits. Although it would be interesting to find out under what circumstances this happened. Sooner or later it appears in almost every spinning angler. Perhaps it came modified from fly fishing from a fastener for changing flies. What's interesting about it, as well as the pros and cons of using it, is described below.
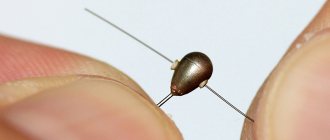
Appearance
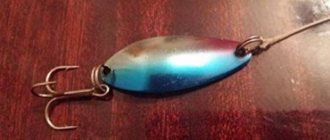
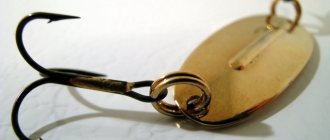
The appearance of the fastener without reference to dimensions is shown in the picture
It is worth paying attention to the eyelet on the left - it is pressed tightly to the axis. On the one hand, this relieves the tension that occurs when pulling the fishing line, but on the other hand, it makes it difficult to install some baits
Size
The dimensions are selected based on the feasibility of use - in much the same way as carabiners are selected. They perform the same function
It is important to note the simplicity of the fastener, because far from stores it is not always possible to make a high-quality connector for fastening baits yourself
Of course, you can use a string leash. This is where the most interesting thing about this device is revealed - the absence of knots! If for a monofilament fishing line the strength of the knot can be partially compensated by its type and design, then for a braided fishing line the loss is more significant, despite the manufacturers’ recommendations for special types of knots.
Self-production
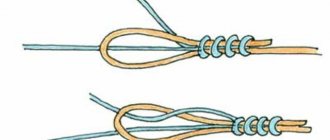
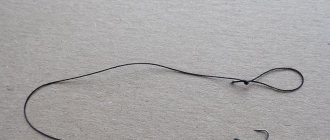
For clarity, the following pictures show a homemade tied fastener made from thick wire and thick braided fishing line.
Currently, the minimum factory-made size available in the Russian Federation is only 7 mm. Having made a small slipway at home, you can make fittings of any reasonable size.
A few words about the choice of material for self-production: it is advisable to choose stainless steel wire with a diameter of no more than 0.5 mm. It is not recommended to use very thin ones, since under load they can “cut” the braided line. On the other hand, in field conditions you don’t have much to choose from - an ordinary paper clip will do.
Advantages and disadvantages
Almost every device has its pros and cons, related to both ease of use and effectiveness.
1. Among the advantages it is worth noting:
almost 100% use of the declared characteristics of braided fishing line, which is important when using fairly thin cords;
there is no need for developed fine motor skills of the fingers, which are impaired in cold weather, with age, etc.;
absence of unnecessary parts in installations, which affects the overall weight of the equipment;
quick change of bait when it is urgently necessary to enlarge;
free connection, although this cannot always be considered as a plus;
low cost relative to analogues in the form of carbines.
2. But there are also disadvantages:
often unpredictable place where the braided line breaks;
due to its design features, it is not very friendly with filamentous algae. Although very few connections can cope with them, with the exception of the hub one.
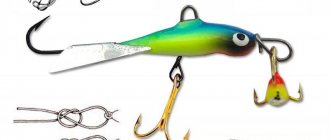
There may be some other disadvantages, but they will most likely be determined by the specifics of the baits used. For example, attaching such a fastener to a popper is not always easy. Especially if it is made of thick enough wire. But if the wire is thin, it can easily compete in convenience with most types of carabiners.
Installation Tips
It is worth noting that several turns that wrap around the axis of the fastener are made towards the bend, pressed against the axis.
As a rule, about 5-7 turns are enough to securely fix the braided line to the fastener without cutting off the tip of the previously formed loop, less than one and a half to two centimeters.
Final point: when making your own, you must remember to follow basic school safety precautions, protecting yourself appropriately when disposing of excess wire material
Please note that there should be no burrs that could subsequently damage the skin.
Conclusion
In general, despite the external simplicity and apparent weakness of installation, this fastener should be considered, if not as a complete replacement for knot fastening of lures, then at least when used with braided fishing lines. In addition, installation can be varied by using a fastener instead of the usual elements.
How to make it yourself
The possibility of self-production is an undeniable advantage of such fasteners. In order for a knotless fastener for a do-it-yourself braid to turn out to be of high quality, you need to stock up on the following materials
:
- A piece of wire with a diameter of 0.6 to 0.8 millimeters.
- Round nose pliers.
- With pliers.
- With wire cutters.
To make it follow these steps
:
- Before you start manipulating the wire, make sure there are no jagged ends at its end. If the tip catches, it must be removed using pliers.
- Now you need to bend the tip of the wire 180 degrees; for this it is best to use pliers.
- Now you need to bend this bend in the other direction using the same tool.
- Then you need to bend the edge of the wire with pliers so that a hook is formed.
- Use pliers to cut off the required length of wire.
- The other end of the fastener must be bent 90 degrees.
- Press the wire with pliers to form a loop.
- Ready, all that remains is to attach the accessory to the tackle and you can use it.
How to tie a knotless fastener to a braided line, connection features
A knotless clasp is a pleasant and very useful device for every fisherman. Pleasant because you don’t have to tie those painfully uncomfortable knots; useful because it allows you to firmly attach the bait to the fishing line.
This is a small device that has special curves on both sides. It is usually made of steel wire. It can be found in all serious specialized stores. There are both domestic and imported manufacturers.
Knotless is designed to connect bait and cord without knots . This connection is very strong and requires less time to tie. The clasp is most suitable for attaching small-sized baits. It is better to fasten large gear with a knot, since they themselves are heavy, and the fastener will add additional unnecessary weight.
In competitions or when fishing on the track, the use of a knotless fishing rod is quite justified. However, if fishing takes place from the shore or in snags, then knotless fastening only complicates the whole process.
The leash can be attached to the fishing line in two ways: with a knot or using a knotless fastener. Let's take a closer look at the features of these fasteners.
- suitable for both fishing line and braid;
- when the line breaks, it breaks at the knot, and not in the middle;
- there is no extra element.
- low strength;
- inconvenience of connection (tying knots).
Advantages of a knotless clasp:
- strength;
- minimum time and effort for tying the equipment to the fishing line.
Flaws:
- used mainly for braiding;
- an extra element that weighs down the tackle;
- If the cord breaks, the break most likely will not be at the connection, but in the middle.
Thus, both types of connection have both pros and cons. For each specific case, a different method of fastening is suitable. So, for fishing using a cord, it is more advisable to knit the tackle using a fastener, but when fishing, for example, with a microjig or ultralight, unnecessary elements are not needed, so a knot is suitable.
It is worth remembering that for each fastener you need to select the appropriate fishing line . The fastener number must correspond to the thickness of the cord.
To properly bind the connector, follow the instructions:
- It is necessary to select a suitable fastener. Its size depends on the size of the bait and the thickness of the fishing line. It is better if the fastener is slightly thicker than the fishing line, otherwise the fishing line may fray or stretch out.
- Place the eye of the tackle into the eye of the fastener.
- Throw the fishing line over the protruding hook of the connector to create a double fishing line.
- Wind the fishing line onto the connector several times (4-6 times), for a large one 2-3 turns are suitable.
- Insert the fishing line into the second eye (lock) and tighten tightly.
- Trim the remaining fishing line.
It must be remembered that it is best to knit a knotless fastener on a braided fishing line, as it does not stretch.
Another advantage of a knotless fastening device is that you can make it yourself. What will you need to make a fastener?
- wire with a diameter of 0.6 or 0.8 mm;
- round nose pliers;
- pliers;
- wire cutters
We take the wire , check that its end is without jagged edges, otherwise we bite it off with wire cutters. Next, use round pliers to bend the tip of the wire 180 degrees. Using the same round pliers, we wrap the resulting bend in the other direction. Bend the end of the wire slightly with pliers. You should get a nice hook. Take the other end of the wire, bite off the required length and bend it 90 degrees. Use pliers to press the wire to form a loop. That's it, you can use it!
Tips from fishermen
- Craftsmen advise tying the fastener on a wet fishing line, then the fastening will be stronger.
- It is advisable to leave the tail longer so that the fishing line does not slip out.
- It is better to use this device with light gear so as not to weigh down the structure.
- The clasp is suitable for those fishermen who love to cast a fishing rod from the shore.
- It is better to attach it to braided wire.
- Select fasteners commensurate with the thickness of the fishing line and the dimensions of the tackle and spoon.
Every fisherman should try to use a knotless connector, if only to decide for himself whether this thing is useful or not. The convenience of this device is undeniable, but the most important thing about it is the strength of the connection . By the way, this quality sometimes plays a cruel joke on fishermen when the cord breaks for some reason. It breaks not at the junction, as with a knot, but in any unexpected place, then the damage is much more serious. However, such incidents happen extremely rarely and most fishermen, both experienced and beginners, remain satisfied with this accessory.
So, when going fishing, remember the advice of wise fishermen, don’t be afraid to take risks and you will definitely be lucky.
Advantages of a knotless fastener
- Using such a fastener allows you to attach baits of any size to the braid and not worry about the thread wearing out or breaking at the connection point.
- The use of a fastener significantly increases the speed of bait replacement. You can change the bait literally in a matter of seconds.
- Easy to make yourself.
- Weak points in the equipment are not created, since the connection does not involve nodes. The braid can break in any other place, but not in the place where the bait is fixed.
- The possibility of loosening the thread while fishing is completely eliminated.
Fishermen note one drawback, although some even say that this is an advantage. It doesn't matter how it's considered, but it's worth mentioning.
Increased strength of the connection can lead to breakage of the braid in any other place.
getfish.net
What kind of connection is this?
A knotless fastener is a shockingly simple, but at the same time ingenious device that allows you to tie the bait to the main line without a knot, thus maintaining 100% strength. A knotless knot is a small piece of wire with a loop on one end and a loop with a hook on the other.
The fishing line wraps around this wire in a special way and is held in place by friction. I note that knotless ones can only be used with braided fishing lines. Smooth, slippery monofilament lines cannot be secured to such a device, as they will come undone.
In addition to high connection strength, a knotless clasp has another advantage over a conventional clasp - the time it takes to tie. In order to wrap a fishing line around a wire with eyes and a hook, it takes at most 10 seconds, while complex fishing knots sometimes take much longer to knit.
In this way, the angler saves precious minutes of fishing. Knotless fasteners are also compact, which makes them very attractive for lovers of light and ultra-light spinning rods.
Knotless fishing rods have become a real godsend for sports fishermen. For those who compete, it is very important to have reliable, delicate tackle and save precious seconds, which can sometimes decide the outcome of the fight.
Amateur fishermen, for the most part, still use regular carabiners, or tie the fishing line directly to the winding or fastening ring on the bait. However, I believe that we need to gradually move away from outdated methods and use all modern inventions. Especially if they are available.
Knotless braid connection
There are two main options for attaching the bait to the cord: a classic connection using one of the many fishing knots, or using a knotless fastener. And while the first option is used by almost every angler, the second option has not yet gained widespread popularity in the former CIS.
What is a knotless clasp? This is a specially curved structure made of steel wire, which allows you to reliably connect the bait to the braid without weakening the strength of the cord at the attachment point. The device is designed in such a way that the load on the connection does not weaken, but rather tightens the fishing line or cord wound around the fastener, almost completely eliminating the loss of the bait.
Mounting method
In practice, a knotless connection is more convenient than tying knots due to its simplicity. The key to a reliable connection in this case is the correct choice of device size. The knotless fastener for braided line with a diameter of 0.1 mm should be significantly smaller than for 0.25 mm monofilament. Further machinations are extremely simple:
- We place the loop of the leash or bait in the large eye of the clasp.
- Fold the end of the fishing line in half at a distance of 3-4 centimeters from the edge.
- We put the resulting loop on the fastener antenna.
- We wrap the fishing line around the body of the fastener 5-6 times.
- Snap the loop into the opposite eye. The connection is ready.
Experienced fishermen advise leaving the free end of the fishing line at least 1 centimeter to prevent it from slipping into the loop when the load is loosened and re-tensioned. To achieve the most durable connection, it is also recommended to pre-wet the fishing line or braid, which will allow it to tighten more tightly on the fastener.
Advantages and disadvantages
Like any other fastening method, a knotless connection has its strengths and weaknesses. The main advantages of a fastener over a knotted connection:
- Strength. Unlike a knot, fastening using a knotless connection does not reduce the strength of the braid; the probability of breakage in the area of the connection is many times lower than when using knots. Accordingly, the weight of the fished trophy can be significantly higher.
- Easy to install. A knotless connection is installed easier and faster than a classic knot. In addition, there is no need to remember the many complex machinations involved in tying many popular knots.
Read: Common Sculpin
However, the design also has some disadvantages.
- Strength. Oddly enough, this is not only an advantage, but also a disadvantage. Indeed, in the case of a “dead” hook, the break will most likely occur in the area of the reel, which will mean the loss of not only the bait, but also several meters of braid.
- The presence of an extra element that weighs down the equipment and complicates the animation of some baits, especially the ultralight class.
- Installation on thick monofilaments is inconvenient due to their high resistance to bending.
Thus, this type of connection is not suitable for all fishing equipment. For example, when fishing with a jig in thick snags, excessive strength of the connection can very soon lead to a break in the critical length of the braid and the need to replace it, which is fraught with loss of time and money. However, if there is an expensive branded wobbler on the other side of the line, and the fishing is aimed at trophy specimens, a knotless fastener will undoubtedly be the best choice.
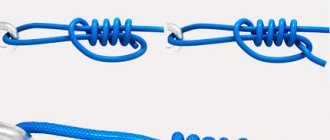
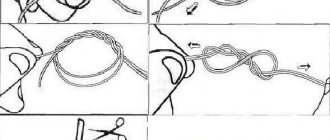
How to knit a knotless pattern?
Tying a knotless clasp to the end of a cord is very simple. First, let's take a closer look at the diagram.
- First you need to insert the ring of the bait or leash into the eye with the hook. This is done very quickly and simply.
- Next, you need to fold the end of the fishing line in half and throw it on the hook.
- Now the double fishing line needs to be wrapped around the wire. The more turns there are, the more reliable the connection you will get. For example, I do 6-8 turns. But some limit themselves to 4, believing that this is quite enough.
- After the cord is wound onto the wire, you need to insert it into the locking ring.
Well, that's all! We got a very reliable connection without any nodes. At first glance, it may seem that the connection is complex, and it will not be possible to make it in 10 seconds. It's a delusion! You just need to do the procedure a few times at home, and on the pond you will be attaching the fastener to the fishing line in a matter of seconds!
I also want to pay attention to this question: buy or make? Knotless fasteners, even very high quality ones, can be bought at a fishing store for literally pennies! But, unfortunately, small things of this kind are sometimes simply impossible to find in small fishing stores located in small towns. Of course, you can always order the necessary item via the Internet, or make the required part yourself.
A knotless fastener is made of thin, springy wire. Using pliers, you need to make all the bends, and you will get a good fastener. However, you can only make fasteners for large baits yourself. If you fish with ultralight, then it’s better to just place an order in the online store.
What is a knotless clasp?
A knotless fastener is a small fishing accessory made from a small piece of wire with curved ends, which allows you to install parts of the equipment without tying fishing knots.
What does this do for the equipment? Firstly, the fishing thread used retains its original characteristics, which extends its service life. Secondly, the resulting structure becomes more durable, since it is devoid of nodal connections, which are considered the most vulnerable areas of installation.
Thanks to the fishing clasp, the resulting equipment can be easily disassembled by replacing its parts with others (for example, a twister with a vibrotail, or replacing a jig head, Cheburashka, etc.).
What is stronger is a knot or a knotless one, amateur fisherman A. Slepnev will tell you in his video
A little about the disadvantages
A knotless clasp may seem like just the perfect device, because it:
- maintains the strength of the fishing line;
- quickly installed;
- much more compact than a regular carabiner.
And what disadvantages might this device have? Oddly enough, the main advantage of knotless (the ability to maintain the strength of the connection), in some situations, is also a disadvantage.
Often when fishing there are situations when a braided cord gets tangled so much that you have to remove the section with the beard and tie the ends of the two sections with a knot. There are many compact knots for connecting the two ends of the cord, which retain up to 95% of the strength. But a knotless clasp retains 99-100% strength...
If during a full release you get a dead hook, the cord will break not near the bait, but at the connection point. Thus, you will tear off a large piece of expensive braiding, and also make it difficult to further catch the point, because the hooks of the baits will cling to the torn cord. Therefore, if you have knots on the fishing line, it is better not to use knotless ones.
By the way, the fishing line can break in the middle even if you rewind the cord so that the fresh section is at the top and the worn section is at the bottom. In this case, the braid may tear at the transition point between the worn and new section.
A knotless carabiner is an excellent alternative to a conventional carabiner. But if you want to tie and test it, first make sure there are no weak points in the cord, otherwise serious damage may occur. No tail, no scales!
tvoyarybalka.ru
Positive and negative sides
Knotless has many positive aspects:
- Easy to connect to the main line and other fishing products with eyes or rings, allowing you to easily and quickly change them.
- Light weight that does not interfere with the play of the bait.
- Reliable knotless connection without loss of breaking load.
- Simplicity of design , allowing for independent production of “Not a knot”.
There are also negative sides:
- Volumetric connection , which does not allow the lines to be tied together.
- Possibility of using knotless connection only with braided cords .
The order of connection with the main braided line
“Not a knot” come in different sizes: S, M, L, XL. The thicker the line, the larger the knotless size.
Before tying the knotless cord to the main cord, you need to put a spinner or other necessary equipment element on the S-shaped loop of the knotless cord.
- Fold a small piece of braid in half.
- We place the cord loop on the “c”-shaped section of the knotless loop.
- We begin to twist the double cord around the knotless rod in the same direction where the lowered end of the oval loop of the knotless fastening is facing.
- We make from 3 to 6 turns depending on the diameter of the cord.
- We insert a double cord into an oval loop.
- Trim the protruding end of the cord, leaving ½ cm.
There are mandatory rules for reliably connecting the fishing line with the “Not a knot”:
- Be sure to wind the line in the same direction where the lowered end of the oval fastener is facing.
- Make at least three turns for thick braided fishing line, at least 6 turns for thin line.
- Do not twist the double cord when turning around the knotless rod.
- Wrap the braided line around the rod, turn to turn.
Attaching monofilament to knotless
The generally accepted opinion is that the connection between a knotless line and a monofilament line is unreliable. This statement is only partially true. A thin monofilament line up to 0.12 mm in diameter connects quite reliably to the “Not a knot”. You just need to make at least 8 turns in the right direction, turn to turn around the rod. A larger diameter line from 0.12 to 0.2 mm can indeed slip under heavy loads, but there is a way to eliminate this disadvantage, although this makes the tying process somewhat more complicated.
The method is as follows:
- Having put the fishing line on the “c” shaped section of the loop, we lower it along the “s” shaped loop lower to the rod and begin to rotate the knotless part in the direction where the lowered end of the oval loop points. The double line twists among itself.
- Having obtained a uniform, tight twist, we again transfer the monofilament loop to the “c” shaped section S - the loops of the knotless connection.
- Next, we wind according to all the rules, inserting a double fishing line into an oval loop. Unravel the excess end of the double fishing line. We cut off the protruding end, leaving ½ cm.
Knotless clasp - a non-alternative alternative to fishing knots
The very name “knotless fastener” reveals the meaning of this term - the connection of elements of fishing equipment without the use of knots. Any nodal connection reduces the breaking load of the fishing line by 20-40%. It’s a shame to lose your catch due to a decrease in the strength of the fishing line at the knots.
But what other way can you attach spoons, swivels, leashes, etc. to the main fishing line? How to do without a node connection?
There is an excellent way out that allows you to attach the equipment elements to the main line without knots and reducing the breaking load.
What's happened
A knotless fastener “Not a knot” is a small metal device that connects to the fishing line without forming knots, to which you can easily attach various elements of equipment with ears or rings.
Positive and negative sides
Knotless has many positive aspects:
- Easy to connect to the main line and other fishing products with eyes or rings, allowing you to easily and quickly change them.
- Light weight that does not interfere with the action of the bait.
- Reliable knotless connection without loss of breaking load.
- Simplicity of design, allowing for independent production of “Not a knot”.
There are also negative sides:
- A volumetric connection that does not allow the lines to be tied together.
- Possibility of using knotless connection only with braided cords.
The order of connection with the main braided line
“Not a knot” come in different sizes: S, M, L, XL. The thicker the line, the larger the knotless size.
Before tying the knotless cord to the main cord, you need to put a spinner or other necessary equipment element on the S-shaped loop of the knotless cord.
- Fold a small piece of braid in half.
- We place the cord loop on the “c”-shaped section of the knotless loop.
- We begin to twist the double cord around the knotless rod in the same direction where the lowered end of the oval loop of the knotless fastening is facing.
- We make from 3 to 6 turns depending on the diameter of the cord.
- We insert a double cord into an oval loop.
- Trim the protruding end of the cord, leaving ½ cm.
There are mandatory rules for reliably connecting the fishing line with the “Not a knot”:
- Be sure to wind the line in the same direction where the lowered end of the oval fastener is facing.
- Make at least three turns for thick braided fishing line, at least 6 turns for thin line.
- Do not twist the double cord when turning around the knotless rod.
- Wrap the braided line around the rod, turn to turn.
Attaching monofilament to knotless
The generally accepted opinion is that the connection between a knotless line and a monofilament line is unreliable. This statement is only partially true. A thin monofilament line up to 0.12 mm in diameter connects quite reliably to the “Not a knot”. You just need to make at least 8 turns in the right direction, turn to turn around the rod. A larger diameter line from 0.12 to 0.2 mm can indeed slip under heavy loads, but there is a way to eliminate this disadvantage, although this makes the tying process somewhat more complicated.
The method is as follows:
- Having put the fishing line on the “c” shaped section of the loop, we lower it along the “s” shaped loop lower to the rod and begin to rotate the knotless part in the direction where the lowered end of the oval loop points. The double line twists among itself.
- Having obtained a uniform, tight twist, we again transfer the monofilament loop to the “c” shaped section S - the loops of the knotless connection.
- Next, we wind according to all the rules, inserting a double fishing line into an oval loop. Unravel the excess end of the double fishing line. We cut off the protruding end, leaving ½ cm.
Self-production
Depending on the desired size of the knotless connection, ferrous wires of various diameters are used.
- for size S, 0.13 mm guitar string is suitable ;
- for M – the diameter of the ferrous wire can be from 0.14 to 0.24 mm ;
- for L – ferrous wire 0.24 – 0.42 mm ;
- for XL - ferrous wire can have a diameter of 0.46 - 0.8 mm .
There are 2 ways to make knotless ones.
Method I Instrumental.
You will need:
- round nose pliers;
- pliers;
- a nail or iron rod with the cross-section necessary to form loops of the required diameter;
- side cutters.
Procedure:
- We cut the wire of the required length for a knotless connection of the required size. For XL size, the piece can be approximately 5 cm long.
- We bend one end of the wire with round nose pliers in one direction, forming a “C”-shaped section of the loop.
- Insert the round nose pliers into the resulting hook (letter “C”) again and bend it in the opposite direction until the letter “C” touches the knotless rod. This creates an “S”-shaped loop. If the "C" hook does not reach the rod, it must be bent with pliers.
- At the other end of the wire, make an oval loop with pliers, lowering the end of the oval loop in any direction.
- We cut off the excess end of the loop with side cutters, leaving ½ - 1 mm of wire below the knotless rod.
The knotless pattern is ready.
Pliers will be needed if the hinges do not lie in the same plane and need to be slightly aligned.
A nail or rod will be needed if you cannot screw the loops with pliers without forming burrs and irregularities that can disrupt the integrity of the cord structure.
II method. Machine tool.
- We make a machine for winding wire for L size knotless.
- we pierce a thin wooden board through with a nail No. 1 with a diameter of 2 mm;
- 3 cm from the first nail, we pierce the board through with another nail (nail No. 2) of the same diameter;
- use side cutters to bite off the tip of both nails;
- draw a line on the board with a thick pencil from the center of the first nail to the center of the second;
- We mark the place where the third nail was pierced. It should touch the drawn line on the right and be 2 mm below the first nail;
- punch through the third nail, bite off the tip.
The machine is ready.
- We wind the wire, starting with nail No. 3.
- Next we go around nail No. 1.
- We stretch the wire to nail No. 2, make an oval loop, lower the end of the wire below the rod, as shown in the previous photo.
- We cut off the excess ends of the wire with side cutters.
The knotless pattern is ready.