The word “leader” usually refers to a piece of fishing line that is placed between the bait or hook and the main fishing line, as well as the equipment that is held on the leader.
Tying a leash to the main line is not as simple a task as it seems. Depending on the type of fishing and fishing conditions, the method of attachment is selected. Sometimes it must be movable, sometimes it must be quickly replaceable, sometimes it must be solid and reliable.
Very often, fastening involves connecting a leash with a fishing line made of dissimilar materials, fishing lines of different thicknesses, braided and regular, monofilament and metal wire, etc. This imposes additional requirements and usually creates additional difficulties for fastening.
Loop to loop - attaching a leash using a looper
The “loop to loop” method is good for attaching longitudinal leashes, that is, those that are like a continuation of the main fishing line and go straight from it. The method by which you can tie a leash at an angle of 90 degrees will be discussed further. For this method, soft lines and leashes made of relatively soft materials are usually used, for example, attached to a cord when fishing with feeders. This method is also the simplest - usually no additional knowledge is required to use it, you just need to be able to use a looper.
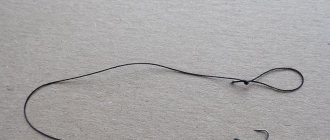
So, what is looper? This is a small device made of plastic or other material with a special hook at the end and a small handle that is comfortable to hold with your fingers. Its length is small - only about 15–20 cm. In order to make a loop, you need to do the following:
- Fold the fishing line in half.
- Place a loop of fishing line onto the looper hook.
- Wrap the loop around the neck of the hook 5-6 times.
- Remove it through the hook.
- Moisten and tighten the knot.
The result is a neat, miniature loop; it will be extremely difficult to knit one without the help of a looper. In addition, all leashes will have neat, identical loops, which is also difficult to achieve without the help of a device. The looper knot practically does not lose strength and does not untie - if you have a choice, use a regular loop knitted without the help of a looper, or knitted with a looper, then it is better to opt for a looper. In this case, the trimmings are minimal.
In addition, the looper can work with braided wire - anyone who has tried to knit knots on braided fabric knows how difficult it is due to its softness, very thin cross-section and the presence of small fibers. Loopyaz allows you to knit them without any problems, even on old wicker, which flocks in all directions. In the case when it is necessary to tie a larger loop, it is simply fixed to the required size and pressed with a finger, then the fishing line is wrapped and removed from the looper hook.
The looper is a very inexpensive device that must be in the arsenal of a floater, feeder, and even a spinner. However, spinning anglers usually use an American fastener - another way of attaching braid to equipment. It is also good for winter fishing - you don’t need to tie knots with frozen fingers, but you can use a device for a loop under a spoon or a balancer.
Getting the loops right takes a little practice. You can train both on monofilament and on braid. After a little training, the angler will be able to knit loops almost blindly. This is very convenient - you can easily tie a paternoster or other type of equipment in case of a break in bad weather conditions and even at night.
If you don’t have a looper at hand, you can tie a loop by hand. To do this, you need to fold the fishing line in half and then work with it already folded in half. A loop is made from it, then the fishing line folded in half is threaded through this loop two or three times. The knot is wetted and tightened - a blind loop is obtained, which can be used if the looper is forgotten at home. Although it is not recommended to do this - too much precious fishing time is spent on all this. The modern fisherman is already too busy a person to waste time on all sorts of complex knots.
However, this method can help if you have to knit a very thick and stiff fishing line. For example, during sea fishing. The looper does not cope very well with thick fishing line; it can come off while winding loops. However, in this case, it is advisable to use special crimping tubes to make the loop. This will save time, will be a very compact and neat method, and will not reduce the strength of the fishing line in the area of the knot.
In order to connect a fishing line with a leash using the loop-to-loop method, you need to have, oddly enough, two loops - one at the end of the main fishing line, the other at the end of the leash. It is best to tie them using a looper, as described above. To connect, a loop of fishing line is threaded into the loop of the leash, then the leash is threaded into it. There is one limitation here: if there is any equipment on the leash, then it must go into this loop.
If the loop on the main line is too small and the hook and hooks attached to the leash cannot fit into it, then it will not be possible to secure it; you will have to re-make the loop on the main line so that the leash can be inserted into it.
The connection is detachable, that is, if necessary, the leash can be easily removed and then put on again. This is the advantage of this connection over a conventional fishing line knot. In the case of a knot, you usually have to cut it off if you want to change the equipment. Most often you have to use a needle to remove it. A needle is another device that should be in the arsenal of every angler, especially a feeder and float fisherman. Usually it is part of the extractor - located inside its handle.
When they want to get the needle out, they simply separate the plastic body of the extractor in half. Using a needle or simply with your hands, pull out the loop and remove the leash.
Expert opinion
Forester Seva
Expert
Ask a Question
Unfortunately, the method has some disadvantages. First of all, the leash and the main line can often get tangled, and the leash with the hook will cling and get caught in the loop, breaking it with the point of the hook or hooks of the bait. So that it does not get overwhelmed and confusion occurs less often, an intermediate link is used between the leash and the main line - a swivel. And to make it easier to take off and put on, change equipment, fasteners are used.
Mounting methods and components
Having considered the types of leashes, we will focus on the types of their fastening, especially since they can be the same for different types of inserts.
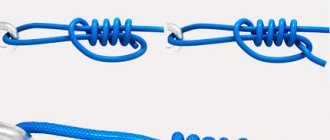
Loop in loop
The most popular option for tying leashes to the main line is called loop-to-loop. This method is used to attach various types of fishing inserts to mounts for both peaceful and predatory fish.
The procedure according to the diagram presented above:
- The loop of the leash is put on the loop of the main fishing line.
- Then the hook is passed into the warp loop.
- The knot is carefully tightened.
Palomar
Knots on braided knots tied using the Palomar method hold best, so we will briefly describe the procedure for knitting it.
- Fold the end of the fishing line in half and pass the loop through the eye of the hook or the loop of the swivel.
- Wrap the loop around the base.
- Place a loop on top of the hook.
- Tighten the knot.
Clinch
We will continue the description of fishing knots for leashes with a diagram of a clinch knot. This popular fastening method is performed in the following sequence:
- We pass the end of the fishing line through the loop of the hook or swivel.
- We wrap the end several times, 6-8 times, around the base.
- We pass the tip first into the loop near the hook, then into the loop formed during the knitting process.
- We wet it, tighten it, cut off the excess, leaving about half a centimeter.
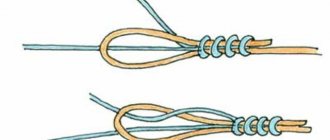
Lateral outlet
When you need to attach the leash to the main line so that it is located at 90 degrees, proceed as follows:
- We form a simple loop on the main line.
- We pass the end of another fishing line through it.
- Fold it in a half loop.
- We wrap the loop with the free end 6-8 times.
- Pass the end into the original half-loop and tighten.
Fairy lights
To make a garland in which several branches are used, a so-called “running” knot and leashes with a triple knot at the end are used.
As can be seen from the above diagram, first a running knot is prepared on the main line, which is tightened after placing a piece of another line in the lower loop. The leash attached in this way has a certain degree of freedom and can move through the loop.
Double leash
This option is often used in float rods and very sharply in donks. Its peculiarity is that the two leashes have a common loop for fastening. Knitting is done in this order:
- Take a piece of fishing line of 40-50 centimeters.
- It is folded in half so that the ends are of different lengths, for example 25 and 15 centimeters.
- A figure eight loop is knitted.
- First, hooks are attached to one and then to the other end.
This structure is attached to the equipment using one of the methods described above.
Using swivels, fasteners and other metal elements
This method is preferred and is used in almost all cases. In this case, the swivel prevents twisting, which helps both when pulling out the equipment and when landing fish. It is known that when using a spinning line, the line usually turns out to be twisted, and with it the use of a swivel in front of the leash or bait is a prerequisite.
The first method for attaching the leash and the main line is using the improved “loop-to-loop” method. In this case, they are connected in a loop to a loop not directly, but with the help of a swivel, which is an intermediate link between the main line and the leash. To do this, you need to have loops made at the ends, as well as a swivel. It is advisable that both the swivel and the equipment pass through the loops. The swivel is supposed to have at least two loops.
First, a swivel is placed on the leash loop. This is done as follows: the loop of the leash is threaded through the ring of the swivel, then the swivel is passed through the loop of the leash again. After this, the operation is repeated for the loop of the fishing line - it is threaded through another ring of the swivel, and then the leash and swivel are threaded through the loop of the fishing line. It is very important that both the leader and the line come straight out of the swivel rings and not backwards. In this case, the risk of entanglement and the risk of breakage will be minimal.
There is also an alternative method of fastening. It reduces the strength at the attachment point, but it will help when one of the loops, for example, on the main line, does not allow the rig with a swivel to pass through it. In this case, the leash loop is made larger so that the equipment is guaranteed to pass through it. After this, the leash loop is threaded through the free ring of the swivel. The rig is then threaded through the loop on the leash and tightened.
The result is a swivel mount, but it is still better to use the first method, although it is a little more complicated. This method involves the leash sliding along the swivel ring, so it is better to replace it more often so that it does not wear out at the attachment point.
You can replace a leash with such a fastening in the same way as fastening it using the loop-to-loop method, and it will even be easier to do. First, the loop is pulled out of the ring, then they look carefully at which side the leash passes through the ring, and pass the leash through the loop of the leash so that it is removed from the ring. If you make a mistake, then you need to carry out this operation in the other direction, but twice.
In order to quickly remove the leash, a swivel connected to a clasp is often used. Using the clasp, you can replace the leash in just a couple of seconds - you just need to open it, remove the leash that has a loop, and put another one on the clasp. The best way to do this is by first putting the leash loop on the clasp, then opening the clasp and passing the leash through it. In this case, the fastening is the same as in the first case described above, when the loop covers the fastener ring - it is stronger and less susceptible to abrasion, since the loop of the leash in this case has almost no slip on the fastener.
Separately, we should consider the fasteners that are used to speed up replacement, in particular the American fastener. This fastener is specially designed to be securely and quickly attached to the braid. As any fisherman knows, tying something, making some kind of knot simply with your hands on a braided line is a difficult task - it is thin, does not have longitudinal rigidity and often frays.
In addition, the braid is very slippery and not all knots on it will hold well. An exception may be, perhaps, coated braiding - the knots hold well on it.
American - universal clasp. It is designed on the principle of ancient fasteners for raincoats and other clothing - there a metal device supplemented the fastening with the help of straps and straps, the result was a knot-type connection, but easily separated and connected again due to the metal part.
Such a fastener is a curved wire that has two parts at different ends: on one part there is a curved ring, one end intersecting the central wire slightly to the side, on the other part there is a bend with a hook into which it is convenient to insert a metal ring, for example, a swivel or bait. First, the swivel is put on the clasp, after that the braid is put on the hook, wrapped 5-6 times around the clasp and then passed into the back ring. It turns out to be a fairly simple and detachable connection.
Of course, attaching the leash directly to such a clasp by simply passing its ring into the clasp will not be entirely correct. The fact is that the leash itself will have a small thickness and may jump out of the fastener and get tangled. Therefore, it is better to attach it to the swivel so that it does not twist the line and get tangled; the swivel ring is much thicker and is unlikely to jump out.
You can, of course, fasten it by first putting its loop on the clasp, then passing it through the latch and putting a loop on top of the latch, as in the canonical method of attaching to a swivel, but this will require a fairly large loop on the leash, capable of covering the hook of the clasp without problems, yes and a swivel would be useful to avoid tangling. The American one is more often used for attaching bait in spinning fishing directly without a leash, but if the angler does not want to make a loop on the braided line using a looper, it will be a good alternative.
It is worth mentioning a forgotten, but quite simple and effective alternative to the clasp - winding rings. The winding rings are a piece of wire twisted in the shape of several spring coils; the coils should be tightly adjacent to each other. This is a kind of analogue of a double-sided fastener, however, it may not be so easy to put on and remove the equipment from it without a special device - pliers. Also, winding rings have another disadvantage - usually the ends of the wire on them will injure the fishing line.
Therefore, it is better to attach anything to them either using fasteners or swivels. However, if the winding ring is used to attach a metal leash, there is no such problem - the metal parts of the equipment are not injured from contact with the winding ring.
Also, a winding ring is better than a clasp in that the latter can accidentally open in water, and the winding ring will always securely fix the equipment.
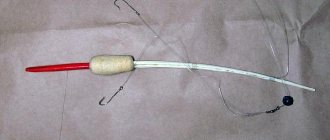
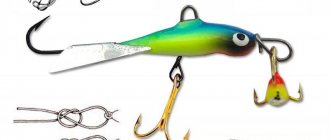
Attaching leashes for pike fishing
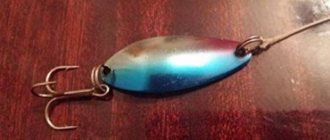
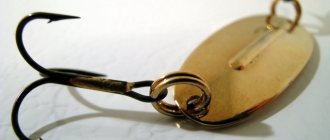
Metal leaders are made from steel, tungsten or titanium wire and are designed to protect the main line from contact with the pike's teeth. As you know, this predator opens its mouth while fishing and begins to chat from side to side; as a result, the fishing line in contact with its teeth can be cut, the fish and part of the equipment will be lost. Therefore, when fishing for pike, it is important to use a leash.
Metal leashes can be purchased at a fishing store or made yourself. Purchased leashes usually already have two rings at the ends, often with swivels inserted into both, sometimes even with clasps. All that remains is to secure the bait on them using a clasp or a winding ring and attach the second swivel to the fishing line using a loop-to-loop method or a clasp.
Metal leashes can also be made independently. One of the manufacturing options is to make part of the metal leash, one of its ends, in the form of a twist with a latch. In this case, the loop to which the bait is attached can be opened after unwinding the twist.
As a result, you can change baits while fishing quite quickly, without replacing the leash and other parts of the equipment. Also, this mount is very compact - there are no additional links in the form of clasps or winding rings. Usually only a single swivel is placed in front of the bait.
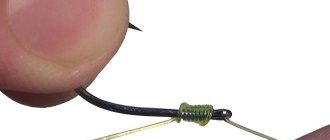
You can also make leashes yourself from leash material - a special flexible cable-like fiber that the pike does not bite. To do this, the material is cut with a special knife and a leash is made from it using crimping tubes. Before this, you can put on it the necessary bait, fastener or some other element of equipment. This also eliminates the need for unnecessary equipment. In exactly the same way, using crimping tubes, metal leads can be made.
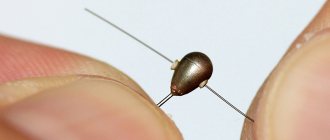
Crimping tubes
What to do if you need to secure a leash made of thick fishing line, for example, fluorocarbon with a diameter of 0.4-0.6 mm? In this case, it is difficult to use the looper, the knot will turn out to be too large, during the process the line will be excessively over-tightened and may come off the looper when the knot is tightened. There is a way out - you can use crimp tubes.
Crimping tubes are special tube-shaped metal elements designed to create loops on fishing line and other elements of fishing equipment. They should be selected strictly based on the diameter of the fishing line, wire or leader material. Before making a loop using a tube, you need to check that the leash goes inside two or three times - no more than two and no less than three. Also for manufacturing you will need special pliers for crimping the tubes.
If you don’t have them, you can use the ribbed clamping section on ordinary pliers, narrow-nose pliers or other pliers-type devices with sufficient compression force. However, the quality of crimping will suffer; it is best to use crimping pliers, especially if you don’t have enough experience yet. To make a quality loop, you may need a rod around which the loop will be formed. You can take a small nail or other suitable object. Then the loop will be small.
You should immediately think about what exactly you want to put in the finished loop of the future leash? If this is a regular swivel or a one-way fastener, then you need to put them there immediately when forming the loop. A winding ring or double-sided clasp can be added later.
Before crimping the tube, you should insert a fishing line or leash material into it. If the line gets through three times, they insert it three times, making a loop and one more time in the opposite direction. If twice, then twice. The metal wire is inserted only twice, because the third time the bend will be too sharp, at which it can break - this must be taken into account when choosing a tube. There is no need to twist the metal wire before crimping - then the connection will be less strong and the tube may slip off.
It can be useful to give it a slightly oval shape before crimping the tube, if it is too big for two times, but too small for three - then the line can be inserted along the long side three times. Tubes are usually produced in increments of 0.1 mm in internal diameter, starting from about 0.3 mm, for example, there are sizes 0.4 mm, 0.8 mm, 0.5 mm, this allows you to accurately select their size. If in doubt, it is best to take the fishing line or leader material with you to the store to determine how many times you can thread the line through the tube.
The tube is crimped gradually, six to seven times, turning the tube while crimping along its entire length. Special pliers have ribs that, when compressed, make local dents that fix the line very well. When crimping with ordinary pliers, you need to crimp the tube more times, do it more gradually, and the quality of the crimp itself will be slightly worse.
Features of attaching multiple leashes
Moreover, more than one side leash can be tied to the main line. There can be several of them, up to three pieces (!). But they need to be connected correctly. And this must be done not only so as not to tangle the leashes, but also so as not to tear them off from the main line.
And this is best done with the help of the so-called “snake knot”, which is knitted like this:
- Scheme for tying several leashes with a snake knot.
It is necessary to position the main line parallel to the lead line. - Make several turns (literally two or three) with the end of the leash around the main line.
- Perform a similar operation with the end of the main line.
- Thread the ends of these lines through the loop formed in the middle of the structure.
- Tighten carefully.
It turns out one already tied leash and two freely protruding ends, to which, if you initially make them long, you can tie a couple more leashes. For reliability, you can attach swivels with carabiners to them and attach leashes to them.
In this case, everything depends on imagination, the main thing is not to overdo it and not to make a structure that will clearly scare away the fish. If there is no need for three or even two leashes, then it is better to simply cut off the ends.
As they say, it was not the gods who fired the pots. It’s better to practice many times, so that later, if an unforeseen situation arises (for example, a break in the leash right in the pond), you can quickly fix the problem and not lose precious time, which is so important during the fishing process.
Fishing knots for tying a leash
In extreme cases, when there is no looper, when there are some specific fishing conditions, if the connection cannot be made using detachable loops, fasteners and other effective devices, knots are used to attach the leash. Fishing knots are a bad option, because the leash tied with a knot cannot be removed - you can only cut the fishing line. And since the leash is a consumable material, that is, it can break off more than once during fishing, the tying procedure itself will be repeated again and again. Knots can be used to attach a shock leader, but not a leash.
Securely tying the leash and fishing line is not easy. The process of tying a thin and not rigid fishing line into a knot, often with wet slippery fingers, in bad weather, with frozen hands in the cold, is very long. The fisherman spends his time not fishing while near the reservoir, but on some kind of macrame. This could cost him the fish he caught, or even risk being left without a single tail - this is a serious setback. However, binding methods are used and need to be considered.
Improved fishing knot
A simple method of connecting a longitudinal leash to the main line. To perform it, you will need to know a simple knot - a loop is made on the cord and its tip is threaded through it once. Probably even a child knows him.
An improved fishing knot is suitable for tying two fishing lines that do not differ too much in diameter - no more than twice. The first fishing line should be tied with a simple knot, the second fishing line is threaded into it and a simple knot is formed on it with a loop around the first. The knots are wetted, tightened and the lines are pulled together. The main advantage of this connection is its simplicity and speed of execution. The main disadvantage is extreme unreliability, especially on cords and thin fishing lines.
How to tie a leash on a fishing line with a figure eight knot
A more advanced version of the previous hub connection, which is much more reliable. Applicable in the same cases. To perform it you need to be able to do a simple figure eight. To do this, one line is wrapped around the other two times - two loops are obtained. The hinges are secured with a finger to prevent them from straightening. The tip of the fishing line is threaded under the second fishing line into the first loop.
Thus, you should get something like the number “eight” when tightening the knot. Exactly the same “figure eight” is formed on the second line around the first. The knot is wetted and tightened, the ends are cut at a distance of approximately 3 mm from the knot.
Grinner knot
The knot is also quite simple and is performed according to the same principle. First, one line makes a loop around the other. After this, its tip is wrapped around the second fishing line and passed through the loop 5-6 times. The same operation is performed on the second line.
With this knot it is already possible to connect relatively dissimilar fishing lines. If you need to tie a fluorocarbon leash, which has significant rigidity and on which it is difficult to make this type of knot due to the large number of sharp bends, you can tie a figure eight knot on the fluorocarbon leash. This way it will be easier to perform and the fluorocarbon will be less damaged when tightened.
Other
The described methods of tying a hook to a fishing line completely cover the needs of the fisherman when working with small hooks and thin fishing lines on fishing rods and bottom gear. However, if you scour the Internet, you can dig up more. There is no practical expediency in this - only if there is a desire to experiment simply with other methods for the sake of interest.
Subscribe to the channel:
YouTube channel RYBAFAN
We are VKontakte
How to tie a leash to a fishing line at 90 degrees
Quite often there is a situation when a fisherman needs to secure a side leash, which does not extend straight from the main line, but at an angle of 90 degrees. There are two ways to attach such equipment - movable, removable and fixed, when the leash is attached to the fishing line using a knot. The most convenient is a movable mount, but it does not always correspond to the fishing conditions.
In the case of a movable fastening, a loop must be made on the main line. The easiest and most reliable way to do this is, yes, with the help of a looper. In the right place where you want to secure the leash, the fishing line is folded in half, put on the looper hook, wrapped around it several times and removed. The resulting loop does not tighten and will allow you to secure the leash. It is best to secure it with a swivel, because the side leash almost always creates an additional chance of tangling and twisting; you can also install a clasp so that the leash can be replaced more easily.
A small loop of thick fishing line is usually very rigid and makes it easy to change leashes on the fastener. However, we must remember that the size of the loop should allow the swivel to be threaded through it. First, the loop is passed through the ring of the swivel, and then the swivel is passed through this loop. If the loop is too small, then one way or another you will have to use a swivel attachment through the clasp.
You can also tie a side leash to the main line. True, in this case it can only be removed by cutting it, and a knot will remain on the main line. To attach, the leash line is directed along the main one, where the knot will be, it is pressed with a finger. After this, a loop is made, the leash is passed through this loop six to eight times, and the knot is tightened. This kind of fastening is almost never used, except in very crude cheap equipment when fishing with self-catching gear. This way you can tie a leash that is no more than one and a half times thinner than the main fishing line.
In addition, this method is used when you need to quickly tie several leashes to the main line when fishing with a hook. Here it should be said right away that many leashes are usually not used in modern fishing. By tying two leaders to the main line, or even tying several leaders to the main line, the angler hopes for a greater chance of a bite. However, the fish usually eats the bait and is not detected. However, tying an additional leader to the main line is sometimes useful, especially when fishing for small fish.
Features of attaching several leashes: feeder, donka, winter fishing with a garland
In addition, you can easily attach several leaders to the main line, but it is very important to do it correctly. What node can do this? The best option for this would be the “snake knot” :
- The main line should be parallel to the leader line.
- We wrap the end of the leash in a couple of turns around the main one.
- Then we do the same with the end of the main line.
- Next, we thread the ends of both lines through the loop that is created in the center of the structure.
- Tighten carefully.
Thus, one leash is already tied and there are 2 more free ends where several more can be tied.
Feeder
Feeder fishing with a spinning rod has recently become very popular due to its effectiveness. However, at first glance, its loops are very complex, which is why many people do not undertake to knit them themselves, but this is not so.
The best option in this case is the “symmetrical loop” . It means a double line with a loop, on one of which the leash slides. To knit such a loop you need:
- Take 1-5 meters of monofilament, which folds in half.
- Use a “surgical loop” to make a small loop at a slight distance from the bend of the fishing line (approximately 7 cm).
- There are 2 free ends of the fishing line left. After looping them, it is necessary to twist them to make the equipment rigid.
- The end of the twist must be secured with a “surgical” knot.
- From this knot another 39 cm is measured and a knot is tied.
- After this, 2 ends of the fishing line remain, one of which is cut off, and a swivel with a carbine is tied to the other.
- The second loop remains for the leash, which can be knitted in the usual “loop to loop”.
Winter fishing with a garland
The garland is knitted as simply as possible. The simplest method is this:
- It is best to start with the top jig, tying it in the usual way, passing the line through the eye or hole, making a loop parallel to the fore-end.
- Several turns are made around the fishing line.
- The free end is lowered into the same loop.
- The knot is tightened.
Now you can make a loop for attaching to the main fishing line or attach a clasp or carabiner.
Attaching a leash in different types of fishing
Let's look at the best ways to attach a leash in different types of fishing and gear.
Installation of a leash for a spinning rod
Spinning fishermen are perhaps the most “advanced” fishermen; they use the most advanced materials, equipment, reels and rods. And they were the very first to evaluate the effectiveness of knotless fastening. In any rig, be it a retractable leader, a rig with a Tyrolean stick, or fishing with a bombard, they almost always use fasteners.
You won’t find a single knot in modern spinning equipment – and rightly so. The loops here are usually made using crimp tubes; it is often necessary to tie a metal leash to the main fishing line when fishing for pike, American fasteners. However, you shouldn’t discount the looper here either - it is often useful.
Connecting a leash in feeder and bottom fishing
In bottom and feeder fishing, looper is used more often than in other types of fishing. With its help, an angler can, in a matter of seconds, make loops of any size that he needs while fishing, perform any feeder installation or connect the leash to the main fishing line.
Swivels with a fastener are usually attached to them, and on them are a feeder, a leash and other elements of equipment. It must be remembered that the presence of a swivel in front of the feeder, leash, or additional leash is mandatory. Silicone shock-absorbing balls are also widely used, especially when sliding the feeder in inline-type rigs, so that it does not break the swivel with the leash.
It is also worth installing such a shock absorber above the feeder rig - when reeling quickly, it will prevent injury to the upper tulip of the rod. If there is no such ball, you can simply put a large silicone cambric.
Quite often, when fishing with a regular donk, a side leash is used. When fishing with a donkey with an elastic band, this is the main method of attachment. This type of fishing is now forgotten, but it can be very productive both when catching small fish and when catching pike for game - in this case, the elastic is placed along the shore, and there is no need for long casting to depth. For side leashes, loops and the swivel method are almost always used. The leash is attached to the swivel using a loop-to-loop method, or you can attach the leash with a clasp.
Blitz tips
To get the maximum catch, it is important to keep a few tips in mind:
- The most popular method for tying a leash to the main line is “loop to loop”.
- Swivels with carabiners are the best option to prevent the fishing line from tangling with the leash.
- A swivel with a carabiner is best knitted with a “fixed” knot.
- The main line can support 3 leashes.
- For three leashes, the “snake” knot is considered optimal.
- The “snake” knot should leave long ends of lines and leashes for further attachment of additional leashes.
- It is important to consider the strength of the knot.
- You can tie any knot yourself. Practice is important.
- The correct knot is very important when catching.
Considering the strength of the knot and the entire equipment in general, you can easily catch even the largest fish. Each knot is capable of being swayed even by an inexperienced fisherman. It is very important to be diligent and attentive, then patience will pay off in full.
klevyj.com