The Flemish knot, better known as the figure eight knot, gained its popularity due to its ease of execution and strength.
The article describes the classic way of knitting this connection, introduces the reader to its alternative types, and also contains corresponding illustrations and step-by-step instructions for knitting varieties of the Flemish knot.
Description and technique of performing the figure eight knot
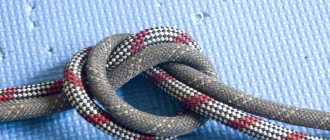
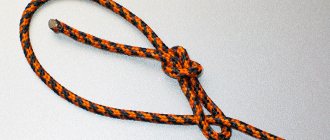
The figure eight knot gets its name because of its inherent shape. It is mainly used in fishing and mountaineering (Figure 1).
So, with the help of this knot, fishermen attach hooks, leashes and other equipment elements to gear, and also use it to tie up broken fishing line.
The figure-eight knot is excellent for providing insurance for climbers during high-speed descents, since it never unravels without permission. At the same time, it cannot be called universal, therefore, in addition to the standard method of tying it, there are also alternative knitting patterns, which will be discussed below.
Figure 1. This is what a correctly tied figure eight looks like with and without a loop
A standard knot can be tied in the following sequence:
- Take the rope by one end and fold it into a loop. In this case, the lower part should be brought behind the upper one.
- The free end of the rope should be passed through the loop.
- Pull both ends at the same time.
Node purpose
A knot called a figure eight is used to connect the ends of a fishing line, knit loops, attach fishing equipment, and belay. It is used not only by fishermen, but also by sailors, as well as in speleology, rock climbing and mountaineering. The only caveat is that this type of connection is not suitable for fluorocarbon lines.
Figure 2. The connection is used both in everyday life and in specialized industries
Thanks to its simple and quick knitting pattern, this knot is quite popular. In addition, this method of tying knots provides a reliable and strong connection of leashes, which does not give way and is easily untied after prolonged tension (Figure 2).
Pros and cons of using
Among the advantages of using the “eight” are the following:
- Stationarity - the node does not move under any circumstances.
- Strength - the connection does not loosen or come undone on its own, which is why the figure eight is often used as a fishing knot.
- Fast execution - can be tied in a few seconds.
- Possibility of easy untying even after prolonged use of the rope.
- Impossibility of spontaneous tightening of the loop.
- Variety of intended purposes: maritime affairs, speleology, insurance activities, etc.
- Can be used as a stopper.
- The ability to retain the properties of a single piece of fishing line after tying, thanks to which its original strength can be preserved.
Along with the advantages, there are also some disadvantages:
- Labor-intensive application on thin line.
- The need for reinforcement in order to increase reliability when used on thin lines. So, to increase strength, you have to fold the running end of the rope in half, and only then tie a knot. This makes the installation process more complex and time-consuming.
- It is absolutely not suitable for tying fluorocarbon (other rigid) fishing lines, since the strength of the connection is reduced by half due to the deformation of the material on which the knot is tied.
- Knowledge of variations is a must, especially in mountaineering.
Basic rules of knitting
You should practice tying a figure eight knot using a step-by-step knitting pattern:
- Take a rope (line) no longer than 50 cm by the running end.
- Bend one end no more than 30 cm long in the form of an arc, applying it along the remaining part.
- Guide the undercarriage below the piece of fishing line (rope) that was not used and pass it through so that a loop is formed. In this case, the end of the chassis should be left down.
- The next movement is to direct this part with a turn around the fishing line, getting into the loop.
- Pull the knot tightly and finish knitting.
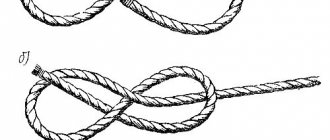
Figure 3. Basic nuances of knitting
A correctly tied knot looks like a “figure eight”.
It also looks like an “infinity” sign (Figure 3).
Types of knot
There are more than a dozen varieties of the ligament that looks like 8ka. The most common subspecies are:
- classical;
- double;
- nautical;
- counter;
- looped
The binding technology of a certain variation has a specific feature. Before using a new connection, it is recommended to practice on a cut fishing line or rope. In this case, special attention should be paid to the main element - the loop.
A double ligament is characterized by the fact that it ends up with two loops at the end.
Classic (single eight)
This weave can come in handy at any time during the fishing process. At the same time, the classic version is quickly remembered and created according to a simple scheme.
How to tie a Figure Eight knot:
- First of all, you need to prepare the material for training; it is advisable to choose a rope that will not slip in your fingers.
- The working part of the rope must be placed on top of its base, this will create a loop with a diameter of approximately 10 cm.
- Next, pass the end of the rope under the base and then out through the loop.
- The resulting bundle should be moistened and tightened.
Single eight
Nine (double eight)
The next variant of the double Eight is called the Nine. The knitting pattern for this fastening is similar to the standard method, but it is stronger and more complicated. To form a Nine, you need to perform the following algorithm of actions:
- The fishing line used is folded in half.
- The pattern of knitting a knot in the classic version is repeated.
- At the last stage, the working part of the fishing line is inserted into the loop not once, but at least twice.
- The resulting fastening must be tightly tightened.
On a note!
The double Figure Eight knot can be an even stronger connection if you use a stiff material, such as fluorocarbon lines.
Double Eight
Double figure eight with two loops
A ligament that forms two loops is considered a complicated version. Therefore, training is also required before direct use. The sequence of creating such a node is as follows:
- Two loops are made from one double fishing line: the first is formed by bending the fishing line, the second by twisting the fishing line.
- The middle part of the first loop is not completely threaded into the second.
- Then the first loop is thrown over the second.
- From the resulting knot, two new loops should form, which must be pulled, pulling out two parts of the base of the fishing line used.
- After tightening, you will get a double figure eight, and if you use fishing line, you must not forget about wetting.
Double figure eight with two loops
Fishing knot
A fisherman's knot (sea knot) is a version of the figure eight for attaching fishing gear (hooks, jigs and even sinkers). The advantage of this weave is its small dimensions, which allows it to remain invisible to fish. The mount for the hook and other gear is formed as follows:
- The end of the braid used goes through the eyelet.
- Then it wraps around the main part of the tackle (hook) several times.
- The end passes further through the loops formed by the turns.
- After which the bundle is tightened by pulling the end of the fishing line.
Fishing knot for hook
Counter eight
The figure eight knot requires a lot of practice and time to make. They can be used to connect both identical fishing lines or ropes, as well as those of different thicknesses. This fastening is chosen due to its ability to maintain its original shape due to strong tension.
This variation is made from two different cords using the following steps:
- The two selected cords are connected in parallel.
- By turning it twice, a loop of cords is formed.
- One end of the double line is inserted into the loop.
- Tension occurs due to the tension of the ends on both sides.
Instead of the counter eight, fishermen prefer the Bloody Knot, as it holds more firmly and is easier to make. To connect materials of different diameters, it is recommended to use a bond called Carrot.
Counter eight
Multiple eight
A sea knot with multiple twists differs from a standard fishing and mountaineering knot not only in the knitting pattern, but also in its purpose. However, this variation is also classified as the Eight subtype.
Basically, repeated weaving is used to strengthen a worn or weakened cord and also prevent it from breaking. A multiple variation of the Figure Eight, intentionally creating a thicker rope, is tied with a single rope as follows:
- the rope bends to form a large loop;
- the end of the rope passes under its main part;
- then the same end passes through the loop from bottom to top 5-6 times;
- the resulting bundle must be tightened, holding the rope on both sides.
Multiple eight
Directional Eight
The directional Figure Eight knot (another name is the Reverse Bowline) is another reliable method of fastening, which has a non-tightening loop. A distinctive feature of the bundle is its location on the rope, namely in the middle. This is due to the need to create attachment points on the main cable for climbers.
Directional Eight is done according to the following scheme:
- First of all, the location of the ligament is selected.
- The selected rope segment is rotated 180 degrees, thereby forming a loop.
- The loop wraps around the main part of the rope twice, eventually it connects and a coil is formed.
- Next, the turn is threaded into the second part of the original loop.
- The knot is tightened by pulling both sides of the rope and the loop.
Attention!
After creating such a Figure Eight, a carabiner is attached to the loop, and the load is distributed along the course of the rope.
Directional figure eight
Types of figure eight knots
Among the types of knot execution, both classical and alternative methods are distinguished. We will look at the most popular of them.
Classical
The classic figure eight knot is knitted according to a simple pattern:
- Towards the end of the rope, make a loop with a diameter of 10 cm;
- The remaining end is passed through the loop and wrapped around it twice.
- The ligament is tightened.
Figure 4. This is what the classic figure-eight knitting pattern looks like.
If the resulting connection resembles the number eight, this means that the knot is made correctly. But, if during the process you have difficulty tying, it is better to practice a little, and then you will learn how to do the “figure eight” quickly and correctly (Figure 4).
Double
The double figure eight knot is used to obtain an increased connection size at the end of a fishing line or rope, or to obtain a double loop of increased strength.
Procedure
Stages of work:
- A double line is used to make a loop, which is first pulled through the swivel or ring of the hook.
- The line is wrapped around the base and threaded back into the ring.
- Tighten the knot with force, having previously wetted the tackle being processed (for reliability).
In order not to forget the skills at the pond, repeat these steps at home, bringing them to automaticity. The main advantages of this system include the fact that the knot does not move under significant load, the loops can be untied without problems, since they are not tightened tightly. In addition, the operation is fast and takes just a few seconds.
Technique for knitting a figure eight knot step by step
The figure eight knot is unique in its ease of knitting and practicality. At the same time, it is quite reliable, since it does not unravel spontaneously when tensioned, even when fixed around the support. It is used in both tension and slack ropes, ropes and cables (Figure 8).
Step-by-step instructions will help you on how to tie such a knot:
- We take a rope (fishing line, rope, cord) with one running end.
- We make a loop through which we pass the running end.
- Tighten the knot and fix it at both ends.
Figure 7. Step-by-step tying technique
By repeating the steps described above, you can make several such knots on one rope.
Similar nodes
Eight is the highest quality and most reliable fastening option. At the initial stage, we recommend mastering the single or double version. A certain part of fishermen uses alternative types of connections, which will be discussed below.
Vein loop
Fishermen claim that this is an oak loop, supplemented by one turn. Moreover, in the same direction. This option is more suitable for attaching ropes and cords.
Stages of creating a vein loop
sliding
Mounting option for hiking trips. Sliding is used as a fixed, tightening option. Peculiarity:
Photo of step-by-step assembly
It is important to consider that the alternative knots we are considering are of lower quality than the traditional 8. On these designs, the loops can move up and down the line.
If this situation does not bother you and suits you, then everything is fine. To attach hooks, it is recommended to use more popular options, such as:
- Bloody knot.
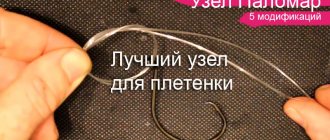
- Palomar.
- Spindle.
For the simultaneous installation of two ropes, a bloody fisherman's rope, or a structure called a carrot, is best suited.
Oak loop
The name is unpopular. Although he is the one many have known since childhood. Just look at the photo and see for yourself that the author’s words are correct.
The design is not capable of replacing 8. Since when the structure is tensioned (tightening the two ends of the fishing line in different directions), the displacement always occurs in the direction of one point. This effect is clearly more noticeable on thinner ropes than on thicker cords.
Oak assembly technique
Finally
There are many combinations for crocheting. There are so many of them that it is impossible to list them in one article. Therefore, we are considering options for introducing our readers to other editing methods, good luck.
Alternative options for tying a figure eight
Varieties of the Flemish knot are no longer so easy to perform and require great skill. Alternative weaving methods are most suitable for fishermen who prefer that the knot tied is strong and the long-awaited catch does not fall off the hook along with the bait.
Knitting each such knot involves a certain amount of effort and time, so you can’t do it without training and stubbornness. There are several such methods. Among them: a counter figure eight knot, fishing line knots, and a tightening loop.
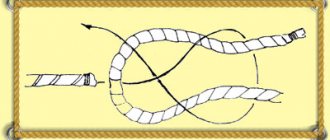
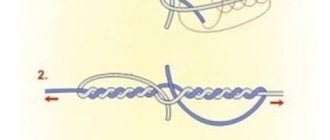
Counter eight
This knot is used to connect lines of different diameters. Its main advantage is the ability to hold its shape well and not slip, since the “counter eight” tightens much more tightly, although it will take more time to knit with your fingers (Figure 8).
Line knots
“Line knots” are used to connect a fishing line to a hook during fishing. They are so strong and reliable that it is impossible to untie them.
Figure 8. Counter eight knitting pattern
These knittings are tightened tightly and require quite a long time to complete.
Tightening loop
This type of “eight” is also designed for attaching hooks and feeders. The technology for its implementation is similar to the classic joining method, but requires much more time and skill to bind it firmly.
The knot itself is more resistant to unraveling than a typical knot.
Alternative nodes
There are no other ways to tie a figure eight as efficiently and reliably as shown in this article. The Counter Eight is not as reliable a knot, so we recommend using only the single and double versions of this knot.
This node also has alternative names. You may have heard of it using the following names: figure eight climbing knot, gazebo knot, Canadian figure eight, convoy, safety figure eight, tourist figure eight. The connection of all these nodes occurs exactly as we showed in the instructions.
Other popular nodes
In modern times, in addition to the specified method of fastening, the following types of units are used:
- Dagger type. Refers to the best options for connecting edges with a large cross-section. It is not complicated in design and is compact after tightening.
- Bowline gazebo. The oldest and very original knot, contains elements of a regular loop, half-bayonet, weaving and straight knots.
- The direct version is a pair of half-knots, tightened sequentially one after another in different directions.
- Anchor version. Very reliable fastening used for securing sea anchors.
- The noose is tightening. Two loops are circled several times with the running edge of the rope, then the end is threaded into a loop turned to the root side, after which, pulling out the outer loop, clamp it in it. This is the method used to knit nooses for hanged men.
- Climbing knot. It is notable for the fact that, in comparison with the figure eight, it unties and tightens equally well in both directions.
- Barrel version. The lower part of the loop is passed along the central part of the bottom of the container, the free edges are connected with a straight knot or a gazebo knot, depending on the circumstances.