Fishing clinch in various versions is often used in spinning fishing. One of the effective ways to use a clinch is to tie a leash, hooks, swivels, and accessories.
Those fishermen who use a regular loop-to-loop knot for this purpose scare away the fish, since it is more noticeable to the fish. The clinch allows you to solve this problem by securing the tackle with a reliable knot.
The clinch knot can be used to attach sinkers, hooks, swivels, jig heads, feeders and other elements of tackle. It is believed that this knot demonstrates the greatest strength in cases where the diameter of the eye does not exceed 1.2 mm.
Due to its advantages, this unit has gained considerable popularity. The ease of tying makes it accessible even to novice fishermen. It is considered to be suitable for knitting fishing line and braid of large or medium thickness.
It is usually used for lines with a tensile strength of up to 6 kg. It is believed that it is not advisable to use it for thicker fishing line. It is especially often used for attaching a leash to the main line or for tying a hook.
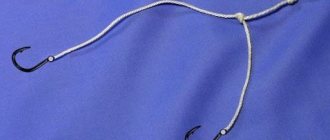
Clinch knot (for hook, swivel):
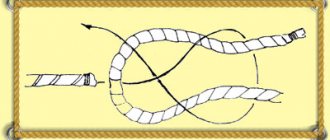
How to knit a regular clinch knot - diagram with photo
To clinch you will need to do the following:
- Pass the free end of the fishing line through the eye. This needs to be done with a large margin. It is threaded so that it is at least 15 cm.
- After the eyelet, the end of the fishing line is wrapped 5-6 times, moving towards the main part of the fishing line. When wrapping it, you do not need to tighten the thread too much.
- After this, the tip is threaded into the loop that has formed near the ear itself.
- After this, the knot needs to be moistened and tightened. The protruding end needs to be cut off.
The knot strength is 85%. When using it, the strength of the tackle will be the specified value from the original one.
This node option is considered the main one and is used most often. Each step of creating a clinch is shown in the figure.
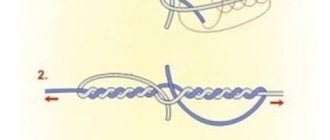
How to tie a double clinch knot
This unit is used in cases where a higher strength unit is needed. To knit it, perform the following steps:
- The double end is threaded so that the double part goes completely through the eye.
- The double thread is wrapped 4-5 times around the main part. This should leave a single tip of the required length.
- It needs to be threaded through the fold.
- Now the knot needs to be moistened and tightened. After this, cut off the protruding tip.
Each step of creating a node is shown in the following figure.
Double clinch knot
What's happened
This is one of the most common fishing knots, which can be used under the following circumstances:
- they are very convenient for tying hooks;
- such a knot holds spoons perfectly;
- The Clinch knot is usually used to tie wobblers and swivels;
- he holds carbines well;
- fishermen know that choosing a knot for a fly is not easy, so as not to upset the balance of the gear, but the Clinch knot copes well with this task.
Clinch knot reinforced
This type of knot is usually used to attach hooks in cases where it will be subject to significant load. To connect this node you need to do the following:
- You need to thread the fishing line into the eyelet at a distance of at least 15 cm.
- Wrap the tip around the fishing line 5-6 times. These rings should not be tight. It is necessary to wrap the fishing line in the direction from the eyelet to the main part of the fishing line.
- You need to make another loop as follows: the tip is threaded into the hole that comes first from the loop.
- After this, the fishing line will need to be threaded into the large loop you just created.
- The knot must be wetted. After this, it must be carefully tightened.
The operations described here can be clarified by studying the following diagram.
Clinch knot reinforced
This knot provides 98% strength as opposed to 85% of the classic clinch version
How is the clinch used?
This type of fishing knot is widely used in spinning fishing, where it is used as a device for tying bait, which must be changed frequently during fishing.
Many novice fishermen use a carbine for this. However, as practice shows, it reduces fishing rates. It is very difficult to catch such wary fish as grayling or trout using a carabiner. A regular clinch is used to secure a sinker to a fishing line when assembling deep-water and spinning tackle. It has a strength of 80-90%. The strength of the reinforced one is 95-98%, it makes it possible to save gear when it gets caught on various objects. This often happens when the river current is strong. In this case, an ordinary knot can come undone.
If high structural strength is required, for example, with a strong current in a river, then an improved clinch is used, since it does not come loose and does not cause losses. However, if the breaking load is higher than the standard, the line may break both at the knitting point and elsewhere.
Therefore, fishermen who do not have sufficient experience are advised to use a conventional knot.
Using known methods, you can easily learn how to knit a double clinch knot and a regular one, which will help many amateur fishermen do what they love
Both types of these knots are firmly attached to any type of fishing line:
The designs are simple to implement. It is not at all difficult for a novice fisherman to remember the technique for performing them. They are used with:
- sinkers;
- artificial baits;
- hooks;
- jig heads;
- feeders;
- swivels that have an eye made of profile or wire.
This is interesting: Cooking while camping
In this case, the diameter of the ear should be no more than 1.2 mm due to the fact that the knot will hold weakly on a larger ear.
This design is not used for tying sinkers with a through hole of a transverse or longitudinal configuration, for rings, tubes and other similar devices.
Stop Clinch
The use of stopper nodes is intended to create a thickening that will limit the movement of the tackle element within the required limits. There is a variant of the clinch knot, which is used as a stopper. In this case, a knot is created, for example, from a woolen thread, to tie the fishing line. To connect it you will need to perform the following operations:
- The thread is folded in half and placed along the fishing line.
- Starting from the double tip, one part of the thread is wrapped 6-7 times around the second part of the thread and fishing line. During the knitting process you need to keep an eye on it. So that the turns are neat and lie parallel to each other.
- The tip of the thread, which was carried around, is threaded at the place of the original bend.
- To tie a knot, you need to take the two ends and pull in different directions. Protruding ends must be trimmed. The knot must be wetted before tightening. The size of both ends should be at least 2 cm.
The details of the node creation process can be seen in more detail in the following figure.
Varieties
There are several varieties of the Clinch knot. It can be simple, improved, strengthened, single and double.
Single improved
This is the simplest knot to tie, although it can easily come undone, which is bad. Weaving pattern:
- The end of the fishing line is threaded into the eye of the hook. The tip is pulled out 10-15 cm.
- The main line is wound around the tip in a spiral. In this case, make from 4 to 6 revolutions.
- The running end is pulled into the resulting loop (at the bend).
- With one hand, hold the formed spiral, and with the other, pull up the tip of the fishing line. The coils should lie flat, without creeping on each other.
- Then the tip is threaded into the new resulting loop.
- The knot is moistened with water and carefully tightened. The remaining tip should not exceed 5 mm. Therefore, its excess is cut off.
Unlike a simple node, this one is 97% more reliable. A clinch is often used to tie anchors. This type of knot cannot be made from braided cord.
Double
If we compare the double clinch with the single one, it is much stronger, although it has a complex knitting. It is used for tying sinkers to the main fishing line and various baits, carabiners, hooks that are subject to heavy loads. A double clinch knot is woven from monofilament or braided thread using the same method as a single one. The only difference is that the thread is folded in half.
Weaving process:
- Thread the working edge of the thread into the eye of the hook and pull it through again to form a double loop.
- The thread is wrapped 5 times with the working end and pulled through a double loop.
- The clinch is moistened and tightened by pulling the ends.
Advantages: does not stretch due to high density.
Stopper
A locking clinch is a simple type of knot that is knitted from simple wool or cotton thread, as well as from thin braid. Monofilament fishing line is not suitable for it. They mark the area on the fishing line along which the float moves. According to the weaving method, the locking clinch resembles a knot for tying a hook.
- To make it, you need to fold a piece of braid or thread in half on the main fishing line. In this case, the braid should be located in the middle.
- Holding the top and line, make 4 windings.
- Then thread the end of the fishing line into the loop.
- The clinch is moistened with water and carefully tightened.
- The ends are trimmed, leaving about 2 mm.
Improved
To create an improved clinch, you will need to double-fold the line. It is pulled through the eye of the hook. The running end is wrapped around the root part of the fishing line. In this case, from 5 to 7 turns are made. The tip is pulled through the starting loop. The finished clinch is slightly moistened with water and tightened. The excess tail of the fishing line is cut off.
Reinforced
Reinforced - designed for fixing hooks when increased connection strength is required. On hooks, which often occur in fast underwater currents, the reinforced clinch does not come loose. Thanks to this, gear is not lost. Its strength is 95%. But you need to take into account that if the level of breaking load is higher than normal, the fishing line can break anywhere. For production, fluorocarbon thread or braided fishing line is used.
- To make it, a piece of fishing line is bent in half and the top is threaded through the eye of the hook.
- When the line passes through the eye, it is folded in the opposite direction so that the formed loop lies on the main line.
- The resulting tail is wrapped 5-7 times with the working end.
- The tail is then pulled through the loop.
The finished clinch is moistened and slowly tightened. To do this, the tip of the thread (fishing line) and the hook are pulled in different directions. The tip is cut off.
Hardened Clinch
This unit provides strength reaching 95%. When you plan to catch large and energetic fish, it is beneficial to use a reinforced clinch. To do this, you need to take the following steps:
- The tip of the fishing line must be folded in half. The resulting double thread is pulled through the eye about 15 cm.
- The double end is wrapped around the main part of the fishing line 4-5 times.
- Then it is returned back and carried through the loop near the ear.
- It is necessary to wet and tighten the line. The protruding tip must be carefully trimmed.
You can clarify the sequence of operations by studying the proposed scheme.
Pros and cons of the clinch knot, where it is used, when not to use it
By using this knot, a fisherman can take advantage of the following advantages:
- To connect it, you need to perform very simple operations. All clinch options are not difficult to create. Even a beginner can use them confidently.
- This knot can be used even if the eyelet for tying is small.
- The knot is effective even for very thin fishing line.
- The clinch is well suited for knitting thin and medium monofilament lines.
When using it, it is necessary to take into account that it has certain disadvantages:
- For braids with a smooth surface, the knot is not used.
- Not recommended for use with longitudinal holes.
- The use of a knot is not recommended for large ears.
- It is believed that this knot is not suitable for threads thicker than 0.4 mm.
Although the clinch can be used in cases where it is not recommended, its strength in such cases will be significantly lower than usual.
Clinch knot for braiding, how to knit, diagram and explanation - improved and strengthened Clinch Knot for fishing line and cord, visual video:
When not to use the clinch
If the eye of a fishing accessory is large in diameter or completely absent, then a clinch cannot be used. If you tie it on such a bait or other part, it will not last long and will unravel on its own. Therefore, professional fishermen advise not to use a clinch fishing knot on such parts. It will also come undone if the fishing piece has a double winding ring because it is too thick. It can only be used for those fishing accessories whose wire eye is thin.
Possible difficulties and their solutions
When creating a knot, you need to take into account that it reduces the strength of the gear. This happens for several reasons. The friction force when tightening the knot slightly destroys the fishing line, which affects its characteristics.
Friction creates overheating, which also reduces strength. The more kinks in the thread, the more the reliability of the connection decreases. To reduce this effect, it is enough to wet the line before tightening. Due to moisture, the impact of the friction force will become weaker.
Usually, after tying a knot, there is a sticking tip left. It is customary to trim it. However, you need to remember that this cannot be done close to the node. It is necessary to leave at least 3 mm to prevent spontaneous unraveling.
In some cases, it is necessary to thread not a single, but a double thread through a narrow eye. If the hole is very thin, this will be difficult to do. In this case, it will be convenient to carry out the procedure in the following way:
- Thread a single thread into the eyelet to the required length.
- Then thread the tip back, leaving a double thread on the desired side.
After this, you can continue tying the knot according to the appropriate instructions.
When knitting a stopper knot, there is a requirement that the length of the ends should not be less than 2 cm. This has the following explanation. If the tips are short, they will show significant stiffness. At 2cm in length they will become significantly more flexible. In this case, when passing through the rings they will not cling to them.
The second reason is that over time, being in water for a long time, this knot will weaken. The long ends make it easy to tighten again.
How to tie a San Diego clinch knot to tie the hook to the fishing line:
Single
The single clinch is one of the simplest fishing knots. But due to its simplicity of knitting, it is also quite easy to untie
, which is not good. Undoubtedly, for fishing in certain conditions and when using high-quality fishing line or cord, it is no worse than a figure eight knot.
How to tie a clinch knot becomes clear even to a beginner, once he looks at the step-by-step instructions. Below we will provide you with photos and videos on how to do this correctly, and we will try to describe a detailed diagram.
How to knit
- In the eye where you plan to tie the bait or hook, you need to thread the fishing line
and stretch it about 10 centimeters. - Then you need to fold the line in half
and
spin the bait around its axis 4-10 times
. I make 6 turns, but every fisherman tries to do exactly as he sees fit. - Now take the fishing line by the free end and stretch it near the eye
between the resulting fishing lines. - Now wet and tighten the knot
.
That's all, now you know how to tie a clinch fishing knot. Well, to make it even clearer, I suggest you look at the animated picture of how this is done. It will be much clearer this way.
Similar nodes
Using a clinch knot allows you to get a strong and reliable connection. However, the fisherman should know that similar knots can also be used. One of them is a grinder. To do this, you need to do the following:
- The fishing line is threaded through the eye of the swivel. This needs to be done with a large margin so that it is enough to knit this knot.
- The threaded end is divided into approximately three equal parts. After the first third it is bent back.
- From the eye towards the main part of the fishing line, the tip is wrapped around a double thread so that the turns are located inside the large loop. It is necessary to make 4-5 revolutions.
- When the last one is completed, the thread is threaded once again inside the large loop.
- Once wet, the knot is carefully tightened so that it retains its shape. The protruding tip must be cut off.
This knot, although worked slightly differently, has similar characteristics to the clinch.
Other uses of the node
Most fishing knots are closely related to maritime ones, as they were borrowed from sailors. It is customary to use a clinch knot to install feeders and sinkers, which have to be changed frequently while fishing. Although some beginners prefer to use a carbine. But because of this, the level of catch decreases several times and fish such as trout, grayling and podust become difficult to catch.
To prevent the line from deforming, the clinch is moistened with water and only then carefully tightened. It is impossible to use one universal knot for all types of fishing lines. Each of them has its own variety, and professional fishermen successfully use them in practice. They are used to tie:
- hooks;
- wobblers;
- swivels;
- spinners;
- flies;
- carbines.