Spawning time and spring fishing
Warts are a sign that the fish is preparing for the breeding process. Fishing begins as soon as the ice melts from the reservoirs.
A distinctive feature is that the bream feeds constantly at these moments, without taking breaks like some other species. Gradually, with the onset of warming, the bite intensifies, reaching a maximum (the water at this moment is 12-14 degrees). After this, preparations for the spawning period begin (water is about 15 degrees), the bite can be unpredictable. When the water temperature reaches 16 degrees, spawning begins. The bite subsides and lasts for 4-7 days, depending on the weather.
In case of good and stable weather conditions, without cold snaps, a maximum of 1 week is sufficient. If nature turns on the whims, then the process may drag on a little until the water temperature rises again to at least 16 degrees.
As soon as the spawn passes, the bream returns to the shore again, moving on to the next phase of feeding. This period of time is called post-spawning, it lasts for a week. After a week, he moves away from the shore in search of holes, and having found a suitable place, he remains there throughout the summer.
Where to look for bream in spring
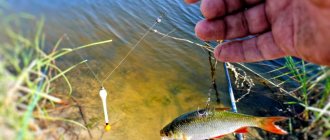
Fishing for bream in the spring should take place along the coastline, where there are enough depressions and depressions. The fish moves away from the fast current into small backwaters and river pockets, where the water settles a little and contains less turbidity. Flocks look for secluded corners in flooded bushes, last year's grass and snags.
You can look for bream in the spring at the very edge of the algae. The fish move through the muddy water closer to the shore and grass thickets in search of food. If you manage to feed such a place, then an experienced fisherman can collect a good catch.
Search conditions in May are constantly changing and depend on water levels and temperatures. Flocks move chaotically in search of food. Only with the onset of stable weather and an acceptable water level does the bream begin to feed cyclically. At this time, fish come out from the depths at night closer to the shore and it becomes easier to catch trophy specimens.
When the flood subsides and the water clears, the flocks move closer to areas with rip currents. In such places there are natural feeders into which insects, worms and other food are carried away by the water flow.
Read more about how to fish with a feeder in spring and what nuances should be taken into account.
Bream habitats during the day
Relying on the information above, you can now imagine a map of fish movements and identify potentially catchy points. Now all that remains is to figure out where the fish are most likely to be depending on the time of day.
In order not to be tied to a date or a specific time, remember that everything depends on the water temperature, which can vary from year to year depending on the month. But what remains unchanged is at what approximate water temperature spawning and feeding begin (degrees are written above).
The cooler it is, the farther from the shore the bream stays and vice versa: the warmer it is, the closer it is worth looking for.
- In the morning , in clear weather, it is worth starting your search from the coastal zone, fishing in areas 1.5-2 meters deep. The water in these places begins to warm up first, so these are the best places for fishing.
- During the day , look for shallows where it is also warm, since the water is still cool at depth. There are almost no bream near the shore, since this is a rather cautious fish, it stays at a distance.
- In the evening, the search should begin from the coastal area, where there is at least some vegetation (even if it is reeds or driftwood). Let us remind you that spawning is approaching, and the fish are looking for places to spawn.
- At night, the wary bream migrates again to the shallows to search for food. Fishermen have noticed that during the full moon and the absence of clouds, the bite improves. Most likely this is due to the fact that in the moonlight it is easier for him to see and find food at the bottom, so he can peck much better. The larger the individual, the more cautious it behaves, regardless of the time of day or night, so now is the most favorable time to catch a trophy.
Catching bream on a feeder.
Compared to float fishing and classic donkey fishing, a feeder has one main advantage: with its help you can lure the fish to the right place, and with the necessary casting accuracy, you can significantly increase the chances of “getting” the bait into the place where the school is located. Moreover, it is believed that when catching bream on a feeder on a river where there is a current, it is more effective, since the flock follows a suspension of bait carried along the current to the place where the bait lies. On still water, in a lake, a cloud of bait after casting remains in a limited area.
When determining the place to cast feeder gear for catching bream, you should first find deep areas of the bottom, edges, and slopes. To do this, you can use both echo sounders and depth gauges, or you can make them yourself. For example, by tying a load, moving it along the bottom using tension and shock, determine the differences. Changes in depth are the best place for catching bream with a feeder.
When preparing a place for fishing, you should, if possible, take into account its convenience, the absence of obstacles when fishing (snags, reeds), the possibility of placing stands for a rod, seat or fishing chair.
When choosing a feeder rod for catching bream in the current, you should choose a length of 3 meters or more, tip test from 80 to 130 g. Such a test will allow you to use fairly heavy equipment that will not be carried away by the current and cast the bait far enough. However, the tackle should be adapted to specific conditions, for example, if there is no current and light weights can be used, the tip test can be reduced to 60 g.
The reel is selected to be an inertia-free reel with a size from 2500 to 4500, depending on the casting length, the friction is the one the fisherman is used to, mainly the rear one, but this is not important, the presence of a baitrunner is welcome.
The fishing line can be either braided or monofilament, we indicated the diameter above. But you should not take a very thick one (0.18 is enough for a braid with a head; the breaking load is quite enough even for the largest specimen). The leash should be made at least 0.5 m, at least 0.16 mm, using less will increase the likelihood of derailment.
When fishing for bream with a feeder, feeders should be used based on the conditions of the reservoir, the strength of the current, its presence, and so on. It is preferable to have several options of different weights, sizes and shapes, as well as the required quantity with a margin, since snags and breaks are quite common. The same applies to hooks - they are consumables that should be available. You can read about the selection of hooks in the article on our website.
You can also read about bait for catching bream.
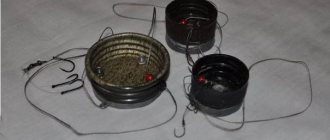
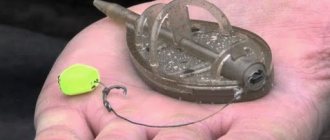
Equipment options for catching bream can be seen below.
Having determined the place where we will catch bream, we should feed the fish. To do this, experienced fishermen use special means: slingshots for casting bait, remote electrical devices that deliver and scatter bait in the right place, but usually high-volume feeders, which, when cast, deliver the mixture to the right place (at least 10 servings) to create a spot , which is suitable for fish.
After this, you can equip the working feeder tackle (paternoster) and throw it into the feeding area. You shouldn’t wait long for a bite - don’t be lazy, refresh the bait about once every 10 minutes. This will allow maintaining the required concentration of suspended matter in the fishing area.
As small fish approach, large particles, such as peas, should be mixed into the mixture, and the size of the bait should be increased. A sign that a large fish has approached is a sharp cessation of the bream's bite.
The bream should be hooked actively and sharply; you should not wait for it to swallow the bait “deeper”.
When fishing for large bream, you should use the clutch and practice jerking with the rod, waiting until the fish gets tired, and then bring it to the shore and be sure to use a landing net to place the trophy in it. There is no need to rush; even a tired fish can make a dash at the last moment, disappointing the fisherman.
Fishing methods
The methods do not differ radically from the summer or spring periods, remaining unchanged. Bream travel in schools and feed from the bottom, so the methods will be selected accordingly. Which one you choose will depend on the equipment method and approach, but it’s difficult to say that one of them is much better. The choice depends on experience or fishing conditions.
On a float rod
When it comes to float fishing, a long rod wins; a 6-7 meter blank will be just right. A 5 m fishing rod is more versatile.
Rod equipment:
- The main line is 0.20-0.25 mm.
- Leash with a diameter of 0.12-0.15 mm. The material is monofilament or fluorocarbon.
- The reel can be either inertial or inertial-free; the first option is preferable, since this is not a feeder rod and there will be no long casts.
- Hooks are used in sizes from 8-14, in rare cases they knit something larger, in No. 6.
- The distance is selected experimentally, but casting too close is also not worth it.
To the feeder
The feeder is the most common method of spring bream fishing, as it allows long casting and fishing from the bottom. Used in currents and in still water. From April to October, you can use this method without hesitation, since during this entire time it does not lose its relevance.
Having equipped the rod with a marker weight, find promising places - these will be shallows further from the shore, where the water temperature will be higher compared to the holes. Afterwards, 5-6 casts of bait are made (full feeders) to create a feeding spot.
This will allow you to lure fish to the fishing point by smell, as well as keep them in one place. In order for this to be feeder fishing and not donk fishing, casts must be made in exactly one place. To do this, immediately after finding the place, place an elastic band on the reel, securing it to the eye of the reel, and also find a landmark on the opposite bank.
Next, placing the feeder behind your back, aim at a landmark while casting. The rubber band on the reel will not allow you to unwind excess line, so you will place the feeder exactly on target. It is necessary to transfer the tackle a maximum of every 10 minutes, checking the bait and filling the feeder with a new portion of bait. If there is no bite for a long time, then you need to experiment with baits.
On the donk
Donka is a simplified version of a feeder rod. When using it, very often there is not even a fishing rod - all the gear is tied to a wooden block. There are a lot of installations, some of them using a feeder, some without it. The main line is quite thick (0.25-0.30 mm) - its diameter is not critical.
The length and diameter of the leashes are much more important. The more capricious the bite and the stronger the current, the longer the leash is knitted. We advise you to start with leashes from 0.5 m, gradually increasing its length in the absence of a bite. The same applies to the feeder, where the conditions for the size of gear are no different.
The hook size also does not differ from fishing with a float. It is advisable to pre-fed the place to attract bream. For bait, use a worm, bloodworm, maggot, sandwich (a combination of several types of bait). Read more about donka fishing
The beginning of the annual fishing
You can fish as soon as the ice melts. You can use bottom and float gear. Usually the fish is located 10-30 m from the shore. She goes for the air and smells. At first the bite is not stable. Sometimes the fisherman leaves with a catch, sometimes empty-handed. But when the water becomes warmer and clearer, the fish bite better.
We must not forget about the equipment of fishermen. A special suit must provide protection from weather conditions, be lightweight and functional.
If you know the habitats of individuals, their habits, preferences, then you can always leave with a catch. Also, you should study the nature of the reservoir itself, its bottom, the presence of currents, and depth. Optimally suitable gear, groundbait, and bait will complete the preparation of a successful fisherman.
In the spring, you should fish in reservoirs with an uneven, embossed bottom and standing water.
Here the catch is distributed evenly. Bream will definitely appear near the old reeds in search of food. It is very cunning and avoids strong currents. These are the preferences of this fish. Article on the topic: White bream and bream: differences, structural features and habitat
Universal equipment
Suitable for any type of fishing and rod, using the following recommendations you definitely can’t go wrong:
- Fishing line or braided cord - it doesn't matter to anyone. Line with a diameter of 0.20-0.25 mm, braid 0.10-0.12 mm.
- The leash should always be thinner and more delicate than the main line. A diameter of 0.12-0.16 mm is sufficient.
- It is advisable to select hooks depending on the bait. For a worm, a long forend is preferable. Color doesn't matter. Size from 8-14 rooms.
- The rod does not matter, especially for a novice fisherman. You can fish with either a bamboo fishing rod or a twig made from bushes. Much more important is fine equipment, the right bait and bait.
- For the shore, a long rod is desirable. In this case, size will always be a plus: feeder 2.7-3 m, float 5-7 meters.
- If you have a boat, read about catching bream with onboard fishing rods
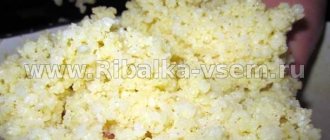
Lure
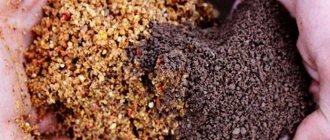
When it comes to bait, everyone can do what they can, but there are constant ingredients used by everyone and not only in the spring. This can be either a purchased ready-made option or one made at home. One of the recipe options:
- Vanilla sugar
- Sunflower oil
- Pearl barley and wheat porridge
This is not the final version yet. Next, having purchased a basic, ready-made bait, mix all the ingredients. The recipe is considered one of the best in spring fishing, perfectly attracting not only bream, but also rudd, silver bream, and roach.
Second homemade recipe:
- Wheat bran (1 part)
- Oatmeal (add a little at a time to achieve desired viscosity)
- Breadcrumbs (3 parts)
- Cookies (1 part)
- Corn, pre-shredded (1 part)
- Sunflower seeds, roasted (1 part)
Breadcrumbs have a beneficial effect: when they fall into water, they create a cloud of turbidity. It is this turbidity or dust in the form of a cloud that attracts fish. And by adding chopped worms or bloodworms to your bait, you will keep the bream in the fishing spot for a long time.
Don't forget a few important principles :
- Don't overfeed your fish. You should not throw the feeder very often or very much with large fractions. Having eaten, the bream will simply leave the place.
- What you will use as bait must be present in the bait. To highlight it, use dips (chocolate flavor, tutti-frutti, vanilla).
It’s worth taking a closer look at flavors and dips. At first, try not to use any odors; it is quite possible that spring bream is still wary of strong odors.
Only in case of long pauses in the bite should something be changed in the bait. This is where dips come to the rescue - cans with a spray and with different smells, making it possible to distinguish the bait from the rest of the food on the bottom.
Tasty and sweet smells will be just right:
- Cherry
- Vanilla
- Caramel
- Chocolate
- Cinnamon
- Strawberry
All of them are used in the summer, under the same conditions, so be sure to take 3-4 dips. But remember to use it carefully. It is enough to spray the bait 1-2 times for it to start working in a new way.
What baits are used
One of the deciding factors when choosing bait in the spring is water temperature. Before and after spawning, the bream fattens up and live bait is best suited for these purposes:
- Bloodworm
- Worm
- Maggot
- Caddisfly (larva)
- Dragonfly larva
Closer to May, when the water warms up sufficiently, you can gradually switch to vegetable and other baits:
- Corn
- Pearl barley
- Semolina
- Dough
- Boyles
- Styrofoam
It is not necessary to use 1 type of bait on the hook. Sandwich (using several types at once) gives excellent results. If there is no bite for a bunch of worms or a couple of maggots, try combining them: use a worm with maggots, or bloodworms with pearl barley.
All types of bait listed above - live and vegetable - are used not only in the spring, but all year round. When bream is picky, experiments should be carried out with bait or groundbait. Don’t forget to try dip if there is no bite for a long time - it can save the situation.