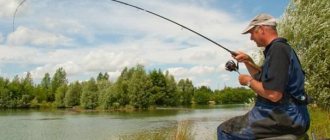
Feeder fishing has already firmly occupied its niche in the society of fishermen around the world and is widely popular among them. It is not surprising that the development of skill and perfection in this area of fishing art leads to the invention of new types of equipment, complicating their installation.
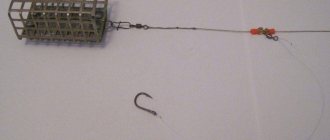
As most anglers know, the design of feeder rigs is based on loop tying. Additional elements are mounted in the loops, allowing you to equip the installation with leashes, feeders, and secure it to the main cord of the tackle. In many design options for feeder equipment, the asymmetrical loop for the feeder stands out in a special way.
The concept of an asymmetrical loop when fishing with feeders
Not every angler will call this type of equipment simple to implement and universal to use in practice. This impression was formed due to a misunderstanding of the essence of the operation of the equipment, as a result of which the distribution of this design among a wide range of feeder lovers did not receive sufficient recognition and practical application. But in vain.
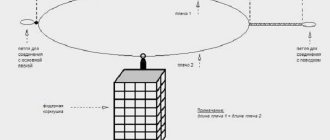
The principle of operation of this loop is based on the difference in the length of the arm of the main loop in relation to smaller fastening loops, which are located opposite each other. The longer arm is intended for mounting the feeder, and the short one is for transmitting the bite signal to the quivertip of the rod. I agree that there are difficulties in the implementation of the equipment, but they are not so difficult as to completely abandon the use of this type of installation. Most likely, in fishing conditions, trying to verify all the sizes is quite problematic due to the lack of time, but at home, spending two hours to prepare several ideal options for an asymmetrical loop, if desired, you can always find. And the time spent, with a high probability, will be well spent and will prove this by the effectiveness of fishing, while some fishermen in the neighborhood will not even see the smallest bite throughout the entire fishing.
Further, as the article progresses, I will try to clearly reveal all the secrets of knitting an asymmetrical loop for the feeder and its equipment, as well as the nuances of the proportional relationships between the elements of the equipment and point out the advantages of this installation under certain fishing conditions.
Recommendations for the manufacture and use of feeder loop equipment
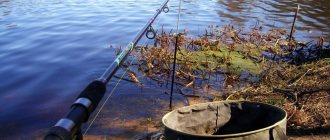
Making a loop for a feeder is simple: the main thing is to follow the correct sequence of work and do everything carefully, due to which you will be able to get a catchy net.
During the manufacturing process of the feeder, it is advisable to slightly press the swivel hole with pliers so that it takes on an oval shape. In this form, it will be easier to slide along the fishing line and not catch it when biting.
It is more convenient to throw the feeder from behind the head , and it is thrown into the same place. The tackle is heavy, so this must be done carefully, otherwise there is a high probability that the feeder will fall off.
The asymmetrical feeder loop can be used for fishing near the surface - this is suitable for fish such as bleak, bream, sabrefish or rudd. In this design, foam plastic is placed in the upper part of the feeder - it does not in any way impair the flight characteristics of the gear, but at the same time allows you to place the feeder in the surface layers of the reservoir. This will greatly increase the likelihood of biting fish species that live and feed near the surface.
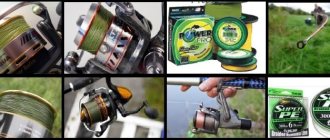
How to choose fishing line
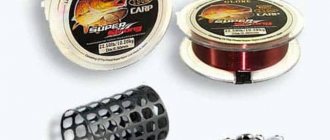
Important! This equipment works most effectively when used as a basis for tying lines with no memory and a high coefficient of rigidity.
Fluorocarbon representatives with a diameter of 0.25-0.30 mm are an ideal option . Modern fishing lines of this series have a high degree of transparency and excellent abrasion resistance characteristics, which meets the necessary requirements for feeder fishing. After all, shell rock, coarse sand and pebbles of various fractions at the bottom of a reservoir are not uncommon, and, in principle, a favorite feeding place for fish.
Also an important factor in the use of these fishing lines is the ability to maintain high strength in places where knots are tied, which is not always the case with conventional monofilament fishing line of the same diameter. Installation from such a cut of fishing line will be durable, invisible in the water and have the least shock-absorbing properties.
How to knit an asymmetrical loop
Don’t be too upset if your first practical knitting experience isn’t entirely successful. An asymmetrical loop for a feeder is indeed not the simplest element in feeder equipment, which is worth considering. There is no need to rush in this matter, since all the nuances of the work discussed below must be extremely consistent in size and elements.
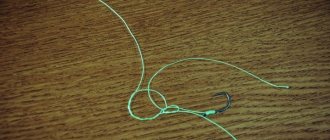
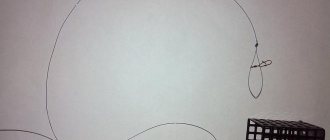
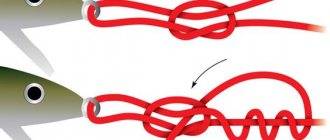
A meter-long piece of fishing line is folded exactly in half and the first small loop is knitted at the place of the fold to install the leash. A variant of the loop knot is up to the angler to choose, the main thing is that the loop is blind. The next element will be the twist. Its size should not exceed ten centimeters. This size must be observed. Twisting to a lesser extent will not particularly affect the performance of the installation, but a longer element will periodically be the culprit for tangling the feeder loop. The finished twist in the same dimensions is tied with a knot. The easiest and fastest way is eight. Now let's move on to the main part of the work, which contains the main purpose of this design.
Important! We tie the two remaining tails of the fishing line so that one of them is only two centimeters longer than the second. This difference in size is asymmetry.
We finish the knitting again with a blind loop, which will serve as a connecting element to the main cord of the tackle. The installation is now complete. As can be seen from the description, with care and accuracy, the asymmetrical loop is not so scary, but quite effective, and this is what we will talk about next.
Advantages and disadvantages of equipment
So that it does not seem that this equipment is a complete panacea for lack of bite, let’s start with some of the existing disadvantages of this installation option. As already mentioned, the main negative factor is the labor intensity in knitting a loop, this is especially noticeable in comparison with the production of a symmetrical loop for a feeder. Even with correctly connected elements, tangling of the equipment is common, which is caused by careless casting. The equipment requires an additional fastener, which serves to connect with the main cord, since the installation is knitted separately from the main thread. The angler is required to constantly monitor the gear, since self-hatching of the fish is practically eliminated. Well, now about the sweet stuff - about the advantages of this equipment.
Important! The fundamental advantage is the sensitivity of the gear to bites and, what is very important, even the smallest ones.
The feeder is located on the long arm of the loop, having a handicap over the short arm of 20 mm, allowing the tip of the rod to instantly accept any touches of the fish to the bait, which are perceived and transmitted to the tackle by the short arm of the loop. With such equipment, the use of light feeders and thin leashes is justified, especially in standing reservoirs, without fear of fish breaks, because the equipment is always under supervision. With passive biting, asymmetry is a salvation from a zero outcome of fishing.
Factors affecting loop quality
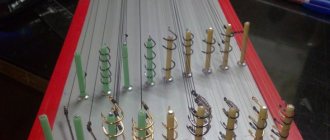
There are some subtleties that should be taken into account when making asymmetrical loops. Inconsistency of materials or incorrect assembly of the installation can significantly reduce the sensitivity and performance of the equipment.
What determines the quality of the loop:
- For installation, you must use only rigid fishing line. A small test will help determine the desired stiffness. To do this, you need to wrap several turns around your finger or pencil. A suitable line will straighten immediately, while a soft line will retain its shape.
- It is better to use fluorocarbon or feeder monofilament. The material must be resistant to abrasion and cuts.
- The length of the twist should not be from 6 to 15 cm. The length must be adjusted to suit the fishing conditions.
- The feeder must have free movement. If the feeder gets stuck or stumbles, the loop needs to be replaced.
- No matter how durable the material for making the loop is, it is necessary to monitor its condition. After 3-4 fishing trips, the loop may fray. To avoid losing the feeder, you need to replace the loop on time.
- With passive biting, the length of the sang increases. When activating the bite, you can reduce the length of the oblique loop.
- The length of the arms should not be less or more than 2 cm. As the length increases, the loop loses sensitivity. If it is less, the risk of overlap will increase.
- The leash is chosen depending on the bite activity. For passive biting, long leashes are installed. If the bite is active, the length of the leash is reduced.
- To tie an asymmetrical knot for the feeder, you need to use a looper.
Using an asymmetrical loop
Often, when fishing with a feeder, the angler, without waiting for a bite signal, begins to check the bait and discovers that it is slightly tattered or that a moth or some small component of the bait is missing. If such cases are repeated repeatedly, this is a clear sign of fish passivity. The fish touches the bait, but the weight of the feeder and the lack of timely hooking, because the angler does not see or hear it, deprive the joy of catching trophies. This situation is the moment of using an asymmetrical loop.
Read a complete guide for beginners about catching bream on a feeder and preparing equipment, as well as choosing bait and bait.
The thinness of the equipment will allow you to respond in a timely manner to the lethargy of the fish and catch it. When the bite is active, feel free to switch to installations with the possibility of self-hooking, because with this installation, an asymmetrical loop, the fisherman will simply get tired of constant sharp bites and labor-intensive hooking of fish.
Features of the asymmetrical fishing loop
What is the difference between asymmetric and paternoster? The difference is most pronounced when fishing for passive fish. When we catch cautious fish, we use long leashes (from 70 cm). In this case, the fish is more willing to take the bait. She is not embarrassed by a feeder lying at a certain distance from the hook. She first carefully tries the bait, and then swallows it and moves away from the feeding spot. There is no particular difference between a paternoster and an asymmetrical loop, as long as the weight of the feeder does not affect the movement of the fish. When the fish feels the feeder, it can spit out the bait and will not be hooked.
It is at this moment that the difference between the montages appears. When fishing with a paternoster, fish self-hook when they bite. This occurs as a result of tension when the feeder lies on the bottom and the hook digs into the mouth. If during the pull the fish does not have time to spit out the bait, then it will be successfully hooked.
When the fish shows caution and tries the bait for a long time and tediously, each time spitting it out at the slightest tension on the leash, then it is better not only to put a long leash, but also to replace the paternoster with an asymmetrical loop.
What happens when we fish asymmetrically? After each cast, we wait until the feeder falls to the bottom and make several turns of the reel, thus tensioning the main cord and the tip. After this, the feeder slides to the bottom point of the loop. When a fish bites and then carries the bait in its mouth, the feeder will simply move freely along the loop and the fish will not feel any tension until it hits its edge. At this time, the fisherman sees all the pulls and, most importantly, the fish does not feel the resistance of the feeder for a long time. This time is quite enough to make a timely hook. It is for this reason that the asymmetrical loop is considered more sensitive.
The fisherman himself decides at what moment to make the hook. And in such cases, the fish will no longer be able to spit out the bait, as in cases where it hooks itself. This is especially evident when fishing in calm areas. Small pokes of fish are better visible when caught asymmetrically.
Its length may vary. Or rather, the length of the loop along which the feeder goes. The larger this loop is, the freer the fish will feel and the likelihood that the feeder will rest against the end of the loop during bites will decrease. Therefore, when fishing for active fish, it is better to use a long asymmetrical loop, and when fishing for passive fish, it is better to use a short one.