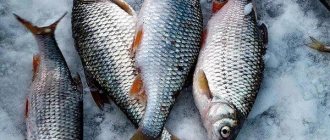
"Equipment of a float rod." It is difficult to find an angler who does not fish with a float rod. This is the simplest tackle, familiar from childhood. As boys, we made fishing rods from rowan and hazel branches, equipped them with a “Klin” fishing line, a float made of a broom or a goose feather, and caught crucian carp, roach, rudd and worms in the nearest ponds.
Many of us, remembering the carefree times of childhood, want to sit with a fishing rod on the shore of a pond again.
The need arises to assemble float gear, and this is where many questions begin.
How to choose a rod and reel? What floats and hooks should I buy? How to correctly arrange all the equipment elements?
In this article I will try to give comprehensive answers to all these questions.
Rigging a float rod - It's not that simple
Previously, everything was extremely simple: a fishing line was tied to the end of a wooden fishing rod, a float and weight were mounted on it, a hook was tied to the end, and that’s it - the tackle was ready for use.
This version of the float rod is called a fly rod, and is actively used by modern sports fishermen as the simplest option. The second name for this arrangement is a fishing rod with a blind rig.
Naturally, now few people use bamboo fishing rods. Modern fishermen have switched to fishing rods made of fiberglass and carbon fiber. But the general principle of the layout of the flywheel (blind) equipment remains the same.
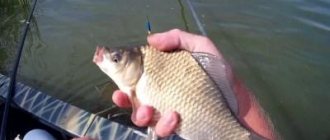
The fly rod is an imperishable classic, which is used mainly for catching bleak, rudd, roach and crucian carp.
However, the blind equipment of a float fishing rod has many disadvantages, the main of which are the inability to adjust the length of the fishing line, and the labor-intensive process of replacing equipment in case of breaks, which, by the way, happen very often.
Much more practical are telescopic rods with rings and a reel (Bolognese fishing rod). In the classic version, the reel serves solely as storage for winding and winding fishing line, and does not participate in any way in the fishing process.
It is also not used during casting. In essence, the Bolognese fishing rod is a modernized version of the fly fishing tackle.
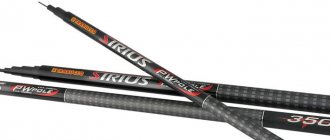
To catch large fish at long distances, so-called match rods are used. As a rule, they are made of carbon, have a composite structure, and have many rings on the blank.
In appearance, they look more like feeder fishing rods or spinning rods.
Match fishing rods are equipped with lightweight spinning reels, and sliding rigs are used.
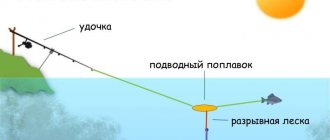
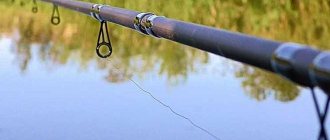
The float slides along the line, and a special stopper limits its movement. By moving the stopper up or down, the angler changes the fishing depth.
Match rods with spinning reels allow you to cast rigs very far and catch cautious, large fish. The spinning reel is also involved in the fishing process.
For fishing at distances of more than 10 meters, plug rods with a length of 15-17 m are used.
They consist of several sections, which, while landing the fish, as it is dragged to the shore, are unfastened until the extreme segment is in the hands of the fisherman, to the end of which, through a special rubber shock absorber, a blind rig is attached.
The average plug rod costs about a thousand dollars, the specialization is very narrow, so this type of float tackle is of no interest to ordinary amateurs.
As you can see, everything is really not easy. So which option is the most versatile? What kind of fishing rod should you buy, and how to properly equip it so that you can catch different fish in a variety of conditions?
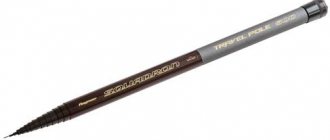
Rod with blind rig
A rod with a blind rig does not require a reel, it does not have guides, but fishing with its help gives excellent results in different bodies of water. The rod can be from 3 to 8 m long, much less often – 9 m. It is often called a fishing rod with full equipment, which is due to the length of the main fishing line and leash used (you can fish without a leash). Using a rod 8 m long and tackle 7.65 m long, you can successfully fish in a lake at a distance of 13 m, and in a river from 14 m.
The more expensive the rod, the lighter it is, but at the same time it requires careful handling at all stages. The lines used, types of equipment, floats and weights do not differ from the standard ones for float fishing.
A huge advantage of a blind-rigged rod is its ease of use. Thanks to this, a three-meter rod with a blind rig becomes the first fishing rod for six-year-olds.
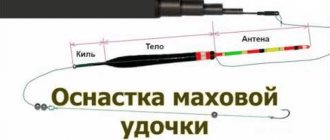
1. A rod with a blind rig has a telescopic device. The rod unfolds from the tip to the bottom segment. The number of segments depends on the length of the rod. The top can be solid, one-piece with a wire ring for tying gear at the end. It can also be hollow inside, and this version is most often used to install a tackle connector or shock absorber - inside the rod. The shock absorber makes it easier to catch strong fish. Chapped or cracked edges of the segments indicate that the rod will soon break during fishing.
2. The cork that covers the top of the rod should be made of high quality rubber or plastic because the safety of the rod segments depends on its durability and fit. The cork should provide resistance when pressed into the segment (however, much less than that of a natural cork when pressed into the bottle by a drink). If you use a plug that is too wide and press it hard, the segment may crack.
3. Standard tackle connector, firmly glued to the tip. It makes it easier to replace gear (this is done with lightning speed). To install the connector, you need to accurately match the inner diameter of the connector to the outer diameter of the tip at the attachment point. It is better to take the tip with you to the store to select the appropriate connector.
4. A well-made fishing rod has a special surface where the palm grips it when fishing. This surface prevents slipping of the palm, which is wet from bait, fish mucus or water, as well as from rain, snow, etc.
5. The rod must have a screw-on cap on a durable thread. The plug should have a drain hole for water to get between the rod segments. In addition, the plug must have a rubber insert that protects the fragile edges of the carbon fiber segments from damage.
6. The bottom of the rod should be protected by a strong attachment with a screw-on cap. In cheap fishing rods, the plug very often falls off under the influence of water or due to sand damaging the rod segments.
Float rod equipment - Universal tackle
A fly fishing rod is the simplest, but by no means the most profitable option. Match tackle is a good option, but not for a beginner. Difficult and expensive. The only option left is the Bolognese fishing rod, and it is truly the most preferable.
However, if you need truly universal tackle, I advise you to equip the Bolognese rod with an inexpensive spinning reel for match or spinning fishing.
As a result, you will get a truly versatile tackle that can be used both for fishing in the coastal zone and for long-distance fishing using a sliding float. Well, now let’s dwell in detail on those points that need to be taken into account when choosing a fishing rod.
Choosing a Rod, Reel and Line
When choosing a fishing rod, pay attention to models with a length of 4 m. No more, no less.
Rods 3-3.5 m long are too short, and 5 and 6 meter rods are too heavy and inconvenient.
The most budget option is to purchase a fiberglass fishing rod. They cost around 300-500 rubles.
But I would recommend shelling out for a very simple carbon rod.
Carbon fiber tackle is more sensitive, sharp, and most importantly, it is much lighter than a glass fishing rod. It's a real pleasure to fish with it.
You can take a budget reel, with a spool size of 1500-2500. Budget does not mean the cheapest.
Buy a simple model with 1-2 bearings, but from a well-known company (Daiwa, Shimano, Rioby, etc.).
It is not necessary that it be coated with titanium nitride on the sides; the presence of a bearing in the line roller is not important.
You will fish with a regular monk. Fishing line, unlike cord, does not impose any special requirements on the reel.
You need to buy fishing line in a 100 m reel. Why so much? There is a golden rule: after every 10 active fishing trips you need to cut off 5-7 meters of monk. This is a guarantee that the fishing line will not break at the most inopportune moment. The optimal diameter of the monofilament line is 0.16-0.2 mm.
Athletes usually use thinner fishing lines, but for a beginner it is better for the tackle to have a large margin of safety.
The fishing line for fishing with a float rod should be sinking and barely noticeable in the water. Therefore, pay attention to fluorocarbon monofilament lines.
They are more expensive than usual, but they have neutral buoyancy and low stretch, which is very good.
Now let's move on to the most interesting part - the equipment. To catch fish in windows among aquatic vegetation, it is better to use blind equipment. But if you are going to fish at a long distance, you need to use equipment with a sliding float. Let's take a closer look at each of the options.
Blind equipment
In order to properly equip your fishing rod with a fixed float, you will need:
- goose feather float;
- rubber or PVC cambrics;
- shotgun weight;
- fishing line, diameter 0.12-0.14mm;
- hook.
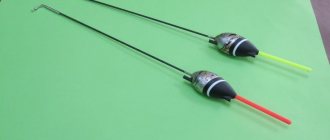
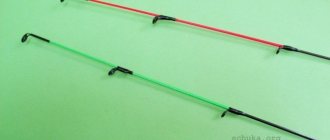
A few comments along the list. The goose feather float has excellent sensitivity and is clearly visible at short distances. The tackle equipped with it turns out to be very sensitive, you will notice even the most cautious fish bite.
Fishing line 0.12-0.14mm is used to make a leash. Its length must be at least 10 centimeters. The pellet weight is clamped either on a leash or on the main line, above the connecting node.
Hooks are selected depending on the bait used. For example, if you are fishing with a worm, it is better to tie hooks with a long shank to the leash.
But if dough or bread crumb will be used as bait, it is better to use short hooks with a wide hook and a special spiral holder on the fore-end.
Step by step, the process of equipping a fishing rod for fishing with a blind rig looks like this:
- The line is passed through rubber cambrics.
- Cambrics, with a fishing line threaded through them, are pulled onto a float of the “Goose feather” type.
- The free end of the fishing line is connected with a “carrot” or “loop to loop” knot with a leash (diagrams of the knots are attached).
Carrot knot
How to knit a carrot knot
Loop to Loop Knot
How to tie a loop-to-loop knot
- One or two pellets are clamped on the leash or on the main line. The loading weight is selected empirically. The float should appear 3-4 centimeters out of the water.
- A hook is attached to the leash.
That's it, the blind rig of the float rod is ready! This method of equipment is best used in heavily overgrown, swampy reservoirs when catching crucian carp, tench and rudd “under the nose”.
But if you want to catch carp, bream, carp or large roach, you need to increase the fishing distance and use a rig with a sliding float.
Blind equipment for a float rod
How to make a blind rig for a fly or plug fishing rod is one of the most popular questions that beginners and not only in fishing are interested in. After all, spring has come, the time for fishing in open water, and everything in your equipment should comply with fishing canons, and the blind rig of a float rod is most popular for lovers of catching small white fish. Dmitry Salapin, who kindly agreed to demonstrate it, will help you figure out how to do this at a professional, and at the same time at an amateur level.
Float rod equipment
To do this, you will need pre-loaded floats. Tools include tweezers, scissors, and a sinker puller, a silicone casing, a reel and a marker for signing equipment on the reels.
Before making the equipment, they decide on the fishing line on which everything will be mounted. The most commonly used fishing line is 0.12 mm in diameter and less commonly 0.14 mm. The 0.12mm size is thin and strong enough for fish, and strong enough to withstand currents. If you increase the thickness of the fishing line, you should also increase the carrying capacity of the float. And this is not entirely good, since the tackle must be well balanced.
If you know that you will have to fish in “strong” catchy places, where there are frequent snags on algae or grass, then the diameter will have to be increased to 0.14 mm or even 0.16 mm. Of course, if we are talking about fishing for small fish. For catching strong and large fish, such as carp, this is clearly not enough.
Manufacturing of float equipment
Tie a loop on the fishing line. There are many ways to tie a loop. Therefore, choose a loop that is familiar to you, for example, a figure eight. This will be the end loop through which the equipment will be attached to the connector of the fly rod or plug rod. The excess tail of the fishing line from the loop should be cut off with scissors.
After tying the loop, you should measure the amount of fishing line for the tackle. For example, for a fly rod, the length of the rod is minus 15-20 cm. On the plug - depending on the whale under which the equipment is tied, or tie a long equipment, and then shorten it directly on the reservoir, if such a need arises.
We measure the required length of fishing line. To do this, take something heavy, for example, a box with weights will do, clamp the fishing line and unwind the required amount of fishing line.
Attaching the float to the fishing line
Float rod equipment - float
The best way to attach a float to a fishing line is with silicone cambric, as it is soft, elastic, does not tear, does not freeze in the cold and holds the float well on the fishing line. For a long keel you will need at least three silicone cambrics. Two cambrics can be placed on a float with a keel less than 10 cm.
Cut three pieces of silicone cambric, making one of them slightly longer than the other two. If you are making a rig for Cralusso BOLO floats. As you remember, you should cut off four cambrics.
Thread the fishing line through the wire eye. If the float has a hole inside the float, then pass the fishing line through the channel in the body of the float, and put the cambrics on the fishing line in the reverse order, that is, first put on two short cambrics, and then one long one. Now you need to transfer the weights from the equipped float.
Equipping float equipment with a sinker
Float rod rig - olive
If you use an olive on pins, then you should first clamp the locking pellet, which will lock this olive from above. If it is on pins, then you should add two more cambrics that will secure the olive.
All float equipment is assembled from top to bottom. Clamp the stop pellet at a distance of 4-5 cm from the end of the fishing line and mark this place. This is necessary so that by moving the clamped pellet on the fishing line, the area where the pellet is clamped may be damaged when pinched by the pellets, and it should subsequently be cut off and not used. This way, all the fishing line that will be used in the rig will not be damaged.
The olive must be placed with the less massive part towards the top of the rig, and the thicker end towards its bottom and move it along the fishing line to the stopper. Clamp all other pellets and install them in the reverse order of their load-carrying capacity. Thus, all further installed pellets in the chain will work for anti-twisting. Clamp the pellets with tweezers and slide them along the fishing line. If you squeeze the pellet, use a device for removing pellets or use tweezers to slightly squeeze the pellet from the sides.
Loading the float rod equipment
After installing all the weights on the fishing line, you will get the following picture: a stop pellet on top of the olive, and below - a series of weight pellets, forming a kind of anti-twist. As a backup, you can install several small pellets, which can be reduced or increased depending on the fishing location. The pellets acting as a backup should also be moved up along the fishing line and the damaged section of the fishing line on which the pellets were clamped should be cut off.
Now tie a loop for the leash at the other end of the rig. When tightening the fishing line, do not forget to wet all knots. Trim off excess fishing line. Now the feeder pads can be moved down to the loop at the very bottom, and they should be finally installed while fishing. All pellets should move with tension along the fishing line, but lightly, without injuring it.
Winding float equipment on a reel
ledge on the reel
The equipment is prepared for fishing and should be wound on the reel. To do this, there is a protrusion at the end of the reel, onto which you should throw a loop of equipment, which is located next to the under-hitch. Now wind the line along one side of the reel. After the line is wound, install the float on the cambrics.
Distribute the cambers as follows: one just under the body of the float. After all, there is a hole in the float through which the fishing line passes, and it will not injure the cambric. If there is no hole in the body of the float, and the line went along the body of the float, then the cambric should be moved down a little so that an angle would not form between the line and the body of the float and the float would cut through.
Install the second safety cambric in the middle of the keel, and the third at its end. Moreover, a piece of the last silicone cambric should hang slightly from the keel of the float. This prevents tangling and overlapping the end of the keel. Slide the float along the line so that it rests completely on the reel.
Installation of cambrics
To secure the second loop to the reel, use a rubber band. To do this, pass the elastic through the loop, bend it in half and secure it to the reel. The equipment is prepared and ready for fishing.
A note about the choice of reel: it should be selected so that the body of the float is completely hidden in the reel. Then he will not be injured during transportation. Accordingly, select the length of the reel to match the length of the float, so as not to damage the keel or antenna of the float.
All that remains is to sign on the reel the data of the installed equipment, that is, the length of the fishing line, its diameter, the weight of the equipment and the date of completion of the equipment.
This is how you can create equipment for a float fishing rod.
Watch a video about rigging a float rod
You may be interested in the following articles: Fishing with a match rod on a pond and lake Match rod equipment
See you on the website Getting ready for fishing
No tail, no scales!
May 14th, 2013 | Tags: Equipment | Category: Fishing tackle