What is veki? What are the advantages? How to equip. Wiring methods.
Times change. Gone are metal spinning rods and inertial-type reels, fishing lines up to 0.6-0.7 mm thick, heavy homemade spinners with lead soldering and a length of 15 cm. Such a spinner could easily kill a careless fisherman and an onlooker on the shore. However, inertial reels and large baits remained in operation, only now at a modern level. And new baits appeared, as well as unusual methods of spinning fishing. And such methods include fishing for pike with a veki.
What is veki?
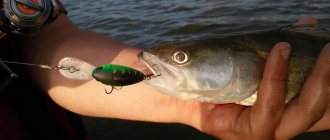
This method of fishing - wacky - is reminiscent of fishing with a float rod for an ordinary dung or earthworm. It doesn’t matter what type of worm it is or where it lives. Another thing is important: a silicone or edible rubber worm is placed on the hook in the same way as a natural live worm, that is, across . And here the bait begins to play as if the “dung beetle” or “underleaf” found in a pile of leaves in the backyard was actually squirming on the hook. This is the key to the success of the new method of fishing with a spinning rod. Moreover, it is not necessarily the gambling and inexperienced squinting fish that become prey, but large pikes are often interested in such artificial worms.
The behavior of an artificial bait, that is, a worm or a vibrotail, is too chaotic and energetic, giving the name to the bait itself. If translated from English, the method of catching a weckie sounds like this: stupid worm, stupid, crazy. And if you look closely, it’s most likely a natural worm. This similarity between the artificial worm and the natural worm in movement on the hook is precisely what causes attacks from predators even during periods when the fish are inactive and lethargic.
Tackle for fishing with weki
Since baits set transversely often fly due to their weight and are not equipped with additional weights, such fishing requires a light spinning rod for twitch fishing. In addition, the wiring method most often used is jerking, that is, twitching . But special hooks for fishing with wecks have already appeared, with a weight on the fore-end. They resemble micro jigs. However, it can be used for fishing with weckies and micro-jigs in their natural form, when a relatively long cast is required.
With the advent of fishing with crazy worms, various devices began to appear to protect baits from snagging in the so-called “toad worms,” that is, in densely grassy bays of rivers, lakes and reservoirs. And, of course, a special role is given to the protection of artificial baits when fishing in snags. Now there are hooks that have wire protection, like on spinners, where the hook is covered with metal tendrils. Offset hooks are not used when fishing with weckies. As already mentioned, there are special hooks specifically for this method of fishing.
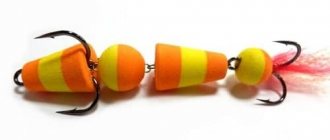
Fishing for pike in zhabovniks
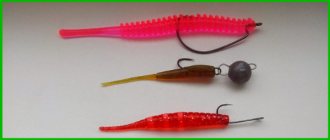
A pair of popular silicone worm rigs
Veki equipment: a visual aid to equipment
Lately there has been a noticeable increase in interest on the site in equipment for veki. And this is very good! The “abnormal” worm shows simply phenomenal results when catching predatory and semi-predatory fish. Experienced athletes who have mastered the technique of fishing with wekis say that compared to traditional rigs, this equipment is superior. Especially when the fish is very passive, or where there is strong fishing pressure.
There are already quite a lot of articles about wacky fishing techniques and I’m sure there will be even more. We still study the classic jig and sometimes discover something new, and this is a completely new equipment that only a few understand. Now I will not rant on the topic of wiring the vehicle. My task is to clearly show you how to make a rig. I think that this will not be superfluous, because before this there was only an oral description and a few photos of finished veki. I will demonstrate the equipment process on the new Keitech Sexy Impact. In my opinion, these lures are the best suited for wacky fishing.
For installation we will need: rubber band, thin threads, a hook and super glue
In principle, rigging a weckie can be simpler than the method I will discuss later: do not use a mounting ring and thread the hook directly through the body of the bait. But in this case, an expensive edible (it is advisable to use only this) will only be enough for 1-2 bites! Therefore, to save nerves and money, it is better to use mounting rings. Anything can be used as this element. The main thing is that the ring sits tightly on the body of the bait and does not fall apart when casting. I use a rubber band loop as a mounting ring. It's cheap, cheerful, and most importantly, there is no shortage of rubber bands!
We fold the elastic band and tie it with thread so that a loop is formed. Its size should be such that it tightly squeezes the body of the bait
We drip super glue onto the thread. This is for reliability.
We cut off our finished mounting ring. Doubt its reliability? It's too much. The ends are actually held together very well.
Now take a cap from super glue and put an elastic band on it
We insert the bait into the cap and pull the loop onto the body of the slug
That's it, the mounting ring is on the bait! In principle, you can already put the bait on a hook and use it on a split-shot or Carolina rig.
But you can go the other way and load the slug with a piece of clove
In order to load the bait, you just need to insert a piece of nail (it can be a cylindrical piece of lead or a self-tapping screw) into the head part of the bait (you need to sink the weight completely into the body, photo - for clarity)
All is ready! You can fish =)
Finally, I’m posting a video of the game Sexy Impact on veki:
Game of bait
Considering the active play of artificial crazy worms and the greed of pike when attacking these active baits, you must be prepared for the fact that the predator will simply swallow the bait. And it won’t be easy to get it out if you don’t have special devices at hand, such as a gapper and an extractor. You must have them on any fishing for a predator, but in the case of fishing with a weki, they are mandatory.
With this method of attaching artificial baits, when the worm or vibrotail is in a position across the hook, even a uniform retrieve, more often used in fishing with oscillating spoons, can create a very intricate game. But the best way to imitate a live worm or other active living creature living on the bottom is jerk wiring. Already when it falls into the water, the bait is very similar to a living, frightened worm that has fallen from a river cliff and is now writhing wildly in the water column. With its liveliness and naturalness, such an artificial worm attracts any autumn predator. If you compare it with baits on a jig head rigidly attached to a hook, then this is heaven and earth.
Rules for choosing electrical network elements for a wooden house
According to the PUE, the cable is installed at a distance of more than one centimeter from the internal surfaces of the building. This is necessary to reduce the area of contact of the network with wooden walls and ceilings. Wiring in a wooden house, according to the rules for electrical installations, must be located outside.
Antique electrical wiring in a wooden house is usually used with double insulation. The first layer protects the wire from the external environment. It is made of polyvinyl chloride. The second insulation is cotton or silk. It is impregnated with fire-resistant varnish.
You may be interested in the article Electrical wiring in an apartment: everything you need to know
The wire cross-section depends on the power of the lighting line. To connect a house, a wire with a cross-section of 1.5 mm is usually sufficient, but you can choose stranded copper wire with a cross-section of 2.5 square millimeters. To accurately determine the wire cross-section, it is necessary to determine the total load that is created by all electrical devices.
Cable for electrical wiring on insulators
Cable and insulators for retro wiring.
To organize antique electrical wiring, choose three- or four-core wires. According to the PUE, retro wiring must be grounded. When designing such electrical wiring, a beam circuit is required. It is important to comply with the following requirements:
- On the line for lighting, using a wire with a cross-section of 1.5 millimeters square, the permissible power is 2 kW. The total current consumed by the line should be no more than 10 A.
- For sockets you need a cable with a half-millimeter cross-section. For socket groups, the maximum connection power is 3 kW. The total current should be no more than 16 Amps.
- If in living rooms such retro wiring will not cause problems. Things may be different with the kitchen. A braid made of cotton fabric will get dirty in the kitchen, so it is better to choose wires with a rubber sheath for this room. The coating must be light-stabilized. Very often, ceramic tiles are chosen as the wall material for the kitchen area.
Antique-style electrical wiring on casters can also be installed in the kitchen, but in places where there are tiles it is better to organize it discreetly. In addition to the rules for choosing a cable, you need to pay attention to the manufacturer. Vintage cable is represented on the market by European and Russian manufacturers. Gi Gambarelli is considered the best of Europe.
In addition to Gl Gambarelli, Fontini is known, which produces rollers, junction boxes and various types of switches. The design is in vintage style. These cables are quite rigid, but their main advantage is that they have a fire certificate and are non-flammable.
It is important to know that the fire inspectorate will only accept such wiring in a house if there is a fire certificate.
Insulators
Vintage electrical wiring is installed using overhead points and junction boxes. For organization, overhead dots (rollers) made of porcelain or plastic are usually used. Each of the materials has its own advantages and disadvantages. Porcelain rollers are more expensive but last longer. In addition, they are quite fragile and can be damaged during the installation of an external electrical network.
You may be interested in the article: Connecting a kitchen hood to the mains
Plastic rollers are cheaper, not as fragile, but do not have the same visual appeal as porcelain ones. The number of insulators is not standardized, but usually such a quantity is chosen so that the wires do not sag. 1-3 insulators are used per meter of cable.
It is worth choosing rollers along with the wiring so that the insulators and cable are in the same color scheme.
Junction boxes, sockets and switches
Retro sockets and switches.
Typically, manufacturers who produce and sell elements for retro electrical wiring also offer sockets with switches and junction boxes. Here the appearance and quality depend on the manufacturer. Manufacturers from Europe are distinguished by good quality and attractive appearance, but cannot boast of a low price. Russian manufacturers offer consumers sockets in retro style. They have some pretty interesting models.
The cheapest option for organizing electrical wiring in a retro style is Chinese. Their appearance is quite attractive, but the electrical component is not always reliable, and, as you know, electricity is not something to joke about.
Rules for installing retro wiring
The stages of organizing a vintage electrical network can be divided into several stages:
- Determining the location of sockets, lighting fixtures and switches. For such retro wiring, the sockets must be at a sufficient distance from the floor.
- Determining the device connection diagram. The reliability of the electrical system depends on a properly designed circuit.
- Route markings. Marking is done using a laser level. The optimal route is selected.
- Fastening the rollers. The insulating rollers are placed at a distance of 4 centimeters from the switch, junction box or socket. When retro electrical wiring in a wooden room is pulled horizontally, then insulators should be installed more often. The distance between the rollers is a maximum of 45 centimeters. If installation is carried out in a vertical position, then the distance between the rollers can reach up to half a meter. When organizing an electrical network in a house made of timber, they are guided by the number of logs. For logs with a diameter, the insulator is installed through the log. If the log is less than thirty centimeters, then install rollers through 2 logs. When turning the wire, two ceramic insulators are used, which are located relative to each other at an angle of 45 degrees. In places where sockets, switches are installed and in the area where corner insulators are located, the wire is tied up. This is usually done with fabric material, which is removed from the remains of the twisted cable.
- Installation of mounting boxes.
- Installation of sockets. If the room has running water or heating pipes, then the distance from sockets and lighting fixtures should be half a meter or more. The minimum distance from door and window openings must be at least 10 centimeters. When connecting the cable to the outlet, you need to leave 20 centimeters for further connection. To prevent the wire from unraveling, it must be tightened with a clamp. Then the remaining section must be dismantled and the insulation removed for connection. When running wires, they must be bandaged at the points of contact with the corner insulators. This is necessary to eliminate tension in junction boxes.
- Connecting and unsoldering the cable. When connecting, you need to make sure that the wires are not twisted. All branches must be located only in junction boxes. Wires can extend from them vertically or horizontally. If the cable goes through walls, use porcelain bushings through which the cable passes.
You may be interested in the article: What are the advantages of high-quality LED lamps?
In addition to retro wiring, you can also use a combined version. Twisted wire is combined with cable channels. Trunk lines are laid in boxes, and connections to sockets and switches are made in retro style.
Wiring in retro style is a painstaking process. It is necessary to determine the location for the wire and install insulators at the required distance. The rollers are fastened with self-tapping screws through a hole in the product, so markings must be done in advance so as not to end up with extra holes in the wall later.
How to save money on retro wiring
If the cost of all electrical wiring is high, then you can make a twisted wire yourself. This will help reduce costs. To do this, you should buy a copper wire braided with fabric and twist it yourself. When purchasing, keep in mind that when twisted, the length of the wire will decrease by 30%. For independent production of twisted cable, you can use stranded copper wire (RGKM). This wire has a two-layer sheath of silicone and fiberglass. This wiring element can be used in bath rooms. When conducting such wiring yourself, it is better to twist it during the installation process. If the conductors are twisted, then after each insulator it is better to change the direction of the turn.
The cost of elements for the implementation of an electrical network in a vintage style will be considerable, but the beautiful and safe interior is worth it. Unfortunately, there are no Russian manufacturers who could provide good equipment for the implementation of electrical wiring in an antique house. From some you can buy high-quality wires, from others you can buy beautiful vintage sockets.
Due to the lack of domestic products, the price of retro wiring elements will remain high.