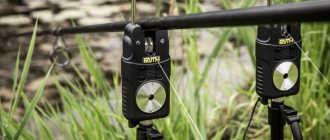
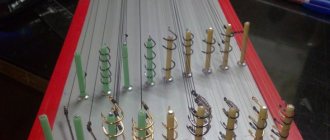
Wire feeder
Making a feeder feeder from wire is quite simple. The most important advantage is that by using wire of different thicknesses, you can replenish your arsenal with feeders of different volumes and weights.
What do you need:
- Wire made of copper or brass. Thickness from 1 to 3.5 mm.
- If the spring equipment is sliding, then you need a tube (the rod of a ballpoint pen, or a Chupa Chups stick).
- Wire cutters;
- Bend pliers;
- To wind the wire in the form of a spring, you will need a bolt or any other cylindrical object;
- To give the spring a “barrel shape”, round nose pliers are best suited.
Manufacturing process:
- Take the wire and wrap it around the bolt. The number of turns depends on the size of the homemade feeder being made. Usually 7-12 turns are enough. The wire is then bitten off with pliers.
- Next, we give the resulting spring a “barrel” shape. It is necessary to increase the central coils, and moving to the edges of the spring, gradually reduce the diameter of each coil. It is more convenient to carry out the work using round nose pliers. Excess wire is removed from the edges with wire cutters.
- Now you need to insert a tube into the spring so that the fishing line can move freely when a fish bites. To do this, a previously selected tube is inserted inside the spring, and the outermost coils of the spring are crimped with pliers.
Friends, having considered the usual options for making feeder feeders, we invite you to pay attention to the unusual ones. For example, from a plastic bottle, or from women's curlers!
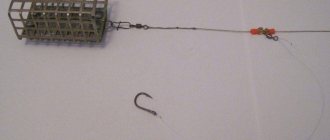
DIY metal feeder for feeder
To make a metal feeder for fishing, you will need the following materials:
- two key soft metal steel blanks and one additional;
- two pieces of wire or two bolts;
- metal mesh.
First you need to make a mold. To do this, stack the blank so that the additional one is between the two main ones; this will give the casting an ellipse shape, and it is stable regardless of the ground.
Align it to the side. To securely fasten the form, you need to clamp it in a vice with the short side up, and in the corners you need to drill a place for drilling at a distance of 10 mm from the edges on the side and top. Then we drill 6 mm through holes.
We tighten the form with stoppers made of wire or bolts. When using pins in order to get rid of play, one side is slightly ground, removing a little wire. The untreated areas are driven into the countersunk, and a thread is cut on one side. We mark and core the middle point of the stack, drill the marked place using a 6 mm drill so that about 5 mm remains before the drill exits. Additionally, you need to go through a 16 mm drill and separate the stack of plates. Again we fold the 2 main plates, connect them and compress them with a vice with the hole facing down. We cut the material along the edges with an indentation of 16 mm, but do not reach the end by the same amount.
How to properly tie a jig to a fishing line Diagram of how to learn how to tie a hook to a fishing line Tourist knots - types and methods of tying Gardner's loop for a feeder: how to tie
At the top we mark the shoulders with an indentation of 16 mm, widen the neck with a drill by 16 mm, then cut out a strip of mesh. We apply a 50 mm edge to the half of the workpiece and mark the places where the holes are melted. At the same distance on both sides, we cut slots in the halves with the depth of the mesh profile. Next, we make an eyelet out of wire for fastening and saw through two holes for the eyelet. Now you need to fold the blanks with the mesh and eyelet installed and check the tightness of both parts. At the end, we smooth out the corners and polish the roughness.
Before work, you need to properly prepare the metal:
- we melt lead or tin;
- remove scale and debris from liquid metal;
- We cast strips from molten metal.
The feeder is made like this:
- we make blanks from the mesh;
- roll them into tubes;
- We put the mesh and eyelet in half of the mold and connect them together;
- Before casting, heat the mold and fill the metal;
- cool the form;
- remove excess frozen metal;
- We disassemble the form and get a finished feeder.
Table for selecting feeder equipment according to fishing conditions
| Fish | Reservoir, bottom character | Catching equipment |
| Carp | pond, silt | |
| river, silt | ||
| river, hard bottom | , | |
| Carp | river, silt | |
| river, hard bottom | , | |
| crucian carp | pond, silt | , |
| river, silt | ||
| river, hard bottom | ||
| Bream and silver bream | pond, silt | |
| river, silt | ||
| river, hard bottom | ||
| Roach | pond, silt | |
| river, silt | ||
| river, hard bottom | ||
| White amur | pond, silt | |
| river, silt | ||
| river, hard bottom | ||
| Tench | pond, silt | , |
| river, silt | ||
| river, hard bottom | ||
| Bleak and Chekhon | fishing near the surface | |
| shallow fishing | ||
| Chub | pond, silt | , |
| river, silt | , | |
| river, hard bottom | , | |
| Vobla | pond, silt | |
| river, silt | ||
| river, hard bottom | ||
| Trout | river, hard bottom | |
| Pike | river and pond, hard bottom | |
| Zander | river, hard bottom | |
| Som | river, hard bottom | |
| Burbot | river, hard bottom |
What is the weight of the feeder for the river and for the lake
Weight is the main parameter of the feeder. It is this quality that provides the prerequisites for selecting gear. The required mass depends on the type of reservoir, or rather, on the strength of its flow.
On rivers with moderate currents, massive types of bait devices are used, which make it possible to reliably hold the equipment at a certain fishing point without shifting or rolling along the stream. Preferred accessories are made in the shape of a parallelepiped with flat weights, the large area of which allows you to press more firmly to the bottom. The weight of such products is gained by lead plates and the weight of their own metal frame.
Feeder feeders for strong currents are made squat with a low edge, which makes it possible to more effectively prevent the forces acting on it. As a rule, heavy types include devices weighing 70 grams and above. All products with less weight can be successfully used in standing and weakly flowing reservoirs. In fishing practice in lakes, trapping and feeding troughs of various shapes are used. After all, here the accessory does not need to additionally ensure its stability, and the shape can provide advantages in casting range and exclusivity in the supply of complementary food, and the low weight contributes to the collection of a thinner and more sensitive rig, which directly affects the results of catches.
It is especially worth noting that the mass and volume of the device do not always correlate with each other. Homemade feeder feeders can be made of fairly light material and accommodate a large amount of complementary food, while their own weight will be of little importance. For currents, in special cases, they make an accessory that is miniature in size, but with a solid load, stable at the bottom and with high aerodynamic qualities.
What are the requirements for a feeder feeder?
FLIGHT PROPERTIES
The feeder supplies the required amount of bait at all distances (including minimum and maximum).
The fisherman must deliver the food to the selected point with a high degree of accuracy. Often the point is located at a sufficient distance from the coast. Therefore, the feeder has a shape that facilitates long-distance casting and has aerodynamic properties.
For feeder fishing, feeders are used that differ in body size, weight, material from which the body is made, and the shape of this body.
LOADING THE FEEDER
The main requirement for a feeder feeder is that the weight corresponds to the fishing conditions.
The feeder must “hold the bottom”, lie in one place, and withstand the effects of currents. This is a rule for fans of feeder fishing on rivers with strong currents.
The weight of the feeder has to be selected according to the location, taking into account the strength of the current and the test of the rod. It is tempting to use heavy feeders within the test. But this is not the best solution. Light feeders are easier for fishermen to operate.
Some models of feeders have a variable removable load, that is, they are collapsible with replaceable weights. The weight of the feeder changes by placing a load of the appropriate weight on the body.
Manufacturers prefer to produce feeders of a certain weight, which must be indicated in the markings on the body. A self-respecting manufacturer must indicate the actual weight of the feeder.
The weight of the feeder indicated on the label is a kind of filter that separates cheap counterfeits from genuine products.
Counterfeits differ little in appearance from the original. Buying a feeder from an unknown manufacturer with parameters not indicated in the labeling (or without labeling at all) is a lottery. Experience suggests that “homemade” feeders are identical in appearance, but of different weights.
WEIGHT DISTRIBUTION STEP
Traditionally, feeder feeders are labeled based on imperial weights (ounces). Therefore, you should not be surprised if the labeling of the feeder contains designations unfamiliar to residents of continental Europe, such as (oz). According to the same British tradition, such weight distribution has a step of 7 g (or ounce).
Feeders used outside the British Isles are marked in grams in 5g increments.
VOLUME AND OVERALL DIMENSIONS OF FEEDERS
In addition to its own weight, an important parameter of the feeder is the size of the body.
This indicator determines the amount of bait supplied. Sometimes fishing conditions dictate the need to supply more food. Sometimes it is important not to overfeed the fish. Feeders of different sizes allow you to vary the amount of bait supplied.
In the marking of feeder feeders, the body size is indicated as follows:
- small-mini feeders (mini and small), which are used for bait in shallow areas;
- medium feeders (middy and medium), for fishing on the river;
- large feeders (large), for preliminary feeding (feeders).
In this case, there is no connection between the body size and the feeder’s own weight.
COLOR AND PAINTING
The color and smell should not indicate the presence of a feeder at the bottom of the reservoir. The color of the housing must match the color of the environment. The smell should either be absent or merge with the smell of the bait used.
CONTROLLABILITY
When reeling in the fishing line, the feeder should easily come off the bottom surface. This is important when you have to fish in rocky, trash-filled or overgrown areas of the reservoir. In such difficult conditions, it is preferable to use feeders, the simplest designs and streamlined shapes.
WORK QUALITY
Those who purchase branded feeder feeders have nothing to worry about. However, it is worth checking the quality of the feeder you buy.
Pay attention to the quality of feeders made from welded mesh (wire connected by spot welding). Such a feeder should be inspected for the presence of sharp protruding edges, the quality of welded joints, paying attention to movable joints.
The fulfillment of the above requirements for shape, size, weight, and type of feeder is influenced by the material of the feeder body.
DIY metal feeder for feeder
Option 1
Materials:
- Two main steel blanks 60x80x10 mm and an auxiliary one 30x80x5 mm (the material itself must be soft).
- 2 pieces of wire Ø 6 mm and 20 mm long or 2 M6 bolts.
- Metal mesh with a cell of 4-6 mm.
- If the workpieces are hardened, then it is necessary to remove the hardening.
Manufacturing instructions:
- Making a form. Three steel blanks are stacked so that the auxiliary one (5 mm thick) is between the others. This is so that the casting is shaped like an ellipse. This shape will be stable on any soil. Align along the 80 mm side. The auxiliary should be exactly in the middle. To securely fasten the mold, clamp it in a vice and weld it at the ends. Now fix the form in a vice with the short side up. The corners are marked with a hole for drilling. The distance from the edges at the top and sides is 10 mm. Drill through holes 6 mm. Tighten the shape with stoppers (2 pieces of 6 mm wire, 20 mm each) or M6 bolts. If you use pins, then to eliminate the backlash, slightly sand one side of each piece of wire by 10 mm. The unprocessed parts are driven under the countersunk into one of the parts.
- Cut a thread on one of the sides. Now mark and core the middle point of the stack. Center the drilling machine and drill with a 6 mm drill strictly perpendicular to the marked area. Drill so that there is 3-5 mm left before the drill exits. Additionally, they are passed with a 16 mm drill.
- Separate the stack of plates. Place the two main plates together again, connect them and clamp them in a vice with the hole facing down. From both edges, the material is cut off, retreating 16-17 mm from the edge, but not reaching the end of 16 mm. Now mark the shoulders on top. To do this, 16 mm are retreated. For ease of pouring, widen the neck with a 16 mm drill. A strip of 50×80 mm is cut out of the mesh. Next, you need to attach a 50 mm edge to the half of the workpiece and mark the spots for the mesh. Slots are cut symmetrically on both sides of the halves to the depth of the mesh profile. An eyelet is made from wire to which the feeder will be attached. For the ear, two sawn holes are sawn through. The blanks are folded with a hidden eyelet and mesh installed in all of them. Check the tightness of the halves.
- At the final stage, all sharp corners are smoothed out and all roughness is polished.
Preparing metal for melting:
- It is necessary to melt lead or tin.
- Remove scale and debris from the liquid metal and cast strips from the molten metal.
- For the last stage, a metal corner is used.
Feeder manufacturing:
- It is necessary to cut blanks from the mesh.
- Each mesh is rolled into a tube.
- Place the mesh and wire eyelet in half of the mold.
- Connect both halves.
- Warm up the mold before casting.
- Metal is poured from the molten strip.
- Cool the form.
- It is necessary to bite off the excess frozen metal from the mold.
- They disassemble the mold and take out the finished feeder.
Option 2
Making a form. There are probably several options here:
- Use a chisel to hollow out a recess in the board with the shape of the future feeder.
- Make a mold from plaster. In this case, a model of the “cargo” part of the feeder is made from sculptural plasticine. Then a mold is made from this model in plaster.
Preparing metal for melting
The description of preparation is similar to the method mentioned above.
Lead preparation:
- If you use a board with a mold: Place bent mesh blanks into the niche of the mold. Instead of a mesh, you can also insert bent pieces of wire. Place the wire eyelet in the mold. Carefully pour in the metal from the molten strip. Pour in such a way as not to catch the installed elements with the stream of liquid metal. It is necessary to take out the finished feeder and bite off the excess frozen metal from the mold.
- If a plaster mold is used, then the steps are similar for casting a feeder in a metal mold. There is no need to preheat the mold.
Recommendations:
- Making a feeder feeder with the first option is the most complex method.
- The second option is much simpler, but such a feeder will have several disadvantages. Of which can be distinguished by poor stability on a rocky bottom. In addition, the steel mold is the most durable.
Here are some more general tips:
- Before filling the molds, you should degrease the molds themselves and additional elements of the future feeder. The form is rubbed with graphite from a pencil. Thanks to this, the finished feeder can be easily separated from the mold.
- Additionally, the feeder elements must be tinned and coated with flux. In this option, the adhesion of lead (tin) to the mesh (wire) and eye will be stronger.
https://youtube.com/watch?v=ugCmqLQVDLE
Top 9 feeders for mid-price feeders in 2021
METHOD FEEDER
1 place
An original “delivery” of fish delicacy, and this model can be used even with a large hook.
| Options | Characteristic |
| Weight | 30 g. |
| Manufacturer | Dinsmores |
| Material | metal |
| average price | 190 rub. |
feeder feeder METHOD FEEDER
Advantages:
- unique design;
- you can quickly change the leash;
- streamlined shape (allows you to make casting more accurate);
- reliably fixes complementary foods - is washed out gradually.
Flaws:
- None.
The product fully meets the requirements of modern fishermen.
Gripper Flat-Bed Method Feeder
2nd place
This product is intended specifically for catching carp and other bottom fish.
| Options | Characteristic |
| Weight | 20/30/45 |
| Manufacturer | Middy |
| Material | metal |
| average price | 300 rub. |
Gripper Flat-Bed Method Feede
Advantages:
- hollow arcs that increase the availability of bait;
- the lead form is tightly bonded to the muddy bottom due to the heavy lower part;
- good placement of the hook (convex) - it’s convenient to let the fishing line through.
Flaws:
- None.
The model behaves well in viscous muddy bottoms, thanks to the flat bottom of one of the sides. In addition, it is aerodynamic, so it can be thrown over long distances with ease.
Mega Method Feeder
3rd place
A modern flat is a feeder with a flat base.
| Options | Characteristic |
| Weight | 70 |
| Manufacturer | ESP |
| Material | metal |
| average price | 340 rub. |
Mega Method Feeder
Advantages:
- quality;
- design;
- You can use huge carp baits when fishing;
- long service life;
- good aerodynamic properties.
Flaws:
- Use only when there is no current.
A distinctive feature of the product is the presence of a tail, which ensures correct and, most importantly, simple installation of feeder equipment.
FC Flat Method
4th place
An unusual plastic feeder, its length reaches almost 70 mm.
| Options | Characteristic |
| Weight | 70 |
| Manufacturer | VeGas |
| Material | plastic |
| average price | 120 rub. |
feeder feeder FC Flat Method
Advantages:
- easy;
- design;
- convenient operation.
Flaws:
- Buyers note the absence of cons.
This model is suitable for the flat method, according to the manufacturer.
Inline flat
5th place
A universal kit that is suitable for beginners to better master fishing with a feeder.
| Options | Characteristic |
| Weight | 15, 24, 40 |
| Manufacturer | Flagman |
| Material | plastic |
| average price | 101 rub. |
feeder feeder Inline flat
Advantages:
- The set includes three types of feeders with different weights;
- excellent aerodynamics;
- firmly adhere to the bottom of the reservoir.
Flaws:
- None.
The weight is always placed downwards, and the bait, accordingly, is always on top, which contributes to a good catch.
TURA
6th place
A modern high-quality feeder behaves confidently at ultra-long distances.
| Options | Characteristic |
| Weight | 70 |
| Manufacturer | FISHLANDIA |
| Material | plastic |
| average price | 350 rub. |
feeder feeder TURA
Advantages:
- quality;
- neat finish;
- accurate casting even in windy weather;
- ring weight.
Flaws:
- high price.
A body with such a net is intended for fishing in reservoirs where there is no strong current.
Our tackle
7th place
When diving, the model always takes the correct position due to the shifted center of gravity.
| Options | Characteristic |
| Weight | 70 |
| Manufacturer | Our tackle |
| Material | metal alloy, ABS plastic |
| average price | 320 rub. |
feeder feeder Our tackle
Advantages:
- unique container shape;
- build quality;
- durability.
Flaws:
- overpriced.
Use only where springs flow and there is a strong current. Thanks to special spikes, an anchor effect is created, so the feeder sits firmly on the bottom.
Inline Feeder DINS-ILF1
8th place
Suitable for the flat method, there is no need to create spots of bait, and you can also quickly examine the bottom of the reservoir.
| Options | Characteristic |
| Weight | 70 |
| Manufacturer | Dinsmores |
| Material | high strength plastic |
| average price | 150 rub. |
feeder for Inline Feeder DINS-ILF1
Advantages:
- there is no friction between the fishing line and the frame (it is passed directly through the frame);
- quality;
- form.
Flaws:
- None.
Use only in areas where there is no current or springs. Moreover, the model is not at all afraid of a very silted bottom.
Method Kosar
9th place
The model is designed specifically for fishing in the “Method” style.
| Options | Characteristic |
| Weight | 55 |
| Manufacturer | Carp Expert |
| Material | plastic |
| average price | 230 rub. |
feeder feeder Method Kosar
Advantages:
- good camouflage;
- available components;
- build quality.
Flaws:
- None.
Kosar is best used in reservoirs without current. As for bait, the manufacturer advises fishing with bulk mixtures and pellets.
Even at this price you can find good, high-quality equipment that will last a long time.
Feeder feeder “Bullet”
The practicality of the “Bullet” feeder is that its casting range reaches 100 meters and the spread of feed is about 1 meter. And also an important feature is that the feeder itself sinks quietly and calmly.
To make a homemade bullet feeder with your own hands, you need to:
- Polyethylene pipe.
- Styrofoam.
- Emery.
- Super glue.
- Float, rings, slings, carabiner, wire, sinker.
Making a “bullet” feeder feeder for a feeder is quite simple: cut a piece of the required size from a polyethylene pipe. Afterwards, drill holes according to the diameter. After sanding a piece of polystyrene foam, glue it to the pipe. We insert the float into the middle of the pipe, making a through hole in the foam, and glue it so that it does not fly off. We attach a sinker to the other end of the float using wire. We pass the winding rings through the holes and hook the lines. We attach a carabiner to the ends of the slings. This feeder feeder got its name “bullet” not only because of its similar shape, but also because of the speed of immersion. The bullet feeder is very suitable for currents.
To make a bullet feeder with your own hands, you can also use other available materials. For example, construction mesh, plastic bottle or curlers. To use current feeders, you need to use a heavier sinker.
It is best to take fine-grained foam, it is more elastic and lends itself best to sanding. You can sand it using sandpaper or sandpaper. The bait for the feeder feeder can be varied. It can be made from corn flour, sunflower cake or commercial bait.
So, thanks to simple skills, you can make feeder feeders with your own hands from any available materials. Such homemade products will come in handy when fishing and will save time and money. Making homemade feeders is also interesting and exciting. Have a nice rest and good bite!
Choosing a feeder for the feeder. Not everything is as simple as it seems at first glance
And this is exactly the case, not everything is as simple when choosing a feeder as it seems at first glance, especially for novice fishermen. And first of all, oddly enough, it is necessary to understand why it is needed on the feeder gear. The answer that for baiting, and as a result, attracting fish, will be correct, but incomplete. Those fishermen who use, for example, a picker or a match, which are a type of feeder, can do without feeders, feeding the place either by hand or from a slingshot. And they don’t complain about the results.
Therefore , first we will dwell on important notes or even rules when fishing with a feeder, which are not only desirable, but mandatory to know in order to use feeder equipment and tackle most effectively. So:
- On the vast majority of our rivers with any, strong or weak surface current, the flow at the bottom of the reservoir is either absent or very minimal. It follows that it is not the bottom current that pulls the feeder, but a fishing line or cord that is located in the upper layers of the reservoir. And if there is a bottom current, then on such a gravel bottom, for example, our bait will not linger, which means the feeder will be completely ineffective. And there are not many fish on such a bottom, because there is no food for it.
- In order for the feeder to rest confidently on the bottom of the reservoir, it is necessary to increase not only its weight, as it seems at first glance, but also to select the thinnest but strongest cord that will have less resistance in the water. And of course, it is necessary to take into account that the wider the bottom of the feeder, the more stable it is at the bottom. Various devices that increase the hooking of the feeder to the bottom of the reservoir are also fully justified.
- An important, perhaps even the main, requirement for a feeder feeder is maximum capacity with minimum dimensions. It is also desirable, although not always necessary, for the feeder to have good aerodynamic properties for long-distance casting. Its goal is to bring the bait to the fishing site and unload this bait. The faster the feeder unloads the bait, the faster the bait will start working.
- When choosing bait for a feeder feeder, it is necessary to take into account that light fractions produce turbidity and attract fish to the fishing site. But large fractions of the bait remain at the bottom and serve as fish food, i.e. keep the fish in the fishing spot.
- For feeder fishing, it is necessary to have a wide range of feeders for various fishing conditions and various reservoirs with fast or slow currents. Feeders are consumables; in one fishing trip you can “lose” several feeders, especially at the initial stage of mastering feeder gear.
Read the article: “Basics of feeder fishing. We complete the tackle"
The variety of types, shapes and weights of the offered feeders can confuse even an experienced fisherman. And it’s easy to verify this by going to any fishing store. But the right choice of feeder for feeder fishing largely determines the success of fishing with feeder gear. It is almost impossible to consider the pros and cons of all modifications of feeder feeders, but it is quite possible to systematize them according to certain characteristics.
First of all, when choosing a feeder you need to pay attention to 3 main characteristics:
- Design - open, semi-closed or closed feeder.
- Section - round, square or triangular.
- Weight - determines the load both on the feeder itself in the pond and on the feeder rod when casting it.
1. DESIGN
Open-type feeders have the highest bait capacity compared to closed-type feeders with the same dimensions. The bait from open feeders is washed out faster, which means they will set the “table” for the fish faster. This is exactly the task that the feeder faces, and the open type feeder copes with this task most fully. The more spacious the feeder with minimum dimensions, the better, especially at the initial stage of baiting the fishing spot.
Open feeders, as a rule, have a streamlined shape in the form of a drop, a spring, or any section considered below, but open at both ends. Such feeders have minimal resistance when pulling out the gear and are most suitable not only at the stage of mastering the feeder, but also after fully mastering the feeder gear.
briefly look at feeders in the form of a “spiral”, which we also classify as open feeders. Such feeders are most often of the sliding type, i.e. the fishing line or braid passes through the hole through it and moves from the leader to the stopper. The advantage of such feeders is their simplicity and high casting range. These feeders are most suitable for fishing in still water. Among the disadvantages of using such feeders, it is necessary to note some loss of sensitivity of the gear.
- Semi-closed type baits have a plug on one side, which slows down the process of washing out the bait. This design is most popular when the bait is not sticky enough, for example, when bloodworms or maggots are added to it. Often such feeders are used on reservoirs with medium currents or for rare castings. Such a feeder, unlike an open one, does not set the “table”, but only attracts the fish to it. Which is more consistent with the ideology of an ordinary donka, but not a feeder. The plug in such feeders provides additional resistance when pulling out the equipment and significantly loads the equipment. And this must be taken into account when choosing a test rod and spinning reel.
- Closed feeders, as the name suggests, are closed at both ends, and, first of all, have the goal of increasing the time for the bait to be washed out of it. Such feeders are more often used in reservoirs with strong currents, unless of course such feeders are cylindrical in shape. Just like semi-closed type feeders, they serve to attract fish, but in no way to set a “table” for fish. It is clear that for such feeders it is necessary to prepare bait from small fractions. Large particles of bait will remain in such a feeder.
And of course, such closed feeders can also include quite specific feeders for maggots or worms as bait, where there are not many holes and they are larger in size. It is clear that they also cannot attract fish and serve to keep them at the fishing site. Most often, such feeders are plastic and lightweight. They are most suitable for muddy bottoms because they are less prone to sinking into it.
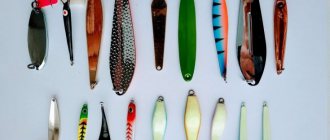
2. SECTION
- Cylindrical feeders have good flight characteristics due to their streamlined aerodynamic shape. After all, it is the cylinder of the simplest geometric shapes that has the best aerodynamics. Such feeders are most suitable for ponds with standing water or slow flow. This shape is unstable at the bottom of the reservoir, and in strong currents the cylindrical feeder will be carried away. But, we note that even if it is carried away by the current, it can be used as bait, which is successfully used in feeder fishing. Let us repeat that an open feeder with a round cross-section is most suitable for feeder fishing, and most fully solves the main task of a feeder feeder for delivering bait to the fishing spot and quickly unloading it.
- The T rectangular shape is more suitable for bodies of water with fast currents. It’s not for nothing that they say that “the faster the current, the more triangular the feeder should be.” Such feeders, even without additional hooks, hold perfectly at the casting point, although they do not have outstanding flight characteristics. Among the disadvantages, one can also note the small capacity of such feeders. Feeders that stay well on the bottom even in strong currents include feeders with a semicircular , spherical cross-section. We will not consider them separately and we will not be much mistaken if we include them in this category.
- The square shape is also good for fast currents and, unlike a triangular shaped feeder, allows you to hold more bait. The feeder holds well at the casting point, but when casting it also does not fly as far as a round feeder, although further than a triangular feeder. This is the most versatile form and is widely used by fishermen. It flies well and stays confidently at the bottom of the reservoir. This is the second shape of the feeder after the round section, which must be chosen for the feeder. And of course, pay special attention to the absence of any end caps. Think carefully about their need for the specific body of water where you are going to fish.
3. WEIGHT OF THE FEEDER
This is a very important parameter considering that fishing with feeder gear involves frequent casts. Place a light feeder, it will be carried away by the current or twisted, increase the weight - you will unnecessarily load the feeder tackle, both the rod itself and the spinning reel. And choosing such an optimal weight of the feeder can be very problematic. As a rule, the weight of the feeder is up to 60 grams, which is quite sufficient in reservoirs with standing water or weak currents. But if the current is strong, then the weight of the feeder can reach 120 grams, even without taking into account the weight of the bait.
With such a large weight of the feeder used, pay attention to the test of the rod and the quality of the rings, and keep in mind that the load on the spinning feeder will be very significant. Most often, the weight of the feeder is indicated on the weighting material, made either from a lead plate or any other weighting element.
is necessary to pay special attention to plastic feeders. Their main advantage is that they are lighter than metal ones and are more suitable, for example, for fishing on a muddy bottom - they do not fall into it. Quite often, quick-release weights can be installed in such feeders - a quick and easy option for adapting to certain fishing conditions. Less often, but still, such light feeders are used for fishing in the water column.
4. VOLUME OF THE FEEDER
Of course, in terms of volume, or more precisely in terms of filling, feeders can be completely different. But in order to somehow estimate how much bait the feeder can bring to the fishing site, and therefore, albeit approximately, estimate how much bait to prepare for fishing, we will give a few numbers. This is the size scale for a popular open cylindrical feeder from a reputable manufacturer:
- Diameter: 35 mm, length: 47 mm, weight: 10 grams, filling approximately 40-50 grams.
- Diameter: 41 mm, length: 47 mm, weight: 10 grams, filling approximately 60-70 grams.
- Diameter: 45 mm, length: 66 mm, weight: 10 grams, filling approximately 90-100 grams.
These numbers clearly show not only how much bait to prepare for fishing, but also show that a heavy feeder is not needed very often. And it will be more effective if the feeder is more voluminous with a low dead weight. And the total weight of the feeder with bait will correspond to the test of the spinning rod, and you will set the “table” for the fish faster.
5. CONCLUSION
almost impossible to examine all the types of feeders for feeder fishing in detail, but the main types that are discussed in this article will at least allow you to navigate their diversity. And knowledge of their functionality and purpose will allow you to choose the most optimal feeder for fishing in a particular reservoir. But let us emphasize once again that on the fishing conditions, including the choice of feeder.
Happy fishing!
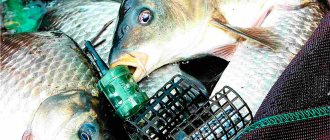
Cork feeder feeder
This method of manufacturing a bait device can be confidently attributed to the field method of a quick and simply simple option for equipping a feeder rod. To organize the work you will need an awl or a sharp nail and a knife. The materials you need are a cork from a plastic bottle and pieces of tin, which you can get directly from a used tin can while fishing; the angler always has an option for canned sweet corn in stock. Tin is used to load the product, cutting round pieces with a knife to fit the size of the cork. A hole is pierced in the bottom of the cork and the tin circles required for shipment are mounted by stringing it on a wire, gaining the mass required for fishing conditions.
The workpiece is fastened by making a wire hook, attached to the edge of the cork in a hole pierced with an awl or nail. The grooves inside the cork, made to screw it onto the neck of the bottle, act as ribs that hold the bait inside. A simple, miniature, but quite effective device is capable of attracting fish at short fishing distances in slightly flowing reservoirs, and will also help out in moments of lack of bait devices or their loss, saving fishing from failures.
DIY plastic feeder for feeder
Such feeders are usually created from improvised materials, so you do not need to look for and buy materials in stores, because every home has them. The advantage of this option is its cost and ease of manufacture.
Feeder made from a plastic bottle
Another name for a plastic feeder is Cheboryukovka. It is called after the name of its creator in the mid-2000s - Igor Cheboryukov. Cheboryukovka is famous for its simple design and ease of manufacture, literally from improvised means.
A number of advantages of such a feeder:
- floats well to the surface of the water
- variability of shape and thus achieving the functional features you personally need (any volume, feed capacity)
- ease of manufacture and availability of materials
To create a Cheboryukovka you will need:
- plastic bottles from which the body of the future device will be made
- scissors
- stapler or soldering iron
- hole punch or soldering iron
- lead sinker
- pliers or pliers
- paper clips
Good to know! So, you have decided what purpose (for what fish) the feeder will serve. Accordingly, we found out the required weight of the sinker and estimated the required volume and feed capacity.
Manufacturing stages:
- Cut blanks for housings in the form of rectangles from plastic bottles. Namely, cut off the bottom, then make a cut along the straight part of the bottle to the neck and cap of the bottle, or to the narrowing or ribbed part (if the shape is unusual). Leave only the straight part, cut off the rest
- on the resulting blanks, outline the required dimensions (length and width), mark the locations of future holes with dots
- cut the plastic according to the outline
- in cases where the feeder is large enough, you can use a hole punch to make holes
- Roll the edges of the plastic towards each other into a cylindrical shape. Staple them or solder them
- Use a soldering iron to burn holes if necessary.
- secure the sinker
On average, sizes vary from 4-4.5cm to 5.5-6cm in length and diameter up to 4cm. When unfolded, the length remains the same, but the width ranges from 11cm to 15cm. Before you start working with scissors, it is recommended to mark the dimensions with a marker directly on the plastic.
Good to know! As a sinker, you can use either specially cast ones in homemade molds or purchased in a store, or you can use ordinary lead plates, which are easily attached to the feeder. For the last option, just buy sheets of lead and cut them with metal scissors.
The length and width of such plates are selected depending on the required weight of the sinker using a simple formula:
Thickness x Length x Width x 11.34 (specific gravity of lead) = weight, g
Feeder made from women's curlers
It would seem, how can a fisherman use women's curlers? The fact is that they make good feeders, because they initially have a suitable shape and the necessary holes for feeding.
It is also worth noting that the sizes of such feeders are easily adjustable. All you have to do is use the cutters and the optimal diameter is achieved. You should choose curlers made of durable plastic that does not have a strong repulsive odor.
DIY cork feeder
Materials:
- plastic bottle cap
- copper or brass wire
- ordinary paper clip
- lead sinker
Manufacturing stages:
- cut out pieces of lead plate with a diameter slightly smaller than the diameter of the plastic plug
- 4 holes are burned in the cork
- pull the wire through the holes made and tighten it tightly
- 4-5 holes are burned on the sides. Of which 3-4 are needed for leashes with hooks, and 1 for a ring
Homemade feeder feeders from photo printing machine filters
Such filters are excellent in all respects to the future design: light and durable plastic, cylindrical shape, mesh structure.
It's quite easy to get them. To do this, you need to contact photo centers. The fact is that filters wear out and are thrown away, you just need to agree that you will take them for yourself.
Materials:
- lead sinker
- copper or brass wire
- directly filters from photo printing machines
Manufacturing:
- a bend with an eye is twisted from the wire, which is necessary for attaching to the tackle
- cut the cylindrical filter into 3 equal parts, this will become the body of the product
- We cut lead plates with the necessary parameters. They are usually 6 to 7 centimeters long and 1 to 2 centimeters wide.
- We fix the sinker and wire to the body, bending the edges of the plate
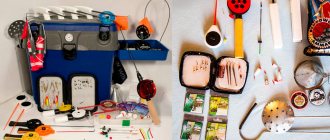
Plastic feeders
Plastic feeders are lighter. Without exceeding the rod test, more food can be pressed into plastic feeders. Good for ponds and lakes.
Feeders with wings, as in the photo, are used in areas with a clogged bottom. They float up quickly and quickly and break away from the bottom.
If the bottom is silty, such feeders with a wider base will weigh less on the bottom. However, during currents, plastic feeders create unnecessary resistance to water.
DIY floating feeder for feeder
Such feeders are suitable for fishing in muddy areas of a reservoir or when fish are reluctant to feed at the bottom and prefer to stand at the surface of the water.
Materials
There are several options for making a feeder. They differ in the material of the mesh cylinder. This can be a metal cylinder, a mesh twisted into a tube, a finished bottom feeder after modernization, or a plastic mesh cylinder (for example, large-diameter curlers).
We will consider the work plan for creating a floating feeder from the already selected cylinder. You can flatten the cylinder, making an oval section.
You will also need:
- Leash 50 cm.
- A can of construction foam.
- Carbine.
- Thick wire rod. You can use a piece of a spoke from a motorcycle wheel.
- Heat-shrink tubing.
Manufacturing instructions:
- Lace one edge of the cylinder crosswise.
- We fix the rod.
- Fill the laced edge with foam.
- We remove the foam that has gone beyond the boundaries of the cylinder.
- Cut off the tubercle of frozen foam from the edge of the feeder. A flat float is less susceptible to wind.
- Lubricate the sides filled with foam for reliability with glue.
- We paint the foam white or black.
- We attach a clamp to the rod. For reliability, we fix it with heat shrink tube.
- We attach the collar with the leash with a carabiner.
- We place the carbine itself on a 25 cm long loop made of fishing line.
Recommendations:
- It is not recommended to leave the feeder in the water for a long time. You should recast more often.
- They are caught in calm weather. It is possible in the rain, but so that there is no wind.
- The feeding mixture should float on the surface of the water and easily fly away from the feeder if it falls.
Types of feeders
There are different types of feeders, despite the differences in design, they are designed to perform the same tasks, but in different conditions.
Mesh
The design of this variety is a small cage made of mesh material, weighted on one side with a special metal plate. One of the criteria for classifying mesh devices is their shape; triangular, square, round and semicircular models are distinguished.
Feeders in the shape of a square or triangle are used in reservoirs with fast currents, since in such conditions they demonstrate greater stability and are not carried away by strong flows of water.
Based on the type of construction, all mesh models can be divided into two main groups:
- Open-type feeders are used in reservoirs with stagnant water, where they provide rapid consumption of the bait mixture at a selected point.
- Semi-closed feeders are used in areas with rapid currents, since feed consumption in them is slower and the mixture will not be carried away by water flows.
Spiral
Another popular variety is spiral feeders, the main advantage of which is ease of operation and excellent flight characteristics, which is important when it is necessary to make long casts.
The only drawback is that it cannot be used on fast-flowing rivers. The design includes a central rod through which the fishing line is passed; the device itself retains freedom of movement along it.
There are modified models that borrow design features from fixed weights: such devices are used by more experienced anglers to catch bream or carp.
All spiral feeders can be divided into the following subtypes:
- The regular feeding spiral is a special twist on the classic feeder without any additional weight. It is not suitable for large grains; this type is used for working with fine-grained mixtures. The fishing line is passed through the rod, so it can only be replaced together with all the equipment.
- The wide spiral differs from the previous version, since the design includes an elongated lead olive sinker through which the working line is passed. This feature expands the scope of application: the feeder is also effective when fishing on fast-flowing rivers.
- The bait bomb is another subspecies, the distinctive feature of which is the displacement of the load to the lower part of the structure. Fastening to the working line is carried out using a swivel. The main advantage of this option is the ability to make long casts.
- Combined feeder feeders are subtypes of spirals, usually used to equip classic English gear. They are used for carp fishing or catching trophy specimens of peaceful species.
Other types
There are also special varieties that are less popular among anglers.
Some options and their main features are discussed below:
- Feeders equipped with lugs have special elements in their design and significant loading capacity, which makes them possible to use in the most difficult sections of fast-flowing rivers.
- A sponge used in conjunction with live maggots. For some time it is placed in a container with live maggots crawling inside; subsequently it is used instead of a feeder and performs its functions. After each fishing, the sponge needs to be replaced.
- Models with porous material that absorbs the attractants used. The pores must be microscopic in order to slowly release the absorbed liquid additives into the reservoir.
- Special models for catching eels are ordinary nylon nets filled with suitable bait - grain, fish meat or chopped worms.
- Wire models are used only when it is necessary to supply a large volume of bait mixture or when fishing in reservoirs with fast currents. The low popularity is due to its large size, which negatively affects the casting distance.
Which equipment should you choose?
The success of feeder fishing depends not only on the correct choice of gear and bait, but also on the method in which the equipment was made in a particular case, so next we will consider the most well-known and common methods of equipment.
Paternoster
This equipment is often called “for lazy people” by fishermen, as it is very simple to use.
It is produced on the main fishing line, so it is done as follows:
- A triple loop is made at the end of the fishing line, that is, the knot is made three times, only after that the structure is tightened.
- Next, at a distance of about twenty centimeters from the first loop, another loop is made, but the longer one is also a triple one.
At this point, the equipment can be called ready, the first loop (smaller) is for the leash, and the second is for the feeder, and you can start fishing.
Inline
This type of equipment allows the fisherman to see approaching fish and adjust his actions, for example, add bait.
It is performed “inline” as follows:
- The main line must be threaded through the hole in the feeder swivel.
- Secure the fishing line in this state with a bead.
- Tie a loop and thus connect the leash.
With the help of such equipment, the fisherman will be able to adjust his actions along the way when he sees a specific fish, change the type of complementary food, or simply increase its volume.
Method
The main feature of this type of equipment is the relatively close location of the nozzle and hook from the location of the bait. The “method,” as practice shows, can be used both on reservoirs with standing water and on fast currents.
It has been noticed that using this method, there is a high probability of catching white fish, with the only exception being the common carp and crucian carp.
Symmetrical loop
The rigging in the form of a symmetrical loop consists in the fact that two knots of absolutely equal length are tied on the main line, in one of which a feeder is then installed, and in the second a leash.
Asymmetrical loop
Unlike the above, this type of equipment differs in that the knots tied on the main line are of different lengths. A feeder is installed in the long one, and a leash in the shorter one.
Helicopter
Such equipment will best demonstrate its high qualities on reservoirs with ultra-fast currents, and the higher this indicator, the better.
“Helicopter” is done as follows:
- One hundred twenty-centimeter fishing line needs to be folded in half.
- Having retreated fifteen centimeters from the beginning of the fishing line, you need to make a knot, maybe a figure eight.
- Stepping back from the centimeter knot you just made, you need to make another similar knot.
- You need to insert a feeder into the loop obtained from such manipulations; there is no specific method, the main thing is that it is convenient for the fisherman himself.
- It is necessary to take into account that the “helicopter” is convenient for use: the total length of the entire gear does not exceed the length of fifty centimeters.
- Finally, you just need to secure the leash between two knots using the cape method.
With this “helicopter” ready, you can get down to business.
Harvester
Anglers who used a tube equipped with an anti-twist became the inventors of a more advanced method of equipment.
So they began to attach the feeder not to the tube, but to a ten-centimeter loop, which is then further attached to the tube. This design is more convenient to use on reservoirs with a muddy bottom.
Anti-twist tube
This type of equipment is distinguished by its ease of implementation and, moreover, by the fact that when using it, the possibility of tangling the fishing line is minimized.
To make such equipment, you need to prepare the following elements in advance:
- Anti-twist tube.
- Swivel.
- Stopper bead.
Making an anti-twist tube:
- The tube needs to be put on the main line, then the bead comes.
- The line needs to be tied to a swivel, followed by a leash with a hook.
- A sinker or a feeder is attached to the clasp on the tube.
Tackle “crucian killer”
The equipment is designed for catching fish of the carp family, which suck out bait and find hooks with bait. Unlike the standard installation of a feeder with a tube, here we use 2-3 dummy feeders and leashes with hooks of 8-10 numbers. For installation you will need:
- a piece of fishing line 50 cm long, 0.25-0.3 in diameter;
- 2–3 pacifier springs;
- leashes made of soft leash material 3–5 cm long, with hooks number 8–10;
- sinker with an eye, weighing 30–40 grams;
- swivels, 3–4 pieces, depending on the number of pacifiers.
Some fishermen knit equipment on a cord, but such equipment is inconvenient to use, because when the cord gets wet, it gets tangled and a lot of time has to be spent on getting the installation into working condition.
We knit a montage for 2 pacifiers:
- a load is tied to the end of the fishing line using any convenient knot;
- a swivel is tied 2 cm above the load;
- a dummy is put on the fishing line and pulled to the lower swivel;
- 5 cm above the bottom one, the next swivel is knitted;
- putting on a pacifier;
- another swivel is knitted 5 cm higher;
- leashes are attached to the swivels;
- a loop is made at the end of the fishing line and connected to the main fishing line.
If the installation uses not two, but three dummies, then points 5 and 6 are repeated. Before casting, you need to make sure that the tackle is in working condition, fill the springs with bait and put floating attachments on the hooks.
How to make homemade feeder feeders
Often, do-it-yourself feeder feeders are made from plastic bottles. They are in every home and do not need to be purchased separately. However, this method has one significant drawback - the material is very thin. In addition, craftsmen make feeders from metal mesh, curlers, or take plastic folders. From one such folder you get about 20 feeders, but in terms of cost they are more expensive.
Let's look at how to make homemade feeder feeders from a standard plastic bottle:
- Using a knife, cut off the bottom and neck of the bottle. We get a plastic cylinder. Then we cut it lengthwise on one side, unfold the finished sheet and lay it out on a flat surface.
- The most optimal size of a plastic feeder is considered to be 6 x 13 cm. Take a marker and mark the marks for the holes in a checkerboard pattern.
- We cut out the blank, fold it overlapping to form a cylinder and secure it with a stapler or glue.
- Burn holes with a soldering iron. They can also be punched or drilled. Some people prefer drilling to prevent the plastic from warping at high temperatures.
- We apply a lead strip on the outside along the length of the feeder, tucking the ends of the lead inward. We securely clamp the loop with the fastening unit with lead. When using such a feeder, it will float up without resistance thanks to the wings formed by the lead plate and plastic.
You can make excellent feeder feeders with your own hands from women's curlers. They have a cylindrical shape and ready-made factory holes in the body. If necessary, the size of the feeder can be reduced with pliers.
There are also heavy feeder designs that are used for fishing in strong currents. To make them, you need to melt old lead and pour it into casting molds. When the lead hardens, the mold is opened and lead castings of various configurations are obtained.
Housing material
The body of feeders for feeder fishing is made of metal and plastic.
Most feeder feeders are made of metal. There are models whose body is made:
- using metal mesh (or wire);
- by stamping or casting.
Metal feeders for feeder fishing are made in the form of a cage feeder of a rectangular, triangular or cylindrical shape.
Models of feeders and bodies made of durable plastic are distinguished by a wide variety of shapes. The body is designed as:
- a plastic mesh rolled up in a certain way (Mesh Cage feeder);
- cylinder made of sheet plastic with holes (Open Ended Feeder).
Feeders with a metal body have increased strength characteristics compared to feeders of the same size made of plastic. Each of the feeders is designed for fishing in certain conditions.
Models of feeders, the body of which is made of perforated metal sheet, are used when bait is served in small portions. Experts recommend not using feeders of this type on silted reservoirs and in areas of reservoirs with a clay bottom. The junction of the feeder with the fishing line must be equipped with a swivel, although it does not always prevent tangling and twisting of the fishing line.
Models made of metal mesh are considered a classic feeder for feeder fishing. Feeders are used in reservoirs with and without current. This is a universal model of feeder, because feeders made of metal mesh are difficult to use on ponds overgrown with aquatic vegetation.
In such conditions, it is better to use a streamlined feeder made of durable plastic. This species collects less underwater grass when reeling.
Closed or open
Bait devices differ not only in geometry. Structurally, they come in two types:
- Closed. The body of the accessory is made of mesh or perforated material: the feeder cannot be completely sealed. Use such products when you want to create a trail of bait, a column of feed turbidity or an extensive feeding area. Through the cells, the loose or low-moisture mixture is washed out with water in portions.
- Open. In stagnant and slow-moving waters, use devices in which a thick, plastic nutrient composition is held in place by rigid ribs. The hook is usually pressed into the edible mass or placed on a leash in close proximity to the feed, with or without bait. Fill open containers by hand if it is a spiral type, or squeeze the mixture out of the matrix.
Designs with a removable or non-removable end cap can be classified as semi-closed options.