We do it ourselves
The tackle is made in such a way that the feeder is located at the surface. By spraying the bait mixture, it should collect fish. This principle is suitable for fishing in heavily silted reservoirs with standing water. There, an ordinary feeder buries itself in the ground when it falls and does not bring the desired result. A floating fish, on the contrary, sprays bait strictly in a certain place. Creates a cloud of turbidity that attracts fish.
The floating feeder for the feeder appeared not so long ago. Surely, in large fishing stores they are already on sale on the shelves. However, for most fishing tackle sellers this kind of gear is new. Therefore, if you suddenly want to try fishing with such a device, you will first have to make it yourself. And we will help you a little.
Here are some simple tips:
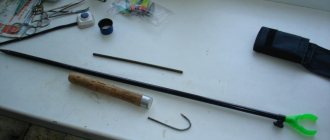
- The easiest option is to use a ready-made sliding feeder. The weight is lifted from her. Next, construction foam is blown in from below. If you don't have foam on hand, you can cut out a piece of foam or use a champagne cork. It is worth loading in such a way that at least 1/3 of the feeder is visible above the water.
- As a basis for the feeder, you can use a welded metal mesh, curlers, or anything else that is suitable in size and purpose.
- Excess foam around the edges and outside should be carefully cut off. Such a floating feeder will be less exposed to wind due to its aerodynamic properties.
- To better observe the behavior of the gear, it is advisable to paint the foam in a clearly visible color. You should not choose too bright colors, as this may scare away the fish.
- It is worth having feeders with metal and plastic bodies in your arsenal. Plastic does not make as much noise when it hits the surface of the water. Metal better withstands waves and small ripples on the water. Such a device will be more stable. In addition, it is easier to throw due to its greater weight.
By making certain feeders with your own hands, you can most accurately select the weights you use most. Over time, you will be able to make feeders for specific bodies of water.
Feeder bait and attachment
I use my own Fin Perfect Mix 1 (from Sonubaits) as it contains a high proportion of ground swelling pellet, which helps give the mix a light, buoyant feel. Another important ingredient is bran. I buy them in bulk from a pet food retailer, but you can also get them at the supermarket, where they sell them as a breakfast cereal mix. You should definitely make sure that the bran is coarsely ground, since such a mixture will fly out of the feeder better. You definitely don't want the food to stick. I take Mix 1 and bran in a 1:1 ratio and add as much water as necessary so that it is completely absorbed. This mixture is easy to prepare in a few minutes right on the shore: the more “active” it is, the better. You don’t need to take a lot of either component - one packet of Mix 1 and about the same amount of bran is enough for five hours of fishing. I experimented with many nozzles, and the oily cylinders with a diameter of 8 mm from Sonubaits have proven to be the best so far. This is a special floating pellet that you can turn into a slowly sinking pellet by treating it with a special pellet pump. Immediately after pumping, I simply leave them under a layer of water in the side trough of my platform. When installing such a “barrel” on hair, I always pierce it from the end, and not from the side, because this way it holds better and does not fall apart longer. If the pellet has an oval shape, I, for the same reasons, pierce it along the larger axis. I like the attachment on the hair to be closer to the shank of the hook - this seems to improve its grip. If you have a lot of unrealized bites, this is often due to the hair being too long. I am convinced that using a slow sinking bait will bring you more fish.
We are looking for a promising place
First of all, you need to visually assess the reservoir and identify the most promising places for fishing. Such places are very easy to identify. Sabaneev also wrote in his book that you need to look for places that are visually different from the rest of the reservoir.
Don't forget that we are fishing on a feeder.
Therefore, you should be guided by all the principles of feeder fishing:
- we throw the feeders into a strictly marked place;
- You shouldn’t wait long pauses between recasts. It must constantly “gather dust”;
- if after 10-15 feedings there is no bite, then the fishing point should be changed;
- After the first bites, it is worth replacing the metal feeder with a plastic one, as it creates less sound when falling.
We're trying to catch
After casting, set the tip of the rod towards the float, as if you were fishing with an ordinary float rod. By the behavior of the feeder, you can judge whether the fish are biting.
It turns out that the feeder is, in fact, also a float:
- There is no need to cut sharply. With this fishing method, the fish must be caught on their own.
- An ordinary feeder rod is suitable for the rod. Use monofilament fishing line as a cord. The monofilament must be strong and not sinking.
- A loop is tied at the end of the fishing line. The carbine is inserted into it. In turn, a feeder and a leash with a hook are attached to it.
It is better to use small hooks. The length of the leash is selected experimentally, depending on the depth of the reservoir and the frequency of bites.
The composition of the bait should be light and finely dispersed. Its main task is to create a cloud of turbidity in the place we need. If it is not possible to use a ready-made store-bought mixture, you can prepare it yourself. Among baits, preference should be given to slowly sinking ones. These are various types of neutral boilies, pellets and more.
DIY plastic feeder for feeder
Such feeders are usually created from improvised materials, so you do not need to look for and buy materials in stores, because every home has them. The advantage of this option is its cost and ease of manufacture.
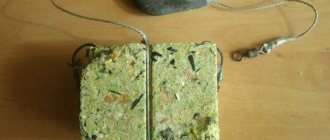
Feeder made from a plastic bottle
Another name for a plastic feeder is Cheboryukovka. It is called after the name of its creator in the mid-2000s - Igor Cheboryukov. Cheboryukovka is famous for its simple design and ease of manufacture, literally from improvised means.
A number of advantages of such a feeder:
- floats well to the surface of the water
- variability of shape and thus achieving the functional features you personally need (any volume, feed capacity)
- ease of manufacture and availability of materials
To create a Cheboryukovka you will need:
- plastic bottles from which the body of the future device will be made
- scissors
- stapler or soldering iron
- hole punch or soldering iron
- lead sinker
- pliers or pliers
- paper clips
Good to know! So, you have decided what purpose (for what fish) the feeder will serve. Accordingly, we found out the required weight of the sinker and estimated the required volume and feed capacity.
Manufacturing stages:
- Cut blanks for housings in the form of rectangles from plastic bottles. Namely, cut off the bottom, then make a cut along the straight part of the bottle to the neck and cap of the bottle, or to the narrowing or ribbed part (if the shape is unusual). Leave only the straight part, cut off the rest
- on the resulting blanks, outline the required dimensions (length and width), mark the locations of future holes with dots
- cut the plastic according to the outline
- in cases where the feeder is large enough, you can use a hole punch to make holes
- Roll the edges of the plastic towards each other into a cylindrical shape. Staple them or solder them
- Use a soldering iron to burn holes if necessary.
- secure the sinker
On average, sizes vary from 4-4.5cm to 5.5-6cm in length and diameter up to 4cm. When unfolded, the length remains the same, but the width ranges from 11cm to 15cm. Before you start working with scissors, it is recommended to mark the dimensions with a marker directly on the plastic.
Good to know! As a sinker, you can use either specially cast ones in homemade molds or purchased in a store, or you can use ordinary lead plates, which are easily attached to the feeder. For the last option, just buy sheets of lead and cut them with metal scissors.
The length and width of such plates are selected depending on the required weight of the sinker using a simple formula:
- Thickness x Length x Width x 11.34 (specific gravity of lead) = weight, g
Feeder made from women's curlers
It would seem, how can a fisherman use women's curlers? The fact is that they make good feeders, because they initially have a suitable shape and the necessary holes for feeding.
It is also worth noting that the sizes of such feeders are easily adjustable. All you have to do is use the cutters and the optimal diameter is achieved. You should choose curlers made of durable plastic that does not have a strong repulsive odor.
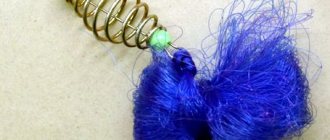
DIY cork feeder
Materials:
- plastic bottle cap
- copper or brass wire
- ordinary paper clip
- lead sinker
Manufacturing stages:
- cut out pieces of lead plate with a diameter slightly smaller than the diameter of the plastic plug
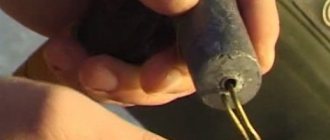
- 4 holes are burned in the cork
- pull the wire through the holes made and tighten it tightly
- 4-5 holes are burned on the sides. Of which 3-4 are needed for leashes with hooks, and 1 for a ring
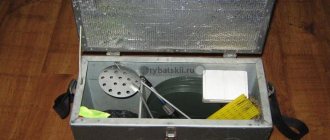
Homemade feeder feeders from photo printing machine filters
Such filters are excellent in all respects to the future design: light and durable plastic, cylindrical shape, mesh structure.
It's quite easy to get them. To do this, you need to contact photo centers. The fact is that filters wear out and are thrown away, you just need to agree that you will take them for yourself.
Materials:
- lead sinker
- copper or brass wire
- directly filters from photo printing machines
Manufacturing:
- a bend with an eye is twisted from the wire, which is necessary for attaching to the tackle
- cut the cylindrical filter into 3 equal parts, this will become the body of the product
- We cut lead plates with the necessary parameters. They are usually 6 to 7 centimeters long and 1 to 2 centimeters wide.
- We fix the sinker and wire to the body, bending the edges of the plate
A few words for
No matter how much anglers argue about such fishing, there is still some indisputable evidence that this method has the right to life:
- The ability to fish at longer distances than with a float rod.
- No additional cutting required. The fish almost always catch themselves.
- In the process of evolution, some fish breeds have learned to recognize gear for certain types of fishing. A floating feeder in this sense is a fairly new method.
- Too much spot feeding is not required. If there are no bites, you can easily change the fishing point.
- It works well when the fish lives in half-water and does not want to feed from the bottom.
- The constantly dusty cloud of tasty bait will not leave passing fish indifferent.
If you still decide to fish on a floating feeder, do not rush to run to the fishing store. By making a feeder with your own hands, you put part of your soul into the finished product. Fishing with such gear will truly bring you pleasure, regardless of the catch.
How to catch a floating rig for carp
Sometimes the carp does not want to sink to the bottom and take the bait from the bottom. There can be many reasons for this fish behavior. For example, the temperature stratification of water in calm, warm weather, when the fish basks in a warm layer. Or the presence of floating food, including that abandoned by fishermen, which the carp collects from the surface.
At the same time, anglers are mainly trying to catch carp from the bottom. To do this, use the appropriate equipment, perhaps with a slight ascent of the nozzles. If there are no bites, then the reason is often cited as an unsuccessful choice of place for unsuitable baits and bait that need to be changed.
In fact, there may be plenty of carp in the fishing area, they just move on top, the only question is the correct presentation of the bait. It must be applied to the horizon where the fish is located. Floating rigs, and the entire method of fishing with floating baits, are also called zig-rigs.
How to fish with a floating bait
When fishing for carp, if there are no bites from the bottom for a long time, at least one rod should be equipped with a zig-rig and fish different horizons in the baited area. If the carp simply does not sink to the bottom, then bites on the floating bait will not take long to arrive.
How to ensure that the bait floats to the upper layers of the water? How to regulate the amount of sub-ascent?
It is possible to use a floating attachment on a long leash. But this is not the most practical solution. It is advisable to use a float controller. It can be made from a sbirulino float or purchased ready-made at a fishing store.
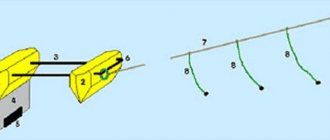
Zig-rig equipment diagram
The diagram of such a modified zig-rig with an underwater float is shown in the figure.
The float is attached to a fishing line with a leash. The fishing line runs inside the float tube, about 20 cm long. A bead is glued to the lower end of the tube, which does not fit into the ring on the sinker when casting the tackle. The ring with which the sinker is supplied can be made from the tulip of the fishing rod.