A fishing float is not only a bite alarm, but also an element of float equipment that has a multifunctional meaning, but you will find out what it is after reading...
Content
- 1. What is a float and why is it needed?
- 2. How the float works
- 2.1 Float antenna
- 2.1.1 Antenna color
- 2.1.2 Antenna size
- 2.1.3 Antenna material
- 2.1.4 Types of antennas and their applications
- 2.2 Float waterline
- 2.3 Housing (body) of the float
- 2.4 Float keel
- 2.5 Fastening elements
- 3.1 Float sensitivity
- 3.2 Float stability
- 3.3 Float capacity
- 4. What are the different forms of floats?
- 4.1 Olive shape
- 4.2 Ball shape
- 4.3 Drop shape
- 4.4 Float in the form of an inverted drop
- 4.5 Spindle float
- 4.6 Straight float
- 4.7 Flat float
- 4.8 Antennaless float
- 5. Useful video
- 6. Useful links
What is a float and what is it for?
A fishing float is one of the elements of float equipment that is attached to a fishing line (for example, monofilament).
Purpose of floats:
- Float - a bite alarm for a fisherman;
- By attaching a float to a fishing rod, the angler thus controls the depth of the bait, studies the bottom topography and monitors the location of the bait;
- Possibility of casting at a certain distance (long, medium or short).
- If you react correctly to this or that indication of the float and change it in time, then the hook will be timely, and the fish will reliably “sit” on the hook.
- They say that fishermen who have reached the highest levels of enlightenment are able to determine the type of prey based on the nature of the bite and correctly build a fishing strategy.
How does a float work?
All floats, regardless of their external design differences, have a similar structure. It is important to know the design of this accessory, to navigate the functionality of each of its parts, since this knowledge will be useful for building a hunting line depending on certain fishing conditions.
Main parts of the float:
- surface;
- underwater;
- waterline.
The purpose of the first part is to ensure that it is visible to the angler, while the waterline and underwater half are out of his field of vision. It is this half of the float body that has a different volume, which affects the carrying capacity of the float, and the part at the waterline affects its sensitivity.
2.1 Float antenna
The antenna is a continuation of the frame (body) of the float, has a design in the form of an elongated stick with a spherical tip or a drop-shaped tip and is made of different materials. The float antenna is the link between the fisherman and the float.
The main purpose is visibility of the location of the float, a message about its behavior to the fisherman during the fishing process, a bite alarm.
2.1.1 Antenna color
The color of the antenna of a fishing float is selected according to the following principle - the color should be sharply different from the color of the water in the reservoir.
The most popular colors are yellow and red. There is also a black color for the antenna, which many fishermen independently repaint their “connector”.
The angler's perception of color depends on many factors:
- light direction angle;
- degree of illumination;
- the presence of a shadow;
- fishing time, etc.
Based on this, using only red floats with an antenna in fishing may not always be favorable. The color scheme should be based mainly on the above factors.
Recommendations for using antenna color depending on fishing conditions:
- yellow and light green colors are effective in the early morning, in cloudy weather, in places with reflection, tall vegetation from the branches of which creates a shadow.
- red color - clearly visible on a sunny (clear) day, as well as when the sun is behind or to the side of the angler.
- The black color of the antenna is appropriate when the sun is located opposite the angler;
- Glowing antennas are used in night fishing.
Tip: pay attention to sets of floats; their use is convenient, since the set includes interchangeable antennas of different colors, which is very convenient for changing fishing conditions.
2.1.2 Antenna size
The size of the antenna depends on the casting distance of the equipment. So, the shorter the casting distance, the thinner the antenna should be and, with increasing range, increase in diameter. For example, every 5 m of casting requires an increase in the antenna diameter by 0.5 mm.
2.1.3 Antenna material
Stainless steel (steel) wire sinks in water, that is, it has a negative degree of buoyancy due to the excess density of water. It has a small thickness (0.5 - 1.2 mm), a length of up to 70 mm, high sensitivity and requires precision in loading. Area of application: fishing with small baits in good weather. Types of gear - plug-in float rod, when fishing at short distances, and can also be used with a fly rod.
Carbon fiber - has the same buoyancy as stainless steel, is also small in thickness, does not have light transmission, which implies use at short distances, with small baits and good lighting. As a rule, they have a length of up to 70 mm. In order to repaint a carbon fiber antenna, it must first be painted white.
Composite (fiberglass) - has different buoyancy, which depends solely on the manufacturer and composition. This material makes it possible to produce antennas of different diameters. Although they are multi-colored, they are clearly visible under different fishing conditions. Easily repainted, does not deform. Disadvantages - a thin, high-density composite works well in calm water without current, while a thick composite is difficult to balance due to its weight. Floats made of composite antennas of medium diameter are installed on a Bolognese, fly or match fishing rod, and thin ones are installed on plug tackle.
Polyethylene - has zero buoyancy, the density of such a material is almost equal to the density of water, is sensitive, transmits light, flexible, which allows you to avoid overlaps when casting, and is varied in diameters.
Polypropylene is a material with medium buoyancy, allows fishing in the current and in the bottom method (dragging along the bottom), has average sensitivity, is usually manufactured in medium and large diameters, has poor transparency and insufficient visibility.
Bamboo is highly buoyant, since the density of bamboo is higher than the density of water. Shows itself perfectly when fishing in windy weather and in currents. It has good visibility, but has a low degree of sensitivity, which allows you to miss a bite. It requires care and protection from water by impregnation, since, by absorbing moisture, it reduces its load-carrying capacity.
2.1.4 Types of antennas and their applications
What antennas and how to use:
- A thin antenna is used for fishing with small baits;
- Thick float antenna - for fishing with large baits;
- Long antenna – suitable for plug and match fishing;
- Short - effective for catching fish that live in the water column;
- Flat antenna design – suitable for fishing with plug tackle in the current;
- With a flared tip - great for long-distance throwing;
- With an extension in the central part - for bottom fishing with an anchored bait.
2.2 Float waterline
Waterline is the place separating the surface and underwater parts of the float, indicated by a line.
The position of this line depends on the following characteristics:
- Float shapes;
- Load capacity;
- Weight of the weight.
That is, if you change the weight of the load, then accordingly the waterline will change its position, on which the sensitivity of the fishing float depends, that is, the visibility of the bite when the float is in the water.
2.3 Housing (body) of the float
The body (body) is the central part of the float, which is responsible for buoyancy, therefore only lightweight materials are used in its manufacturing process. The keel gives the float stability on the water.
2.4 Float keel
It is interesting that many amateur fishermen do not pay special attention to this detail, but in vain. The float keel is one of the parts of the float that performs a number of special tasks:
- tying the float and fishing line;
- stabilization of the float on the water;
- maintains its balance under all fishing conditions, including the impact of equipment elements;
- quickly puts the float in a vertical (working) state, that is, a bite state.
Float keel characteristics:
- material;
- length;
- diameter;
- buoyancy.
As for the material used to make this part, it is identical to the material of the antennas.
The diameter and material directly depend on the fishing conditions. The main task of any keel is the ability of the float to quickly return to its original, ready-to-signal state. Keels with the lowest degree of buoyancy and made of wire, aluminum, carbon fiber, and fiberglass are excellent for this. Such “heavy” keels help to instantly stabilize the float in windy weather and when manipulating the equipment.
When using a metal keel, you need to consider the following important points. Firstly, the weight of this element requires the use of less loading weight.
Secondly, the center of mass changes, which gives an additional opportunity for the float and weight to rotate, which can provoke unwanted overlap of the equipment. All these circumstances reduce the possibility of casting over medium and long distances.
Thirdly, if you are fishing at significant depths and fishing, then due to the reduced weight of the load, the bait takes longer to sink to the intended depth and all this time the equipment is in motion, swimming a considerable distance, which is absolutely not necessary for you. To avoid this phenomenon, floats with a larger load capacity are used, but this makes the equipment crude.
Conclusion: a metal keel is suitable for specific, extreme fishing conditions.
If you choose a float with a long keel, remember that the advisability of using an extended keel depends on the depth. For example, if you are fishing in shallows or in the upper layer of water, then an elongated keel will hinder you, since it will quickly take the desired position, while the bait has not yet had time to descend to the desired point. Under such circumstances, you will miss the bite. The opposite picture awaits you when fishing in windy weather and waves. Here a more serious load is required, which will ensure the balance of the float thanks to the heavy keel and the rapid immersion of the bait.
The maximum dimensions of a metal keel do not exceed 12 cm; a larger size will not allow it to be balanced, but keels made of fiberglass and carbon fiber are from 10 to 20 cm (standard length).
The thickness of the keel should be equal to the thickness of the antenna.
Recommendations if you choose a float based on the keel diameter:
- The small carrying capacity and compactness of the float body (for example, a drop float, a needle or a float in the form of a spindle) requires the use of a thinner keel with an average length, made of carbon and fiberglass 6-14 cm, and less from metal.
- The shape is in the form of an inverted drop or spherical - the keel is larger in diameter and no more than 16 cm long.
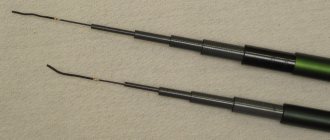
2.5 Float fastening elements
Options for attaching a fishing float to a fishing line
Passage rings are provided for attaching the float to the fishing line. The specific location of the rings on parts of the float is important when fishing on water with a current in order to hold the bait at one point.
Some float models have, instead of rings, a recess that runs along the float body. This type of fastening is intended for cases of catching trophy specimens with heavy loads.
DIY float
Experienced float fishermen often encounter a situation where they cannot find the desired float on sale. In the sea of consumer goods there is simply not what you need - either there is no balance, or everything fits but the buoyancy is not the same, etc.
In this situation, only making a float with your own hands will help. How to make a float? — Let’s look at the recommendations given on this matter by the famous sports fisherman Andrei Yanshevsky. According to these recommendations, the process of designing and manufacturing a float is approximately as follows.
The float is based on balsa
Balsa wood is best for making a float. The material is durable, lightweight, and well processed. Balsa can be purchased in stores for aircraft or ship modellers. It is sold in the form of boards of various thicknesses.
It is important to choose a board with a uniform density over its entire area. Visually this can be understood by the structure of the wood. The more uniform it is, the easier it will be to process the material. Balsa with a density of about 0.11 - 0.12 g/cm3 is best suited.
Other materials for making a float
In the same store you can immediately purchase other materials for making a float.
- Straightened steel wire 0.5 - 1.0 mm.
- Rods made of carbon fiber or fiberglass with a length of 1.0 m and a diameter of up to 1.0 mm.
- Varnish called “Emalit” or nitrovarnish NTs222 or NTs228.
- 1 liter of urethane varnish (called “Yachting varnish” or “Yacht varnish”.
- Acetone, white alcohol.
- Glue "Moment" or similar.
- A little wire with a diameter of 0.2 mm for making rings.
- Acrylic paints of different colors in small packaging. They can be purchased in stores for artists, schoolchildren, and home crafts.
The average cost of materials for the manufacture of one float will be only 3 - 4 rubles. But if you stock up, with the expectation of making many floats, you can spend 1000 rubles.
Tools used
To process balsa, similar to how it is done on a lathe, you need an electric motor with a power of 90 - 200 W with a chuck. An electric drill can also be used as a motor, although it is quite noisy. If an electric motor is found, it must be mounted on a frame, for example on a wooden block.
The engine is converted into a lathe as follows. A piece of an ordinary pencil is fixed in the cartridge, onto which a silicone tube of suitable diameter is placed. The float blank will be inserted into this tube during processing. You will also need:
- sandpaper of various sizes;
- sharp knife;
- wire cutters;
- drills with a diameter of 0.3 - 1 mm.
Next, we will consider the design of the float and the selection of its components - the keel and the float antenna.
Keel selection
The keel of the float must have a certain length and mass. By selecting the keel, the float is balanced. By lengthening the keel or using thicker wire to make it, we increase its mass and shift the center of gravity down.
The general rules are as follows. The lower the center of gravity of the float, the better. But the downward shift of the center of gravity is limited by the length of the keel and other parameters of its buoyancy.
For floats with a buoyancy of 1.0 - 1.5 g, the keel mass, as a rule, should not exceed 20 percent of their carrying capacity.
As buoyancy decreases, this percentage increases. On very small floats, the keel mass can already reach 70 - 80% of the buoyancy. This is done so that with very, very light rigs, there remains the possibility of casting and manipulating the tackle. In this case, weight is added to the float itself in the form of a massive (relatively) keel.
To make the keel of light floats, fiberglass is often used rather than metal, so that with such low weights the diameter and length are not too small.
For metal keels, wire with a diameter of 0.5 - 0.8 mm is usually used. The thinner one is not used for the reason that it is not very strong and bends. On large elongated floats it is possible to use wires with a diameter of up to 1.5 mm.
It is necessary to plan a keel that is obviously longer than necessary, so that later it can simply be shortened when balancing.
Question about gluing a keel into a floating body
To what depth should the keel enter the floating body of the float? The general recommendation is that the keel should fit into the body of the float by about a third of its length. But naturally, for different forms of a floating body, this parameter can vary greatly.
For elongated floats, the gluing depth is reduced, but still should not be less than 20 mm. For spherical floats of low buoyancy (less than 0.5 g), the keel can also be docked with the antenna.
Selecting an antenna for a float
What is the best material to make an antenna for a float from? For very small floats, when fishing under the surface of the water, or with very careful bites, the antenna can be made of metal, i.e. it may be a continuation of the keel.
- To make a float antenna, you can also use fishing line of the required diameter. But first it needs to be straightened. Straightening the fishing line, i.e. Removal of internal stress occurs when it is heated.
How to straighten a thick fishing line? Bring some water to a boil in a frying pan. Then pieces of fishing line are placed in it. When heated, the line will bend from side to side as it floats in the water. But the water will soon evaporate. Therefore, it is necessary to determine the moment when there is no more water and the line has straightened. At this time, cold water is poured into the frying pan and the fishing line “freezes” in a straightened position.
- You can also use boar bristles to make an antenna, which is even better than fishing line. But both of these materials have one very significant drawback - they do not paint well.
- Bamboo is an excellent material for making a float antenna. It has more buoyancy than plastic, which is a good thing. On sale you can find bamboo toothpicks, as well as impressively thick grill skewers. Bringing bamboo sticks to the required condition is very labor-intensive. But this process is simple and it is possible to do it yourself.
As in the case of the keel, initially it is better to glue in the antenna with a margin of length.
How to make a balsa float body
First you need to cut the blanks from the balsa board. To do this, the board is drawn to the required dimensions and cut with a sharp knife. The result will be rectangular bars. Then the edges are removed from the bars with a knife, and they are given a rounded shape in cross-section.
After this, they begin to grind the workpieces with sandpaper. The float blank is tightly inserted into the silicone tube on the electric motor. The engine starts up and the workpiece rotates.
When starting, you need to hold the free end of the workpiece with your left hand so that it does not fly out of the mount. Processing begins with sandpaper from the free end in order to grind it down to a cone and get a second centering point there for further processing. In this case, the workpiece is held against beating with the left hand, and the processing is performed with the right hand.
When the cone at the free end of the floating body of the float is formed, they begin to grind the balsa along the entire length, giving it the desired shape. In this case, the left hand centers the rotating workpiece, and the right hand does the processing using sandpaper.
The workpiece is cut with either sandpaper or a knife. After such treatment, it will have a fleecy, rough surface, which makes no sense to clean; when priming, the pile will still rise.
Next, the process of drilling a hole for the keel in the end of the float body is performed.
The drilling itself is performed with a drill with a diameter 0.1 - 0.2 mm smaller than the diameter of the keel used, to the depth the selection of which was discussed above. The drill is carefully brought to the rotating workpiece and slowly centered. When drilling, the process of self-centering of the drill will already occur.
After this, the selected keel is lubricated with “Moment” type glue and inserted into the drilled hole. After the glue has dried, the keel is clamped in the chuck and the balsa is drilled under the antenna on the other side. In this case, the drill is selected in exactly the same way and the selected antenna is glued in.
As previously mentioned, it is better to select the keel and antenna with some excess length, so that they can then be shortened if necessary. The result should be an almost finished unpainted float.
Primary primer
For the primary primer, nitro varnish is used, diluted with acetone to the viscosity of water. The float is lowered by the antenna into a long and narrow container with diluted nitro varnish, and immediately slowly removed. In this case, air bubbles will be released from the pores of the balsa.
After priming, the float is dried until the varnish is completely dry. To do this, the keel is simply stuck into something suitable.
Now it’s time to remove the lint and polish the body. This is done with the finest sandpaper, very carefully and without pressure.
Then a ring for the fishing line is glued into the body of the float. It is bent from wire on a drill with a diameter of 0.5 - 0.8 mm. The drilling diameter for it is selected slightly smaller than the wire itself.
It is also useful to re-prime. If air escapes from the pores again, which is possible when using very porous and light balsa, as well as when the varnish is too diluted, then a third primer will be needed after the float dries again.
Priming and painting
For final priming, it is recommended to use a thinned urethane varnish. It can then be painted with nitro paint.
But you can also prime with acrylic paints. And then apply urethane varnish. True, in this case the paint layer will be thicker. Therefore, the method is not entirely suitable for very small floats.
The following selection of paints by color is recommended. The body itself can be painted in soft colors - brownish or silver. But the coloring of the antenna largely depends on its depth during fishing. If the antenna is completely above the water, it is painted with bright colors along its entire length. If it goes deep, then the underwater part is painted black, and the surface part is painted yellow, orange, and red.
Balancing the float
Balancing is done after the paint has completely dried - when the mass of the float has already been established. The balancing process is performed by trimming the keel to the desired length. The figure shows a balanced float.
Another option for making a homemade float - this time a buoyant heat made from extruded polystyrene foam. Today, this material is already inexpensive and widespread (in any hardware store). Therefore, such floats are cheaper, but processing the material is more difficult...
What are the different forms of floats?
The stability and sensitivity of the float depends on this parameter.
4.1 Olive shape
It is a universal form of float, as it is applicable both in water with and without current. A float with this shape is resistant to water and wind.
Where are olive-shaped floats used and with what weight:
- 0.5 – 1 g – standing water, water with a small river current and a depth of no more than 2 m;
- 1 – 3 g – at a depth of 3 m, and at an average flow speed at a depth of 1.5 – 4 m;
- 4 – 6 g – with medium and strong current at a depth of 4 to 7 m.
4.2 Ball shape
It is one of the universal fishing floats.
Where is a ball-shaped float used:
- on currents of varying intensity;
- in standing water;
- in windy or calm weather.
The downside is that it is less sensitive than an olive float.
4.3 Drop shape
The center of gravity in such floats is shifted downwards due to the thickening of the shape of the float body at the keel. Thanks to this, the float is stable in water with an average current speed. Excellent for all types of float rods and for fishing at depths of 1.5 m or more.
4.4 Float in the form of an inverted drop
If fishing takes place on a deep-water river with an area larger than the average size with any current, then floats in the form of an inverted drop will turn out to be, by the way, and if you use a float on Bologna gear for the purpose of free floating of the float, then this is the best choice for such conditions.
4.5 Spindle float
Cigar-shaped floats or spindles are not afraid of water ripples and strong winds. They perfectly show the most capricious bite.
Advantage of floats:
- when fishing with a hold, which happens exclusively with Bolognese tackle, the float does not come out of the water and the angler records bites;
- work at a depth of 0.5 - 2 m.
For reference! Hold fishing is a method in which a float with Bologna equipment floats at a speed lower than the current speed, which allows the bait to move more slowly relative to other underwater inhabitants and the fish distinguishes the bait from the general picture and “bites” on it.
Disadvantage - in case of strong waves of water, current and wind, a float in the form of a spindle with an elongated body is not used due to its instability under such fishing conditions.
Despite this drawback, a spindle-shaped float can have different shapes of keel, antenna and body, which allows the fisherman to choose the right float for specific fishing conditions:
- a float with a long body and a medium keel is used for fishing in water without or with a weak current;
- a float with a short body design and an elongated keel is used in windy conditions, but in water with a slight current.
Also, the choice of float depends on the type of bite:
- a float with a short antenna works to catch a bite;
- A float with a streamlined shape and a medium antenna is universal.
4.6 Straight float
This form of floats can be used when fishing in small ponds (lakes), the depth of which is no more than 2 m. However, the disadvantage of this form is that a straight float will not withstand the test of bad weather (for example, wind).
4.7 Flat float
Disc-shaped, fastened in the form of a keel mounted on the body at an angle of 45 degrees. Stable in any current.
Flat floats are used:
- when fishing with plug tackle in a body of water with a current. The essence of using this type of float is that the fisherman holds the equipment at one fishing point and at the same level with the tip of the tackle;
- when fishing with a rod and reel, close to the shore.
The peculiarity of the float is the accurate registration of bites during the current, due to its shape, due to which the float is less susceptible to pressure from the water, which is compensated by the fishing line and the keel maintains its vertical position above the water surface and is visible to the fisherman.
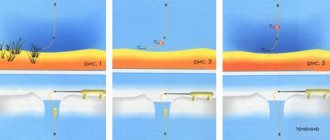
4.8 Antennaless float
A float without an antenna is a dibber. Refers to floats that work on the surface of the bite, ideal for fishing in shallow water areas and for long casts. Used in carp fishing, crucian carp and bream fishing.
When properly loaded, the float is not visible to the fisherman, since its body is hidden in the water column, and the equipment is at the bottom.
How an antennaless float works - as soon as the fish swallows the bait, the float rises to the surface, which is a bite signal.
Float body
There are two main body shapes - spherical and elongated needle-shaped. The spherical shape is used in reservoirs with a current, if when fishing in baited or local places it is necessary to keep the bait in one place without drifting downstream. The round shape prevents the float from “emerging” from the water (a prerequisite is that the passage ring must be located on the body).
The needle-shaped shape is used in calm bodies of water without current. Such floats are the most sensitive to bites, but, unfortunately, they are the most sensitive to external influences.
Therefore, to achieve a compromise between maximum sensitivity and minimum exposure to external factors, a transitional teardrop shape is created. It is the drop-shaped shape that is the most common and, in my opinion, the most universal shape of the float body.