Features of the hinged transom for PVC inflatable boats
When buying an inflatable boat, it is worth remembering that additional elements are rarely included in the package. Often lovers of water transport want to make a real full-fledged vessel out of their boat. In this case, it is worth equipping the boat with a motor. Since it is unsafe and inconvenient to attach a motor to an inflatable surface, a hinged transom was invented - a T-shaped design that allows you to equip the boat with a motor.
What types of mounted transoms are there?
When choosing a mounted dance, you should be guided by several aspects:
- the quality of the transom must be at a high level, which will increase its reliability;
- correct fixation of the motor in the working position;
- affordable price category.
There is no division of transoms into specific types; the distinction between them occurs due to the price category, the materials from which they are made and the manufacturer. You need to choose a transom very carefully, without being tempted by the low cost.
If the transom or fasteners break, you can lose the motor, put a hole in the boat with its propeller, and get injured. In order to extend the life of the transom and the safety of boat passengers, it is worth choosing the right motor, the power of which will not exceed the permissible norm (5 l/s).
There are a few important things to keep in mind when attaching the canopy transom:
- the stern of the boat should be shaped like a trapezoid;
- There should be a straight section at the end of the boat.
Mounted transoms are made of special plywood with a special waterproof coating. If you choose the wrong transom, it can lead to disastrous consequences.
Homemade transom for a PVC boat
If you have a working tool and a little tinkering skill, making a mounted transom for a PVC boat with your own hands is not difficult. Materials for homemade products are easily available for sale, and the dimensions and drawing of the transom for the boat can be found on websites, in thematic magazines, etc. You can also design the mounting structure yourself, the main thing is to correctly calculate the dimensions so that the device is both conveniently attached to the boat and securely holds the motor.
In addition, the transom must be designed taking into account the following criteria:
- Sufficient strength - the device should not be deformed or loosened by the operation of the motor.
- Water resistance - the boat is constantly in contact with water, and to ensure that the transom does not lose its original properties, it is necessary to use water-repellent materials with protection against corrosion processes.
- Plate thickness - calculated according to the motor power, see above for more details.
- The wear resistance of fastenings is an equally important parameter, since flaws in fastening elements can lead to engine failure and even capsizing of the vessel.
You might be interested: Boat navigator - how to choose, main characteristics, popular brands
Only full compliance of the device with the parameters presented above will ensure proper operation of the motor and safe stay on the boat. Having decided on the appropriate materials and necessary tools, you can proceed directly to making the product. The transom manufacturing process itself is simple and is carried out in several stages.
- Sizing and drawing development. As already noted, these procedures can be simplified by taking ready-made solutions from the Internet.
- Making a plate. Durable and waterproof materials are suitable for the transom board: plywood, metal, plastic. The thickness and dimensions are calculated according to the parameters of the boat and motor. It is also worth noting that the edges of the plywood should be sanded down with sandpaper, or even better, trimmed with a rubber layer so that over time the PVC fabric does not rub against the edges of the board.
- Work on fastenings. It is better to use steel tubes as the material. In this case, the fastener arms are bent manually, and the transverse tube is welded. Such fastenings are used together with eyelets (bosses).
- Transom plate fastener. Here a bolted connection is prepared for mounting the board to the mounting arches or reinforcement.
After making all the parts, all that remains is to assemble the components together and install the made PVC boat transom with your own hands directly on the hull of the vessel. And how to do this correctly, read in the next section.
Types of mechanical impacts on the transom
The mounted transom is affected by motor forces:
- pushing force;
- engine gravity.
The impact of these forces leads to the fact that the transom begins to exert pressure on the boat at two points. At the bottom of the mount there is a pushing force, and at the top there is a pushing force in the opposite direction.
A negative impact on the transom and the boat is increased vibration, which occurs due to the operation of the motor. Such an impact can lead to loosening of bolts and nuts, which can simply unscrew. In order to protect the transom from such impact, lock nuts or lock washers should be used.
Boat transom thickness
For the safe and efficient use of an inflatable boat, the technical characteristics of the transom itself are important. First of all, this concerns its thickness, the angle of inclination during installation, as well as the quality of the transom coating.
When it comes to the thickness of the transom, the main role is played by the maximum power of the engine that will be installed on the boat in the future. For example, if you plan to install a motor with a power of up to 15 hp, then the transom should have a thickness of at least 2.5 cm. If the motor used is even more powerful, the thickness should be 3.5 cm or more.
Dimensions
Today, the size range of transoms is standardized in the world and consists of the following elements:
- height 381 mm – S;
- height 508 mm – L;
- height 635 mm – XL.
Each height has its own motor size, respectively. For PVC boats, only the size range of category S is used, while size L is intended for boats, and XL is for large yachts.
In order for the transom on inflatable motor boats to be absolutely safe, several important points should be taken into account:
Popular mounted transoms and their prices
Today there are three most popular models of mounted transoms from different companies:
- The hinged reinforced Limar transom has a high-quality fastening that ensures absolute reliability and safety. Price of such a transom: 30-40 US dollars.
- Mounted transom SEA-PRO. This type is somewhat cheaper, its price is only 20 US dollars, but the quality is also at a very high level.
- Domestic brands. Of course, buying a transom from a domestic manufacturer is much cheaper; you can find the device for as little as $5. There is no significant difference in quality (with the same price category) between foreign and domestic.
Before purchasing a transom, you should carefully inspect it for cracks and other imperfections. Even a small hole can lead to negative consequences, so you need to check everything in advance.
How to choose a PVC boat with a hinged transom
When choosing a PVC boat, you need to follow a number of tips that will help make the task easier:
- Decide what you need a boat for: if for walking along the river along the shore, and for swimming short distances, a boat made of unreinforced PVC, which is also used for mattresses, children's inflatable balls and armbands, is perfect. If the purpose of buying a boat is to travel on the open sea, hunting, fishing, then it is better to choose a boat made of reinforced PVC. This material is much stronger and will be more susceptible to holes when colliding with stones.
- It is important to assume in advance how many people the boat will carry. Based on this, the following criteria can be distinguished: for one person a boat up to 3.3 m in length is suitable, for two – from 3.3 to 4.2 m, for a trip of three – over 4.2 m.
- Decide what is more important: ease of transportation or quality and comfort while sailing. This is due to the fairly large weight of the boats, to which, in addition to the main elements, the bottom is added. In turn, it can be either inflatable (light enough, but not stable during swimming), or aluminum or made of waterproof plywood.
How to make a hinged transom for a PVC boat?
To form the hinged element, you must use the following materials:
- A reliable plate, the size of which is 18-24 millimeters.
- The base is in the form of a metal section.
- Latch in the amount of 2 pieces.
- Fasteners in the amount of 4 pieces.
- Petrol.
- Practical adhesive with a plastic base.
Do-it-yourself PVC boat mounted transom
After purchasing all the necessary components, you should begin manufacturing the structure:
- Get the boat in working condition.
- Select an area to secure the oar latch.
- Mark the area with a waterproof pencil.
- Lower the ship.
- Use sandpaper to remove dirt from the marked areas.
- Treat with a degreaser (thinner or gasoline).
- Apply the adhesive to the prepared area using a brush.
- Wait 10-15 minutes.
- Repeat the procedure.
- Wait 5-7 minutes.
- Install the latch.
- Press down the area where the glue sticks with a heavy object.
After all the steps are completed, it is necessary to leave the structure for a day to dry completely.
How to strengthen a hinged transom on a PVC boat
In the basic configuration, the transom, as a rule, has only one layer of PVC. However, it is very easy to enhance it with a low profile. This will protect the belongings and passengers of the boat from water splashes, and will also allow you to install a more powerful motor. This will also reduce drag when planing.
Transom strengthening is a procedure that should entail strengthening along the boat's stringers along the entire length of the cylinder. Despite the fact that many boat owners consider this procedure useless, its use will increase the life of the boat.
Installation
One of the classifications of transoms involves their division depending on how they are attached to the vessel.
According to this principle they are divided into:
- Removable. Removable ones are installed on boats with outboard motors, and a popular way to mount a removable transom is to mount it on a bracket. In this case, it is mounted to parts located in pairs above and below.
- Pasted. Glued-in transoms are usually spaced at an angle of 8 degrees. To adjust the position and height of the transom, movable pads are often used.
Design
Almost all designs of mounted transoms are similar to each other.
Basically it consists of boards, fastening arches and eyes:
- a board is a square or rectangular plastic, plywood or wooden board, covered with an appropriate moisture-resistant coating, 20-25 mm thick, having additional holes, depending on the design solution.
- the arcs are used to attach the board to the side of the boat. The arcs themselves are made of steel or aluminum, the ends of the arcs must be carefully processed, the chamfer should not have burrs or nicks that could damage the boat's cylinder. The arches can be connected to the boat by bolting or using rivets. Like the arcs, the bolt heads and threads must be carefully machined.
- eyelets - special rubber holders glued to the side of the boat for attaching the arches. Eyes can be either factory-made or homemade, the main criterion of which is the reliability of attachment to the boat cylinder.
Instructions: How to properly install and adjust the motor on a PVC boat
Oars are reliable and practical, but for full movement on water, an inflatable boat requires the installation of an engine. Putting a boat motor on a PVC vessel means giving yourself the opportunity to raft far from the shore. Adventures, pleasant company, a rich catch and, of course, indescribable coastal beauty await the owner of the power plant. Modern engines come in different sizes and weights. This means that you can install an outboard engine on almost any inflatable boat. The tilt-and-turn design of the power plant allows not only rafting in deep water, but also movement in rapids or rocky shallow water.
The FISHERInfo portal will tell you how to properly install a motor on a PVC boat.
Installation
In order for the boat to show all its declared characteristics in action, and for the engine to work properly and not fail along the way, the engine must be installed correctly.
What are the dangers of incorrectly installing a motor on a PVC boat:
- The navigator will lose control of the ship.
- The boat will skid and throw to the side when turning, tacking an obstacle or accelerating.
- The ship will turn over with its keel up along with its passengers.
- May scoop up water or sink.
- The engine may catch fire.
The correct sequence for installing the motor is:
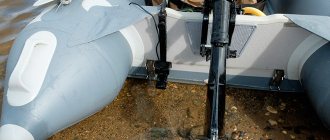
- Measure the transom with a measuring tape. The standard height of S category 381 mm is used for small and medium-sized motor boats. Large vessels are equipped with a transom L category 508 mm. These parameters are important when choosing the leg (deadwood) of the power unit.
- The power plant is fixed vertically strictly in the center of the transom. For boats with a keel, it is easy to install the motor by focusing on the convex bottom ridge.
- The motor is equipped with clamp screws that screw down and tighten the mounting platform tightly to the transom.
- The propeller must be immersed in water.
- The angle relative to the transom is adjusted experimentally on the water. When the motor is tilted towards the stern, the bow of the boat will be raised, and the power plant can scoop up water. If you bend the motor too far from the stern, the bow of the vessel will begin to scoop up the wave, the glide will disappear and the speed will decrease.
Important! The correct gliding angle of the watercraft and the fuel consumption in the engine tank depend on the correct installation angle.
Adjustment
Depending on the dimensions and model of the inflatable boat with a transom, the outboard motor is adjusted in practice. This means that no matter what theoretical skill the boat owner has, only rafting will show how best to hang and secure the power plant.
Tips on how to adjust a boat motor to a PVC boat and how to properly tilt the installation from the transom:
- Turn off the engine and lift it off the transom.
- Remove the stop from the bosom with the limiting comb. There are usually three notches on the ridge.
- Move the pin to the desired position on the comb.
- Start the engine and test the new adjustment.
DIY hinged transom
The distinguishing feature of the mounted trans is its ease of use and manufacture.
In order to make the design yourself, you need to purchase the following components:
- Sheet of plywood.
- Frame made of metal material.
- Fastenings (the quantity must be selected individually, depending on the size of the base).
- Latches (the desired model can be selected in the online store).
In order for the fastening to be most reliable, the cable must be pulled tight enough.
The best option is a handrail.
In order to make a transom, you must perform the following steps:
- Mark the location of the latch with a waterproof pencil.
- Secure the weight latch.
- Inflate the boat.
- Select the optimal location of the latch.
- The latch on the fastened oars should be in a place so as not to interfere with the motor operating in the required mode.
- You need to fix the latch in such a way that, if necessary, you can remove the oar and continue moving manually.
- Bring the ship to its original position, that is, deflate, and find the mark area.
- Straighten the boat on a smooth area so as not to damage the surface and eliminate any remaining air.
- Clean the fastening area with a degreaser.
- Apply a thin layer of high-quality glue to the surface using a brush.
- Give the glue time to dry for 15-20 minutes.
- Repeat the process and leave to dry for 10 minutes.
- After this, fold both sections, straightening them to remove bubbles.
- Place a heavy object on the folded areas.
- Leave this structure to dry overnight.
Making a hinged transom for a PVC boat
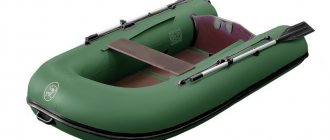
Today, the transom has become an integral part of boats, motor and rowing inflatable boats, the carrying capacity of which exceeds 220-250 kg.
Depending on the type of boat, there are two main types of transom: stationary (fixed) and mounted (removable).
Many lovers of outdoor activities on the water, who have a rubber or PVC boat at their disposal, want to increase the speed of movement on the water by installing a motor - gasoline or electric. The stationary rigid element is tightly glued into the stern of the vessel by the manufacturer. As a rule, it is made of multi-layer waterproof bakelite plywood.
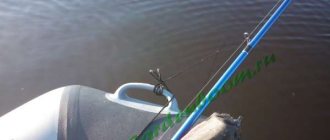
Many manufacturers include a hinged transom in the package. Each of them has its own fastening elements and is designed to install a low-power motor (up to 3 hp). In addition, a rigid element at the stern of a PVC vessel is often used for attaching additional equipment, for example, an echo sounder sensor.
In the case where the hinged transom is provided by the manufacturer and is included in the delivery package, no special problems arise - it is necessary to secure it in accordance with the instructions and use it for its intended purpose.
But lovers of fishing and other types of water recreation, who have boats of sufficient carrying capacity and, for various reasons, are not equipped with a rigid element for mounting the motor, have to buy it or make it themselves.
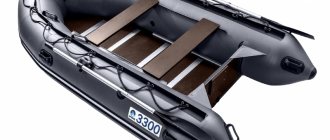
External and hinged transom for a PVC inflatable boat
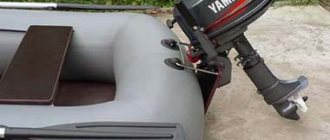
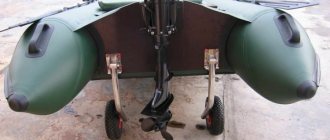
The transom is a flat, rigid plate onto which the outboard motor is mounted. Its width either matches the width of the boat or is slightly smaller. The transom must be strong enough to support the weight of the motor. And it is also important that it is technically correctly combined with the design of a particular modification of the boat. Only then will an ordinary rubber dinghy turn into a real motor boat.
The hinged transom is recommended for installation on small inflatable boats or tourist catamarans. Such a removable transom consists of a metal or plastic frame, a fastening system and a platform (transom board) on which a motor, usually of low power, is mounted. Mostly manufacturers make transom boards from bakelite plywood. This material has high moisture resistance, excellent strength and a rough surface.
In the stern of a boat or boat with a rigid hull there is a built-in additional open stern compartment, where a transom is located for one or more motors, and fuel tanks are installed. A special anti-corrosion transom board serves to impart rigidity to the entire structure.
A boat or boat with a stationary transom is designed for certain engine models, because the height of such equipment is not adjustable. You should pay attention to the angle of the transom to ensure optimal immersion of the motor in the water. It is also necessary to monitor the depth of immersion and not allow the engine foot to hit the bottom, because this can destroy the hull of the boat.
The safe and efficient use of a rubber boat is determined by the technical characteristics of the transom. First of all, it depends on its thickness, the angle of inclination during installation, and also the surface of the transom. When it comes to thickness, the maximum power of the motor used on the boat is important. For example, for an engine with power up to 15 hp. The thickness of the transom should be more than 18 cm. If the motor is more powerful, a thickness of over 3.5 cm is desirable.
The angle of inclination of the transom plays a certain role. It varies between 4-6 degrees. This is necessary to ensure that the legs of the outboard motor are sufficiently immersed in the water. This gradation of inclination indicators is designed for motors from different manufacturers. Thanks to the optimal position of the engine, the speed of the rubber boat increases and the amount of splash behind the stern decreases. The correct transom angle improves propeller performance and reduces fuel consumption. And as a bonus, there is almost complete elimination of the risk of catching air with the propeller.
The height of the boat transom recommended by the motor manufacturer. The transom is the flat part at the stern of the boat designed to mount an outboard motor. Transom height refers to the distance from the top of the transom to the bottom of the boat. In order for the outboard motor propeller to be at the desired depth, the transom height recommended by the motor manufacturer must correspond to the actual height of the boat transom. Instead of exact values, transom height is often indicated using letter symbols: S, L, X or U.
A short transom is marked with the letter S, usually referring to a transom height of 381-454 mm. The long transom is designated by the letter L, which means 508-572 mm. The letter X corresponds to 605-635 mm, U indicates a transom height of 650-680 mm. If you think that the depth of penetration does not correspond to that required for proper operation of the engine. It can be slightly reduced or increased. And keep in mind that the higher the motor is located, the higher its efficiency.
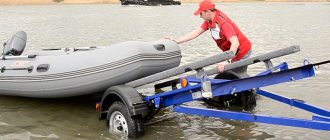
A remote transom is a good solution if you do not want to buy a motor boat separately. This device has clear advantages. See for yourself: - Quickly turn a rowing boat into a motor boat, and vice versa. Installing the transom takes less than a minute. — You don’t have to worry about the selection – the hinged transom fits any model of small-sized PVC boats. — Convenient to transport - it is light and takes up little space. — It’s inexpensive, you buy it and you’re already racing on a motor boat.
Agree, a useful purchase!
We make a transom for a PVC boat
The way you install the transom depends on the shape of the boat.
Possible options:
- fastening to molded elements fixed on the vessel in pairs - two on top (for fastening) and two on the bottom (focus on the side);
- installation to the sides using special pins;
- increasing the supporting area by installing brackets in the form of curved tubular frames;
- fastening or lacing a rigid element to the side of the stern of an inflatable boat.
One of the most accessible and less expensive methods is to install a transom attached to a metal frame through standard elements for inflatable boats.
To work you will need:
- locksmith tools;
- welding machine;
- solvent, PVC boat glue, sandpaper;
- thick moisture-resistant plywood 15-17 mm;
- frame made of metal rods or strips;
- boat rails and oar latches.
First of all, it is better to make a metal frame, manufacture, assemble and attach a homemade hinged transom to the frame.
Then (depending on the size of the resulting structure) glue additional fasteners.
The frame is made of metal rod with a cross-section of 10 mm.
To increase the service life, it is advisable to immediately select a suitable material – stainless steel.
Next, in accordance with the dimensions, we bend the elements in the right places, and then fasten them together by welding.
Let's start making the transom. It consists of two boards made of moisture-resistant bakelite plywood (you can use regular plywood - you will need appropriate processing).
We cut out the necessary fragments, process the edges, mark the locations for the holes and make them according to the dimensions.
If you don’t have waterproof plywood on hand, we use regular plywood.
Do-it-yourself PVC boat mounted transom
The transom is a full-fledged PVC boat motor mount; of course, if you make it yourself, it can be unstable and flimsy, although it all depends on how the transom was made.
When making this device for mounting a motor, you should follow all the recommendations and take into account the technical characteristics of the PVC boat and the motor itself, which will be attached to it using a transom.
https://youtube.com/watch?v=eCnzhf0hemI
Transom and motor
It is important to take into account that such a device as a transom for an inflatable boat is not suitable for mounting a high-power engine. D
The engine installed on a PVC boat should not have more than three and a half horsepower, which allows the boat to reach a speed of about ten kilometers per hour. The fact is that the boat and the transom itself have a limit on the weight of the motor.
When purchasing a motor, PVC boat and transom, you must carefully study the technical specifications.
The fact is that the boat has a weight limit, and the transom, which has a reinforced structure, has a fairly large weight, which increases the load on the fastenings, and, accordingly, on the relatively thin polyvinyl chloride.
Such a transom is capable of supporting a powerful engine of up to three and a half horsepower, but it can only be used on a large inflatable boat.
In addition, the power of the motor puts pressure on the transom plate and the stern of the boat: the more power, the greater the pressure.
Design
The design of such a device as a hinged transom for a PVC boat is extremely simple and includes:
- plate;
- Mounting arc;
- Eyes, which are sometimes called bubyshki.
The plate can be square or rectangular and is made of plywood. The fastening arc is a bracket that is put on the plate, after which its ends are secured to the boat using eyelets.
Eyes or lugs are staples whose ends extend into a flat base.
Materials for production
Moisture-resistant plywood is used as the material for the plate.
This material is quite thin and light, and also has a smooth coating, which protects the plate from exposure to adverse environmental factors.
Staples in most cases are made of metal, in particular rolled metal, bent in a certain way.
It is best if it is stainless steel or steel with a protective coating.
Steel is a strong enough material so that the bracket does not deform under the influence of the load exerted when the boat engine is running.
And the resistance to aggressive environments that stainless steel or coating has protects the metal from corrosion.
For the manufacture of eyes, in most cases, plastic is used, since it is a lightweight material that is resistant to environmental influences, in particular moisture. In addition, plastic can be easily fixed to polyvinyl chloride film using glue.
Manufacturing
In order to make a transom for a PVC inflatable boat, you will need a drawing. You should not choose a device for securing the motor of the most complex design.
For self-production, it is best to take a transom of a simple design, especially if you plan to attach a relatively low-power motor using this device.
To make the plate, plywood with a protective plywood coating is suitable. The thickness of the plywood must be at least ten millimeters. After cutting off the required piece of material, you need to sand the edges of the plate, since the PVC film is easily damaged. Special loops are attached to the plate, with the help of which the plate will subsequently be connected to a metal bracket.
Fastening arches are made of rolled metal. You need to take a metal rod of small diameter, about ten to fifteen millimeters, and bend it in a certain way. You can bend the rod using a special machine or using a workbench and hammer.
Frames can be purchased separately.
The entire structure is assembled immediately before installation on the inflatable boat.
We use the motor “to the fullest”, or the transom reinforcement features
Practice shows that the considered methods of attaching a rigid element work well when the motor is running at half power.
As soon as the engine is turned on at full power, it often begins to “wrap” under the boat, bend the cylinders, etc.
In most cases, strengthening the rigid element allows you to get rid of this problem. The essence of the procedure is the correct distribution of the load from the motor over the surface of the boat. Making it yourself is also quite simple.
An acceptable option is to install additional “braces” made from a metal rod.
To do this, additional rails are glued to the sides of the boat, into the holes of which metal amplifiers are inserted.
Instead of the sides, to add additional rigidity, you can consider the option of attaching a hinged transom, where additional “braces” are attached to the bottom or bench (bank) of the boat.
Experienced fishermen have noticed that in order to make a PVC boat move normally using a motor, it is better to use not a bottom flooring made in the form of slats from separate elements, but one that is a solid structure.
PVC boat transom size
3. Technical characteristics
3.1. Transom dimensions, mm, no more: height……………310 width……………290 3.2. Weight of the set, kg, no more than ……2.2
4. Technical description
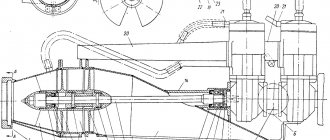
The hinged transom consists of the following main elements (Fig. 1): • a platform made of laminated plywood (item 1); • frame with upper hooks (item 2); • lower hooks (pos. 3). To attach a mounted transom to a boat, PVC eyelets with a hole diameter of 10 mm (not shown in Fig. 1) are used, which are glued to the hull of the boat. All metal elements of the transom are made of stainless steel grade 08Х18Н10.
Installing a transom on a boat.
Figures 2,3 and 4
5.1. The recommended transom position is shown in Fig. 2, fig. 3, fig. 4.
5.2. When installing the transom on the boat, observe the following requirements: • the transom should not touch the cylinder; • glue must be applied to the entire contact surface of the eyelets at a temperature not lower than 18 °C.
5.3. The sequence of gluing PVC eyelets onto the boat cylinder:
5.3.1. Move the frame with the upper hooks to a position perpendicular to the plywood platform (view A in Fig. 1).
5.3.2. Push the eyelets onto the metal hooks until they stop.
5.3.3. Install the transom onto the boat cylinder.
5.3.4. Do not allow any gap between the hooks and the eyes in the axial direction to prevent “bumpiness”.
5.3.5. Press the eyes tightly through the hinged transom to the cylinder, trace the outline of the eyes with a ballpoint pen and mark the exact position.
Warning: after marking the eyes, do not change places!
5.3.6. Degrease the bonded surfaces on the eyelets and on the boat cylinder with acetone. Glue each eye separately according to the markings, starting with the marks. Press tightly and roll the gluing area with any hard and non-sharp object. For gluing, use polyurethane glue. The preferred adhesive is Bostik VINYCOL 1520
Marking and gluing of eyelets should be done on an inflated boat.
5.3.7. No earlier than 2 hours later, lower the cylinder, insert the transom hooks into the eyes and inflate the cylinder again, check the tightness of the fastening in the eyes by rocking the transom manually, then release the pressure in the cylinder and remove the transom. Inflate the balloon again and leave it for 24 hours.
5.3.8. Perform the first operation within 24 hours.
6. Dismantling and storage
6.1. To remove the transom from the boat, simply bleed the air from the cylinder. 6.2. It is not recommended to disassemble the transom due to the loss of the self-locking properties of the nuts. 6.3. Before storage, clean the transom from dirt and moisture. 6.4. For easy storage, fold the frame with the upper hooks (see view A in Fig. 1).