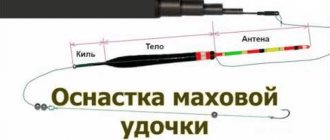
Rod
Any rod (plug-in, telescopic) that allows you to change tips is suitable as a rod. Interchangeable tips are called quivertips.
There are:
- quivertype pickers (tops for using rigs without feeders);
- feeder quivertypes (tops for using rigs with feeders).
The length of the rod depends on the distance at which you plan to fish and ranges from 1.8 to 4.5 meters.
Quivertypes are solely responsible for signaling bites. The rod set includes up to 5 tips. They differ from each other in sensitivity (test, power), which is indicated on the form (they may have different colors to indicate power).
Rods differ in power into classes:
- ultra-light,
- easy,
- average,
- heavy,
- super heavy.
For lakes and rivers with weak currents, quivertypes with a swinging spout are used. For rivers with a current, quivertypes have a trembling nose.
English donka: from and to. Part one.
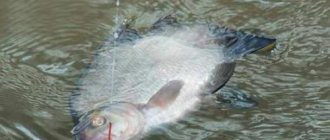
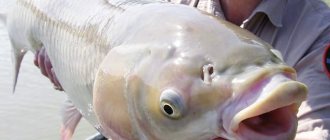
On most different reservoirs, bottom tackle of the English type, or as we usually call it, feeder (feeder) tackle has now gained enormous popularity and works very successfully. And any angler, if desired and, of course, has the appropriate capabilities, can master it effectively. But, despite its apparent simplicity, understanding feeder fishing at the initial stage is fraught with a number of difficulties. Which often leads those who already have some experience of fishing with traditional bottom fishing rods for our country (for example, zakidushki), and, even more so, those who are mastering modern bottom fishing from scratch, to various mistakes both when choosing, and when equipping the tackle itself, and when using it . However, all of the above is not so surprising, especially in light of the fact that there is still an opinion among many fishermen, and not just ordinary amateurs, that bottom fishing is the lot of the lazy. And that it is quite simple and does not require serious knowledge, preparation and approach. I agree with this when it comes to such simple bottom gear as, say, the same notorious zakidushki (photo 1). But not when feeder tackle is used - of course, in the classic English version (photo 2). After all, the first bottom tackle of the English type and the technique of their use were developed in the 50s of the last century specifically for sports and, please note, high-speed fishing. A competent approach when choosing a feeder rod, its appropriate equipment and the application of an effective fishing algorithm on a specific body of water and in certain conditions is of no small importance, and sometimes even decisive. And here, in order to decide on all this, it is important to know not only the type of fish that is supposed to be caught, or its size, but also the size of the reservoir, its depth, the presence of a current, coastal and bottom topography, the state of the bottom - for example, mud there, snags or stones. And, of course, it is important to take into account such circumstances as the temperature of not only the air, but also the water, the amount of atmospheric pressure, wind strength and its direction, the presence of precipitation, etc. We'll talk about all of the above below. And one more thing: in this conversation I will try to draw the attention of beginners not only to the basics, but also to the most typical mistakes in mastering this type of fishing and ways to avoid them.
fishing rod is a special fishing rod consisting of four functional parts: the main rod, plug-in or telescopic - it doesn’t matter whether there is a thin and sensitive tip inserted into its upper part (the so-called “quivertip”), a fishing reel and equipment of one type or another. A beginner who is just about to master feeder fishing first faces the problem of choosing the rod itself. And although the variety of feeder models is not as great as, for example, in a spinning rod, there is still something to puzzle over. First, let's talk about the main rod. What characteristics should you pay attention to when choosing? Well, firstly, it is, of course, length, and secondly, power. In addition to these basic ones, you shouldn’t forget about some others - such as the structure of the rod, the quality of the material of the blank and accessories.
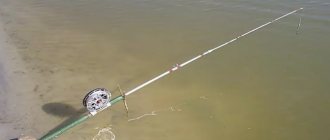
As for the quivertype, it is a kind of signaling device; its bend indicates to the angler that a fish is biting (photo 3). The quivertype does not have any other functions - such as participating in casting bait or catching fish. Bite alarm - that's all. Length. This is a fundamental parameter of any fishing rod - and the feeder (for simplicity, this is what we will call a bottom rod in the future, as a rule, an English-type feeder rod) is no exception. The approach here is basically the same as when choosing a spinning rod or a match fishing rod: first of all, you need to take into account the size of the reservoir, which determines the casting distance. Although the large size of the reservoir does not always mean a large feeder length. Here everything is determined by the expected conditions. That is, for example, when fishing on a reservoir or river from a boat or in the evening, when the fish comes out into shallow water, a short feeder is suitable (photo 4). Well, for example, when fishing in reservoirs in the cold season, you will need a longer rod for long casts (photo 5), etc.
As a rule, the lengths of modern feeder models range from 1.8 to 4.5 m. By the way, for some reason it is believed that the more powerful the feeder, the longer it is. In fact, this is not the case; such an opinion is simply the result of poor knowledge of the gear market. And many manufacturing companies have relatively short, with a length of 3 m, heavy class feeders, and long, more than 3.6 m, light class rods.
Feeders up to 3.3 m long are better suited for fishing at distances from 15 to 50 m. That is, in the coastal zones of large bodies of water (photo 6), as well as on small rivers and lakes or for fishing from a boat. Longer rods are needed for fishing at great distances from the shore. That is, on large bodies of water, be it reservoirs, large rivers or lakes (photo 7). And if you have to fish in reservoirs of different sizes, then it is better to have both short and long rods in your arsenal for convenient and effective fishing. However, for this case, many companies produce multifeeders, or, as they are sometimes called, “transformers” (photo 8). The kit of such a rod includes an additional elbow - and if necessary, a feeder with a length of, say, 3.3 m can easily be converted into a 3.9-meter one. All this expands the fisherman’s capabilities, and is also economical. Therefore, such universalization is quite acceptable. True, such rods cost a little more, they weigh a little more, and the structure changes a little when installing an additional elbow. But it's not that scary.
Quivertypes. The sensitivity of the feeder, if we mean the quality of bite signaling, is determined by its replaceable quivertypes (photo 9), which are plugged into the upper part of the main rod. Each feeder kit, depending on the manufacturer, model and price, has from one to five similar interchangeable tips. They differ in degree of hardness (optimal test) and are designed for fishing with a load of appropriate weight - be it a feeder with bait or just a sinker. Quivertypes vary in the material from which they are made and in their external design. In sets of feeder rods from some companies, all tips can be made of fiberglass. Other companies, which in my opinion are more advanced, include both “glass” and carbon fiber tips in their kits. In the latter case, the first ones, of course, are softer, with small tests, the second ones are hard and are designed to work with heavier equipment. It is worth noting separately that carbon fiber tips are much more sensitive, thinner and lighter than their fiberglass counterparts of the same test. If some companies indicate on the form of the main rod the range of optimal test for it (for example, 10 - 60 g - photo 10), then quivertips may have multi-colored tips, indicating the degree of their hardness. In this example, the yellow color is for a soft tip, optimal for fishing in still water using light weights, up to 30 g (half the test range), red - for a harder tip, for weights up to 60 g.
Other companies that follow the traditional English classification scheme do not indicate the test numerically on the forms, but have an inscription - for example, Heavy (heavy), which indicates the power class of the rod. The tips included in the kit of such rods are already marked (photo 11). They can be multi-colored, or they can be painted the same color, but in both cases, on the bottom of them there is an indication of the maximum test of the equipment being thrown, and sometimes also the material from which the tip is made. For example (photo 12): 1 oz (1 oz = 1 ounce = 28.35 g) glass (glass) or 4 oz carbon (114 g, carbon fiber).
In this case, you need to focus on the test values of the tips. For example, if a middle-class feeder kit includes three tips with 1 oz, 2 oz and 3 oz tests, this means that the rod is unlikely to be designed for casting a feeder with bait or a sinker weighing more than three ounces (approximately 85 g). In any case, regardless of whether the feeder has marked quivertips or just multi-colored ones without test markings, the stiffest tip included in the kit has the same maximum test power as the main rod blank. For example, if you have unmarked colored tips, and the form indicates a test size of up to 120 g, then this means that the maximum weight of the equipment (feeder with bait or just a sinker) should be up to the specified limit. When choosing a feeder, you should also pay attention to the quality of the tips and rings installed on them. Inexpensive rods have quivertips, usually made of composite materials, and the quality of the guides is very low. As a result, their prices are low. And tops made of high-quality glass and carbon fiber with good rings are not cheap. It is not without reason that some companies, for example Shimano, which equip all their feeders with high-quality tips, reduce the price of some models not only by using simpler blank material, but also by reducing the number of tips included in the kit. For example, instead of three quivertypes, there are two, or even one. The top is the most fragile part of the feeder. Therefore, already in the store, ask if the tops for this model are sold separately. Anything can happen when fishing; no one is immune from breakdowns, especially beginners. And since the connecting diameters of the tips and upper bends of feeders from different manufacturers, as a rule, do not match, replacing a broken tip can be very problematic. It's better to take care of this in advance. In addition, by purchasing one or two tips, you can expand the sensitivity range of your feeder. For example, to a set of three tips of 1, 2 and 3 ounces add tips of 0.5 and 0.75 oz. And one more piece of advice - primarily for lovers of winter open water fishing. As a rule, many manufacturing companies produce feeders equipped with classic type tips with very small rings. The internal diameter of such rings is only 2.5 mm, this makes fishing difficult in winter, especially when using braided fishing line, which freezes more. In addition, the small diameter of the rings makes it difficult to pass the shock leader assembly (what it is needed for, I’ll tell you later). Therefore, if possible, for fishing in conditions of negative air temperatures, use feeder rods that have large rings with an internal diameter of 3.5 - 4 mm installed on the tips. I have seen similar quivertypes (in photo 13 there are a pair of them - on the left, on the right for comparison - standard ones), for example, in a number of feeder models from Shimano and Sensas.
Classification. In general, all English-type bottom fishing rods are divided into classes according to power. Currently, this is an ultra-light class - winklepickers (pickers), then - light class, medium, heavy and super-heavy. In addition, some manufacturers also have intermediate classes - medium-light and medium-heavy. Different companies, as I already mentioned, use different markings on the form, indicating its power. As a rule, there are three marking options: a numerical designation of the test itself (photo 14), a letter designation of the power class (photo 15) or, a little less often, both options together (photo 16 - the rod class is indicated here with the inscription Light Feeder, and its test ). Unfortunately, there are different understandings of the feeder class itself. For example, some companies have a heavy class rod with a power of up to 120 g, while others have only up to 90 g. There are ultralight models with a 10 g top, and there are also supposedly “ultralights” such as the “picker”, which is shown in photo 17, designed even for a 60-gram load. Some super-heavy class feeders can throw loads over 200g, but usually the maximum load in this class is 150 – 180g.
To illustrate this confusion, let me compare the power classification tables of two popular companies. The first manufacturing company is Shimano, which initially adheres to the strict English classification (Table 1). Well, the second one, Trabucco, is no less well-known company, but it has its own scheme (Table 2).
Table 1 Markings on the Shimano form / Class / Maximum test** Winkle Picker (WP) Ultralight Up to 1 1\2 oz* (40 g) Light (L) Light Up to 2 oz* (60 g) Medium Light (ML) Medium light Up to 2 1\2 oz* (80 g) Medium (M) Medium Up to 3 oz* (90 g) Medium Heavy (MH) Medium Heavy Up to 3 1\2 oz* (100 g) Heavy (H) Heavy Up to 4 oz ( 120 g) Extra Heavy (XH) Up to 5 oz* (150 g) and up to 6 oz* (180 g)
* Tests of the most powerful tips included in the rod set are indicated. ** Data in grams are approximate.
Table 2 Marking on Trabucco form / Class / Maximum test Light (L) Light Up to 30 g Medium Light (ML) Medium light Up to 40 g Medium (M) Average Up to 60 g Medium Heavy (MH) Medium heavy Up to 70 g Heavy (H) Heavy Up to 90 g Extra Heavy (XH) Super heavy From 110 g
These are the discrepancies, so I recommend that before purchasing, if possible, look through catalogs and look on the Internet for models of this or that company. In almost every, of course, civilized fishing store, sellers have catalogs of supplied products from one or another company. Don’t be lazy, ask the seller, look through it. After all, in them you can get much more information about the model you are interested in - about the number of rods of different power and length, about the materials of the blank and rings, about the weight of the feeder and its transport length, the exact number of tips. As for the maximum power, depending on where you are going to fish, you need to select a rod not only in length, but also one that is suitable for the class (test). For example, in places without current or with weak current, it is much more effective to use pickers and feeders of light or medium class. Well, for fishing in strong currents you will need more powerful rods, heavy or super-heavy classes. Rigidity and structure. The rigidity of the feeder depends mainly on the material and structure of the blank, and rods of the same test can be both very hard and soft. Rigidity affects almost only the feel of the rod. Some people like “hoses”, others like “clubs”, but most prefer the golden mean - rods of medium hardness. The structure of any fishing rod is the nature of its bending under a certain load. In classic English bottom rods, it is usually parabolic: the loaded blank takes the shape of a parabola. Feeders of various types are now available for sale. By analogy with a spinning rod, the feeder can have a fast, medium-fast, medium, etc. action. As in the case of a spinning rod, the structure of the feeder has a great influence on both the range and accuracy of casting, and the quality of landing fish. The most universal from this point of view are the forms of medium, and even better, medium-fast action (photo 18). In general, the choice of rigidity and tuning is purely a matter of personal preference.
Line test. Any fishing rod, be it a spinning rod, a float swing or a carp model, in addition to the bait (or equipment) test, has a line test recommended by the manufacturer (meaning, of course, the main line). And if the test for baits (or equipment) shows the sensitivity and power of the thrown loads, then the test for fishing lines shows the maximum power load allowed for the rod. That is, simply put, if you exceed the test for the weight of the load being cast, you risk breaking the rod. And the same thing will happen if the test line is exceeded - for example, when biting or playing with a particularly large fish. By the way, a typical example: some, in particular English companies, indicate the test for fishing lines not in diameters, but in terms of breaking load - say, 9 lbs (about 4.5 kg). All of the above, of course, fully applies to feeder rods, which are by no means unlimited in their power capabilities. And all feeder rods, depending on the class, have their own line restrictions. Moreover, unlike carp or spinning rods, this test for fishing lines, as well as for the cast load, for a feeder rod depends on the number of tips in its set. That is, each tip has its own test for both weights and fishing line (hereinafter I use information from the manufacturers). In general, it turns out the following: the “lighter” the tip is in terms of the load that can be thrown, the lower the breaking load of the fishing line used should be. As for its specific meaning, in the homeland of feeder gear, in England, fishing line is selected according to the size of the fish, and not according to the weight of the feeders or weights. For example, for fishing with weights up to 0.75 ounces (about 21 g), it is recommended to use 3lbs line (about 1.5 kg). Well, many of our fishermen still do everything the old fashioned way. And even using modern gear, they set the fishing line as thick as possible and the feeders are heavier, even when fishing in reservoirs without a current. And they try to fish with a light-class rod, which has a line limit of up to three kilograms, using a line with a breaking load of 6 kg, or even more. And then they are also surprised - they say, why did it break? So, when choosing and completing your feeder tackle, take all this into account. Many amateur fishermen make mistakes here too, believing that with a feeder you can catch fish of any size, even catfish, just take a more powerful feeder and put a thicker line. However, it is not. And although, of course, the more powerful the feeder, the larger the fish it can catch, but it is by no means unlimited. Unfortunately, not all companies (you can easily guess for what reason) indicate this test not only on forms, but even in their catalogs. But there are still decent manufacturers doing this. And to make it easier to navigate, I propose Table 3 with tests on fishing lines (monofilament, of course) according to the classic English scheme.
Table 3 Rod class / Lure test / Line test Picker up to 1 ounce (approx. 28 g) 0.1 – 0.18 mm (1 – 3.5 kg) Picker up to 1 ½ ounce (approx. 44 g) 0 .1 – 0.2 mm (1 – 4 kg) Light (L) up to 2 oz (approx. 56 g) 0.12 – 0.22 mm (1.5 – 4.5 kg) Medium (M) up to 3 oz (approx. 84 g) 0.12 – 0.24 mm (1.5 – 5 kg) Heavy (H) up to 4 oz (approx. 112 g) 0.14 – 0.28 mm (2 – 6 kg) Extra Heavy (XH) up to 5 oz (approx. 140 g) 0.16 – 0.32 mm (2.5 – 7 kg)
Pay attention to the breaking load of the specified line diameters. These are the real parameters of high-quality fishing lines. And if, for example, you see a fishing line with a diameter of 0.24 mm indicated on the trade label and a breaking load of more than 7 kg, do not flatter yourself, you are simply being deceived by distorting the parameters.
Material and accessories. The choice of a company and the purchase of one or another of its feeders largely determine your financial capabilities. And, of course, feeder fishing does not place such stringent demands on the rod as spinning fishing. Therefore, there are more opportunities for various kinds of compromises here. For example, characteristics such as the action and weight of a fishing rod directly depend on the quality of the material from which it is made - composite or carbon fiber. But the price also depends on this. And, in principle, it is quite possible to fish more or less successfully with a cheap composite feeder. The key point is sensitivity, but in a feeder this parameter is determined not so much by the blank as by the tip, the quivertip. But still, when choosing, keep in mind that cheap models of composite rods, in addition to greater weight, usually have simpler fittings - rings and a reel seat. And if you can somehow “figure it out” with the reel seat, then with the rings everything is much more complicated. And when choosing, you should pay more serious attention to the quality of the rings. As a rule, at least a dozen of them are installed on the feeder (photo 19). When choosing a fishing rod, you must definitely check the quality and strength of the frame of the guides, as well as the alignment of their installation on the blank and tips. And, of course, the material of the inserts is important - zirconium, aluminum oxide are good, and even better - SiC, especially when fishing with braid. Therefore, when choosing a fishing rod, taking into account all of the above, you still shouldn’t skimp on quality. Moreover, today our fishing market sells many different models of feeder rods from different companies at quite reasonable prices and fairly decent quality. And this is not surprising. After all, now almost every fishing tackle manufacturer considers it their duty to release at least a couple of models of their own feeders. True, as a rule, most of them have a small spread in both tests and lengths, and not all companies have multifeeders. About the variety of models of bottom fishing rods. However, not everything is so sad - and there are many companies that have quite an extensive line of English-type bottom rods - from winklepickers to super-heavy feeders. Moreover, these companies are not limited to producing models that differ only in power or length. Some companies (for example, Fox or Shimano) have specialized carp feeders of different classes. There are even carp pickers and light feeders on sale, designed for catching small carp, up to 2 - 3 kg. Carp feeders and pickers, unlike their simple counterparts, have reinforced joints between the knees, because These are the most vulnerable places that experience significant stress during fishing. There are other models of feeders - for catching carp or barbel. By the way, some of them are called Barbel (barbel). In addition to feeder tips, such rods have a simple additional upper bend (photo 20). The result is an ordinary carp fishing rod with an electronic bite alarm.
In addition to such rods, there are other combined models - for example, feeder-match or picker-match. In addition to quivertypes, they also have an additional upper knee. As a result, you can fish with long casts of both the feeder and the float, which is very convenient when fishing conditions change - for example, the fish is at half-water or the bottom is too silted. In general, we can say that today there is a fairly wide range of feeder rods on our market. When purchasing, the main thing is to take into account the main performance characteristics of the fishing rods, which I talked about in the article, and proceed from the characteristics of the expected fishing conditions. Well, as for certain brands, by and large this is a matter of taste and, of course, financial capabilities
Kiselev A. “Sports fishing” No. 10 October 2011
Do-it-yourself installation diagram and description
There are more than a dozen schemes for equipping English bottom tackle.
There are:
- For installation of cargo (feeder):
- blind installation;
- sliding installation.
- By type of feeder used:
- with an open feeder;
- with a closed feeder (for live food).
- By placing the leash:
- above the load (feeder);
- below the load (feeder).
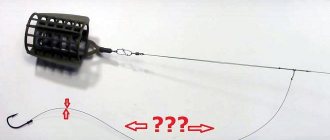
The simplest and most widespread easy installation of blind rigging is Paternoster , if the rigging is knitted on a separate fishing line. If the equipment is knitted on the main line, then you can mount a Gardner loop ,
How to do it yourself:
- We cut a monofilament line with a diameter of 0.25 - 0.30 mm and a length of 50 - 60 cm.
- We tie a swivel to one end of the fishing line.
- We put a stopper bead through the other end of the fishing line.
- We pass the line through the anti-twist.
- We put on the second stop bead. The anti-twist ends up between the two beads.
- We tie a swivel to the second end of the fishing line.
- We attach a leash to one swivel, and through the second swivel we tie the equipment to the main fishing line.
- We attach a feeder to the anti-twist with a clasp.
Varieties of English donks
Let us recall that a quivertip is a flexible, replaceable tip of a feeder rod. Based on its appearance, the following types of English donkeys are distinguished:
- Picker quivertype - does not include feeders.
- Quivertip feeder – makes it possible to make long casts with fairly heavy feeders and baits.
High-quality rods for bottom fishing are most often made from high-modulus graphite, their component parts are connected using plug-in fasteners, and the handle in most models is made of cork. Their distinctive properties are high sensitivity and reliability.
Along with graphite, budget gear made from composite or fiberglass are quite popular. Any English bottom rod is equipped with three interchangeable tips of different hardness, which are used for fishing in different conditions - in slow, medium and strong currents. When choosing a tip for an English donkey, you need to ensure that its rigidity corresponds not only to the strength of the current, but also to the weight of the intended catch.
Read more
How to catch pike in spring?
When selecting fishing line, take into account the parameters of the rod and its tip. For picker fishing, the most rational choice would be monofilament, characterized by minimal friction on the rings. For fishing with a heavy feeder rod, it is optimal to use braided fishing line.
Selecting components with the required parameters and assembling feeder gear with your own hands is quite easy, although some novice fishermen prefer to purchase ready-to-use gear in specialized stores in the hope that it was assembled by masters of their craft who know a lot about bottom fishing.
There are more than a dozen equipment schemes for English bottom tackle
Recommendations for installation assembly
As a leash we use monofilament fishing line of a smaller diameter than the fishing line on which the feeder and the main fishing line are attached. It is better to lose the leash than the entire equipment when biting a fish that is too large.
If the installation of the equipment is carried out not on the main fishing line, but on a separate one, then we recommend using monofilament fishing line. The swivels and anti-twist slide better on it.
If a braided cord is used as the main fishing line, then it is better to mount the equipment on a separate monofilament fishing line. The strength of the braided cord should be greater than the strength of the fishing line on which the equipment is tied. When connecting the main line to the rig, it is better to use a swivel rather than connecting loop to loop.
Float installation: basic methods
Depending on the places where you plan to fish, choose the type of float attachment.
If you want to install an English donkey for fishing in still water, then a blind mount for the float is required. In this case, its position is determined by the fisherman himself, choosing an option convenient for fishing. To do this, a copper wire is pulled into the lower ring of the float and, by twisting its ends, it is firmly attached to the fishing line.
The second option for blind installation is fastening using two cambrics. The wire itself is not curled, but bent in the form of a loop, bending the edges in one plane.
For fishing in deep reservoirs, where there are places with thickets of reeds and snags, as well as for long casts, sliding equipment is suitable. In this case, the float itself moves between the two stoppers. But for such equipment you must have a certain skill, since the fishing line can often break. Therefore, it is not advisable for beginners to use it.
Donkey attachments
The attachment for the bottom tackle depends on the type of fish you are going to catch. It could be:
- worm;
- maggot;
- bloodworm;
- corn;
- semolina dough;
- boilies.
During the current, it is better to fish with baits that stay on the hook for a long time. For example, dough on a river will quickly wash out.
You can learn more about catching carp with boilies in a special article, which covers such nuances as their choice, the technique of catching carp with boilies, and selecting the right flavorings.
English bottom tackle - what is it?
As the name suggests, this tackle first appeared in England, where local fishermen began using replaceable feeders and flexible tips for bottoms, which turned out to be very convenient in the process of fishing. It is the replaceable rod tips that are a characteristic feature of English bottom tackle.
A standard English rod usually has three interchangeable tips, also called nods. They vary in rigidity and are designed for fishing in different currents (slow, medium and fast). Depending on the weight of the sinker, the feeder and the intended prey itself, they can also be different. The tips are usually painted in a bright (usually orange) color and are put away in the butt part of the rod when it is assembled.
Many fishermen prefer to make their own equipment such as an English donka. Its installation is quite simple, and the tackle turns out to be very catchy.
Feeder installation using anti-twist
This option is used for fishing in places where the bottom of a reservoir with stones and shells can cut the fishing line or damage the equipment with the feeder. It makes it possible to avoid breaking the fishing line or braided cord, as well as prevent the latter from becoming frayed.
You can knit it on a separate piece of monofilament or braided cord, and then use a clasp to connect it to the main fishing line. Or mount all the components directly on the working line.
To install a donut with an anti-twist, you will need:
- feeder feeder;
- plastic bead;
- leash equipped with a hook;
- swivel;
- anti-twist
Installation is as follows:
- a fishing line is inserted into the anti-twist on the short side;
- after it comes out of the long side, a bead is strung on it;
- A swivel is tied immediately behind the bead using a “clinch” knot;
- the feeder is attached to the clasp;
- the free end of the swivel is connected to the leash using the “loop-to-loop” method.
Just a few simple steps and your English donk is ready. Installing it with an anti-twist may seem cumbersome to some, but it provides a number of advantages.
Firstly, this equipment responds well to bites. As soon as the fish starts to bite, the rod tip is activated due to the fact that the line easily moves through the anti-twist. That's why you can immediately make a hook.
Secondly, the fish does not feel the weight of the feeder and calmly takes the bait without suspecting anything.