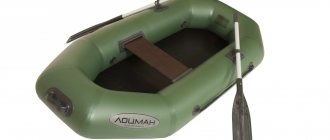
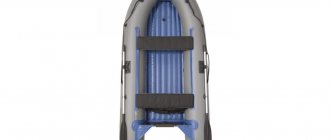
An inflatable rubber boat is a necessary thing for any fisherman or hunter. Having such a means of transportation on the surface of the water, you will be able to fully appreciate all its advantages. Namely: light weight, compactness when folded, decent speed that rubber boats equipped with a motor can develop.
Not without its shortcomings. The fact is that the thick rubberized fabric from which the boat is made is not strong enough: snags, reeds or pieces of reinforcement can damage it. All the benefits mentioned above come at the cost of periodic repairs.
You can handle boat repairs yourself and without high costs. Let's consider various options for defects and ways to eliminate them.
Popular brands of boat glue
First, let's decide on the glue. Several popular brands:
- 4508. The main component is rubber. The strength of the glued seam is much better if you use glue with a hardener. Attracts the stickiness, viscosity of the composition, as well as the elasticity of the compounds. There's just one problem with using 4508 glue: it's toxic and explosive. If you want to work with it indoors, it must have supply and exhaust ventilation. Be sure to read the instructions for use and storage after purchasing the glue, it also contains other important points!
- Radical. Black consistency for real brutalists! To increase bonding strength, the surfaces must be dried before application. The composition perfectly withstands low temperatures, strong mechanical loads, as well as salt water, so you can fish even in the Dead Sea. And this glue has a danger class, for example, it cannot be used close to fire.
- Gum is a one-component composition based on natural rubber. It has exceptional water resistance, good adhesiveness and elasticity, and retains its adhesive ability for up to a day after application to the surface of the product.
Other suitable options are also sold: KLEYBERG, “Liquid patch”, etc. By the way, we have a separate article with an overview of different options.
How to glue the bottom of a boat?
Gluing the bottom (PVC) onto a rubber boat
As a rule, the bottom of the boat is subjected to the greatest mechanical loads, which can cause various types of damage. To glue the bottom back to a rubber boat, you need to follow certain rules.
Before the gluing process, it is necessary to completely tear the bottom off the boat, then heat it with a hairdryer and clean it well with sandpaper. Then you need to glue the sealing tape. Only after this should you start gluing the bottom.
The operation of gluing the bottom is carried out with the boat at full, maximum inflation. After this, the air is completely bled off and the boat should remain in this state for 48 hours until the glue dries completely. During the work process, it is necessary to strictly follow the technology for working with glue, otherwise a high-quality connection will not work.
Which glue to choose?
When choosing adhesive from other options, consider the following:
- A very low price is a reason to refuse the product. Most likely, the composition is of poor quality or not suitable for rubber boats (the material may be damaged!).
- Don't buy superglue. The name, of course, inspires, but you shouldn’t expect long-lasting results from this option.
- Universal formulations are also not a very good option. It is best to use adhesives designed specifically for sealing boats or the materials they are made from. There is even Moment glue specifically for boats.
- It would be good if the glue had high heat resistance.
The most suitable option for a fisherman is the one that comes with the boat. If this is not the case, buy a compound for rubber boats with high heat resistance. It is better to look for such adhesives in specialized stores: boat or construction stores. Don't ignore us: our store has boat repair kits. By the way, there is an opinion that non-stick glue is not very effective. This is wrong! If possible, you should choose it.
Adhesive “Moment”, for boats and PVC products
75 rub.
Buy now ozon.ru
Characteristics
- Type : Glue
- Works : External, Internal
- Scope of application : Universal, For wood, For furniture, For windows, For floors
- Country of origin : Russia
- Packing : Box
Description
Adhesive for boats and other PVC products is suitable for both professional and DIY repairs. The adhesive seam is transparent. The connection is resistant to water, oil and gasoline. Suitable for gluing various combinations of soft and hard PVC, rubber, leather, metal, fabric,…
Tools and materials
- Glue.
- Brush.
- Scissors.
- Felt pen.
- Sandpaper, fine-grained paper.
- A piece of rubber for a patch (not always needed).
- Degreaser (acetone, gasoline, thinner).
- Nylon threads (if the damage to the seam or other area is large).
You won’t have to go broke on all this, the cost is quite affordable for fishermen (good fishing rods and tackle are much more expensive, not to mention the boat itself, although our store has fairly affordable prices).
By the way, the gluing process is quite easily soiled, so take care to protect your hands and clothing.
Hot technique
Repairing rubber boats in special conditions is relevant when increasing the level of tightness at the junction of the sides and the lining of the partitions. Lag, movement or wrinkling of the on-board regulator requires special equipment. Under production conditions, a selection of adhesive compositions and rubber patches with a high level of compatibility with respect to rubber compositions is provided.
The imparting of hermetic properties at the junction of the sides is ensured by delamination of the joining unit using a solvent and a steel ruler, and the sealant is removed. The tape is cut at a distance of 1-1.5 cm from the extreme part of the regulator. Its replacement is accompanied by imparting abrasive properties and treating the new material with a solvent.
Repair of a rubber inflatable boat is ensured by applying a double layer of rubber glue. The joint assembly is assembled with an overlay of unvulcanized tape and a sealed compound. In the cut area of the regulator, a protective plate with a cross section of 5 cm is applied. Scuffs in the rubber lining are treated with a 0.4 mm layer of unvulcanized material. The formed knot is rolled with a metal roller. A film material is applied to the borders of the restored section of the sides to give a smooth surface.
A board with a porous rubber gasket is placed at the bottom of the segment. A metal plate and tile are placed on top. This is followed by fixation with clamps and vulcanization. It is important to observe the specifics of the technology: heating the tiles - 140 ± 5 ° C, mode - 30 minutes. Upon completion of the technology, the tile is turned off and cooled to a level of 80-90 °C. The clamps are released and the tile is removed. The quality of fixation is checked after 4 hours.
Determining the location of the rupture
First you need to determine the exact location where the gap could form:
- Inflate the rubber boat as much as possible (do not overdo it!).
- We lower it into the water and look carefully.
- Bubbles will emerge from the site of damage, which are very noticeable in the water. If they are not there, we turn the boat upside down, because the damage may be on the other side.
- We outline the discovered hole with a felt-tip pen so that it can be easily detected on a deflated boat. In addition, this will make it possible to prepare a patch that completely covers the hole. After preparing the patch, be sure to round all the corners, otherwise the material will come off over time.
It is best if the patch material is the same as that of the boat. Although some seams can be glued without a patch, we will also talk about this method.
So, the location of the damage has been identified and the patch has been prepared. Now you need to process the work surface.
DIY rubber boat repair
Holes, surface and seam tears, warped bands, leaky bottoms, damaged rowlocks are all common problems that require immediate repair.
If there is a problem with the location of a small puncture, the easiest way is to use soapy water. First, the boat's compartments are inflated step by step, and then the damaged compartment is lathered. This way you will find a defect where soap bubbles accumulate.
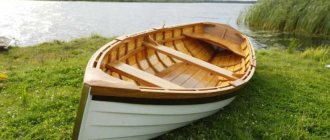
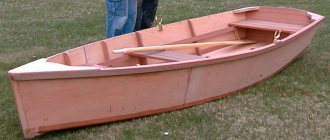
To describe the entire process of repairing a boat with your own hands, let’s take the Ufimka rubber boat as an example. In the old days, this rubber boat was in great demand. A light, compact two-seater rowing boat that can be rowed forward or backward. It consists of two inflatable cylinders, fastened together by a bottom and overhead gussets. But this boat has a significant drawback: the cylinders on the left and right sides do not have their own partitions and therefore, when punctured, the entire side is deflated. And since fishermen eagerly take advantage of the Ufimka’s ability to walk not only on water, but also through aquatic thickets, damage to the cylinders is inevitable. In this connection, the Ufa boat needs to be glued very carefully.
Surface treatment
If you need to seal a large damage, do this:
- We remove all dust and dirt.
- Rub the damaged area on the boat with fine-grained or sandpaper. Thanks to this, the surface will become rough, and the patch, which also needs to be sanded, will stick better.
- We sew up the incisions. We sew up the hole with nylon threads, the tighter the better. This step can be skipped if the damage is minor.
- We degrease the damaged area and the patch.
Let us remind you that all bonded surfaces must be dry!
PVC boat repair at home
There are no difficulties in repairing a boat at home. There are general recommendations that need to be taken into account and followed. Let's not talk or write much, let's move on to step-by-step instructions for gluing.
We have a PVC boat in front of us and our task is to glue the cut together without resorting to the help of professionals.
- We prepare the boat: thoroughly clean all the dirt, wash the surface and dry the area of fabric that needs repair. It is not advisable to treat the puncture site with sandpaper. Sanding will damage the material and reduce its wear resistance. Lay the boat out on a flat surface.
- For degreasing, a solvent is best suited. As a last resort, if there is no solvent, you can clean it with alcohol or acetone.
- We decide on the size of the hole and cut out a larger patch, with a margin of a couple of centimeters all around. For the patch, we use the material from the repair kit, if available, or select its equivalent.
- Using a pencil or ballpoint pen, mark the border of the patch on the hull of the boat, placing it on the place planned for gluing.
- We collect glue with a small brush and carefully coat the entire surface of the future connection. Well lubricate the surface on the boat hull and the patch itself.
- The first layer is like a primer. We wait 15 minutes until the base hardens. Then we apply a second layer of glue on both planes of contact.
- Now all that remains is to warm up the glue base with a hairdryer. We wait five minutes and warm up the patch and the cut itself a little with a hairdryer. There is no need to dry the glue, you need to heat the surfaces.
- We combine the surfaces along the previously drawn contour. We carefully ensure that they match. It is necessary to iron it with something heavy in order to expel any possible air bubbles from under the patch.
- A cut larger than five centimeters is considered large. To eliminate it, two patches are installed. In the above way, only one inside the other. This is done to better guarantee strength, thus ensuring a sealed and durable repair. The first patch is 2 cm larger than the cut, and the second is 2 cm in circumference, larger than the first patch.
If conditions permit, you should leave the boat and not touch it for two days. And it would be nice to press down the gluing area with pressure on top.
Often, over time, small scratches . It's okay, there is no damage, the top layer of PVC is slightly damaged. We recommend paying attention to scratches to prevent surprises. It is enough to treat the top with glue from the repair kit, and in special cases put a small patch, according to all the rules. It is easier to prevent trouble than to fix it.
Gluing
If the boat is leaking along the seam near the valve and the damage is small, back seam gluing will help:
- Open the inflation valve and use a special key to disconnect it from the leg.
- We insert two fingers into the valve hole and gradually pinch to reach the outer joint of the seam.
- We remove the old glue, degrease and coat with glue the strip that releases air.
- If necessary, dry with a hairdryer.
- We wait 12-24 hours (depending on the instructions for use).
- Let's check the result.
How to seal a seam from the outside without a patch in those places where there is tape that has lost its functionality:
- We fill the cylinders with air into three parts (75%) so that the seams straighten.
- We treat the surface as described above.
- We apply glue to the seams in the amount recommended by the manufacturer (usually a few millimeters thick).
- Make sure that the glue is distributed evenly and all joints are filled with it. It is better to apply the composition with a brush.
- Press the surface parts tightly against each other with your hand.
- Leave the boat inflated until the seam is completely dry.
A way to seal a hole in a seam or other place with a patch:
- After treating the surface, apply glue to it (you don’t have to apply it to the patch). It is better to apply glue to the damaged area in 2 layers: the first thin one, then wait 10-15 minutes, then the second layer and immediately proceed to further actions.
- We attach a patch.
- Smooth it out to remove all the air from under it.
It is better to avoid fishing in this boat for the next 3 days.
How to glue a seam on a rubber boat: video instructions
How to seal a rubber boat along the seam?
Fishermen and hunters who frequently use boats know very well that holes most often form in the seams. This occurs because there is a tape on the seams, which over time loses its functionality, namely protection, so holes appear.
To seal the seam, you need to find out the location, and then wash the boat thoroughly and dry it, preferably without the use of specialized tools.
Let's celebrate! The boat is inflated until the seam is straightened and pre-treatment is carried out, after which an adhesive is applied to the seams and pressed by hand. To dry completely, the boat is left inflated for several hours.
How to seal a boat transom: step-by-step instructions
We'll tell you how to install a hinged transom. In addition to this, you will need 4 washers, glue from the repair kit, a corner and a hair dryer.
Step-by-step instruction:
- We inflate the boat.
- We degrease the surface where we will glue the transom washers.
- Apply a ruler from the middle of the seam to the middle of the other seam and mark the center. This is necessary for symmetry. We do the same on the most protruding part of the boat.
- We insert the washers into the grooves of the transom.
- Using a corner, we set the transom angle to 90°.
- We attach the transom to the boat and measure the middle.
- We trace the washers to mark the location for installing the transom.
- We remove the washers to glue them without the transom.
- Apply glue to both surfaces with a brush (on the washers and where they will stick).
- We wait for the glue to dry (10-15 minutes, until it stops sticking to your hand).
- We heat the washer and the surface where it will stick, and immediately connect them. We press well. We do this with all washers.
- After half an hour we deflate the boat and put on the transom.
This process is on video:
In short. How to glue a hinged transom onto a PVC boat at home
Features of applying the patch
Repair of rubber boats is carried out under conditions of covering the damaged area by 2.5–3 m in both directions. Great attention is paid to the selection of materials. The ideal option would be a product close to the spare parts or an analogue of a rubber surface.
In extended tear zones, thread stitching is provided. Increasing the level of adhesion with the adhesive composition and the surface of the inflatable boat can be easily achieved by sanding with coarse sandpaper. Treatment with a solvent (gasoline) helps clean the coating from accumulated dust, degrease and improve the level of swelling of the rubber lining. Before applying the patch, the products are dried.
If you plan to repair a rubber inflatable boat (seam) "Omega 2", the place where the patch is applied is treated with glue. Using a clean brush will provide a similar thin, even coat to the rubber coating of the patch. Its further storage is carried out in an airtight container. The adhesive composition of normal consistency is stirred until uncorking. The thick mass should be diluted with a solvent.
How to clean glue residue from a boat
In some cases, before all these actions you need to get rid of the previous glue (for example, this is not the first time you are repairing a place). This is not easy to do because the glue bonds to the material at the molecular level (at least a good glue does). Therefore, there is no need to use force, otherwise the damage will become even more serious. Aggressive agents can also damage the material. We can recommend removing the old glue with sandpaper, but carefully so as not to damage the cylinder. Before doing this, you can heat the old glue with a hairdryer.
Now you know how to seal a rubber boat along the seams. We wish you good luck with the repairs and further hunting/fishing! And if you still need a new boat, contact us!
Question answer
Question: How to properly seal a PVC boat at home so that it doesn’t burst later?
Name: Fedor
Answer: You need to take a glue suitable for PVC, clean and degrease the surface, and then glue the patch. For the glue to work properly, the surfaces are heated with a hairdryer. In some cases, you can do without a patch, for example, with a minor scratch.
Question: How can I permanently seal a PVC boat?
Name: Alexey
Answer: The glue must be designed specifically for PVC. Other requirements include: resistance to water and sun, high bonding properties. The list of leaders includes such options as Texacol, Bostic, Clayberg and other brands.
Question: How and what kind of patch to glue onto a PVC boat?
Name: Ramil
Answer: Before applying the patch, you need to prepare the surface of the damaged area. After all the manipulations, you can press down the place with a weight. If the hole is large, it is better to make a couple of patches to fix the outside and inside.
Question: How to reliably glue the seams on a PVC boat so that they do not come unglued?
Name: Alexander
Answer: All parts of the seam must be thoroughly cleaned (can be sanded with sandpaper) and treated with a degreaser. Before gluing the patch, we recommend stitching the damaged areas with nylon thread. Two patches are used: the top one is twice as large as the bottom one.
Question: What is the best way to glue the bottom of a PVC boat?
Name: Maxim
Answer: The principle of operation is normal, patches are needed inside and outside. In addition, the bottom can be reinforced with a layer of fabric attached to an inflated PVC vessel. If a technological cut was made, it also needs to be repaired.
Share link:
Sealing a boat in case of a cut: step-by-step instructions
Manufacturers assure customers that the fabric is indifferent to the cutting effects of metal channels, pointed coastal rocks, and coarse coastal sand. But, of course, there is a limit to everything. Hunter-fishermen without experience often damage the bottom, side pontoons with air, the keel block, and the gable. Delayed engine braking, incorrectly chosen fairway in shallow water are the reasons that initiate damage in the form of penetrating cuts. If measures are not taken, the situation will become critical with the threat of partial flooding of the vessel. What to do in case of a cut? What steps should I take to resolve the problem? You will need a set of tools, often included in the manufacturer's standard kit. If the tear is 1-3 centimeters in diameter, apply a rubber patch on top, treating the edges with adhesive.
Domestic adhesive moment copes with the task perfectly. Restoring a cut cylinder will not require an immediate return to shore with a temporary cessation of fishing activity. You can seal the air pontoon directly on the water. The air that escapes through a two-centimeter hole can be restored using a foot pump - an autonomously functioning device. If the bottom is damaged, try to return to the shore as quickly as possible. If a large amount of water gets inside, pump it out using available means. Having reached the shore, pull the punt out onto a dry space, turn it over, and determine the exact location of the cut on a stone, metal, or sharp rock. Use a ruler to determine the diameter of the damage and take further action. Cut out the fabric patch, apply it to the damaged area, and carefully sew it with nylon thread. Eliminate the tension of the stitching material. Having finished with the firmware, proceed to gluing.
Seal the boat with PVC - choice of glue
Let's look at glue in more detail. It is included in the repair kit for the boat. But sometimes it is of poor quality, and the patch will fall off after a while. For example, the “Uran” glue from the kit becomes soft in the warm season. The following adhesives are suitable for high-quality gluing:
- Glue Bostik vinycol 1520;
- one-component adhesive SAR 306;
- two-component glue Molefix 8325.
Consult with a salesperson at a boat store and he will advise you on quality PVC glue.
Re-gluing the oarlocks
No repair of rubber boats can be done without a thorough inspection of the rowlocks. The fact is that this unit is subjected to the greatest load during operation and over time begins to gradually peel off.
The gluing process itself is exactly the same as with patches, but there are some subtleties:
- in order to easily tear off the rowlock, it needs to be heated with a hairdryer;
- It is necessary to glue a new spare part when the cylinder is deflated, otherwise the connection will be loose and will not last long.