How to raise mealworms at home
Who might need mealworms in their apartment or house? Why breed them? Such questions will never be asked by people who keep lizards or tropical spiders as pets.
By creating a small farm for breeding mealworms , they are able to provide their crawling and flying pets with an excellent source of healthy and natural food . In addition, they will no longer have to buy larvae from outside.
Mealworms are darkling beetles that are in the larval development phase . The main task of man is to create favorable conditions for their development and further reproduction of this insect. To do this you will need :
- three small boxes or boxes,
- suitable substrate,
- the initial number of beetle larvae.
In a few weeks you will be able to get your first litter, which will allow you to regularly pamper your pets with tasty and healthy food.
Preparing equipment for mealworms
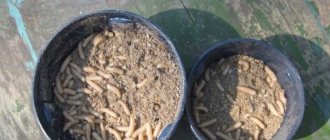
Breeding mealworms at home is a rather painstaking and lengthy process. To successfully set up a worm farm, you need to purchase special boxes with smooth walls in advance. Regular glass or plastic containers are suitable for this purpose, from which worms and beetles cannot escape. Some farmers use aquariums with a capacity of 10 gallons (that is, about 37.8-45.4 liters), as well as all kinds of plastic containers.
Breeding mealworms at home is a rather painstaking and lengthy process.
The lids of such containers must have holes for adequate air exchange. They are easy to make using a heated awl. In addition, you can cover the box with wire mesh, which will also provide good ventilation. The main thing is that fresh air gets into the boxes, but the arthropods themselves cannot be free.
The number of containers for setting up a worm farm depends on the size of the future colony. If you want to breed a large number of worms, it is better to purchase two or three of these boxes, because as they develop, you will have to separate the mature larvae from the beetles.
As for wooden boxes, they are not suitable for keeping flour beetles. Breeding at home is best done in plastic or glass containers, since an adult animal can easily gnaw holes in a wooden structure and get out.
Cage of individuals
To get started, get three plastic or glass containers. The walls of the cages should be smooth so that insects cannot climb them. Rectangular aquariums with low walls or special storage containers made of plastic are best suited. Cages must be provided with a good ventilation system. To do this, many small holes are made in the lid.
Advice . Do not use boxes made of wood or cardboard. Beetles can chew through them very easily.
Substrate
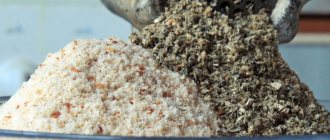
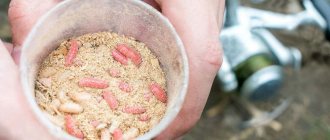
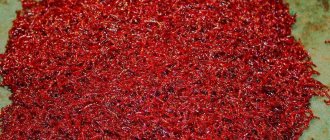
Many of us know that mealworms usually live in flour or other grains. These insects love any grain crops . Bran, corn or oat flakes and so on are suitable for us. It would be a good idea to grind the grains well to obtain a fine powder. Such a substrate is easier to eat by insects, and it will be easier for you to select beetles and larvae from it.
At your discretion, insects can be fed additionally. These could be the shells of other beetles, pieces of bread, bone meal, and so on. Such additives have a positive effect on the nutritional properties of future larvae.
Khrushchak: appearance, stages of development and area of distribution
First, let's figure out who eats our bread as willingly as we ourselves. First of all, let's talk about flour beetles (large and small). These pests are widespread throughout the world, because granaries and bakeries are located almost everywhere, and this is where they live and reproduce. And, of course, after some time they penetrate into ordinary human dwellings.
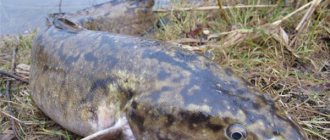
Large flour beetles, also known as flour beetles, or tormentors, grow quite large: up to 12–18 mm long, not counting the antennae. They themselves are dark, brownish-black, and reddish below, while their body is almost flat.
The large flour beetle is considered one of the most common pests of stocks
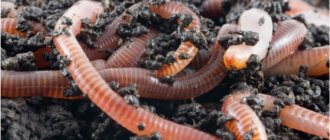
The larvae are significantly longer than their older relatives: their minimum length is from 25 mm. Their color is brown-beige with transverse dark rings, and after molting - dull whitish.
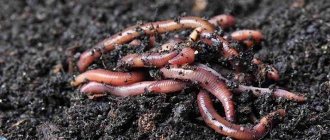
Many people call them "mealworms." In some ways, this is true, because the beetleworm spends its entire larval stage in a nutrient medium, in a kind of “burrow” located in the thickness of flour or cereal. The larva grows for a whole year and manages to molt four times, and then pupates and develops until the last stage of the life cycle, turning into a full-fledged beetle.
The larva of the large beetle is often specially bred as food for fish and birds.
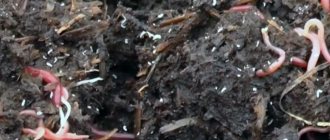
It must be said that Khrushchakis are very unpretentious in food: flour, already baked bread, bran, cereals, starch, dried fruits, and even wool or fabrics will do. Moreover, the larvae can be called scavengers: sometimes they eat the withered corpses of mice, birds, and even their dead brothers.
The small mealworm is most common in Russia and Ukraine. This pest lives in approximately the same places as the big one. In addition, in appearance they are quite similar, but the small one is lighter in color. And the size, as can be seen from the name itself, is also different: small beetles do not grow larger than 3–4 mm, and their larvae are approximately twice as long as the adult individual.
Beetles and larvae of the small flour beetle damage buckwheat and semolina cereals, rice, dried fruits, as well as flour (especially coarse flour)
These pests live in the same places as their larger “relatives”: in grain warehouses, mills and bakeries. Moreover, thanks to the slimy shell, their eggs easily stick to parts of various mechanisms and machine tools, so that small beetles are bred not only in the grain itself, but also in the equipment for processing it, and it can be really difficult to get to them.
It must be said that representatives of both species of these insects do not eat much flour or grain, so the main harm from them lies elsewhere. The beetles themselves, having fully developed, do not linger inside the food and try to fly out into the light as soon as possible. The main danger is posed by larvae, because they leave their excrement and skins in food after molting - all this, of course, can be harmful to humans. When there is a lot of this “good” in flour or cereal, it’s easier to throw the product away.
We buy the first colony
You will have to buy the first larvae. They are usually sold in pet stores . Decide for yourself the number of individuals. To begin with, you can stop at one thousand larvae. In a few months, when the beetles have completed the full cycle of reproduction and growth, you will be able to more accurately determine the number of insects you need.
Beetles of this species are capable of doubling the number of individuals in a colony in a few months. If you plan to immediately feed the larvae to your pets, then you should purchase several thousand worms.
Breeding process
The number of the first colony of larvae depends on the needs of the owner. If they are intended as food for lizards and birds, then 5000 worms will be required. In a few months the population will double. For fishing, it will be enough to start with a colony of 150 individuals.
Substrate up to 8 cm deep is poured into the cage. The first group of larvae is placed, an apple or potato is thinly sliced, and placed on the substrate. The container is closed with a lid. The worms will eat the substrate and reproduce. You will have to be patient, as the full life cycle takes about ten weeks. The larva will become a pupa, then a beetle and begin to reproduce itself. They lay eggs in the substrate. The larvae hatch after a month.
You need to check the cage every day and move the beetles away from the eggs, otherwise they will eat the larvae. In the new box they will mate and lay eggs again. It is not difficult to move them: the substrate is poured into the second container to a depth of 8 cm, and gloves are put on your hands. The beetles do not bite and hardly fly, so they can be handled without fear. Place apple or potato slices back into the cage and cover it with a lid.
Breeding mealworms at home does not require much effort. It is necessary to check the fish tank every day and replace moldy pieces of food with fresh ones. It is necessary to promptly remove dead individuals. In order for the beetles to reproduce, it is important to maintain a certain temperature in the cage.
Temperature
The temperature regime at which the larvae feel excellent ranges from 21 to 24 degrees Celsius . The location of the farm should be warm and dark. Make sure that the surrounding atmosphere does not contain any harmful chemicals that can easily kill the colony.
Cold inhibits all life processes of mealworms. If you want to keep a certain number of larvae to feed, simply place them in the refrigerator. They will remain unchanged for a long time.
Settlement of the colony
Pour a substrate no more than 5 cm thick into one of the cages. Start a colony of mealworms. Insects will immediately begin to hide in the substrate, burrowing into it. Also place a few pieces of vegetables or fruits in the cage. Carrots or apples are best for this. This feeding serves as a source of moisture for the worms and maintains the humidity level in the cage.
First litter
The life cycle of a beetle is about two and a half months under favorable conditions. The worms gradually turn into sedentary pupae and then become black beetles.
While waiting for the colony population to increase, it is necessary to perform certain care actions :
- change vegetables regularly to prevent mold from forming;
- maintain the specified temperature and humidity levels;
- clean the cage, removing dead larvae, beetles and other debris;
Beetles and larvae should not be kept in the same cage for a long time . Very often, adults eat their brood. Therefore, transplant the beetles into another cage. The conditions are the same as in a cage with mealworms. Place a few centimeters of substrate on the bottom and add vegetables. Gently collect the beetles with your hands and move them to the second cage.
When mealworms grow a little, they can be fed. Periodically, after several beetle development cycles, the cages need to be cleaned and disinfected.
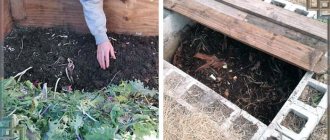
How to set up a worm farm
To set up a farm you need a three-level box.
Bottom drawer
Place live mealworms (darkling beetle larvae) in a layer at least 1 inch thick of a mixture of corn, wheat, and oatmeal (or other ground grains you have in your pantry). Add vegetables or fruits there as a source of moisture. Make sure there is no excess moisture, otherwise the process of rotting will begin. Perfect for:
- half an apple;
- half a potato;
- lettuce, cabbage or celery leaves.
Also, put half an egg carton or a few pieces of cardboard in the box - worms like to hide under them and crawl around them.
Once a month, clean the bottom of the box and replace the grain mixture with fresh one. Using a plastic fork, regularly sift the flour at the bottom to find the pupae and move them to the top drawer, where they will eventually develop into beetles.
Top drawer
The bottom of the top drawer needs to be cut out and replaced with mesh, which will allow beetle eggs to fall into the middle drawer. You could do without the mesh, but beetles often kill and eat the pupae, so separating them will allow you to better track the process of becoming beetles. Watching metamorphosis (transformation) never gets boring! The pupae you place in the top drawer eventually develop into beetles that lay eggs. The pupae do not eat or drink, but the beetles need to be given lettuce leaves and pieces of cardboard or halves of egg cartons placed on the bottom so that they can hide under them.
Middle drawer
The middle drawer should contain the same flour mixture and vegetables as the bottom drawer so that the larvae - mealworms - that hatch from the eggs can feed. Once they are old enough, start feeding them to your chickens.
Be sure to leave some worms to replenish the bottom drawer so that they turn into pupae and then beetles. In this way, the life cycle will be continuously maintained.
So, you will use the middle box to feed the mealworms before giving them to the chickens, the bottom one for breeding and separating the pupae from the worms, the top one for turning the pupae into beetles and laying eggs.
You can also dry the mealworms for later use or simply store them in the refrigerator. This will prevent the worms from turning into pupae and preserve them as larvae. Believe me, chickens love this food in any form - live, dried or chilled!
Mealworm: breeding and use as bait
Experienced fishermen know that in order for fishing to bring pleasure and good results, its organization must be approached seriously and thoroughly. In addition to correctly selected and comfortable gear, bait plays an important role. In our article we will talk about how mealworms are bred for fishing at home, as well as how they are used in the fishing process.
Characteristics of mealyworm
First, let's turn to the theory and tell you what kind of insect this is and why it is bred.
The larva of the mealworm is called a mealworm. The homeland of this arthropod insect is the Mediterranean. The beetles themselves are not large in size - their length averages 1–1.5 centimeters. The larvae reach 3 centimeters in length, they are practically omnivorous, but, as the name suggests, they prefer cereals and flour products.
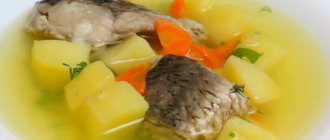
It is worth noting that fishing is not the only area of application for mealworms. In addition to being a favorite bait for roaches and rudd, mealworm larvae are an excellent feed additive for poultry and some exotic pets - turtles, lizards and snakes.
general information
Since ancient times, people have bred worms for a variety of purposes. In addition to fishing, they can be used as chicken feed. Such creatures contain a lot of protein and other nutrients necessary for the full development of poultry. In this regard, some poultry farmers are interested in the intricacies of breeding these arthropods at home.
However, not everyone agrees to such an “adventure”, because few people are ready to look at a bunch of fast, wriggling animals, much less engage in their breeding. In turn, daredevils who are not afraid of such a spectacle successfully keep worms in a small box and then use them for economic purposes.
The biological description of representatives of the species mentions that they are mealworm larvae with small sizes and a specific lifestyle. The creature was first discovered in the Mediterranean, from where it was brought to the European continent. The beetle itself has a body length of 1-1.5 centimeters, and the size of the larvae is 3 cm. When choosing a source of food, animals do not show any special requirements, but based on the name, you can guess about their love for cereals and flour products.
The life cycle of worms consists of several stages:
- Laying eggs. The duration of the incubation period is 8−30 days.
- Stage of larval formation (this is the stage that interests farmers and poultry farmers). The stage takes about two to three months.
- Transformation of mealworms into pupae. The process is carried out within 8−18 days.
- Formation of a full-fledged beetle. The lifespan of this form reaches 1−4 months.
When breeding mealworms you need to be patient and attentive. It is important to provide animals as poultry feed in a timely manner, and also to leave a few individuals for further reproduction. In this case, the development of the colony will be productive.
Breeding mealworms
In order to breed larvae at home, glass or plastic trays with tight-fitting lids are used. To install a simple ventilation system in these containers, a fine stainless steel mesh is sealed into such cages over the entire area. In this case, you should choose a tray with a large depth, so that after filling it with substrate there remains at least 10 centimeters to the top. This is done so that the larvae cannot get out of it.
Mealworm breeders who breed them constantly and in large volumes coat the cages on top along the edge with Vaseline to minimize the likelihood of larvae getting out.
There are other ways to set up a cage. For example, a small wooden box, lined with tin on the inside. If you don't have a suitable plastic, glass or wooden container, an iron baking sheet with high edges will do.
The optimal composition of the substrate for the cultivation of mealworms:
- cereals,
- fluffy or granular bran,
- sawdust.
All this is covered with cotton cloth. The cages must be kept clean and tidy. The tray itself must be clean, and the substrate must be changed at least once a month. To separate the worms from the remaining substrate and excrement, they are carefully sifted through a sieve and placed in fresh substrate.
Where do mealworms live?
Tormenters appear from eggs, which the female lays in large quantities. For laying eggs, the female chooses bakeries, flour and grain warehouses, and mills.
In addition, larvae can often be found under bird nests, under feeders in dovecotes or chicken coops.
In these places they grow and develop for about 12 months , feeding on flour, grain, bran or baked bread. But they will not disdain the remains of animals - dry corpses of birds, rodents, particles of bird feathers, etc.
During the year they go through 4 molts, after which they turn into pupae, from which young beetles emerge by mid-summer.
What is necessary and important to know?
- But the tasty ingredients listed above are only part of the larvae’s nutritional system. Shredded vegetables such as potatoes, carrots, cabbage, turnips, and dried fruits should be placed in the cages daily, as well as aquarium food such as daphnia as protein supplements. To prevent the food from becoming moldy, it can be placed in cans with pre-drilled holes, and the cans can be buried halfway into the substrate. But in any case, the food should be changed at least twice a day.
- If possible, install small drinkers slightly separate from the substrate. The larvae need to drink, but they will not survive in high humidity environments. A good way to drink water is to place a bottle filled with water with a flax wick buried in the substrate.
- Do not forget about maintaining a stable temperature at 25–28 degrees. This can be achieved using electric heating cords that are placed under the bottom of the cage.
- Some people cultivate beetles and larvae in one container. We recommend planting the beetles to prevent the larvae from eating the eggs they lay. The larvae grow for 110–120 days, pupation occurs within two weeks, and the lifespan of an adult insect is 35–45 days. The female can lay about 200 eggs.
- After preparing the cage, the acquired beetles are placed in it. With a sufficient number of individuals, their sexual characteristics will not be so important - adult beetles reproduce very efficiently. To get your first batch of mealworms, you will have to wait two months, then production will become established and constant.
Pupation is a necessary process to ensure uninterrupted worm production. With further breeding, you will need a certain number of adults who will lay eggs. To do this, the grown larvae are selected and transplanted into a separate cage with the same substrate, covered with a cloth, but they are not given any additional food. After the beetles emerge from the larvae, they should be kept in a separate tray for up to 10 days - during this time the shell will harden and they will be able to survive among older individuals.
Useful tips
Grown larvae can be fed to pets. To create a supply of food for them, the worms can be placed in a food tray and placed in the refrigerator. At low temperatures they remain fresh longer.
Regularly sift and restore the substrate, as it becomes depleted over time. Therefore, over time, you need to transplant the mealworms into a new container , and free the old one from the remaining substrate and treat it with disinfectants.
For rapid growth of larvae, provide them with long daylight hours. Use lighting lamps. It is important that the cage area is large. The selection of food is also important: daphnia is used as a protein supplement. Chopped vegetables will help the larvae develop properly. To prevent the food from rotting or molding , you need to place it in an iron can. Holes are made in it and placed halfway in the substrate. Food needs to be changed every day.
The use of mealworms varies ; breeding the larvae does not require much effort . They can be used as bait for fish. They are easy to transport: together with a small amount of substrate, you need to place them in a small container or cardboard box with a lid. This way the larvae will not die. It is better to string them on a hook in the middle of the shell. This way it won't break. Large fish bite on this bait.
Mealworms are used as an additive to the diet of some animals. It is fed to lizards and birds. This is a beneficial insect that does not require special care or conditions.
Using mealworms for fishing
If you do not breed mealworms, but simply purchased a couple of hundred larvae for a fishing trip, you can store them in a box with sawdust, following the basic rules:
Such storage can last from one to several weeks.
- When you get ready to go fishing, place the larvae in a plastic or cardboard box. It is better to carry it in your breast pocket. Thus, the larvae will not die and will be able to perform their function during fishing.
- Using mealworms as bait, experienced fishermen take thin hooks and bait the worms from the middle of the shell - where the shell is thickest. Casting should be done carefully so that the worm does not break.
- This type of bait is perfect for both bottom fishing rods and float gear. You can even catch very large fish with it, which are very suspicious of dung worms and other types of bait.
To sum it up, we can say that raising mealworms is not a burdensome procedure at all, and its use in fishing can make the process more productive and fun.
How to make a mealworm farm
As we promised in the previous article, today we are talking about how to make your own farm for growing mealworms at home. And mealworms, as we found out, are an unusually tasty and healthy complementary food for chickens. Perhaps this is delicacy number 1 . Well, or at least it’s definitely in the TOP 3 chicken deliciousness.
Mealworms are full of protein and other nutrients. By feeding chickens with them, you help laying hens increase the quantity and quality of eggs laid. This happens not even due to the nutritional qualities of the feeding, but due to the fact that in this way you make the chickens “happy” , and from this they increase productivity.
It can be expensive to continually buy these treats from the pet store. Therefore, the idea of making your own mini-farm at home will help you save a lot. Such a farm can provide your birds with excellent snacks all year round. In addition, you can sell surplus production yourself or take it to a pet store, because... Mealworms are used as a treat for many terrarium animals and any domestic ornamental birds - parrots, etc.
So, today let’s look at what “mealworms” are and how to organize a combine to produce them.
What is a mealworm?
From mealworms grows a beetle called the “ Great Mealworm ” or simply “ mealworm .” They can be found in bakeries, granaries, mills, in bags of feed, etc. That is, they love dark and dry places where there is plenty of food - grain, flour or animal feed.
They don’t even need to drink - they receive all the moisture necessary for life in tiny quantities along with grain.
The female beetle lives only a few months and during this time manages to lay up to 300 eggs. After 2 weeks, the eggs hatch and become larvae.
How do these insects appear in the house?
As mentioned above, Khrushchak residents are primarily interested in granaries and large food warehouses. By themselves, they practically do not attack human habitation. And yet, sometimes we find these pests among our supplies. How do they get there? It would be logical to assume that from the places where the packages of flour or cereal came from. This often happens when, due to an oversight, pests appear inside the storage facility, but no one destroys them. Damaged products end up in stores and then in our kitchens. However, this is not the only possible way. Sometimes everything turns out to be more complicated: pigeons and sparrows can transfer eggs and larvae from the same warehouses to the attics of our houses. And, since there is nothing special to profit from there, the beetles descend into our apartments (for example, through the ventilation).
How to make a farm for obtaining mealworm larvae?
It's very easy, simple and not labor intensive! You won't need any technical knowledge or skills here.
For more creative fun, get the kids involved in creating a farm. This is a great way to have some fun and designate a "head farmer".
Step 1: Find a suitable container
Any sealed box is suitable for a mealworm farm - an old aquarium, a plastic bowl, a bucket , etc. A glass (transparent) container has an additional advantage - through it it is extremely fascinating to observe insects - their growth and development, their affairs and movements. Children can watch these processes for several hours every day!
The approximate dimensions of the container should be approximately 30x30x60 cm . In addition to the box, you will need a lid with air circulation. This can be either a metal mesh or a wooden frame with a flexible mesh stretched over it, like mosquito nets on windows. As a last resort, you can take a suitable piece of plywood and drill as many small holes with a diameter of 2-3 mm in it as possible.