For winter hunters of predatory fish, the question of how to equip the girders correctly is always relevant. A lot depends on the equipment of the winter girder. A standard leash, sliding olive and double (tee) are not suitable for all fishing conditions. In some situations, other montages come to the rescue. The thickness of the fishing line, the length of the leader, the size of the hooks - everything must be selected and tied correctly to avoid empty lifts and unpunished damage to live bait.
Content
- Catching pike on girders in winter
- Types of vents With a wide base
- With legs
- With slats
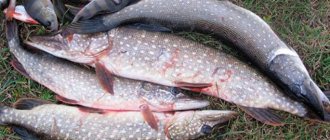
Zherlitsa fishing is one of the most exciting and exciting types of winter fishing. However, all the delights of this species can only be experienced when your goal is to catch a spotted predator, that is, pike.
Fishing tactics
Fishermen complain about the abundance of “pencils” and the lack of worthy specimens. Small pike of the first or second years of life are always found in coastal thickets. But to catch large pike on girders in winter, fishing tactics need to be chosen depending on the reservoir and conditions, and not put up flags at the first bushes you come across. First you need to collect as much information as possible about the reservoir from local fishermen or on the Internet.
If on a small river you can come across trophy pike everywhere, then in large rivers you need to take into account the winter migrations of the predator, determine the most promising areas of the water area from which the search will begin. In winter, pike can be caught well on girders throughout the entire period, but, naturally, you cannot catch it where there are no fish. The toothy one is not a raider perch, so you need to find the area where the predator is currently hunting. When a predator has shown itself, catching it becomes a matter of technique. The toothy one will not go far from its possessions.
Where to look for pike in winter with girders
We can distinguish two large zones in which pike are located - coastal and deep. Near the shore, any thickets, snags and shelters can provide an ambush for the toothy one. Further from the coast you need to look for anomalies in the bottom topography. Pike are rarely found on flat areas. The most promising places where you need to catch pike in winter using girders:
- Boundary of reeds and open water;
- Extensive shallow, vegetated areas;
- Individual underwater areas of vegetation;
- Potholes under the shore, trees overhanging and falling into the water, backwaters behind the cape;
- Channel edges, slopes, steps, exits from pits (any bottom irregularities);
- Snags;
- Boundary between direct and reverse flow;
- The border of calm areas with a stream (the fish will stand on calm water).
On small and medium-sized reservoirs
Catching pike with girders on the river in winter is, first of all, checking promising deep-water or overgrown places near the shore. On an unfamiliar body of water, it is better to use search tactics - moving the flags to other places in the absence of bites. If you know for sure that a predator is present here, you need to wait. The toothy one can only come out at certain times. In this case, several alarms may go off at once, and then there is silence again.
Where to place pike baits in winter on lakes and ponds? You should start from the shore, gradually moving the gear further until the depth level of the predator’s site or its paths are found. You always need to check individual anomalies - a bush, a snag, a creek. Such places can be a haven for a trophy specimen.
On small bodies of water, where the shore and the middle are within walking distance, some of the girders can be installed in the shallows, the other in the depths. Gears for catching pike in winter in snags and in shallow water are set differently than in sufficiently deep open water - more on this below.
Large water areas
Fishing for pike in winter on baits in large rivers and reservoirs requires an initial strategic plan. The predator may be in the riparian zone, or in the riverbed, or somewhere in between. These water areas may be kilometers away, so it will not be possible to catch all possible options in one fishing trip.
You need to determine the fishing zone for yourself depending on your knowledge of the reservoir, information from local fishermen, taking into account weather factors, seasonality and fish activity. In large areas without serious bottom anomalies, you need to find at what depth to catch pike with girders in winter. To do this, the gear is placed in a chain at different levels of the bottom.
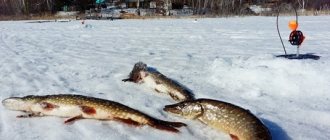
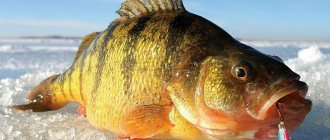
After the bites, all the baits are transferred to places with depth where flags were raised. It is important not to confuse pike bites with perch bites. The striped robber leaves abrasions and removed scales on the live bait, and the toothy one leaves deep cuts.
Catching pike on girders in winter
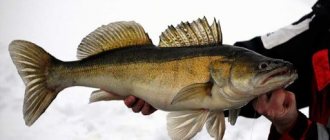
Pike is an enviable trophy for most fishermen, catching which brings great pleasure from the fishing process itself, especially in winter.
Today we will look at this type of fishing in more detail, find out what a standard girder consists of, understand the basic tactics of fishing for it and learn how to find “pike trails” in a reservoir.
First of all, let's look at the most popular types of this gear, which can be roughly divided by type of design.
Types of girders
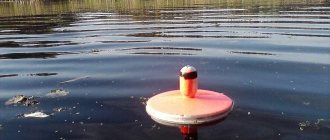
Wide base
The most popular type of this gear. The design of this girder is very simple.
Base. Most often, its base is made of plastic, less often wood. The shape is a circle, 20-25 centimeters in diameter, with a slot for passing fishing line under the ice. In addition, there are also special holes for installing a flag and a stand.
Rack. Mounted in a special hole in the base. The reel is installed on the stand.
Coil. Made from plastic. It is installed on the stand in a special way to ensure free movement when rotating in any direction when biting. Sometimes there are special marks on the spool to better see its rotation.
Checkbox. Mounted in the bottom of the vent. When bitten, it straightens and signals that the fish is interested in the bait.
With legs
This type of vents is used where there are high snowdrifts and snow deposits on ice. It is very easy to catch with them, because it is very clearly visible from a great distance. Structurally, this type of gear has one or three legs for greater stability.
Like vents with a wide base, this type consists of almost the same elements:
- three or one leg;
- rack;
- coil;
- checkbox.
However, there are some distinctive features. In this case, the stand is the main element of the entire tackle, and everything else is mounted on it. The flag is attached to the top, the legs or foot are attached to the bottom, and the reel with fishing line is in the middle.
By the way, if you choose a vent with one leg, then it is advisable to freeze it in ice. In addition to the fact that this will ensure high stability of the tackle, even with this design the leg will serve as a stand. The reel and flag can be attached directly to it.
With slats
Fishing with this gear is very convenient thanks to the installation and transportation of such girders. They practically do not require assembly operations on the ice of a reservoir, since they are most often assembled at home in the following sequence.
- A spool of fishing line is mounted at one end of the rail;
- On the other side is a flag;
- A small hole is drilled in the middle of the rail, into which the fishing line will later be threaded into the hole;
- At the end of the fishing line, which was passed through the hole in the rail, the equipment is mounted. Installation is ready.
Installation of vents
Catching pike with flags in winter is not an activity for the lazy. At first glance, it seems that this fishing method is passive. In fact, during one fishing trip you may need to drill dozens of holes. If there is an active bite or multiple idle alarms, you will have to run. In addition, for such fishing you first need to stock up on live bait. Let's look at how to properly install girders on pike in winter.
Standard fishing
The scheme for installing girders for pike in winter depends on the tactics used and the conditions of the reservoir. When fishing along coastal reeds or reeds, flags can be placed at the border in a chain, or in two lines - directly near the bushes and at a distance of 2-3 meters from them. If there are windows in the thickets, we install supplies there too.
When fishing on the edge or other anomalies of the bottom of the girder for pike in winter, you need to set it accordingly. In large open water areas, a square nest arrangement can be used. When fishing with a team, it is better to distribute a promising place into areas, in each of which an angler works.
At what depth should I place a girder for pike in winter? In summer, pike can follow fish to the very surface, but its normal state is to hunt near the bottom. In winter, the fish is passive, it saves energy. Therefore, you should help the predator and not try to tear it away from the bottom layer.
Live bait should be located 10-30 centimeters from the bottom. At this moment we pay maximum attention; the winter girder on the pike needs to be placed correctly. This is critical. In rare cases, the equipment needs to be raised, for example, above snags or a solid carpet of algae on the bottom.
At the beginning of winter, pike can catch at any time of the day, but it is better in the morning or evening, especially in clear weather and transparent ice cover. In the dead of winter and closer to spring, light is almost not a factor in biting, and a toothy fish can be caught all day. If the biting time on a particular body of water is obviously unknown, then it is advisable to put out all the gear before sunrise - at dawn there may be the only predator outing of the day that will bring the catch.
How to properly install a girder on a pike in winter
The optimal distance between holes is 10 meters. If you do more, you might miss a good place. Yes, and you will have to run far between the flags. Drilling closer is pointless (except for fishing on local anomalies). A predator present within a radius of 10 meters will in any case pick up the vibrations of a live fish with its lateral line.
On a clean bottom, the equipment is lowered into the water until the sinker reaches the bottom. After this, the fishing line is raised to the length of the leash plus 15-30 centimeters (the distance of the live bait from the bottom) and secured to the reel (in the slot). It is important to ensure that an excessively large or lively baitfish does not provoke the flag to go off, but at the same time, the fish that pecks calmly pulls out the line when it grabs it. After this, we cock the alarm (we put the flag behind the coil, into the split - depending on the design of the girder). When there is a bite, the flag will release and rise, signaling to the angler that it has been triggered.
Shallow water fishing
Installing winter girders on pike in February makes adjustments to tactics and equipment. Closer to spring, pike can hunt in the coastal strip, where the layer of water under the ice is only 15-50 centimeters. The ice can be more than a meter thick. In such conditions it is important:
- During the fishing process, determine the depth at which the pike fishes. Every centimeter of depth matters - for example, it takes 15 cm, but not 20 cm. For this purpose, girders are installed at different levels in order to determine the worker.
- The sinker can be removed from the girder, this will improve the mobility of the fish.
- The most important thing is to set the correct working trigger when fishing. The live bait should be located precisely in the layer of water between the ice and the bottom, and not in the hole. Therefore, careful measurement of the water layer under the hole is required. This can be done with wire bent with a poker. Using a poker, we determine the thickness of the ice, and with a cord and a weight, we determine the total depth. The difference between them will be the thickness of the water layer under the ice. The required length must be accurately marked on the working overhang. The toothy fish simply will not find live bait if it lies motionless on the bottom or is in the glass of the hole.
Pike in shallow water are hungry and cautious at the same time. On a bright day, the holes need to be sprinkled with ice chips or snow (if the holes are without a screen), the angler must move quietly, without dropping objects on the ice or stamping his feet. In some places the predator can be extremely cautious.
In such a situation, it is necessary to drill holes the day before, in the evening (fortunately, pike are found in shallow waters mainly during thaws), and devote the rest of the day to catching live bait a little further away for tomorrow's fishing. In the morning, of course, you literally have to tiptoe to move and set up gear in place.
Measuring the layer of water under the ice with a poker in shallow water
Zherlitsy in snags and thicket windows
Catching pike on girders in winter in snags or blind windows requires observing some nuances. If the predator that takes it unwinds a lot of fishing line in such conditions, then it will hopelessly tangle the tackle, if not immediately, then in the process of fishing. Therefore, here you need to install blind gear, without coiling. You need to use small live bait so that the pike immediately swallows it completely when it grabs it.
The fish is hooked under the dorsal fin on a double hook. Accordingly, the girder itself must be strong and the fishing line thick. The fishing principle here is self-cutting or instant hooking when triggered. The fish must be retrieved quickly so that it does not have time to get the tackle into the bushes.
When fishing like this, you don’t need to set up a large number of girders - it’s important to react quickly; you might not be able to see it with a dozen pieces of gear. The emphasis here is on one or two tackles in a specific promising location. The remaining flags can be placed next to snags - up to 10 meters. The predator will calmly walk this distance from cover behind the spotted prey.
How to install a vent yourself
The tackle has been selected, now it’s time to begin its installation and rigging. To do this you will need to wind on a reel. 10-12 meters is enough. The thickness for pike is not less than 0.3 and not more than 0.5 mm.
As for leashes, as in the case of summer fishing, they are simply necessary. Length - from 10 to 15 cm.
The presence of a weight is determined by the current and its strength. In any case, the purpose of the load is to hold the bait, not allowing it to float to the surface of the ice, pull the line off the reel, or even swim away into the thicket, where it will reel in the line.
As for the hooks, the zherlits don’t have a definite answer. Fishermen use both singles, doubles and triples.
Adjusting the flag is an important point. The main thing is to adjust it so that it does not work when the live bait moves. The fact is that in winter the pike is very careful, and when it feels a flag, it will simply spit out the bait.
Design of the vent
The assortment of fishing stores includes many equipped options for supply, but it is better to take “naked” models, without fishing line and rigs. An experienced fisherman has his own opinion on the correct equipment of a winter fishing rod for pike. It differs in the diameter of the fishing line, the size of the hook and the type of leashes.
Structurally, the tackle consists of a plastic base, a reel holder, a reel and a flag. Most models are made in a round shape so that the tackle fits comfortably on the hole. It is less comfortable to fish with rectangular or square baits, especially at sub-zero temperatures.
To install the equipment on a medium-sized fish you will need:
- fishing line with a diameter of 0.3-0.35 mm;
- sliding sinker;
- rubber stopper or pellet;
- leash material;
- hook (single, double or triple).
Delicate tackle certainly increases bites, but the fish break off more often.
Line and leash
In winter fishing for girders, there is a simple rule: if fluorocarbon is used as a leash, the main line is doubled in thickness. As you know, only metal is resistant to the sharp teeth of a pike, and thick monofilament allows you to pull out the fish “roughly,” reducing the chances of being cut. The length of the leash should be at least 30 cm, since the tackle is often left unattended and a large specimen swallows the bait along with a short leash, cutting off the tackle. A popular option is tungsten twist - the material is quite dense and too tough for a pike. The main line is attached to the leash through a swivel, which prevents the bait fish from twisting the tackle.
Sinker
The lead weight holds the bait at a certain depth and is important when fishing in holes, channel edges and currents. The shape does not play a role, but streamlined models in the form of olives are mainly used. The sinkers are installed sliding and secured from below with a stopper or pellet. When biting, the predator does not feel the weight of the installation, since the load falls to the bottom, which allows the pike to calmly swallow the bait. In shallow water areas - bays and sandbanks - the tackle does not require additional weighting. Live bait behaves more naturally, its movements are not constrained.
To learn more:
Jigs for winter fishing: purpose and types
Hook and bait for fry
The method of baiting fish through the gills is becoming increasingly popular. To do this, you need a double, which is located directly under the gill covers and is fastened with a carabiner. The hook is selected for live bait. A large one will pull the bait to the bottom and alert the predator.
With single and triple models, the fish is hooked by the lip, upper fin, and in some cases by the tail. Each method has its own advantages and disadvantages, but when biting, it is necessary to give the pike time to swallow the bait, otherwise there will be a disappearance.
How to bait live bait
The answer to this question will depend on what bait you are using. For example, non-spiny fish, such as roach, are best baited by the mouth. But for perches or ruffs, it is better to pierce behind the dorsal fin.
These tips do not have to be considered a rule, since every fisherman has his own subtleties and tricks in the matter of baiting bait. Let's look at the advice of one of them.
How to find “pike trails” - video
Selecting, buying, preparing and equipping a zherlitsa does not mean that you are ready to become a real zherlitsa. To increase the likelihood of catching a predator with this tackle, you need to know where and how to look for “pike trails.”
Tip #1. As soon as the ice has established itself and you can walk on it, it’s time to look for the toothed one in the shallower coastal areas of the reservoir. For example, it can sit in thickets, under snags and, of course, in the area of the drop from depth to shallow.
Tip #2. As soon as strong ice is established, pike food (small fish) loses activity and slides into holes, which means that you need to look for pike there. Therefore, in the middle of winter, experts advise looking for pikes in slopes near wintering pits.
Tip #3. If in the dead of winter nature spoils us with prolonged thaws, then the pike, following the food supply, moves to shallow places.
Tip #4. In winter, you are more likely to find pike in the area where streams and rivulets flow, where there are a lot of small fish in the fresh stream.
Tip #5. Snag, this particular place is considered one of the most interesting places for snag. If there are snags at the bottom, then sooner or later you can find pike there, provided that the oxygen regime there is not disturbed. On a large body of water, the snag, as a rule, also works in the dead of winter. However, when fishing in snags, be careful and always take a cutter with you when fishing.
For those who don’t want to read, we present a video on how to find “pike trails” and install girders on them.
How to place the girders correctly
When going out on the ice, you need to determine the first fishing zone for yourself. If the place is new and unfamiliar, you should start by checking the reeds and coastal edge. Gear is placed at a distance of at least 10 m from each other. The location of the girder at the edge of the reeds will give the predator a chance to enter the reeds and confuse the equipment, however, in such places, bites occur more often.
The scheme for installing a winter girder on pike is simple: the angler fishes promising points one by one, devoting no more than 30 minutes to each. Many people leave their gear stationary for the entire fishing trip, which is not very productive. You need to look for a predator, especially a passive one, and if you manage to put bait under its nose, you can count on success.
There are usually no pike on the “tables” (as the plateau is called), since the bottom is flat and there is little shelter. Fishing with girders in winter is also not carried out in the deep areas of the pits, unless we are talking about pike perch. An effective tactic is considered to be positioning on a dump, where, by definition, there should be a pike.
How to recognize a pike bite
The tackle has been selected, live bait has been attached to it, the hole has been drilled and the girder has been installed, all that remains is to wait. As soon as you see that the flag has been triggered, it is advisable to immediately approach (but not run) to the gear in order to understand the reason for what is happening under the ice.
Pike bites on jig tackle look something like this:
- A toothy predator approaches the baitfish, inspects it, and grabs it across. With such a bite, on the surface of the ice the reel releases the flag and scrolls a little on its own;
- Next, the pike stops and begins to turn the prey forward with its head to swallow. At this moment the coil stops;
- The bait is swallowed, the predator begins to move, and the reel begins to unwind again. It is at this moment that most fishermen advise hooking, since if you do this before the bait is swallowed, you can miss the pike, since the bait can be torn out of its mouth.
We bring to your attention an interesting under-ice video about how a pike reacts to a baitfish underwater.
Next comes the process of fishing. Here experts advise that you should never loosen the fishing line. The main thing to remember is that if the pike moves easily, we pull it to the surface. If she gets up and resists, we release a little fishing line.
By the way, most beginners, when they see a pike right next to the hole, make a mistake. The main thing here is not to forget that, blinded by the light, she often makes a decisive jerk and tries with force to free herself. Don't miss out!
Equipment for vents
Sinkers, fishing line and hooks
When equipping rigs, I recommend using an olive sinker of such a size that the sinker fits freely into the groove of the reel and not by tension. This will make it easier for you to unwind the beginning of the tackle when installing it. The required weight is obtained by the number of olives.
I use two 3/8 oz olives.
The sinkers are fixed with two stoppers cut from the cargo inner tube.
The line is threaded through the stopper using a thin saddlery awl. The loop knot is covered with a cambric, this protects the line from getting caught behind the knot and getting tangled. A 20-30 cm piece of cord (0.4 mm in diameter or more) is attached to the loop of the fishing line with a noose loop - the cord protects the fishing line from rubbing against the edge of the hole when placing the head of a trophy fish into the hole. Often it is Trophies who lead long round dances, the tension under the hole and the fishing line are in the risk zone... The other end of the cord is also attached to the swivel of the leash with a noose loop. This installation makes it possible to quickly replace the leash in case of chronic wear.
For fishing with girders, I only use doubles.
This is due to the method of attaching live bait, which I successfully practice, and, again, to promptly removing the hook from the leash. The main line is attached to the reel using a self-tightening loop.
Winding fishing line - video
Since winding the fishing line on this model of girder is done somewhat non-standardly, I decided not to talk about it, but to show it.
In words:
- Thread the fishing line from top to bottom into the “Anti-Beard” hole
- Tie the fishing line to the reel with a self-tightening loop, or any other knot that you prefer.
- Wind the fishing line (move the reel clockwise, respectively, the fishing line counterclockwise)
- Equip the vent.
- The concept of “Anti-Beard” is to make one turn of the line counterclockwise around the reel and lower the sinkers and live bait into the hole.
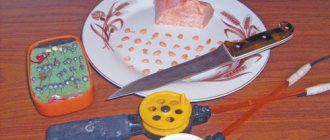
Live bait and its bait on the hook
Dear Friends, use a fixed net for catching live bait only as a last resort, when there is no other alternative. After the net, live bait is no longer live bait, but dead fish and is most suitable for fishing in Pike traps. In fact, they sometimes hang frozen food on traps.
There are countless ways to attach live bait to a hook (single, double, treble), from simple and practical to almost sexually perverted. The method described below involves the use of a double, and was shown to me by old Fishermen in the Tomsk region.
Having removed the double from the leash, the loop of the leash is carefully passed under the gills of the live bait and the leash is pulled out through the mouth
The double is threaded through the loop of the leash and the leash is carefully pulled up. The double depicts a mustache on the muzzle of a live bait fish
What is good about this method of attaching live bait? I will answer in detail point by point:
- Live bait is not injured and remains mobile for a long time.
- When you see a fresh job, you don’t need to run like crazy, your eyes bulging, to the line and hook! It is well known that Pike always grabs live bait across the body, swims with it for some distance and there begins to swallow it from the head. From the head, that’s right, from the Head!.., and there is a double – “with its stings back”..., so the Fish, without being pierced, calmly swallows the bait. With this method of attaching live bait, I have never had any problems. (Ugh, ugh, ugh!!) Of the hundreds of different-sized Shchukans, only a few had a hook in the jaw, a dozen had a hook in the gills, and all the rest had a hook in the beginning of the esophagus.
- Based on the above, when you see a fresh piece of work, do not run to it, but take out a flask with Cognac. Take a sip for a Happy Day in Nature! Take a deep breath of the frosty air... And then, slowly, take a replacement eland with live bait and a hook, go to work, I wish you that there would be a lot of them...
I would like to emphasize to you: Take your time! Let the Pike swallow it... And enjoy your Rest and Fishing!
Want to know more?
Then head to the special sections of our forum, where you can ask any questions related not only to the choice of a girder, but also to the tactics of fishing with this type of gear!
- Winter fishing;
- Tactics of fishing with a zherlitsa;
- Tactics for catching pike with a girder;
- How to choose live bait for a zherlitsa;
- How to choose a leash for a harness;
- Review, modification and tuning of the “Terminator” girder.
Friends, first of all, the article we presented is aimed at those who are thinking about pole gear for the first time, and are planning to purchase their first pole in the near future, and go to the pond - test their strength and acquired knowledge. We hope that after reading the article, beginners will catch their first pike and get unforgettable emotions from catching toothy predators with this tackle.
Do-it-yourself summer bait for pike
Those who are familiar with the design of a winter girder can, of course, easily convert it into a summer version. Although there are different designs and many fishermen do not know how to attach them to a pond or large rivers with moderate currents.
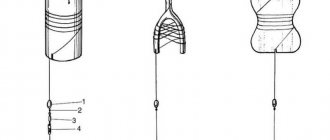
Among the classic options for girders, you can make simple designs with your own hands from scrap materials: a flyer, a tube, a flag or an ordinary plastic bottle.
A fishing line is attached to these materials at one end. It is wound so that it can easily come off the base if necessary. A sliding sinker is connected to the other end, as well as a tee and a leash.
To securely hold large fish, the frame of the structure is securely attached to a stick or wrapped around a nearby tree.
When installing a girder, it is advisable to hide it, install it directly under tree branches hanging over the water.
When using the slingshot design, you need to stick the sharpened end directly into the thicket of reeds or sedge. In such places, the use of spinning rods is out of the question, but ordinary scraps from sewer pipes are just what you will need.
Moreover, it is reasonable to make several vents of different designs at once, and place them close to each other at night. When the fish starts to bite, the line will easily unwind from the stag; there will simply be no obstacles for the fish to swallow the hook.
Self-hooking will occur in full when the fishing line leaves the base of the girder.
In this article we covered the question of how to make fishing chairs with your own hands.
After the spring flood in the summer, the water level in rivers and lakes begins to decline. At the same time, the growth of grass in the pond begins to gain strength. All this, along with the presence of snags, makes fishing difficult for the spinning angler. A hand-made summer vent can come to the rescue.
Those who fish in winter can easily adapt their gear for summer fishing in open water. However, not every fan of exclusively summer fishing is familiar with the design of the girders. The girder is made from simple available materials.
In addition to installing the gear, the fisherman also needs to decide on the method of attaching the girder to the reservoir, especially if it is a large river with a moderate current.
Getting to know the device
The zherlitsa is a classic live bait tackle designed for catching predatory fish. With the help of this device, pike, pike perch, catfish, burbot and perch are quite successfully caught. Depending on the time of year, there are winter and summer zherlitsy. Today, various modifications are presented to anglers.
They all have a similar design, in which there is a bite alarm, a base and a stand on which the reel is attached. The fishing rods use a general principle: a predator, having swallowed the bait, pulls on the line, causing the alarm to go off. Knowing the principle of operation, it will be interesting for the home craftsman to start making a summer girder for pike with his own hands.
When making a summer lure for pike with their own hands, many fishermen wrap the reel with wood so that it unwinds easily from the slightest tug. Often the line is installed in a wooden groove or piece cut from plywood. You can also use an inertia-free reel, which will easily unwind with a little effort.
We suggest you read: Choosing a feeder rod for beginners
How to properly make a summer bait for pike?
Fishermen have developed many variants of such devices. Judging by the reviews, handicraft girders are not inferior to branded ones. The following is one of the simplest ways to make a summer girder for pike with your own hands. To make a fishing device, you need to perform the following steps:
- Wrap a line around a wooden flyer, the length of which should be at least 20 m. You can also use a plastic pipe or durable plywood.
- Insert the line into a special slot in the reel. This must be done so that a sufficiently long piece of fishing line ends up in the water. In this case, the depth of the reservoir itself should be taken into account. Experienced fishermen recommend checking it first before starting to operate the device.
- Next, the fishing line on the girders is equipped with a corresponding sinker using a sliding method. Its weight should not exceed 15 g. The sinker is attached to a swivel, which is then connected to the leash. For this purpose you will need a winding ring. Live bait is attached to the latter on a double or triple fishing hook.
After performing these steps, the girder is connected with a rope to some static object located on the shore of the reservoir.