Four types of winter floats and their fastenings
The figure shows four types of fastening winter floats to a fishing line.
Difficult to replace
1. Float with an internal channel for fishing line. Disadvantage: to change the float you need to break the line. Advantage: tight attachment to the fishing line.
2. Float with fastening at the lowest point. If the float does not have a ring, then it is easy to change it to another one, but if during rigging the fishing line is threaded into the ring, you will have to tear the fishing line to change to another float.
Easily replaceable
3. The float with a side slot is very convenient for quickly changing to another float.
4. Float with removable antenna.
Equipment options for a winter float fishing rod
A winter fishing rod with a float can be equipped in several ways, depending on the fishing conditions: the current and the type of fish being hunted.
Option 1. Using a regular lead sinker and hook.
Figure 1 shows fishing without current.
Figure 2. Fishing in the current, the sinker must be lowered to the bottom. The distance in both cases from the hook to the sinker closest to the hook is 4-7 cm.
Option 2. Using a jig and a hook.
Figure 3 shows the gear in still water. The line is passed through the jig, the latter is attached, then the hook is attached to the leash.
Figure 4 shows the flow situation. In this case, you should attach the leash with the hook by passing the fishing line through the top ring of the jig, and not through the entire cavity. This way the jig will easily reach the bottom, and the leash and hook will not get tangled.
Option 3. With a hard leash.
Figure 5 shows the use of a small leader made of stiff line and a light hook. Thanks to this tackle, the hook will go a little to the side and will be more noticeable.
The same option in the current is shown in Figure 6. Another leash with a non-sinking plastic jig has also been added.
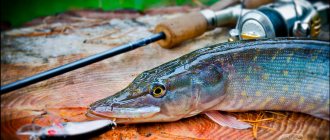
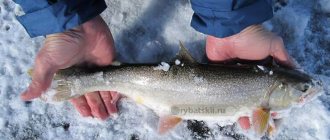
Float rod equipment for catching roach, bream and crucian carp
Equipping a winter fishing rod with a rig with a float allows you to easily switch from summer fishing to winter fishing, and does not require special, additional skills. With such tackle you can catch bream, white bream, silver bream, roach, crucian carp and perch.
Selection of equipment elements
For a winter float fishing rod, the following equipment is used:
- You can choose any fishing rod for a winter fishing rod, since this tackle is quite stationary, its weight does not matter much. It is advisable that the handle be made of cork, wood or other heat-insulating material, so that it does not get cold on your hands when fishing. It is also desirable to have legs or another stand. The rod whip should be flexible enough so that it does not cause the fish to break when hooking.
- The reel on a winter fishing rod can be of any type; its only purpose is to store fishing line.
- The fishing line is monofilament, preferably colored, which, unlike transparent, is easier to distinguish on ice or snow. As practice shows, for fish the color of the fishing line does not matter. As for the diameter of the main line, they recommend 0.15 - 0.18 mm, but here a lot depends on your preferences. Many fishermen complain that thin fishing line gets very tangled, and with a confident bite, the diameter does not matter much, and they prefer to fish with a fishing line of 0.2 - 0.25 mm.
- The leash can be made from either a thinner line or the same diameter as the main line.
- The floats used for winter fishing are quite varied. They are usually small in size and come in double, single and multi-piece types. They can be attached either using a cambric or clamps, or by passing a fishing line through a through hole, clamped with an antenna pin. Some of the most catchy winter floats are, for example, floats of light colors, conical shape, with a wide upper end. However, it all depends on the habits and preferences of the fisherman.
- The weights are selected in such a way that, when loaded, the float is several centimeters below the water level and does not freeze against the ice. The weight of the load itself depends on the float, the method of loading and the current at the fishing site.
- The size of the hook will primarily depend on the fish you are going to catch. It doesn't have to be small. The main thing is that it is thin.
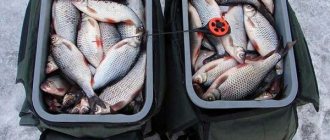
I catch roach, bream, crucian carp, etc. A winter float fishing rod uses live bait - bloodworms, maggots, jigs, etc.
Installation of equipment
Installation of a winter float fishing rod is quite simple. For it, in addition to the previously listed equipment elements, we will need scissors and pliers.
- We measure the fishing line, its length should be equal to two depths of the reservoir at the fishing site, plus 2 - 3 meters. This value is needed so that you have a reserve of fishing line in case of a break.
- We wind the fishing line onto the reel.
- We pass the fishing line through the rings on the rod or attach a cambric, ring or other element to it for attachment to the tip of the fishing rod.
- Then we pass the fishing line through the hole in the float or put on an element that secures the fishing line to the float.
- The next step is loading the float. First, the main weight is attached to the fishing line, giving the float almost zero buoyancy. Below it we place a very small weight, which will submerge our float, and when lifted, the float will float up.
- Below the small weight, approximately 5 - 7 cm, we tie a hook, either on a leash, or directly to the main fishing line. In the second case, you need to make a knot on the fishing line just below the load, where the fishing line will break if it gets caught. Otherwise, we risk losing most of the gear, and not just the hook.
That's it, the winter fishing rod is ready for use
Necessary equipment for float fishing in winter
The thickness of the fishing line is from 0.1 to 0.17 mm. Thinner means a greater risk of the tackle breaking during fishing. Thicker means excessive visibility of the fishing line. The strength of the 0.17 mm fishing line is quite enough to fish out even several kilogram specimens.
Mormyshka. When using a jig in the tackle, you should not use a reelless jig. A jig with a long hook shank and a color of inconspicuous dark shades is suitable.
The hook has a long shank, making it easier to remove fish and attach bloodworms (or other bait).
Loading the winter float. Loading (not shipping) a winter float with a jig and/or lead pellets can be done in two ways:
- If you are fishing with a float on the surface of the water, lower the float so that only the thin tip of the float rises above the water. This way you will increase the sensitivity of your gear.
- If you are fishing in cold weather, then a good option would be to completely submerge the float under water, therefore, use heavier pellets, and place the float at such a distance from the sinker that you can see it under water and any bite can be easily recognized. This method is used in cases of cold weather, when the surface quickly becomes covered with a crust of ice and interferes with the float.
Varieties
Floats for winter fishing with petals are made according to the principle of composite structures. The petals are hingedly attached to the main body; when floating up, they spread out to the sides on the surface of the water in the hole, which gives such an interesting visual effect.
Petal
The float petal has the right to life from the point of view of practicality. This is an ordinary composite float, the upper part of which is made in a shape that allows it to beautifully unfold on the surface, from the center of the axis to the side. It has only one petal, which does not particularly interfere with the fishing process when removing the fishing line from the ice back into the hole. There is also a practical benefit to this design. The overall length of the float is longer than that of a regular float. This means that the amplitude at which the weight of the bait in the fish’s mouth decreases (taken by the pop-up float) is greater. You can read more about this in the article on winter rigging fishing rods for bream. When catching this fish, it is important that it does not feel the weight of the jig in its mouth when biting.
Choosing a winter float
You can buy a winter float based on the following basic criteria:
- the float must be completely painted so that ice does not stick to it;
- a good choice would be to choose a float made of dense foam; they are lightweight and do not absorb water, unlike less dense foam;
- do not use a sliding float, as during fishing the tackle will freeze and such a float will have problems diving to the required depth.
A winter float for bream and other wary fish should have good sensitivity, have not a barrel-shaped upper part, but an oblong shape with a thin tip, so that the bite is clearly visible and at the same time the float does not create resistance for the fish.
Introduction and rationale for the use of floats in winter
Roach and homemade floats
“Do you love the float the way I love it, that is, with all the strength of your soul, with all the enthusiasm, with all the frenzy...”
So-so, Belinsky “about the theater” got attached...
“Do you know how to make winter floats correctly?
How do I make them correctly?
Well, I already wrote that...
Without quotes from the greats? No way. Let's start with them.
Float for a winter fishing rod - is it necessary? In most cases, a nod is enough. Perch and grayling are not “floating” fish at all in winter. However, a cunning and resourceful roach, during a period of weak bite, can bring a jig-perch with a nod to a twilight state of mind. Once, on a lake visited by people, an unfortunate fisherman with a choleric temperament, after the 28th unsuccessful hooking of a roach, broke his box on the ice. Everyone has seen and knows this. Women don't do things like that...
Video on the topic
Video: Winter float. Loading and equipment for ice fishing
Click Play to view
I don’t consider the hungry spring roach that comes at you with its mouth open, although it also has periods when it is not averse to mocking our brother. In addition, a float in winter is a piece of warm summer in a hole, a connecting thread of a fisherman’s spiritual mood, coming from childhood...
The closeness of the fisherman with the float becomes truly intimate. This is the soul of a fisherman, either sinking into his heels as he dives, or flying up into the sky as he rises: “I laid the leshchara!” and... didn’t hit - it happens like that. But much less often than with a nod, this synthetic extension of the whip, cold and calculating like the heart of a sports fisherman. Although the athletes can be understood, time limits, ranks-categories, sponsors-federations-churches, points-prizes, etc. They have no time for such trifles as a winter float...
“Why make them yourself? You can stupidly buy them, there are plenty of them in stores,” some will say. Yes, you can and should buy several samples. But I haven’t seen quick-release winter floats on sale. Or maybe I saw it and forgot. After all, you can buy nods and flies and much more. Right down to the fish.
Homemade products (handmade, as they say there) have a special charm and uniqueness. And the process of manual labor itself, making your own gear, is useful for any fisherman. What if a great master is sleeping inside someone, and then he wakes up!
The best baits and lures
Bunches of bloodworms. Bloodworm is a very good bait when fishing with a winter float. But when you pierce the bloodworm with a hook, it often quickly flows out and turns pale. To prevent this from happening, use bunches of bloodworms prepared in advance at home. Take a thin nylon thread, for example from nylon stockings, and tie a bunch of 4-7 bloodworms, then carefully tie it. When fishing, all you have to do is carefully hook the hook onto the thread, and so that the point of the hook is not too noticeable, put another bloodworm on it.
Well-proven natural baits
- bloodworm
- bark beetle
- maggot
- light-colored insect larvae
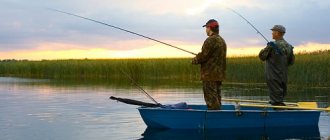
The process of fishing with a winter float rod
Fishing with a winter float differs in many ways from fishing with a float rod in the summer.
Drill a hole and clear the surface of the water from small pieces of ice so that nothing interferes with the float.
The float must be loaded with at least two pellets; a small pellet should be placed 5-7 cm from the hook with the nozzle. This will allow the bait to sink slowly, which has a positive effect on the fish’s attention to the bait.
A bite - surfacing, the float moving to the side, or diving under water - at this moment you need to decisively hook. After hooking, when you feel that the fish is on the hook, take the fishing line in your left hand and place the fishing rod in a specially cleared place on the ice. Carefully, without making any sudden movements, pull the line out of the hole with both hands, the main thing is not to let the line slack or sag, even if the fish is securely sitting on the hook, at this moment it can simply make a sudden movement and break your delicate tackle.
After catching a fish and placing a new bait on the hook, if the old one is missing, lower the tackle into the water again. The line may become slightly frozen with ice when immersing the line - pass it through the clenched fingers of your glove to remove the ice.
Setting up a winter fishing rod with a float
Fine-tuning (balancing) of a winter float fishing rod by selecting the float’s carrying capacity is necessary for two reasons:
By selecting the parameters of the settings elements, which include the float and all the weights of the equipment, we immerse the signal float device under the surface of the water in the hole, thereby protecting the float from freezing into the ice.
By selecting a float of a certain carrying capacity to the weight in the water of the sinkers already on the tackle, the sensitivity of the winter float fishing rod to fish bites is adjusted.
Thanks to the correct distribution of sinkers along the fishing line of a winter float fishing rod, the bait is quickly delivered to the bottom of the reservoir.
Although, for more precise adjustments, we should take into account the weight in the water of the baits on the hooks of a winter float fishing rod and the strength of the water flow if we fish on the river in winter, but only with completely different equipment.
By the way, the same methods are used to fine-tune and balance the equipment of summer float fishing rods with floats equipped with antennas and keels.
This article was written for the general development of novice fishermen and the method of setting up a winter float fishing rod by selecting the carrying capacity of the signal float exists, but is very irrational.
In fact, the vast majority of fishermen are engaged in balancing winter float equipment by selecting sinkers of different weights, the bottom of which is the sinker.
To make further explanations clearer, I drew a picture that schematically showed the position of all the elements of a winter float fishing rod after setting up the equipment at home by selecting the weight of the sinkers.
Making a homemade winter float
A homemade float may be no different from a purchased one, and in some cases even surpass the latter, because you can make a winter float really sensitive, which floats from store shelves cannot always boast of.
- To make a float with our own hands, we will need hard (dense) foam plastic; from it we need to cut blanks for the future float (of course, with angular edges for now). The larger the size of the float, the higher its carrying capacity. After receiving the first workpiece, you can try testing it in a jar of water to see how much weight the workpiece can withstand in order to determine the size of future floats.
- The blanks have been received, now you need to shape the float using a knife, removing all excess.
- To give a smooth surface to our almost finished float, it can be sanded with fine sandpaper or a file.
- We need to make fastenings at the bottom of the float. First, we melt a hole with a hot needle or pin, then we make a fastening from a wire, for example from a telephone wire or from anything, here you just need to use your imagination.
- After inserting the fastener, if you are not sure of the strength of the connection with the workpiece, apply a drop of glue to the joint.
Making a winter float is a creative activity; now, if you want, you can prime the float with a primer, and then, when it dries, paint the top or, conversely, the bottom of the float in the colors you want. It is necessary to prime the float so that it does not absorb water and paint.