Even before the onset of the first frosts, many fans of winter and ice fishing, both with impressive experience and those just starting out, are wondering about purchasing a convenient and high-quality ice auger. After all, without this tool, fishing in winter is unthinkable.
What to consider when choosing it:
- Firstly, this is the diameter of the auger, the main part with which the hole is drilled. It all depends on what kind of fish you plan to catch. For medium-sized fish, roach, perch, small pike, an auger with a diameter of 90-100 mm is suitable. For fish such as white bream, bream, large pike and pike perch, we choose an auger of 120 mm or more.
- Secondly, there must be a reliable connecting node (elbow). When purchasing, you should check the possibility of future play in assembled, working condition.
- Thirdly, the direction of rotation of the ice drill, clockwise or counterclockwise. This is a matter of habit or convenience for each person.
Be sure to visually determine the quality of the weld at the junction of the auger with the tubular part of the ice auger, in order to check for poor quality workmanship. Otherwise, the auger with knives may remain in the ice when drilling.
The quality of the paint used to process the instrument is also important. If it peels off quickly, then the adhered snow and icing will complicate the process.
And the most important thing is the quality of the tool’s knives. When purchasing, it is worth inspecting the working (cutting) part for thermal lines, which indicates non-compliance with maintaining the temperature regime during factory sharpening. Such steel is already considered unsuitable for use for drilling holes in ice.
Types of Ice Pick Knives
The cutting part is made according to accepted international standards, from steel grades R18, R9, R12, R6M5K5 and hardness from 62 to 72 HRC units.
Special cold hardening gives the knives the desired properties, such as:
- Protection against breakage and deformation;
- Impact resistance;
- Resistance to dampness;
- The ability to periodically sharpen them yourself.
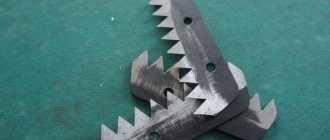
They are divided into several types according to the type of cutting part and are universal in use:
- With two straight edges (requires caution when completing drilling, as “biting” often occurs at the exit);
- With a rounded edge (suitable for wet, sticky ice);
- With a stepped edge (more designed for strong, “dry” ice);
- With serrated edge (for loose and damp ice);
- Triangular in shape with three cutting edges (rarely common type of knives, claimed to be suitable for all types of ice).
Over time, with use, the knives will definitely become dull. Due to the hardness of the ice, sand and small pebbles contained in it. On the spot, while fishing, you can temporarily sharpen them, having with you an ordinary sharpening stone or a needle file. But this must be done thoroughly with a special tool. There are two options: mechanical sharpening on a machine and manually.
Types of knives for ice drills
There is a large selection of cutting devices that are equally well suited for ice drills of domestic and foreign production. The differences are in the quality of the metal, thickness and shape of the products.
According to the configuration, the blades are divided into the following types:
- Straight and even. Used to work with dense and thin materials. Thanks to its simple form, it is easy to maintain.
- Stepped. The products are designed for drilling in dry and hard ice. They differ in their rigidity and the amount of force applied. Due to the steps, they are better held in dense material.
- Spherical. Such auger knives have semicircular edges that easily penetrate damp and viscous ice. The likelihood of corners breaking is much lower than other models.
- Serrated. They are considered universal, as they can work with frozen surfaces of any degree of hardness, humidity and thickness. When working with compacted ice, there is a risk of teeth breaking.
To be prepared for any conditions on the pond, it is recommended to have a full set of ice auger attachments and accessories for their installation.
Installation
Most manufacturers adhere to a single standard, which allows replacement attachments to be installed on products of domestic and foreign production.
Before attaching, you should check the blades to the ice auger for the following defects:
- dull blade;
- broken chamfers;
- burrs on the edge;
- chips and potholes;
- wrong shape.
If the attachments meet the quality requirements, then you need to wipe the ice drill dry with a cloth and install the cutting devices. To avoid loosening of the fasteners, the bolts should be pre-wrapped with FUM tape. It’s even better to take longer bolts and screw a locknut to them on the reverse side.
Adjustment
The sharpening angle of the blades does not always correspond to the type and thickness of the ice on the pond. In such cases, you can change the angle of the attachments to achieve optimal results.
There are the following ways to configure the tool:
- Metal washers. They are threaded onto the mounting screws closest to the axles. Using adjusting washers, the speed of passage of strong and dry ice is increased. The angle remains constant and the degree of grip and stability increases. Depending on the density of the material, the thickness of the washers increases from 0.4 mm to 1.0 mm. You can use plastic bottles and aluminum cans from scrap materials.
- Corner pads. With their help, you can control the sharpening angles of ice drill knives without the use of abrasive devices. The thickness of the gaskets can range from 0.2 mm to 0.6 mm. The material used for manufacturing is steel, aluminum or copper plates. To secure it, a lip is made at the end of the gasket.
Having a supply of washers and gaskets while fishing allows you to quickly adapt to changes in ice conditions.
Read: Do-it-yourself ice drill - is it real?
Sharpening on a machine
One way is an electric sharpener. Naturally, for this, you must have experience working on it. Otherwise, this method is unacceptable, as you can simply damage the cutting edge. For those who are familiar with this equipment first-hand, let’s consider the main stages.
First of all, there must be a special device (corner stand) for installing the part to be sharpened at a certain angle. This will allow you to remove a minimum amount of metal and avoid distortion of the cutting edge chamfer:
- Manually, using a file or an abrasive stone, we remove small chips formed during the drilling process. If the chip depth is more than 2 mm, it should be cut into the shape of a tooth and sharpened.
- We fix the knife, with the long, working side, in a corner stand and set the angle to 30°. Carefully bring it to the desired state.
- Turn the part over with the short cutting edge. The angle between these two edges should be close to 90°. Due to this, the “biting” factor during drilling will be reduced.
- During processing, the part should be periodically cooled by immersing it in water or oil.
- After the main processing, you should polish the knife using a felt wheel and GOI paste. This is required for faster and cleaner drilling. The rotation speed should be about 3000 rpm.
- First we polish the surface of the knife directed towards the ice.
- Next, we polish the upper part, with the obligatory approach to the cutting edge. This will improve the cutting angle and increase the service life.
- Knives prepared in this way can then be very easily sharpened by hand, right during fishing.
How to sharpen an ice screw?
Sharpening depends on the type of blade. Before starting the procedure, it is necessary to check whether the knives are really dull, since excessive sharpening can damage the product. If the ice drill becomes difficult to drill through ice, and the blades do not even cut paper, the product requires sharpening.
Straight knives
To sharpen the straight blades of an ice drill, you can use an abrasive stone or a grinder. Sharpening is done on one side. The metal must be removed evenly; after sharpening, the reverse side must be checked for burrs.
If the cutting part is in a neglected state, the first layer of metal must be removed using even, straight movements, and then using circular movements to bring the edge to the desired sharpness.
Step knives
This type of blade has two parts, so during the sharpening process it is necessary to process each section in turn. A distinctive feature in sharpening step knives is that it is necessary to carry out the procedure on both sides of the blade.
Rounded knives
To sharpen rounded products, you must use a special machine with a burr. Using a marker, you need to mark the edge so as not to remove the excess layer of metal.
Fix the cutting product in a vice and with slow movements, without damaging the line, run the machine along the cutting part. Then go over the blade with a felt disc to polish.
It is possible that doing it once will not be enough, so we repeat the procedure. Once the sandpaper has made a small groove for itself, the work will become much easier. Remember that only one of the planes of the knife is sharpened. Trying to sharpen it on the reverse side will only ruin it. Both knives must also be sharpened, even if one of them was in good condition.
Sooner or later, every winter fishing enthusiast is faced with the problem of dull ice auger knives. At the same time, even slightly dull knives will not be able to drill into the ice, but will only hopelessly slide along it, and thus can simply ruin the whole fishing trip.
Tips for fisherman: Knives for ice augers on wet ice - Tips for beginners
As a solution, you can take the ice drill to a specialized workshop, or you can sharpen it yourself, at home. This is done using a regular emery wheel. Before we begin, we determine the approximate position of the knife to the emery wheel so that the factory sharpening angle can be maintained. After this, we start the circle and, pointing the knife with the cutting edge upward, draw it from one end to the other, maintaining the original sharpening angle.
It is possible that doing it once will not be enough, so we repeat the procedure. Once the sandpaper has made a small groove for itself, the work will become much easier. Remember that only one of the planes of the knife is sharpened. Trying to sharpen it on the reverse side will only ruin it. Both knives must also be sharpened, even if one of them was in good condition.
Now, regarding hemispherical knives. They require a more careful attitude, so before you start sharpening, I first recommend practicing on an ordinary piece of metal. After this, the knife is placed in the same way on the rotating circle and sharpening is carried out, while maintaining the same angle. Don’t forget to cool the knives; to do this, you need to stock up on a container of cold water in advance. This is at home. What if the knives become dull while fishing?
- Telescopic - you can adjust the drill according to your height.
- The second folds the drill in half, making it compact.
Sharpening knives by hand
The most common option for sharpening is at home, by hand. There are several varieties of this action:
- On an abrasive stone;
- Using sandpaper;
- Using glass and GOI paste.
Let's consider each type:
Sharpening with an abrasive stone
To do this, you will need the “correct stone”, carborundum, with wide working surfaces. The grain size should be fine or medium, corresponding to the markings of H4-H6 sandpaper. When purchasing, be sure to check it for potholes on wide surfaces and chips along the edges. The service life of such a stone is enough to process 15-20 sets of blades. Subsequently, its working plane ceases to be level and it is not possible to sharpen the knives correctly.
Sharpening process:
- We fix the block by placing it on a sheet of rubber , or using double-sided tape to prevent slipping during the process.
- We remove burrs. To do this, place the knife with a wide plane on the stone, and, pressing lightly, make 15-20 circular movements. If there is no severe deformation, this will be immediately visible in the grinding pattern; the finishing process is completed.
- Sharpening. Turning the cutting edge towards the stone, we also make circular movements with gentle and uniform pressure. Upon visual inspection, the marks from the abrasive stone should be located evenly over the entire surface.
- We use paper to test the sharpness of the blade. The knife should cut the paper easily and evenly.
Sharpening with sandpaper
This is almost the same method as described above, since the same abrasive is used, only applied to a paper or textile base. But due to the “wave” feature of sandpaper when moving along the surface, the result will be somewhat worse. Can be used when removing chips.
Glass and GOI paste
These are also a kind of abrasives, only very small ones. It will take a lot of time and patience to sharpen the blades, but the results will be very good.
It is important to remember that knives are placed on ice augers only in pairs, new with new, re-sharpened with the same. When straightening knives on the spot, if you are “lucky enough” to land on sand in the ice, without removing them, we make straightening movements only along the cutting surface, away from you – downwards. But the houses will still have to be re-sharpened.
When sharpening, you can use various types of diamond-coated needle files. You should be careful here, because unlike the methods described above, where the entire working surface is processed at once, the needle file only covers a small area of it. Accordingly, the straight line of the blade may be disrupted, which can lead to its breakage when drilling a hole.
We looked at the most common methods of sharpening knives for straight-shaped ice drills. It is also worth considering the options for sharpening the so-called “Swedes”, which have a curved cutting part.
Here, too, there are two options: manual and mechanical sharpening:
- For manual processing you need: a small vice, strips of abrasive paper H4 - H6, 3-4 cm wide and a semicircular file. By moving towards yourself, while simultaneously changing the angle of the file, with the “skin” mounted on it, we carefully straighten the cutting part of the knife. Based on the risks from the abrasive, we determine the thoroughness of the processing. Sharpness test, also checked by cutting paper.
- Having at hand a small, manual machine designed for polishing, grinding and milling work, it is very easy and quick to bring the cutting part to perfect condition. Take a burr that follows the shape of the blade or an abrasive mini-disc. The part is clamped in a vice, the part being processed, for a better view of the work done, is painted over with a felt-tip pen and carefully brought to the desired state.
How to sharpen fishing auger knives at home
Even before the onset of the first frosts, many fans of winter and ice fishing, both with impressive experience and those just starting out, are wondering about purchasing a convenient and high-quality ice auger. After all, without this tool, fishing in winter is unthinkable.
- Types of ice ax knives ↓
- Sharpening on a machine ↓
- Sharpening knives by hand ↓
- Sharpening with an abrasive stone ↓
- Sharpening with sandpaper ↓
- Glass and GOI paste ↓
- Quick tips ↓
What to consider when choosing it:
- Firstly, this is the diameter of the auger, the main part with which the hole is drilled. It all depends on what kind of fish you plan to catch. For medium-sized fish, roach, perch, small pike, an auger with a diameter of 90-100 mm is suitable. For fish such as white bream, bream, large pike and pike perch, we choose an auger of 120 mm or more.
- Secondly, there must be a reliable connecting node (elbow). When purchasing, you should check the possibility of future play in assembled, working condition.
- Thirdly, the direction of rotation of the ice drill, clockwise or counterclockwise. This is a matter of habit or convenience for each person.
Be sure to visually determine the quality of the weld at the junction of the auger with the tubular part of the ice auger, in order to check for poor quality workmanship. Otherwise, the auger with knives may remain in the ice when drilling.
And the most important thing is the quality of the tool’s knives. When purchasing, it is worth inspecting the working (cutting) part for thermal lines, which indicates non-compliance with maintaining the temperature regime during factory sharpening. Such steel is already considered unsuitable for use for drilling holes in ice.
Blitz tips
- The range of ice drills offered on the Russian market is amazingly diverse. And to choose “yours,” you need to be guided by the principles of ease of use (direction of rotation, material of handles), reliability of both its working part (knives), and the entire tool as a whole (connecting elbow, options for attaching knives to the auger).
- An important factor for choosing is the price. If opportunities permit and you purchase a foreign-made ice drill, then you will have a manual “drilling rig” in your hands. The variable angle of attack along the cutting edge will allow you to reach the water through the ice in a matter of minutes. High-alloy steel used for knives allows them not to be sharpened during the fishing season.
- Domestic drills made of titanium are light and convenient, but have flat blades. So, there are always options to choose from, both for novice fishermen who are just yet to try them out and, based on their experience, decide on the purchase of an ice drill that is convenient for them, as well as for experienced winter fishing enthusiasts.