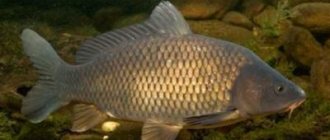
Fishing with a regular fishing rod is still practiced today, despite the presence of many types of gear, especially modern ones.
This is due to the fact that such fishing brings a lot of positive emotions and does not make the angler bored. At the same time, fishing with a float is fraught with some peculiarities. For example:
- When there is a current, the float is not located in one place.
- The float tilts and is not at a right angle.
- Since the float is in an unstable position, an illusory sensation of bites appears.
Floats
The float is considered one of the main elements of equipment. The success of fishing in the current depends on its design. Therefore, specially designed floats are available for such conditions. In order for the body of the float to create a minimum of resistance to the moving pressure of water, it is made wide, but flattened on both sides. As a rule, such floats have two attachment points. The extended part of the float acts as a control element. In order for the float to have a certain center of gravity, its design includes a metal rod, and a very thin one.
This design has minimal influence of the flow on the performance of the float. Most float designs for fishing in currents are designed in the shape of a “pear” or “egg”.
Since the floats have different shapes, they are intended for different fishing conditions:
- pear float is used when fishing at depth.
- egg float is used in conditions when the fish tries to take the bait away when biting, as well as for conditions when long casts are needed.
- A “ flat ” float is necessary when you need to keep the nozzle at the bottom in the presence of a current.
Sports floats
Every fisherman dreams of having in his arsenal a universal float designed for fishing in any conditions. Unfortunately, this dream will remain a dream, because this simply cannot happen. Although, there are floats that are very close to satisfying the needs of any angler. These include sports types of floats. Their operating principle is based on the fact that they are highly sensitive with a low center of gravity. These two factors make the sports float quite stable.
The design of such a float includes a float body, an upper ring with a cambric, an antenna and a keel. The float is attached to the main line using the top ring and the cambric, which is present on the keel.
If you adjust the position of the upper ring, you control the angle of inclination of the float. A float with such characteristics can easily be used in the current.
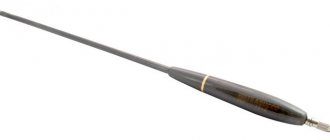
Flat floats
This is another type of float that has a narrow specialization. The body of the float has the shape of a flat disk, or another shape, but always flat. The highlight of a flat float is the keel, which is located at an angle. Thanks to this feature, the float is always in a vertical position.
The body of the float is always positioned with its edge facing the moving water, which minimizes its resistance.
Flat float Wing. Trial .
Loading the float when fishing in the current
For such gear, one lead sinker is not enough. In such conditions, the tackle often snags, so several sinkers will be required.
As a rule, fishermen give preference to 3 main types of float loading, depending on fishing conditions:
- When it is necessary to keep the bait at one point or carry out short-term retrieves. In this case, one load should be at the bottom of the river. Above it, at a distance of 3-5 cm, there should be two weights No. 3 and a weight that prevents the equipment from getting tangled. At a distance of 25 cm there is the main load, which has 90% of the total mass of the load.
- When postings are made with short-term stops. One load containing 10% of the total load should be at the bottom, and at a distance of 25-30 cm one pellet No. 5 is attached, and then, after 40-50 cm, a second pellet No. 5. After this, measuring 15-20 cm, the main load is attached, the value of which is 80% of the total load.
- When to catch bream. The float should have maximum stability, with reduced sensitivity. One pellet should be at the bottom. At a distance of 5 cm from this pellet, the remaining load is attached, which contains 90% of the total load. This loading technique does not allow for wiring, which every angler should remember.
LOADING THE FLOAT IN CURRENT CONDITIONS
When fishing with float tackle in a river stream, one lead pellet is not enough; several weights will be needed at once.
Depending on the fishing method and the purpose of fishing, the loading of a float for the current can be divided into three types:
- One weight is located at the junction of the main line with the leash, the second is above it at a distance of 4-5 cm, all the rest, which is approximately 90% of the total weight, are attached even higher, at a height of 25 cm. This scheme allows you to make small wiring and if necessary, keep the bait at one point.
- The bottom sinker (10% of the total mass) lies on the bottom, one pellet is installed above it at 25 cm, followed by a second at a height of 40 cm, and after another 20 cm the main weight (80%) is fixed. This load is perfect for fishing with short stops.
- The main load (90%) is fixed above the pellet, installed at the border of the main line and the leash, at a distance of no more than 5 cm. This scheme does not involve wiring; it is designed to keep the bait in one place. This is usually how bream is caught.
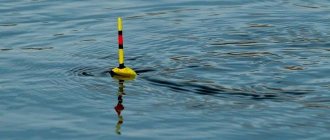
A correctly loaded float has a body located under water, and the antenna protrudes 2/3 above its surface. At the same time, it stands like the hand on a clock showing 12.00. If the load is not enough, the float will tilt or even remain in a horizontal position, and excess weight will lead to a strong forward tilt, which will also negatively affect the fishing process.
Float Cralusso Bolo
This float was invented by the Hungarian sports fisherman Károly Kralik. According to experienced fishermen, with the advent of such a float, fishing has acquired new interest. This float is used by both sports fishermen and amateur fishermen.
Thanks to this type of float, the Hungarian team won its victory at the World Fishing Championship in 2003. Having placed their main bet on the new Cralusso Bolo floats, the Hungarians were not mistaken. After this, many fishermen wanted to have the same floats.
The Cralusso Bolo float or “torpedo”, as it is also called, behaves steadily in the presence of any current. Floats can have a load from 0.5 to 40 grams.
It is applicable on rivers with different currents, as well as on canals. The most suitable technique for using a “torpedo” is to stop it at the point where the bait is located, as well as slow and stepped retrieves.
The float is equipped with a functional petal, which can be installed on the upper part of the float body. The presence of a petal allows you to guide the float even more steadily.
When the bait stops in the right place, there is no need to insert the tip of the float under the water: the petal will help make this much easier. The float is positioned on the line so that it does not come into contact with the body of the float.
Experts recommend the following equipment for a float weighing 30 grams: take a leash 40 cm long, then two pellets No. 4, and then three more pellets No. 3, 25 cm higher, and after 30 cm - the main load with a sliding sinker.
The Cralusso Bolo float, when compared with other types of floats, is easy to control and can be installed at any point without any problems.
How to properly load a sports float?
One sinker for loading the rod in the current, as in reservoirs with standing water, is not suitable. Since the flow speed in different layers can differ significantly.
To get the correct float loading you need to remember:
- the total weight of the loads should be slightly less than the load of the float itself;
- at least there should be 2-3 weights;
- one of the weights is the smallest and almost invisible, placed near the hook at a distance of 5-10 cm so that the bait does not get thrown from side to side;
- the second weight is attached 20-30 cm higher;
- at this distance you can hang 5 weights, this will improve sensitivity, but in order to avoid tangling the gear, the best option would be 2-3 pieces;
- all the weights must be in the correct order: the largest is higher on the line, and the smallest is lower, those in the middle should be the same among themselves, or in the same order.
The float should stand for 12 hours - this is considered an ideal load. But with the selection of weight you need to be extremely careful, because if the weight is small, the float falls, and when there is a lot of load, it sinks or deviates.
Recommended reading: How to make a fishing rod stand with your own hands
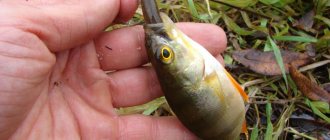
DIY flat float
Experienced avid fishermen have stocked up on their own version of a flat float, such as (Bubble).
It’s not difficult to make yourself, and it works great on a fly or plug fishing rod. To manufacture it, you need to perform the following operations:
- To begin with, you need to find a suitable material, in the form of extracted polystyrene foam or balsa. Using a sharp tool, cut out a workpiece 7-13 mm thick.
- It is necessary to transfer a sample of the shape of the future float to the workpiece. You can get hold of a template if you turn to the Internet for help.
- Using a sharp knife, the shape of the future float is cut out. You can leave allowances of 2-3 mm.
- Taking fine sandpaper in hand, the body of the float is carefully processed.
- The keel is made of bamboo or a piece of wire with a diameter of 0.7-1 mm. The antenna is made in the same way.
- Using a sharp object, in the form of a knitting needle, it is necessary to make a depression on the body of the float, up to 2 cm in size. After this, the antenna is attached using glue. Perpendicular to the keel, a paper clip is attached to the body of the float as an additional attachment point.
- It makes no sense to paint the body of the float, since only the keel arrow will peek out of the water. As for the antenna, a bright color doesn't hurt. Alternatively, you can attach brightly colored heat shrink tubing to the keel.
Flat Float - Wing
HOW TO MAKE A FLOAT FOR FISHING WITH CURRENTS WITH YOUR OWN HANDS
A float is not a telescopic rod or a spinning reel; you can make it with your own hands without any special effort. The best material for a pear-shaped product would be a wine cork. You need to cut it to the required size, shape it into a drop and pierce it with a piece of wire rod no thicker than 1 millimeter thick. Next, a shiny foam ball is fixed at the tip of the antenna with the support of waterproof glue, and the keel is additionally surrounded with lead pellets. The float is completely ready!
Some fishermen make the body of the float from a piece of high-density foam, but this is not the best option because the foam loses its original load-carrying capacity over time.
For a flat float you will have to look for a more suitable material, say, balsa. First, a blank with a reserve of 2 mm is cut out of it, which must be carefully polished with fine-grained sandpaper. The keel and antenna are made of wire or bamboo. In order to properly secure these elements, holes are made in the body into which it is advisable to drop a drop of glue. In the same way, a wire eye or an ordinary paper clip (for additional fastening) is installed perpendicular to the keel. Because in the working position the positively immersed one is under water, there is no point in painting it entirely; you can only cover one antenna with a layer of shiny paint. An alternative method to make the antenna invisible is to attach colored heat-shrink tubing.
A do-it-yourself float for fishing in currents is not only a significant cost savings. The fish caught with it has a special taste, and one can only guess how much the fisherman’s self-esteem will rise.
Fishing in weak currents
For such fishing conditions, it is enough to load the float weighing from 4 to 8 grams. In this case, a leash 10 cm long is enough, which should be located at the bottom. Above the leash, every 10 cm, three small pellets are attached, which are needed to regulate the speed of lowering the bait to the bottom.
Massive pellets are located directly behind the leash. This type of rig allows the bait to sink slowly without spooking the fish. With such tackle you can catch ide, rudd, roach, etc.
Fishing in the middle reaches
For such conditions, select a float with a carrying capacity of 6 to 20 grams. A short leash will not be effective, so you need to take a piece of fishing line 60-150 cm long. Moreover, the main part of the leash should be at the bottom. The bulk of the pellets are located near the leash, and smaller pellets are attached every 10 cm.
The rod should be directed so that the leash with the hook and bait is carried forward by the current from the float. In this case, the float will not lie on the water, and the bait will sink to the bottom and will not have time to be carried away by the current.
FISHING with a FLOAT in a QUICK CURRENT
Equipment for fishing in strong currents
In the presence of a rapid current, fishing becomes very difficult, since the bait is still carried away by the fast current and the fisherman has to control the position of the float with the equipment using a fishing line. As a rule, a float with a carrying capacity of up to 40 grams is selected. A leash of two meters length is required. At the same time, almost all of it should be located at the bottom. All weights must be moved directly to the leader so that the equipment sinks to the bottom very quickly.
Float for fishing in fast currents: Fishing with Normund #16
Advantages of using a flat float
Flat floats for fishing in currents tend to catch waves. Due to this characteristic, some of them can even swim against the current, which is very convenient when catching white fish, which like to take when the bait is lowered or when the current is opposite. For a flat sports float, the eye (ring) should be located as low as possible and closer to the fore-end. After all, the lower it is, the more it speeds up the response of the float.
Another advantage of a flat alarm is that it has a long forend (keel), which perfectly holds the weights and the balance of the float. Due to this, the signaling device is placed on exactly the part of it that is needed. In addition, cutouts on the plane of this float on both sides of the main body contribute to the correct direction of the tackle and the ability to swim against the current.
On store shelves you can find many floats of different load capacities and with the upper ring attached at different heights. When purchasing, you should definitely pay attention to the strength of its fastening. It’s not difficult to make such a tackle with your own hands at home. But here each fisherman chooses based on his financial capabilities and skills. The main thing is that this will not affect the quality of fishing in any way.
Fishing in the current with a sliding float
To mount the sliding version of the equipment you need:
- Attach the reel to the rod.
- The end of the fishing line is passed through all the rings and attached to the spool of the reel.
- You need to wind about 100 meters of fishing line on the reel, but no less.
- At the other end of the fishing line, measuring one meter, a rubber or silicone stopper is put on.
- After this, a sliding float is put on the fishing line.
- Then another stopper is placed at a distance of 0.7 m from the first one, and a set of weights for the flow is also attached.
- A loop is formed at the end of the fishing line for attaching the leash.