The topic reveals a technique for making a winter vent with a flat foam coil and a spring signal flag with your own hands.
Also offered are tips related to modifying the bracket of the girder on the stand and attaching the flag of the tackle for catching pike with live bait with equipment on a flat stand.
Both small-sized traps are made for pike fishing in the winter, but they have some drawbacks that can easily be eliminated with your own hands in the process of manufacturing or modifying the bracket and signal flag.
Winter girder with flat coil
A homemade winter lure for pike with a flat coil in the charged position of the signal flag is shown in the drawing.
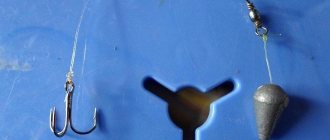
I will list the components of the tackle for pike fishing:
- wooden stand of winter vent;
- homemade coil bracket made of duralumin strips;
- a self-made reel;
- homemade flat spring signal flag;
- fabric flag of the girder;
- M4 screw;
- M4 nut.
Homemade girders for catching pike in winter fishing can be found on every body of water, and of the most varied and unexpected designs. But such gear is of particular interest.
Pay attention to Figure 1, where on a homemade girder designed for catching pike in winter fishing, a reel is shown not round, but an elongated flat shape in the charged position of the signal flag.
According to the author’s idea, not a collapsible, but a folding vent, thanks to a flat foam reel, should take up little space in the stowed position.
You can make a flat coil of a winter girder from a foam block by cutting the foam into equal pieces either on a homemade machine or with a hacksaw.
The cavity for winding the fishing line, into which the end of the signal flag spring of a homemade girder loaded for pike fishing is inserted, is selected on the reel in a circular manner with a knife and chisel.
The author of the girder for catching pike in winter fishing is V. Sidorov from the village of Redkino, Tver Region.
I once had the opportunity to repeat several of these winter fishing rods and try out ready-made gear on holes while fishing for pike, although after a little modification of the flat reel mounting brackets. So continue reading my comments.
Zherlitsy. 2) Winter ice piers.
Zherlitsy. 2) Winter under-ice. In winter, on the ice, fishermen are confronted by frost - as if creating sabotage. If you leave the girder on the hole at night, you need to be prepared in advance - it will freeze.
In very severe frosts, if the fishing line freezes into the ice before the pike bites, then the predator will not be able to pull the line from the reel. Feeling resistance, she will abandon the captured baitfish and leave. If the pike gets hooked and the line freezes after that, then you won’t be able to pull it out. When punching a hole with a sandbank, you can cut the line - it’s very disappointing. In my youth, my friend (more experienced than me) showed me his girders, which he left under the ice for as long as a week - until the next Sunday. They were completely frozen, but he always managed to get both the tackle and the fish. According to his descriptions, using new materials, I made under-ice vents and have been using them for several years, gradually modernizing them. I use three options for fastening the vent under the ice.
1) First method: in not very severe frost.
I place a crossbar (reel board) across the hole. The length of the crossbar should be more than two times greater than the diameter of my hole. The smaller crossbar can be dragged into the hole by the fish.
*The optimal diameter of the ice drill for catching pike is 15 cm. The minimum length of the crossbar is 15+15+5=35 cm. I used bars with a cross section of 12x22 mm for the crossbar. I boiled my new cross members in natural drying oil.
They don't get wet now. After drying, I will also paint them bright yellow so that they can be seen from afar. Then I numbered them based on the paint. A piece of stainless wire (double nichrome) is tied to the middle of the crossbar with a length greater than the thickness of the ice - 1 meter. When transporting, I wrap the wire around the crossbar. The vent itself is attached to the loop at the end of the wire.
If the hole is not completely frozen, I break the ice in it with a foot, and the wire has less chance of being broken than the fishing line.
2) Second method I use it in severe frost. Instead of wire, I tie a rope to the crossbar. If the hole is completely frozen, then it makes sense to drill a new hole next to the frozen hole. Through it, with a one and a half meter piece of wire, bent at the end with a hook, I hook a rope under the hole and pull out the girder with the fish.
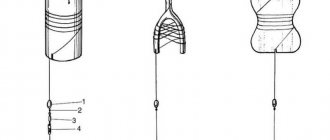
This way you can “drill” the vent several times. If it is necessary to remove the girder, I cut the rope under the hole and at the crossbar, sacrificing a frozen piece of rope. As the body of the girder, I use a tube 10-15 cm long. A friend used tubes from a rubber hose, I use a silicone watering hose with a diameter of 18 to 35 mm.
The larger the diameter of the hose, the better: the line comes off in larger rings and gets less tangled. Then: it’s faster to reel in the fishing line on a thick hose, which is important in the cold! The hose must have a diameter such that a tee hook can be inserted into it during transportation. * At one end of the tube I burn two holes with a millimeter hot wire.
I insert a piece of stainless wire (nichrome) into these holes and tie it, forming a ring. I attach a clasp to it, with which I fasten the girder to a wire or rope going through the ice to the crossbar.
I also tie the main fishing line of the girder here. I wind the fishing line around the tube. At the lower end of the tube I make a cut with a knife one and a half to two centimeters long.
In this slot, the end of the wound fishing line is pinched when the girder is alerted. When biting, the pike should, leaving with live bait, be able to easily pull the line out of the cut. A baitfish, walking under a hole, should not be able to do this. How much main line? Complex issue! Minimum 5-8 meters. The pike that grabs the bait goes to this distance. Another 1-3 meters at the distance of releasing the live bait from the girder. It turns out that ten meters is enough. There is no need for extra fishing line: the pike will unwind even 20 meters, and I don’t like to reel in fishing line in the cold. When fishing near reeds, 3-5 meters is enough. When fishing for burbot, you definitely need a sinker at the end of the main line. The weight of the sinker and the length of the leader are such that the bait fish cannot rise from the bottom by more than 5-8 cm. Usually 1-2 ounces of weight is enough.
Burbot does not need a lot of free line. He, having grabbed live bait or some other bait, swallows it right there, going no further than a meter or two. There will be a lot of slack - the burbot will find somewhere to climb, tangling the line tightly.
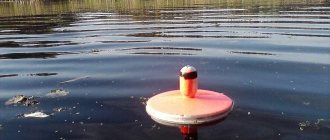
Option 3 of the girders is the easiest. Once, while making a sports tourist ski trip in Karelia, I promised my team to feed them burbot fish soup. It was November 1980. In a sports hike, every gram is accounted for and I did the easiest option. I took with me five simple fishing rods and one fishing rod. The vents consisted of a foam reel. 20x60mm 10mm thick On the reel there are 2 meters of fishing line with a leash and a hook.
We didn’t take an ice drill. I chopped holes in the lakes with an axe, the ice was 8-15 cm. Every evening I cut out five heels of stakes 2-3 meters long. A reel was attached 10-15 cm from the lower end of the stake. The slack was no more than 1 meter. At the beginning of the hike, I caught half a hundred small ruffs (15-20 grams each), froze them, placing them individually in a row. I packed the frozen ruffs individually and did not defrost them anymore. I put them on the hook frozen. I lowered the stakes into the hole, resting them on the bottom. The ruffs thawed in the water in about five minutes and by morning they were eaten by burbot. Every morning I cut out stakes from the ice and pulled out 3-5 1.5-kilogram burbots with them.
After 5 days, my team howled: “We don’t want your fatty burbot fish soup anymore! I'm tired of it! Fed!!! This (third) option required trouble when installing and removing the vents, but on the route I transported (8 hours) only a tiny amount of extra weight. When going fishing for more than one night, the second option is more convenient. For the girders, I made a “machine gun belt” - from thick polyethylene I soldered a cover with 11 cells: ten for the girders and one wider for the leashes.
I made a leader for burbot from a thin board 7mm thick. In the case I put two leashes with 10 leashes each.
Well, as always, when fishing for burbot, you need to have a hook with you. This big-headed one curls up in a ring under the hole and it is very difficult to drag it into the hole!
Dimensions of a flat coil of winter gear
In drawing 2, a winter guard with a flat coil is shown in the folded position of the coil and signal flag for transportation.
In the right position “3” the dimensions of the foam coil are given. The thickness of the homemade spool for winding the supply of fishing line in position “2” is not indicated, choose this size to your taste.
The foam sample is shown on the wide side of the flat coil; on the narrow side it will be much smaller.
Although you can also install a round industrial-made reel by cutting off the handle from it.
Then the width of the wooden stand of the ice fishing pole should be equal to the width of the reel spool. Choose the length of the wooden stand yourself.
The drawing does not indicate the number of brackets. On my girders for catching pike in winter fishing, I installed brackets on both sides of the flat spool of the reel.
Disadvantages of a flat coil spool
A few words about the disadvantages of a homemade winter fishing rod with a flat reel of this particular design, which clearly requires improvement for the convenience of catching pike while fishing.
Take a look at Figure 1 with a loaded winter harness. After the pike grabs the bait on the tackle, a signal flag will be triggered and thrown up. But a bracket with a flat, elongated coil will also work. The forest spreader will fall and take the same position as in drawing 2, where the winter vent is shown in traveling form.
In this position of the bracket, a flat-shaped reel is unlikely to willingly give up the line. As a result, the pike will find itself on a short, stretched vein and may drop the bait.
The second disadvantage is the inconvenience of rewinding fishing line dropped in a homemade foam reel if double-sided brackets are used to attach a flat spool to a wooden stand.
For your own convenience of catching pike in winter fishing with similar girders, the design should be slightly modified with your own hands.
Refinement of a winter girder with a flat coil
Refinement of a homemade winter girder comes down to simply adding the hook shown in red on the bracket with a flat coil.
The locking device can be bent from a steel wire of suitable thickness and fixed to one of the metal bracket bars using a screw, washer and nut.
Also included in the modification is a screw screwed into the wooden stand of the winter guard, onto which the bracket position lock hook is attached.
All the components of the winter girder with a flat reel on a high wooden stand are made with your own hands from commonly used materials that are not in short supply.
After modification, the complete set of the girder for catching pike in winter fishing will consist of a wooden support post, two aluminum strips of a bracket connecting the post to a flat reel, a locking device in the form of a hook and a signal flag.
Attaching a signal flag to a flat rail
The flat spring of the signal flag from a tape measure or alarm clock is attached to the top of the wooden stand of the winter guard using a screw and a wing nut with an M4 thread. At the end of the spring, a washer is soldered under the screw.
The mounting of the signal flag on a wooden stand can also be modified. To do this, in order to fix the signaling device that reacts to the pike’s grip on live bait, put 2-3 rings cut from a bicycle tube on the top of a wooden stand.
The dimensions of the structure can be arbitrary, but I will repeat it again. The width of all components of a homemade winter vent should be tied to the width of a flat foam coil. But, if you are not too bothered by the size of the fishing device, place the reel in a round rather than a flat shape.
Modification of the flat coil bracket
If you use a hook to fix the position of the flat reel, then finalizing the winter tackle will take less time. To do this, we make the flat reel spool bracket one-sided (from one strip of duralumin). Then, for the convenience of winding the dropped fishing line, you can glue a handle to the side of the reel spool. See Making a foam roll for a winter vent
But I suggest you make a more serious modification to this live bait tackle for pike fishing. Make a flat stand for the winter girder that covers the hole.
Flat rod for winter pike fishing
A homemade flat girder for winter pike fishing with live bait, all components of which are mounted on a low stand, is shown in the drawing.
Fishing tackle, like all winter fishing gear assembled on flat horizontal stands, has one drawback - it is poor visibility from a distance of the signal flag activated on a short spring when a pike grabs a live bait.
Therefore, it is advisable to install gear of similar designs during winter fishing on a hard crust of snow.
Advantages of a flat vent
The advantage of a flat homemade girder is the speed of installation, which is especially important when fishing for pike with an ice rig on the first ice, when the day for winter fishing is short, but the snow cover is shallow.
But flat winter poles are more convenient for catching pike with live bait in spring fishing conditions with settled snowdrifts, when the signal flag is clearly visible from afar.
The author of a homemade girder for winter fishing is V. Grachev.
“I successfully use an original and at the same time simple homemade winter girder for pike fishing in winter fishing.
All components are mounted on a flat, elongated stand. The signal flag is also charged in a horizontal position.
Flat winter vent reel
This is not in the original text, but on top of the reel of the ice fishing rod, the figure shows a homemade handle secured to the spool with a nut.
You can cut the ring with your own hands from tin or from the side of a plastic bottle; in the area of the homemade handle, the tin should be bent in half. Then glue it to the cheek of the coil.
For the convenience of installing a homemade girder in winter fishing conditions, I would drill a hole with a diameter of 5-6 mm in the middle of the plywood, and from it to the edge of the stand I would make a cut for winding the fishing line.
And you can wind the spring for the winter guard with your own hands at home according to the recommendations set out in the article “Making and winding springs.” But it is better to cut the signal flag from a flat spring.
Making a summer girder
Making your own girder for fishing in the summer is not particularly difficult. Each angler makes gear for specific fishing conditions and controls the quality of the hand-made rigs.
Classic zherlitsa - flyer
The flyer vent is a classic simple design that has not undergone design changes over many centuries. It is still used successfully today, since it can be made at the fishing site. Its manufacture requires a minimum number of equipment elements.
Manufacturing:
- Look for branches of tree branches and bushes near the reservoir (if they were not prepared in advance). Branches with a branching thickness of at least 1 cm are cut with a knife. The length of branching branches should be 10 - 15 cm, and a single branch (branching) is shorter - up to 5-7 cm. If you find dry branches or prepare flyers in advance, this will be a big plus . A dry branch is much stronger if it is not rotten. If you plan to use the girder multiple times on large pikes and pike-perch, then it is recommended to choose a thicker blank. It is not necessary to sand the workpiece, the main thing is to cut off any irregularities that prevent the natural free flow of the fishing line.
- At the branched ends, splits are made in the plane of the vent. That is, the splits should be on the same line, and not parallel to each other. The fishing line will be clamped in them. A circular cutout is made at the thick end of the flyer to securely tie the rig to a stick or tree on the shore. Many fishermen make a hole. This significantly increases the reliability of fastening the girder.
- The workpiece is equipped with a fishing line with a diameter of 0.4 - 0.5 mm. The length should exceed the depth of the reservoir by 5 - 7 meters. After tying the main fishing line to the hole for attaching the girder, they begin to wind it around the branched ends in a figure eight.
- At the end of the fishing line we put a locking ring, a sinker with a swivel, and another locking ring. This will restrict the movement of the sliding sinker.
- At the end of the fishing line we tie a swivel.
- Attach a leash to the swivel. For pike, it is better to use a metal leash at least 30 cm long with a carabiner for quick detachment from the main fishing line. For pike, the use of a metal leash is mandatory.
- The hook is connected to a metal leash through a winding ring. The size of the hook depends on the size of the baitfish and the expected size of the predator. Place live bait on the dorsal fin. Single hooks can also be used for perch.
- The zherlitsa is tightly tied with a rope to the hole in a short thick branch.
Read: Correct rigging of a bombard and choosing a fishing rod
Zherlitsy with a flag
Gears with a flag are very familiar to anglers who are keen on winter pike fishing.
Winter girders can be successfully used in summer.
The most important thing is to solve the problem of securing the rig in open water. After all, there is no ice on the reservoir anymore and it won’t be possible to install it just like that.
For summer fishing on girders with a flag, designs with a leg are suitable.
The difference in the design of these girders is the visualization of the moment of biting with a straightened flag.
Manufacturing:
- Take any durable material in the form of a tube or slats. You can also use a piece of wooden stick 30 - 40 cm long. This will be the basis for the girder.
- Flags are made on a long elastic tape that tends to straighten. A piece of tape measure, a vertical section of a plastic bottle, etc. can serve as the base for the flag.
- We attach the flag rod to the end of the wooden blank. You can use regular electrical tape.
- A little lower we attach a small inertial coil to the workpiece. We position the reel in such a way that the flag bent over the edge of the reel can easily straighten when the reel drum is rotated.
- We tie the main line to the reel and wind it onto the drum.
- At the end of the fishing line we put a locking ring, a sinker with a swivel and a second locking ring.
- At the end of the fishing line we tie a swivel.
- A metal leash with a hook is attached to the swivel.
- To secure the girder, we tie the stand (base) to a long stake or tree branch driven into the bottom of the reservoir.
Complete set of flat winter guard
The complete set of a flat girder for catching pike in winter fishing consists of six main elements
- flat rectangular base (65×200mm) made of plywood 3-5mm thick.
- signal flag spring made of wire with a cross section of 1.5-2.0 mm. Near the base, eight to ten spiral turns are fixed perpendicular to the stand in winter fishing conditions.
- The package includes a plastic reel or a free reel from under the fishing line.
- two U-shaped stands, made of any rigid wire, are mounted on a flat stand of a homemade winter vent.
- 10-12m of fishing line, before starting pike fishing, the loop is placed under the posts above the charged spring of the signal flag. At the end of the line there is a sinker, double or tee.
- flag of the girder for winter fishing.
All elements of the equipment for catching pike in winter fishing are made by hand and assembled on a horizontal flat stand. All that remains is to bait the bait and wait for the pike to bite.
But it won’t hurt to modify the seat for attaching a signal flag on a flat ice fishing pole.
The technique is described in detail on the next page. Here I can add that the slot for the wide plate of the signal flag spring can first be drilled with a small-diameter drill, then cut with a narrow knife blade.
Options for installing vents
I don’t see much point in dwelling on winter options applicable to this model of the vent. There can only be options for changing the fishing depth depending on the season or characteristics of the reservoir.
Regarding the summer season (meaning the season of liquid water), there are at least two options:
1. A reservoir with pole installation depths of 1.5-2.5 m with a clean bottom.
In this case, everything is traditional and quite simple. Drive the pole at an angle into the bottom, along the supposed Predator patrol path. The coil should be "vertical down". Lower the live bait to the desired depth and load the flag.
In reservoirs with a heavily silted bottom, I do not recommend installing live bait at a distance of less than 30-50 cm from the bottom. Otherwise, the gills of the live bait will quickly become clogged with silt, and you will collect micro-corpses from the girders, not Trophies...
2. Shallow water body (1 m or less) with a heavily overgrown bottom (carpet variant of bottom overgrowing). To equip your girders and have successful fishing on such reservoirs, you will need plugs. Therefore, you will have to: drink the number of bottles of dry wine corresponding to the number of zherlitsa in your arsenal, or contact the administrator in any cafe. The second option is much faster, but the first is incomparably more pleasant... I needed it faster, so I turned to an administrator I knew.
A diametrical hole with a diameter of 3 mm is drilled in the wine cork at a distance of 1 cm from the edge, and a small groove is made with a knife at the end closest to the drilling.
A string is threaded through the hole, and a swivel with a carabiner, or just a carabiner, is mounted on it. The knot on the twine must be sunk into the hole with an awl - we don’t need hooks on the knot or beards!..
When fishing in shallow waters with an overgrown bottom, the stake of the girder can be driven in vertically. Then:
- pull the end with the hook approximately 3-4m from the stake.
- sliding sinkers, secure with rubber stoppers at half the depth in this place.
- hang the float plug through a carabiner on the swivel of the leash going to the live bait.
The float will lift the bait fish above the bottom vegetation, prevent it from burrowing into it and ensure its constant presence in the visibility zone, and therefore in the Predator Attack zone.
Both options: With normal depth and in the case of shallow water, I have tested them - both are working.
Refinement of the signal flag of the girder
The signal flag of the winter girder after modification is shown in the drawing in color.
Also, as an improvement, a cut was made in my drawing to lower the fishing line from the reel of the girder in winter pike fishing conditions.
After modifying the seat, instead of a wire spring, a flat spring of a signal flag was installed, which, in a charged state, is applied to the coil of the winter guard.
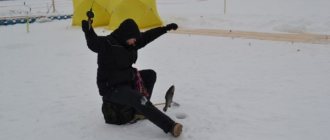
Fishing with girders in winter
There is an opinion that catching pike on girders in winter is an unsportsmanlike, passive way of winter fishing. One could agree with this, if not for a few “buts”: catching pike with girders in winter means catching live bait, drilling a large number of holes, the angler running to the girder that “shot” (signals a bite), rearranging the girders. All these “buts” taken together require so much effort that actively catching pike with a balance beam or lure will seem like just a rest.
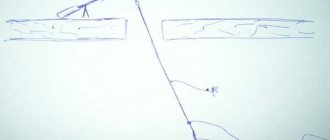
Installation diagram on ice
If it is not known at what depth and what places the pike sticks, the first girders are installed in a row from the shore in depth at a distance of 8 - 15 meters from each other, depending on the area of the reservoir and the diversity of the bottom topography.
In real fishing with girders in winter, some of the girders are triggered, while some are completely ignored. The bait fisherman moves non-working baits closer to those that bring fish, maintaining a safe distance (to avoid entanglement, live baits should not reach each other).
How to bet
Let's consider the procedure for installing an over-ice girder for pike fishing.
After the installation scheme for the vents has been determined and the holes have been drilled, we proceed to installing the vents on the ice. The procedure for installing a separate girder on a pike:
- We determine the depth at the installation site of the girder by lowering the equipment under the ice;
- We fix the equipment at the required depth at the bottom by loading the flag;
- We raise the rig of the girder and attach live bait;
- We lower the live bait to the bottom and set the girder in the working position above the hole.
You should not illuminate the holes, especially in shallow water. They are darkened by sprinkling with snow, especially if the base is not in the form of a lid. Even if the base covers the hole, it is still sprinkled with snow - this way the hole does not freeze longer.
At what distance from the bottom is it better to place live bait? When fishing for pike on girders, depending on the depth at the place where the gear is installed, the live bait is raised 20–50 cm from the bottom. It is believed that this way it will be more noticeable to pike. When fishing for burbot, live bait is lowered to the bottom.
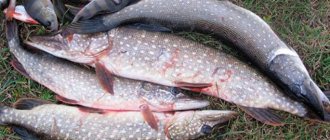
Which live bait is better
To use as live bait on a girder for pike, it is better to use medium-sized roach, silver bream, crucian carp, gudgeon or perch. Ruff is more often used when fishing for burbot, but if there is a shortage of live bait, it is also suitable for pike.
The live bait should be a typical inhabitant of the reservoir; the object of the pike's hunt is the local live bait. Crucian carp is distinguished by its vitality, roach and silver bream, at first, more actively attract pike. Many people believe that the best bait for pike is perch.
In general, you can use any live bait if it was caught in the same body of water.
How to properly mount live bait
It is very important to correctly place the live bait on the hook of the baitfish. The activity of the live bait and the time until it turns into a dead fish depend on this. The effectiveness of hooking pike also depends on the method of baiting the bait.
Experienced garrison fishermen use mainly two methods of attaching live bait:
- Behind the back, under the dorsal fin;
- Through the gills, the forend of the double into the mouth.
The first method is to place the live bait carefully, under the dorsal fin, without affecting the skeleton and internal organs. You need to try to injure the live bait as little as possible, start piercing against the direction of the scales. The hook must be very sharp.
The second method injures live bait less, it lives longer, and gives more effective pike hooks. A leash without a hook is inserted into the fish’s mouth from the side of the gill covers, the double is tied or attached through a loop and is inserted back into the mouth with the forend.
There are other ways to place live bait on a baitfish hook - by the mouth, by the tail, using an elastic band, but they all have a number of disadvantages.
Biting, hooking and fishing
When fishing with girders, there are two phases of pike biting.
- Live bait grip. The pike makes a throw, grabs the bait and freezes for a while. At this moment, a slight unwinding of the fishing line from the reel occurs and the girder flag is triggered;
- Swallowing live bait. The pike turns the bait with its head towards the throat, and slowly moving, swallows it. At this point, the line continues to be ejected from the reel.
When should you hook a pike? Under no circumstances should you hook immediately after the flag is triggered. It is necessary to wait for the second phase of the bite, which occurs 10 - 50 seconds from the moment the bait fish grabs, and after the pike has reeled in several meters of fishing line, hook it.
Fishing for pike is usually not difficult, as long as the leash can withstand the sharp teeth of the pike.
We talked a lot about winter girders for pike fishing and some important points when catching pike with girders in winter. In addition to the material, we offer several videos devoted to the practice of catching pike with live bait in winter. Real fishing with girders on video: