There are many ways to winter fish. Most of them use only one fishing rod with one bait, which requires constant monitoring of the condition of the gear and timely hooking. But if the goal of fishing is to relax and get a catch without extra effort, you can use fishing methods in which you can catch fish simultaneously with several gears in different places in the reservoir, which will themselves carry out hooking and signaling.
Self-catchers for fish are different; one of the gear of this type is a combine (“dumper”). The design of the harvester resembles a summer bottom tackle. Only intended for fishing in a hole, and not in open water. The descender is a reliable piece of equipment; it has been used for many years and still shows good results.
Harvesters are used on large bodies of water with weak or moderate currents. How to properly equip a descender, what parts it consists of and what fishing strategy to use will be discussed in this article.
Combine (susknik) for fishing on the current in winter
Arrangement of winter equipment "Combine"
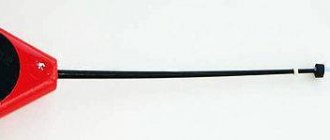
In working condition, the descender differs little from a fishing rod for winter fishing. The basis is a winter rod and reel. The only thing that can catch your eye is a bright and hard, attention-grabbing nod on which a bell can be attached.
The differences in this gear are hidden under water. Using special equipment, the combine simultaneously feeds and fishes a large area of water located downstream from the hole.
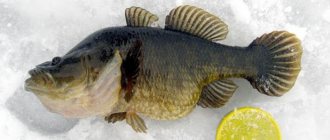
Catching bream on a descender in winter
The equipment of the descender includes a feeder, a movable sinker and several hooks or jigs below. When fishing, the hooks themselves are located near the bottom, where cautious fish feed. The cloud of turbidity that forms when the bait is washed away hides the hooks and vibrations of the fishing line, attracting fish and lulling their vigilance.
Another design feature of the combine is the ability to do cutting itself. To make such a fishing rod, you need to understand each element in more detail and understand what characteristics this or that part should have.
Nod of a combine harvester for catching bream in winter, with attached bells close up
Rod with nod
Fishing with a combine is carried out simultaneously with several fishing rods. For fishing to be successful, the gear must be convenient for use, that is, large and ergonomic. At the same time, you don’t need to spend a lot of money on a descender.
As the basis of the combine, you can use a fishing rod for winter fishing with a whip of sufficient rigidity and a length of 20-25 centimeters. The reel is also not important in this method of fishing - only to store the fishing line. The main thing is that the reel has a locking mechanism.
A nod, homemade or purchased, is used as a bite alarm. Twisted spring nods are more often used; they have greater rigidity. For greater visibility, a bright-colored ball is attached to the end of the guard, which will be visible from afar. You can also additionally install a clothespin with bells or another sound device.
A nod made of a rigid twisted spring with a ball at the end, a fish bite alarm
Line and leashes
To equip the combine, monofilament or braided threads of different diameters are used. The main line, which makes up the largest part of the entire rig, is the thickest. If a single strand thread is used, the diameter should be in the range of 0.24-0.28 millimeters.
The color does not affect the fish’s bite; you can choose any color based on the price or how visible it will be on the ice.
The main thread is something you don’t need to skimp on. Firstly, a good fishing line lasts longer and does not lose its properties over time. Secondly, if the fishing line breaks, all the equipment is lost, and making it from scratch will ultimately cost much more. You need to take the most expensive ones that are on the shelves.
The “tail part” is tied to the main thread, to which leashes with hooks are attached. The number of leashes can be any, most often three are used. Three is enough for successful fishing, and it will not constantly get confused.
The length of the tail part depends on how many hooks you plan to attach to it. This is no more than 5 meters. The diameter of the fishing line for the tail is 0.2-0.23 mm. On the tail there are several leashes 10-15 cm long, a distance of 0.7-1 m from each other and a line diameter of 0.16-0.2 mm.
You can also attach the leashes directly to the main line by attaching a feeder with a sliding stopper above them.
Scheme of the equipment of the descender (installation of the combine harvester equipment for the current in winter
Harvester hooks
When choosing, you need to rely on the same requirements as when choosing any other hooks. The main thing about them is sharpness and strength. The sharper the fish, the better the fish is hooked, which means there is less chance that it will come off when fishing. In the case of a descender who hooks the fish himself, this is even more important.
To choose the right one, it’s enough not to buy the cheapest one. Usually there is even enough quality that costs less than the average price. If desired, you can change it later, because due to a bad hook, only the catch can suffer, and not the entire equipment, as is the case with fishing line.
If we talk about sizes, No. 6-8 are used. The shape depends on what kind of fish will be caught. For example, for winter rigging for bream it will be better if you come across an option with an extended fore-end.
Also, instead of hooks, you can hang jigs of approximately the same size. This will further attract the fish's attention to them and increase the chances of catching them. The main thing to remember is that the size of the hook does not affect the size of the fish caught, and even the smallest hook can catch a large specimen.
Hook for harvester fishing with extended shank
Feeder for combine
A purchased version for bottom gear is suitable as a feeder for the descender. You can take any shape, most often rectangular for greater stability.
However, some may not be satisfied with the quality of feeding of a purchased feeder - it may not reach the entire tail part. Then it’s homemade. This option will work much better; you can take into account what current the fish will be caught on and, accordingly, what loading weight is best suited.
You can also select the volume and number of holes through which the bait will be washed out. To create a simple feeder you will need:
- Find a plastic container with a screw-on lid.
- A weight is attached to the lid using self-tapping screws, the weight of which depends on the strength of the current.
- Another self-tapping screw with a copper wire loop.
- Using a heated drill, several holes are made in the body of the container through which the bait will be washed out.
- A fishing line is passed through the loop, the lid is screwed on and a knot is made at the end of the thread, which will prevent the container from flying off the fishing line.
One of the options for a feeder for a winter drain
What is a combine harvester: structure and features
A combine is a simple winter fishing rod that has a nod, a feeder and several hooks. The peculiarity of the operation of the launcher is that after a hole is made in an area with a current, it is necessary to lower the harvester under the ice. At this time, the hooks are picked up by the current and washed away.
The feeder is heavier than the hooks, so it descends evenly in a vertical direction directly to the bottom under the hole. During descent, the bait is washed out of the feeder by the current and moves towards the hooks, creating a bait spot in their area, attracting peaceful fish.
What elements does a combine harvester consist of: photo
In order for the combine rig to be effective at great depths and in currents, it must be well tuned. Winter descent for ice fishing for peaceful fish includes:
- fishing rod;
- main line;
- a hard nod;
- sliding sinker;
- a group of hooks;
- feeder
Combine harvester schematically
To make the handle of a winter fishing rod, lightweight materials can be used: fine-pored rubber or foam. The whip for underwater fishing should be hard and 25 cm long. The optimal diameter of the reel with a locking element is 45 mm.
Guards made of spring and lavsan have good rigidity and are an ideal bite alarm. The length of the nod is 15-20 cm.
Winter fishing is effective with main monofilament green or yellow fishing line with a diameter of up to 0.25 mm. The tail part of the combine should be formed by double loops with a distance of 0.7 to 1.2 meters. 3 leashes 10-20 cm long are tied to them. To install the leashes, a fishing line with a diameter of 0.12-0.2 mm is used, depending on the fish and the conditions of the fish.
High-quality hooks with a long shank No. 6, 7, 8 are attached to the leashes, with a loop-to-loop knot.
Winter fishing with a combine is especially effective if the fish are active; in such conditions, one cast into a hole can bring a good catch of up to 3 peaceful fish. The fishing line with hooks does not get tangled and does not cling to anything.
Installation diagram of a combine for winter fishing
You can make a feeder yourself:
- A plastic container with a lid is required.
- You should screw the sinker with two self-tapping screws, and screw another self-tapping screw between them, mounting a small loop of wire above it.
- Using a hot nail, make 7-9 holes on both sides of the plastic container. The bait mixture will be washed out through them.
- Pull a piece of monofilament through the hole.
- Tie a vein to the loop on the weight and screw on the cap.
- The clasp loop is formed at the top of the line.
Homemade feeder for a combine harvester
In addition to homemade feeders, rectangular feeders are suitable for the combine, but they are not so effective.
How to make and assemble winter harvester equipment with your own hands
The stages of gear manufacturing have the following sequence:
- First you need to install a reel on the fishing rod, do not forget about the bite alarm. Measure a line 30 meters long and pass it through the gatehouse. Then tie it to the reel with a reverse figure eight or similar knot.
- The main main line must pass through the swivel with a carabiner; 3 stops must be made.
- Using a knot, tie the leash to the main line. The length of the leash is 1-1.5 meters.
- Find the edge of the conductor and tie a heavy lead jig. Next, retreating a distance of 40 cm, you need to tie another leash. Next you need to tie 2 hooks in the same way.
- Tie the loose ponytail in a loop. Place the feeder on the swivel with a carabiner.
Heavy jigs are used for fishing in the current, as they sink to the very bottom where the fish are.
How to assemble a combine harvester for winter fishing with a feeder - installation diagram, collection and modification of equipment:
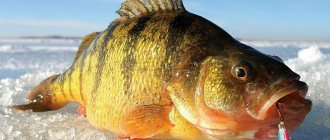
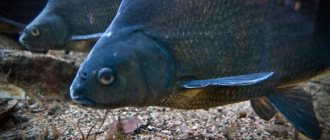
The combine fishing tackle is ideal for winter fishing for peaceful fish of the carp family: bream, roach, crucian carp, silver bream, as well as perch, which belongs to the perch family.
Making your own tackle
Creating a combine at home is a simple task, since it consists only of purchased parts that do not even need to be adjusted to each other. The hard part is making the equipment.
Assembly instructions:
- The basis is a fishing rod and reel.
- As much fishing line as possible is wound onto the reel (up to 30 meters).
- The end of the fishing line is brought out through the put-on guard.
- Essentially, the main gear is ready. All that remains is to make the equipment.
- To do this, put a swivel and two rubber stops on the fishing line, which will prevent the feeder from sliding along the length of the fishing line.
- Then, at the very end, another swivel is installed, to which the tail section will be attached.
- On the tail there are several leashes with hooks, and between the last and penultimate there is a sliding weight in the shape of an olive.
- All that remains is to put everything together by attaching the feeder and the tail section to the swivels.
- Rubber stops allow you to adjust how far the tail extends. The stronger the current, the further you need to release the hooks.
Sinker "olive"
Making a bream descender
To quickly install the descender gear, you must strictly follow the sequence of steps. In this case, there will be no need to redo anything. Before you start, you need to make sure you have all the necessary components.
Preparing the hooks
First you need to do the preparatory work. You need to prepare the hooks in advance. To achieve maximum catchability of the gear, it is necessary that they glow under water. Therefore, take a white sewing thread and wrap it around the shank of the hook. Many turns are made until the resulting winding resembles a moth pupa. In this case, it is required that the hook after such improvement resembles a jig. Next, the thread is generously coated with phosphorus-based varnish, which can be found in any fishing store. If there is no opportunity to improve the hooks, then it is permissible to use them unprepared.
Photo 3. Garland with prepared hooks.
Installation of gear
Direct assembly of the gear occurs in several stages, which should be carried out in the exact sequence:
- A reel and nod are installed on the fishing rod. The fishing line is wound up to 30 m and passed through the nod.
- The main line is passed through the swivel with a carabiner, after which three rubber stoppers are installed.
- The leader material is tied to the fishing line using a knot. Its length is 1.5 -2 m.
- A heavy lead jig is installed at the end of the main leash. At a distance of 40 cm from it, towards the fishing rod, an additional leash 20 cm long is knitted with a prepared luminous hook. At intervals of 40 cm, according to the same principle, the second and third hooks are installed.
- Next, a leash 30-40 cm long is tied to a closed type feeder with a sinker. A loop is made at its free end.
- The feeder is mounted on a swivel carabiner.
Attention! A heavy jig at the end is necessary so that the fishing line with light hooks does not rise under the influence of the current, because bream prefers to take bait from the bottom.
After following these manipulations, the tackle is completely ready for testing. The peculiarity of this installation allows you to adjust the distance from the feeder to the beginning of the hooks. This is useful when fishing in conditions with different currents. If it is weak, then you need to move the stops closer to the junction of the main and leading lines. In a strong current, the beads move further away. As a result, the sliding feeder will rest against the stops and will always be at a fixed distance from the bait.
Making a feeder
If you couldn’t find a suitable feeder in the store, you can make it yourself. To do this, buy a transparent test jar with a volume of 40 ml at the pharmacy. A flat round lead weight is selected in a fishing store. The so-called “doughnut” is perfect. Its weight should be about 100 grams, with an upward deviation.
Using a heated awl, a hole is punched in the bottom of the jar to launch the fishing line. It is done exactly in the center. Next, take a weight and connect it to the outside of the can lid. To do this, you need to attach them to each other and drill a through hole, tightening the walls with a bolt and nut. Using a 6 mm drill, windows are made in the jar itself. They are drilled tightly enough in 4 vertical rows on each side so that the walls begin to resemble a sieve.
Advice! When drilling, do not press too hard, as the plastic will certainly burst. By using a sharp drill bit, the chances of damaging the jar will be greatly reduced. Instead of a drill, you can use a hot soldering iron, which will easily burn holes.
At the final stage, a leash 30-40 cm long is taken and passed through the bottom of the jar. A loop is made at its end, which is tightened on the head of the clamping bolt, which holds the cap and sinker together. The second part of the leash also has a loop for attaching to a carabiner on the main line of the descender.
Bait for catching bream on the descent
Bream is cautious, especially in winter when the water is less turbid. The bait should first of all create a cloud of turbidity. For it, you can use ready-made bait mixtures, or you can make such a mixture yourself. For it you will need crumbly ingredients:
- breadcrumbs;
- crumbled cookies;
- You can also add steamed pearl barley or wheat porridge.
The presence of an animal component in the bait will affect the bite. A jig is used - it is gradually washed out of the feeder, attracting the attention of the fish. You can also use other bait, such as bloodworms or maggots. You can add coriander or vanillin for flavor.
There is no need to complicate the preparation of bait. If there is a bream in the reservoir, it will swim to any tasty-smelling cloud of turbidity. And what exactly it smells like—vanillin or a mixture of sunflower oil and coriander with notes of anise—no longer plays any role.
Bait for catching bream in winter based on porridge
Bait when fishing on the descent
The ideal option in winter is to use live bloodworms or jigs as bait. It washes out of the feeder and hides at the bottom, creating a feeding area. A flock of bream moves around the pond in search of just such spots.
For ordinary ordinary fishermen, it is quite difficult to obtain such feeding, so as an alternative, you can use ready-made bait or homemade porridge (millet works best). But the use of plant baits is an action on the verge of a foul. In winter, it is important to experiment with scent very carefully.
Bream have an excellent sense of smell; the wrong aroma can scare it away. Mormysh or food bloodworms always work, as they are the natural food of this fish. For plant bait, you can use a regular feeder feeder. For mormysh - a special jar with holes, weighted with a sinker. It is easy to make it yourself from a can of photographic film or any other similar container.
It is advisable for each tackle to drill a second hole upstream and place a large winter feeder with bait in it. The feeder will create a common large feeding spot, and the feeders on the descent will create paths leading to hooks with bait.
Operating principle of the feeder
Feeders
Baits
During winter, fish prefer protein foods that are easy to catch. Classic animal-type baits, such as bloodworms or maggots, are suitable for this role. Combinations of several different baits on one hook also work.
To maximize your catch, after each landing of fish you need to check the condition of all hooks and make sure that there is enough bait on them. The bigger, the better. If possible, it is better to hide the tip.
The main thing is to constantly experiment with baits. It is difficult to predict the behavior of fish; its tastes can change in one hour. Therefore, if the object you are fishing for has stopped biting, the first thing you need to do is try changing the bait.
Bloodworm for catching bream on a combine
Catching bream in winter using a combine harvester
Bream fishing is interesting at any time of the year.
In winter, fishing becomes more difficult because the fish become even more careful and attentive. Given the excellent vision, hearing and smell of bream, ice fishing turns into a real challenge. You can catch it in various ways.
Catching bream in winter with a combine harvester is an excellent option for reservoirs with a current, which is popular and allows you to successfully fish even during the dead of winter.
Fishing places
Bream does not hibernate in winter and remains quite active all year round. But winter cold leaves its mark on the behavior of fish.
The structural features of the mouth allow the bream to rummage in the ground, looking for various larvae, insects and other nutrients. In this regard, you should look for it in places with a muddy or clayey bottom.
- At the beginning of winter, bream can be caught well at shallow depths - the first couple of weeks after ice formation, its behavior is not much different from the autumn period.
- In the dead of winter, fish go to depths of more than 5 meters in search of places with a lot of oxygen. You need to look for it in holes, in places with uneven bottoms and changes in depth. In extreme cold, if the reservoir allows, bream stays at a depth of 10 meters or more.
- The end of winter is marked by the beginning of the spring feast, and the fish begins to actively search for food, going out to shallow areas where melt water flows.
It is necessary to avoid large accumulations of vegetation - grass that falls to the bottom rots and destroys oxygen. There will definitely be no bream in such places.
Tackle
The success of winter fishing largely depends on gear - the wrong choice can scare away the fish or make fishing very inconvenient. The following gear is suitable for catching bream using a combine harvester:
- The fishing rod is taken as usual for winter fishing. The choice is largely influenced by the individual preferences of the fisherman. You should take into account the size of the fish - a rod that is too thin and light may simply not withstand the weight of the prey. A short fishing rod with a Mylar whip is convenient - it is quite sensitive and light. In order not to hold it in your hands all the time, you will need a stand for the rod.
- The reel does not play a special role; you can also fish on a reel. If you use a balalaika, then the coil is already there.
- The fishing line should be taken with the smallest possible diameter - the good vision of the bream allows it to clearly see the tackle and a thick thread will simply scare away the fish. The estimated size of production is also taken into account. The best option is a monofilament thread with a thickness of 0.25-0.35 mm. Braid with a diameter of 0.1 mm is also suitable. For leashes, a thinner line is required - 0.14-0.18 mm.
- Sharp hooks No. 5-8 according to the international classification in the amount of 3-4 pieces. It is advisable that a drop of phosphorus be applied to them.
- A closed type feeder weighing 100-120 grams or a weight of the same weight.
- Metal spring nod.
Equipment device
This equipment can be purchased in the store. But its structure is quite simple, so it won’t be difficult to do it yourself.
- At a distance of 5-7 meters from the end of the main line, two stoppers are placed, between which a swivel is installed.
- The feeder (or weight) is tied to a leash 20 centimeters long and suspended from a swivel. In any case, a feeder is preferable, as it significantly increases the catchability of the gear due to bait.
- An insert of several hooks is attached to the end of the fishing line. The length of the insert is about 2 meters. The first hook is attached to the end of the insert; next to it you need to place a weight (several lead pellets), which allows it to sink to the ground. Two or three more hooks are attached to short leashes at equal distances along the entire length of the insert. Instead of hooks, you can put jigs - droplets or pellets - with a luminous coating applied.
It is better to make the insert with hooks from fluorocarbon fishing line - it is not visible in the water, which is very important when fishing for bream.
Tactics for using gear
Catching bream in winter with a combine is classified as passive fishing. After the fishing location has been determined, the tackle should be properly threaded and lowered.
- The feeder is filled with complementary food, and bait is put on the hooks.
- The hooks go down into the hole first. The time of descent depends on the strength of the current - the insert with hooks must be carried by the flow of water without getting tangled.
- Next, you should lower the feeder until it completely touches the bottom.
- The excess fishing line is wound onto the reel and the fishing rod is placed on a stand near the hole.
After this, all that remains is to wait for the bite.
The operating principle is as follows: the food is gradually washed out of the feeder and the nutrient particles follow downstream, passing along the hooks. The bream, following the scent, always passes near the hooks on the way to the feeder, and here everything depends on the correctly chosen bait.
Lure
Catching bream in winter using a combine harvester is almost impossible without bait, which attracts sluggish, inactive fish to the hooks.
Considering the omnivorous nature of bream, the bait should contain both plant and animal components. In this case, it is imperative that part of the mixture consists of bait. All plant ingredients need to be crushed - their task is to create a cloudy nutrient cloud in the water column. Semolina or wheat flour, breadcrumbs, ground bran or Hercules flakes are perfect for this.
Groundbait recipes
1 recipe:
- 0.5 kg of cookies;
- 0.4-0.5 kg bran;
- 0.2 kg semolina;
- a few hemp or coriander seeds.
All components are thoroughly ground in a meat grinder or blender and mixed. Next, add soil, a little water and mix everything until smooth. Directly at the reservoir, chopped maggots, worms or bloodworms are added to the mixture.
Recipe 2:
- 1 cup of roasted and crushed Hercules flakes;
- 1 cup boiled wheat porridge;
- 1 cup roasted and crushed sunflower seeds;
- ½ teaspoon vanillin.
As in the first option, all components are mixed with water and soil and chopped animal bait is added. You can add a little flavoring to the bait, but you should be extremely careful - bream, which has a delicate sense of smell, becomes very suspicious in winter and a strong smell, unlike in summer, will only scare it away.
It is better to use natural ingredients as a flavoring:
- hemp seeds;
- garlic;
- vanilla powder or sticks;
- coriander;
- citrus peels.
Baits
In winter, bream completely switches to animal food, rich in proteins and more nutritious. Main attachments:
- bloodworm;
- maggot;
- dung red worm;
When placing bait on a hook, you can combine bait (maggot worm, maggot bloodworm, bloodworm worm) - in winter, bream bites quite well on such “sandwiches”.
Tips for anglers to increase their catch:
- The mouth of the bream is large, so you should not skimp on bait - bloodworms are placed in bunches, maggots and worms - several pieces depending on the size.
- The number of hooks on the combine can be increased, but this does not necessarily lead to an increase in catch - the tackle will become tangled more often.
- Some anglers attach the hook insert directly to the main line near the feeder. The tackle is shortened, but with a good bite this will not affect the result.
- You need to mix the bait in a pond, using water from it - tap water will scare away the fish with an unusual smell.
- The bream's sensitive hearing picks up any movement and conversations on the ice, so you should be as quiet as possible.
Fishing technique
There are several rules that must be followed when fishing with descents. You need to place gear from one bank drop to another. This way they will not get confused with each other, and at the same time they will fish the maximum area.
If there is a strong current in the reservoir, then holes are drilled at an angle to eliminate friction of the fishing line on the edge of the ice. The location of the feeder is determined experimentally - different options are tried and the one with the most bites is selected.
The tackle must be lowered into the water slowly and gradually. First the hooks, then the feeder - do not throw it into the water, but gently lower it to the bottom. After lowering the equipment into the water, the fishing rod is placed in a vertical position.
Placed combines in working position
Advice from experienced people
To achieve the desired results, do not neglect the advice of experienced fishermen. Among which:
- use well-tuned tackle;
- choose sharp and reliable hooks;
- take plenty of bait;
- observe safety precautions on ice;
- Use water for bait from a specific reservoir.
Both experienced fishermen and beginners can catch winter bream using a combine harvester. With careful preparation of gear and choice of bait, you can achieve very good results. This is an affordable and easy-to-make tackle that works great in the current.
Advantages of using a descender in the current
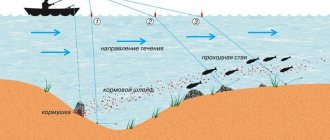
On the current, this tackle performs best. Cautious fish will not be afraid of the light from the hole, since the feeding area is located downstream. Also, when fishing with this method, the hooks lie on the bottom - where the fish feed. The feeder feeds the fishing spot more effectively than if the fisherman threw the same bait into the hole. This distribution of the cloudy spot lulls the vigilance of the fish. And of course, several hooks simultaneously fish a large area of the reservoir, hooking the fish in case of a bite.
Tackle elements
A classic bream descender consists of the following elements:
- A fishing rod with a hard nod;
- Main line;
- A homemade or store-bought feeder on a small forest plot. The feeder is attached to the main fishing line using a fastener with a swivel, moving along it between two groups of silicone stoppers;
- “Tail” (“braid”) is the working part of the equipment. A fishing line with 3–4 leashes, tied to the main line through a simple swivel;
- A small sliding sinker at the end of the “tail”. It is located above the last leash, fixed between two groups of silicone stoppers.
The catchability and ease of use of the gear depend on each of them. Therefore, they should be selected and combined especially carefully and thoughtfully.
Rod and nod
For the combine, simple, inexpensive winter fishing rods with a comfortable handle made of foam or fine-pored rubber are used. The fishing rod is chosen with a hard whip 25-30 cm long. A reel with a diameter of 45-50 mm, equipped with a locking key.
Rigid magazine nods made of a twisted spring are used as a bite alarm on this gear. The length of the nod can be 15-20 cm, the tip can be decorated with bright balls.
We recommend reading: Detailed description of the mirror carp fish
Due to its resemblance to the famous children's lollipop, such a gatehouse is often called “Chupa Chups”. Metal nods made of flat springs are used very rarely - they have less rigidity and high windage.
fishing line
This gear uses 3 sizes of simple monofilament line:
- Main line – 0.28-0.3 mm;
- For the “tail” – 0.22-0.25 mm;
- For leashes -0.14-0.18 mm.
The length of the “tail” should be no more than 5-6 m, and the reserve of the main line should be 20-30 m.
Monofilament of bright colors should be used as the main fishing line - yellow, green. This is necessary to pull the equipment out of the hole. So that you can quickly find the main line against the background of snow without getting entangled in it.
Leashes
On the “tail” of the equipment, double loops are made at a distance of 0.7-1.2 m from each other. 3-4 fishing line leashes 10-15 cm long are attached to these loops. Longer leashes are not recommended in this case - they will make the tackle more susceptible to tangling and snagging.
Hooks
Harvester leads are equipped with strong and sharp single hooks No. 6-8. In this case, preference is given to models with a long forearm.
To tie hooks to the leader line, knots such as “Palomar”, “Clinch”, “Bayonet” (for hooks with a spatula) are used. The leashes are attached to the loops on the fishing line (“tail”) with a loop-to-loop knot (cape).
To make the bait more attractive, a small cocoon of simple sewing thread is wound around the shank of the hook. This increases the visibility of the hook when fishing in the dark. The top is coated with a special reflective varnish “Firefly”.
Important. No more than 3 hooks are installed on the descender. With active biting, this amount is enough. You can pull out 2 or even 3 fish at a time. The tackle does not get tangled and does not cling too much to obstacles and snags on the bottom.
Feeder
For the combine, use a homemade feeder made from a jar for analysis as follows:
- A sinker weighing 80-120 g is attached to the inner lid of the help jar with 2 self-tapping screws (the weight is selected depending on the strength of the current at the fishing site);
- A third self-tapping screw with a wire loop is secured in the middle of the sinker;
- In the side surface and bottom of the jar, use a hot 6 mm drill to make 8-10 holes to wash out the bait; a hole is made with a nail;
- A piece of fishing line is passed into the hole;
- The fishing line is tied to a loop on the sinker, the lid is screwed onto the container;
- At the top of the piece of fishing line coming out of the feeder, a loop is knitted for fastening.
Recommended reading: Red sea bass
This kind of feeder, compared to rectangular feeder ones, is more stable in the current. It ensures maximum feeding of the “tail” located downstream.