Maggot
- This is not only a blue fly larva, but also an excellent bait for white fish.
The river catches well (especially in the spring) with bleak, roach, silver bream, perch and other fish. Maggot is not inferior in catchability to bloodworms and is widely used by fishermen as winter bait. The maggot
attaches well to the hook, lasts a long time and apparently emits an odor attractive to fish, as it often helps a lot when ignoring other baits. It is also unpretentious to storage. In addition, it can be used as bait both in winter and summer.
Content
- 1 Maggot in fishing
- 2 Fishing with maggots 2.1 Tips for fishing with maggots
- 3.1 Groundbait with maggots
- 7.1 Storing maggots in winter
Maggot in fishing
Maggot
Maggot under a microscope
Despite their disgust, maggots are widely used in fishing. They are one of the most popular baits. Depending on the type of fly, maggots can be of different colors and sizes, and this plays a big role in choosing the right bait.
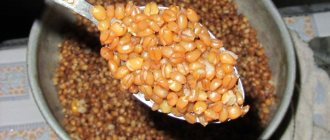
- Small, up to 15 mm, larvae of the magot variety are used very often. They have a strong skin, so they can stay on the hook for a long time. Also, these larvae have negative buoyancy, which is important for pure bait. But the main disadvantage of magots is their rapid pupation. This type of maggots can be stored in the refrigerator for no more than three weeks.
- There are also quite large, up to 25 mm in length, maggots of the gordini or gozzer variety. They are used for catching large fish, in particular in the spring, when they can replace burdock or bark beetle larvae. But these larvae pupate even faster, within just one to two weeks.
- The most popular maggots among sellers and fishermen are called pinka. They reach a length of up to 1 cm, but are very mobile, and also have a slightly red color, which better attracts fish. Pinka is stored for a long time and does not pupate. These maggots can be stored in the refrigerator for up to six months.
Fishing with maggots
Maggot
- the most profitable
bait
. After all, it retains its taste and pleasant appearance longer than others. Therefore, it is not uncommon for a fisherman to catch up to ten fish using just two larvae.
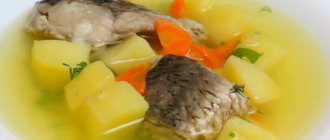
Stores usually sell oblong-shaped maggots; one end of the larva is pointed and the other is rounded. Maggot is excellent for catching both perch - a predator, and peaceful fish - roach, bream, silver bream and other carp fish. Another advantage of maggot is that it is not very favored by the ruff, which often annoys fishermen. Ruff, of course, does not refuse maggots, but does not rush at this bait as impudently as at his favorite bloodworm. In addition, the maggot stays quite firmly on the hook and you can catch several fish with 1-2 larvae, while the bloodworm usually “gets lost” with each bite of the insatiable ruff.
Maggot, as a bait, is optimal for small hooks. Can be attached to the hook either separately, 1-3 pieces, or together with bloodworms. This type of attachment - bloodworm + maggot - is usually called a “sandwich”.
Tips for catching maggots
- When biting is active, several larvae are pierced with a thin hook at once, which are planted with the rear part.
- Do not overdo it with the amount of maggots in the bait! Otherwise, the fish will lose interest and won’t bite. For 1 kg you should take only 50-100 ml of maggots.
- To attract more fish, maggots can be tinted with food coloring to produce rich yellow and red tones.
- The number of maggots on the hook varies depending on your goals. If you “hunt” for large fish, then you can take a whole handful of maggots. Wriggling, they are sure to attract the attention of a predator. For roach and bleak, use 1-2 maggots. Otherwise, the fish does not notice them.
- Sometimes, to impart buoyancy, the maggot is pumped with air using a syringe before attaching it to the hook.
- When catching large fish (for example, bream or carp), it is worth putting several maggots on the hook at once (2-3 inflated larvae are enough to lift the hook from the bottom).
- In this case, the leash may cause doubt in the fish, so it can be loaded with a tiny piece of lead.
Storage
Important for storage will be some kind of container, which must be tightly sealed and without cracks. If the inner walls of the container are even a little wet, the larvae will quickly crawl along them to the surface and crawl away. And if the lid of the container is not secured tightly, the larvae can become food for rats, for whom they are considered a delicacy. The cracks will serve as a way out for the larvae to escape, since they can squeeze into even the smallest loophole, thanks to their extreme mobility and resourcefulness. Also, the larvae should be stored in a cool place, otherwise they will quickly become brown pupae. Of course, you can also fish with a pupa, which is good for roach, but few anglers fish with it, because it is very fragile and is only suitable for thin hooks. If you bait it, you need to make a quick hook, at the first bite.
Read: How to make a bait feeder
Maggots are considered a small and delicate bait. Some fishermen put the larvae in vinegar before fishing. When they are well soaked in vinegar, they are slightly baked in the oven. After these actions, they become strong and voluminous in length and thickness.
You can attach larvae to a hook in different ways, but the hooks should not be too large. It will be more tempting for the fish if there are several maggots on the hook at once (2-3 pieces)
Methods and recipes for preparing maggots for fishing
Groundbait with maggots
Bait with maggot
Maggot is excellent for feeding fish: the larvae move under water, which attracts fish. Another advantage of maggots is that colored or white larvae are immediately noticeable against the background of ordinary solid bait.
The best proportion: per 1 kg of dry mixture, approximately 50 to 100 ml, but not more than 150, otherwise the fish may stop paying attention to the bait on the hook. You also need to remember that maggots are afraid of light and always try to burrow deeper into the bait and, in the end, most of it collects at the bottom of the bucket. Therefore, from time to time you need to mix the bait.
You can also add non-living maggots to the bait. To do this, pour boiling water over it, or even easier - freeze it. With this technique, the larvae can be carefully distributed throughout the entire volume of the mixture. In some ways, this technique is much better to use, judge for yourself: if you add a maggot alive, then at the bottom of the reservoir it will move, which the fish will certainly see, but will it want to take the maggot attached to the hook? If the bait maggot lies “dead” on the bottom, and one or more larvae mounted on a hook move against the general background, then first of all the fish will rush to the live bait. She will also pick up non-living maggots, but not as actively as living ones, thereby staying at the point longer. Another advantage of this technique is that you can freeze the maggot for future use without fear of its pupation, and each time add the required amount for complementary feeding.
Flavoring maggots
To impart odors that are not natural to maggots, you can use flavoring substances that are soaked (sprinkled) into the sawdust where the maggots are stored. In the absence of such or when saving on production flavorings, try using the old-fashioned method - sawdust decoction. To do this, non-coniferous sawdust is used, poured into a pan and filled with water in a ratio of 1 to 2. A flavoring agent, such as honey, vanilla, vegetable oils, drops of Corvalol, etc., is first dissolved in the water. If it is not possible to dissolve your flavoring due to the addition of components such as coriander, garlic, dill, hemp grains, etc., then they are boiled together with sawdust. Next, boil our potion over low heat until it boils and boil for up to 3 minutes. We squeeze out the boiled sawdust and dry it in the microwave. The dried sawdust is subsequently used as bedding for maggots, from which it will receive the necessary smell within a few days of storage.
To be fair, I note that for me, it’s faster and easier to use the dip directly while fishing and give the maggot any desired smell.
Coloring of maggots
Painted maggot
To increase the catch, maggots are painted in different colors: red, pink, orange, yellow, lemon, green; in addition, the larva is sometimes coated with fluorescent paints. When dyed maggots were not yet sold, they were dyed at home.
The dyeing technology was simple: the larvae were degreased by rinsing them in a weak solution of washing powder, dried and placed in a container intended for them. This staining was ineffective, since most of the larvae remained white regardless of the quality of the dye.
Feeding low-fat larvae with food containing dye gave the best effect. Coloring maggots red or yellow at home:
- To do this, chicken yolk is mixed with food coloring and given to the larvae, which acquire the appropriate shade.
However, maggots dyed at home have an unusual taste and smell. The dye may adversely affect the properties of the larvae as bait. In addition, a poorly chosen dye can be harmful to the environment, especially to fish that will eat bait with colored worms placed in the water. It is no coincidence that the use of painted larvae is prohibited in many reservoirs in some European countries.
Therefore, it is better to avoid painting worms at home altogether and entrust this task to professionals. Currently, there are no problems with purchasing maggots colored in the primary colors - yellow and red. Multi-colored larvae from specialized nurseries, intended for use as bait, are identically colored and packaged in plastic boxes.
Boiled and pickled maggot
Many fishermen have encountered this problem when, after many hours of fishing on a hot summer day, the maggot loses its mobility and gradually begins to pupate. For some reason, it is mistakenly believed that such maggots only deserve to be thrown away, since they are not suitable for fishing. But this is far from true; a “sluggish” maggot can be given another life by killing the larva (pardon the tautological pun). Below are some ways to do this.
Boiled maggot
The maggot is selected from the sawdust and placed in a free container, where it is laid out in one loose layer. Next, prepare salted water (1 tablespoon of salt per 200 milligrams of water) and bring it to a boil. Pour boiling water over the collected larvae, stirring them at the same time so that they are evenly scalded on all sides (the larvae will begin to float). You don't need a lot of water, just enough to cover the larvae. After the water has cooled completely, remove the cooked larvae onto a napkin and dry them. The drying process is best done at room temperature for 2-3 hours so that the larva dries and becomes elastic. When drying larvae in an oven or on a hot radiator, make sure that the maggot does not dry out.
Boiled maggot is excellent for both summer and winter fishing, and also holds well on the hook. Another advantage of such bait is that it can be frozen and thawed several times and this will not affect its quality. Before re-freezing the maggot, it is a good idea to dry it again.
Pickled maggot
This exotic method of preparing maggots was invented by English fishermen. As in the previous method, you can use “old” maggots that don’t quite move. Maggot larvae, cleared of sawdust and debris, are marinated in vinegar for 1 hour. After this, after rinsing and allowing the liquid to drain, dry it a little on a napkin. Next, the pickled maggot should be slightly fried in the microwave until firm and elastic.
How to make boiled and pickled maggot?
Many fishermen have encountered this problem when, after many hours of fishing on a hot summer day, the maggot loses its mobility and gradually begins to pupate. For some reason, it is mistakenly believed that such maggots only deserve to be thrown away, since they are not suitable for fishing. But this is far from true; a “sluggish” maggot can be given another life by killing the larva (pardon the tautological pun). Below are some ways to do this.
Method 1. Making boiled maggot
The maggot is selected from the sawdust and placed in a free container, where it is laid out in one loose layer. Next, prepare salted water (1 tablespoon of salt per 200 milligrams of water) and bring it to a boil. Pour boiling water over the collected larvae, stirring them at the same time so that they are evenly scalded on all sides (the larvae will begin to float).
You don't need a lot of water, just enough to cover the larvae. After the water has cooled completely, remove the cooked larvae onto a napkin and dry them. The drying process is best done at room temperature for 2-3 hours so that the larva dries and becomes elastic. When drying larvae in an oven or on a hot radiator, make sure that the maggot does not dry out.
Boiled maggot is excellent for both summer and winter fishing, and also holds well on the hook. Another advantage of such bait is that it can be frozen and thawed several times and this will not affect its quality. Before re-freezing the maggot, it is a good idea to dry it again.
Method 2. Pickled maggot
This exotic method of preparing maggots was invented by English fishermen. As in the previous method, you can use “old” maggots that don’t quite move. Maggot larvae, cleared of sawdust and debris, are marinated in vinegar for 1 hour. After this, after rinsing and allowing the liquid to drain, dry it a little on a napkin. Next, the pickled maggot should be slightly fried in the microwave until firm and elastic.
Methods of planting maggots
Maggot
- a bait that is quite resistant to external influences. It has a relatively strong shell, so it is necessary that after inserting it, the hook tip along with the barb remains open - otherwise the fish bite may be empty. But, thanks to the strength of the shell, in conditions of active biting one and the same larva can be used to catch several specimens.
Maggot is very mobile - accordingly, the hooks used for fishing must have a retaining barb. By the way, on imported commercial packaging of special hooks for maggots there is a marking “maggot”, which is, in fact, what this larva is called in English. Methods of attaching maggots directly depend on the behavior of the fish and fishing conditions.
Methods of planting maggots
A widely used option is the attachment of one larva (pictured 1). With this method, the hook clings to the very edge of its back. Due to the dense shell of the maggot, the bait holds perfectly on the hook, maintaining its natural appearance for a long time.
There are situations when it is necessary to plant several larvae in a bunch. Accordingly, this requires a larger hook, onto which a row of maggots is attached in exactly the same way (by the edge of the flesh) (in photos 2 and 3). When mounted correctly, all larvae remain mobile, and the bunch is very attractive to fish.
But this option is still not without its drawback - the bait acts as a propeller, twisting the leash during prolonged reeling of the equipment (if fishing is done with a rod and reel). In such a situation, another option is better - the hook directly pierces the body of the larva. However, this leads to the fact that she retains an attractive appearance for less time, but still this is the lesser of the evils...
There are cases (mainly when catching small fish) when you can catch several specimens with one “chewed” bait, and in order not to waste time changing bait, you can attach a larva by piercing its body with a hook along an imaginary axis (in photo 4). Not the most aesthetic way, but in some cases very effective.
Methods for extracting maggots
There are several ways to obtain maggots. Of course, this is not always the most pleasant activity. It is worth stocking up on patience and basic hygiene products.
Cesspools.
The algorithm of actions is as follows: the larvae found in the cesspool must be placed in a jar with sand and small sawdust so that, after passing through them, the larva is cleansed of all kinds of dirt. Please note that it is better to pass the larvae through the sand two or even three times.
Silo pits.
Large volumes of maggots are also found in so-called silos: they are found directly near the ground in rotted silage. As a rule, larvae unite in colonies between the cold and warm layers of silage. These can be either greenish or yellow larvae. It is also better to store silage maggots in a silo at a temperature of +8...+10 °C. The container must be made of wood, and small holes must be made in the lid for ventilation.
Maggot in winter.
Some types of fish bite well on dead maggots in winter: perches, breams, roaches, etc. To prepare such maggots, take large larvae, scald them with boiling water, then dry them on newspaper and put them in a jar, adding linseed or camphor oil to small quantities. Close the top of the container with a stopper and keep the container in a cool place. The larvae will die, but the “mummies” will retain an attractive appearance for fish.
Breeding maggots
Breeding maggots
You can breed such a popular bait as maggots yourself, although it will require a lot of effort and patience. There are several ways to breed maggots, but they are all united by the fact that it is best to carry out the process not in an apartment, but in the private sector or in the country. This is primarily due to the unpleasant odor.
- From eggs. To breed maggots in this way, you will need several raw eggs. Take the eggs, make a hole in each egg with a thin object and place them in an open space where flies often fly. After a few days, you can get a bunch of maggots from each shell.
- From fish, liver or meat. To implement this method, you will need fish, liver or meat of low quality. Take fish, meat and secure the raw materials under a canopy. Under the material, do not forget to place a container with sawdust, which must be mixed with a small amount of bran. After two or three days, larvae will appear on the fish or meat, which will grow and fall into a container with sawdust, acting as a substrate.
- Fish on sawdust. Pour hardwood sawdust into a container and place a thin layer of bran on top. Then fill the mixture with hot water and mix all the elements. Place unpeeled fish with its belly cut open in this container. In the morning you need to place the container with fish where the so-called blue flies most often fly. A couple of hours before the sun sets, remove this container and place it in a warm place. After 2–3 days, the maggots necessary for fishing will begin to appear from the eggs laid by the flies.
It is also worth noting that the larvae are quite mobile, so it is advisable to store them in small glass jars. Instead of a lid, it is better to use a metal mesh, which allows air to pass through perfectly.
How to get maggots at home?
For a home incubator you will need a small amount (about 150-200 grams) of meat or fish. It is desirable that the working material contains more flesh and less bones. Having acquired such a piece of meat, we get to work. Cut the meat (fish) into pieces approximately the size of a matchbox and place them in a plastic bag.
We tie the bag tightly to create a greenhouse effect and thereby speed up the decomposition process. Leave it all for 24 hours in a warm place. The ambient temperature must be no lower than room temperature, otherwise the meat or fish will rot for a long time, and the process of obtaining maggots will be delayed.
Approximately after 24 hours, a crucial and somewhat dangerous moment comes. Dangerous because if you want to carry out subsequent operations in your apartment, and even in front of your wife, you risk hearing everything she thinks about fishing, fishermen, and you included. It is possible that your wife, during her monologue, may tell you something that you did not know about yourself and did not even suspect. But let's return to obtaining fly larvae.
Rotten meat (fish), with an unpleasant odor, should be placed in a low container, the bottom of which must first be covered with a small layer of small sawdust. We cover the container with a cloth, not forgetting to leave a few cracks so that flies can get inside, and place it in a shaded place.
In the spring, after a few days, and in the summer, after a few hours, maggot larvae will appear in your incubator, which will indicate that it is time to harvest the crop and bring it to the desired standard by feeding. Before dwelling on feeding the maggot, I will allow myself to give the dear reader some theoretical aspects about the fly larva, since without them your further actions may become unsuccessful.
During its development, the maggot reaches a maximum size of 10-15 mm (in almost all types of flies, the size of the maggot varies within these limits), so you should not try to feed it to the size of an average earthworm. Remember that under favorable environmental conditions, the fly larva can remain for 10-15 days, and then turns into a pupa. Based on this knowledge, you yourself will have to figure out when it’s time to send the maggot for storage or kill it (more on that later). In order to make it easier to understand during the process of growing maggots that the maggot is ripe and to prevent it from turning into a pupa, it is enough to know the following. The “young” maggot, if such a term is acceptable, is very mobile and active.
Its mobility decreases as it ages, and the less time remains until pupation, the less activity it exhibits. In addition, in a narrow part of its body there is a dark spot that disappears a few days before the maggot should turn into a pupa. This simple information will help you when you have to buy maggots. After all, you can often find “not fresh” maggots in the store, some of which will pupate by the morning after purchase, regardless of the fact that the seller convincingly assured you that it was “just from a fly.”
Now let's return to our growing technology and what needs to be done in order to feed maggots.
We select the tiny larvae from the incubator into a separate container (with sawdust!), and it’s a good idea to write down when the “harvest” was collected and when feeding began. The feeding of the young animals itself takes place over 3-4 days. After this period, there is no point in feeding; the maggot will not feed, since it has reached its maximum size. The ideal food for maggots is any food high in protein (liver, lungs, chicken eggs). Feeding is carried out as follows: we lay sawdust, then food, and pour the larvae on top.
During the process of growing, feeding and storing, do not forget that you need to periodically change the litter. The litter absorbs moisture and natural waste from the larvae. Dry and clean bedding will increase the shelf life of the bait and make it attractive. Do not forget also that containers with maggots must be ventilated, otherwise the lack of oxygen (the presence of a rotten smell) will destroy the larvae.
Upon completion of feeding, the maggot must be placed in an unfavorable environment for it - cold, in order to prevent its pupation. Such an unfavorable environment will plunge the larvae into a suspended state. It has been noticed that maggots are able not to die at temperatures up to? 30 C and live in such an environment without turning into flies for up to 2 years!
Using an egg
One of the simplest ways is to breed larvae in a chicken egg. To do this, take a hard-boiled egg, cut off the top and leave it in places where flies gather.
It is not recommended to take a raw egg, as some authors advise - it does not spoil for a very long time and attracts few flies. Flies lay eggs in a boiled egg quite quickly, and in warm weather, within a week you can shake a small portion of maggots out of the shell.
A significant disadvantage of this method is the foul smell of hydrogen sulfide, which produces a rotten egg and a negligible yield of larvae from one egg.
In a bottle
It is much more convenient to breed maggots in a plastic bottle. There are many options here. The easiest way is to take a PET bottle (1.5-2 liters) and cut off its upper part so that you get a funnel.
This funnel is inserted into the cut part of the bottle. Flies will fly into the container through the neck. Bait for flies is placed in the cut part of the bottle - it can be fish, meat, or minced meat.
A little sand and sawdust is immediately poured onto the bottom. It is not worth covering the nutrient substrate itself with sawdust.
For example, meat covered with sawdust will begin to attract flies no earlier than a week later, since sawdust delays putrefactive processes and absorbs odors.
It is advisable to place the bottle in a secluded place so that it does not attract the attention of household members. Various country houses are ideal.
In the city, of course, the only suitable place is a balcony.
The bottle needs to be shaken periodically and checked to see if larvae have appeared. In summer they grow very quickly, and if you miss the moment, they will turn into pupae, or even adult flies.
Typically, the larvae grow to working size within 3-4 days after the flies lay eggs. You can delay their development by putting the bottle in a cool place.
After the flies lay their eggs, the neck of the bottle needs to be covered with several layers of gauze, since not only fish love them, but also predatory little beetles, which can easily destroy your entire strategic supply of bait.
You can cover the bottle with a plastic bag, but not tightly. Rural fishermen should also not forget that rats are very fond of maggots.
In some articles there is a recommendation to place a piece of meat or fish directly in the funnel. According to the authors, maggots from the funnel should themselves fall to the bottom of the bottle as they grow.
In practice, most of the larvae often remain in the funnel, from where they can easily crawl out or become easy prey for little beetles.
The method itself, of course, has a right to exist, but in practice it is not as convenient and simple as they say about it.
When the larvae grow up, they are removed from the bottle. Partially you can shake them out, for example, onto a newspaper, partially you have to pick them out with your hands from the remnants of meat or fish.
Do not forget that maggots spread quickly, so you cannot leave them unattended for even a minute. The maggots are poured from the newspaper into a jar and covered with sand mixed with sawdust. The jar is tightly closed with a lid and turned upside down.
The maggots, having passed through a layer of sand and sawdust, will be cleaned and practically get rid of the unpleasant odor. After this, the jar is turned over to its normal position and the larvae are transferred to any suitable box with a tight lid.
Maggot in the bone
There is an old, original method of breeding maggots in bones. A raw, fresh tubular bone with remaining meat is taken. It's good if it has already started to deteriorate.
The bone is split with an ax, but not completely, but so that a crack forms in it. The bone is lightly sprinkled with earth or sand. Blue flies quickly lay eggs in it, and the larvae grow, feeding on the remains of the meat.
Numerous theorists argue that maggots will certainly crawl inside through the crack, and the fisherman will only have to shake them out before fishing from a “completely bare bone.”
In practice, only part of the maggots is taken inside the bone, while others remain outside. In addition, by the time the bone is completely eaten away, some of the maggots will already have time to pupate.
Another disadvantage of this method is the absolute availability of both bones and maggots for the same little beetles, as well as larger predators.
Maggot in the liver
Much more reliable is another ancient method of breeding maggots - in a piece of liver.
Using a sharp knife, cuts are made in the liver into which wooden splinters - spacers - are inserted.
A piece of liver is placed in any suitable container (in old books they wrote “pot”) and covered with a cloth. Sawdust or its mixture with bran should also be poured into the bottom of the container.
In warm weather, the larvae usually appear on the 2-3rd day, after which it is important to monitor the process daily so as not to miss the moment when the maggot is “ready” for fishing.
Instead of liver, you can use a piece of light or spoiled meat.
Maggot in fish
Of course, the simplest and most accessible for every fisherman is breeding maggots in fish. It is enough to simply spread the fish cut lengthwise in the open air.
In “flying” weather, a few hours will be enough for flies to lay eggs. After this, the fish is tightly wrapped in several layers of paper (newspaper will also do) and placed in a large glass jar with sawdust sprinkled on the bottom.
The jar can be closed with gauze, paper or a lid with holes. The holes should also be covered with gauze or paper. In the summer, after a few days, some of the maggots will begin to escape from the newspaper and crawl along the bottom of the jar. So it’s time to get ready for fishing.
A glass jar is convenient because you can visually control the process.
Maggot can also be obtained from salted fish. Any fisherman who has been drying fish has at least once in his life encountered the fact that, despite all the measures taken, flies managed to lay eggs in the hung fish.
It is these maggots that come out the densest and most elastic. Even a high concentration of salt does not harm them at all. “Salted” maggots grow a little longer than usual, but they are the largest and do not pupate for a long time.
In addition, they have virtually no characteristic unpleasant odor. Apparently, the preservative effect of salt is affecting. Perhaps this is one of the best ways.
Storing maggots
Storing maggots
Maggots can be stored for a long time, and this is one of its main advantages. Young larvae in the early stages of development are stored the longest. They are easily recognized by a dark spot visible through the shell and located in the anterior, tapering part of the larva. The older the larva becomes, the further the speck moves towards its rear. In adult larvae, which will soon begin to pass through the pupal stage, these spots are not visible at all. Maggot is well preserved even for several months, but under certain conditions. It is best to store maggots in the refrigerator at positive temperatures, close to zero. Cooled larvae are motionless, but at room temperature they return to their original state. In order for the larvae to remain dry, they are mixed with small sawdust from deciduous trees (sawdust from coniferous trees is not suitable, as they smell like resin).
It is not recommended to dry the larvae with flour products, since millet and corn flour, as well as pureed white bread, become moldy during long-term storage. Cooled larvae are able to pupate if air enters the box with them. Therefore, after cooling (but not before cooling), it is necessary to separate the larvae from the sawdust and pack them tightly into boxes without access to air. You can use foil bags. Having filled such a bag with larvae, it is tied with an elastic band. But the main condition for storing maggots is the optimal temperature. Temperatures below zero cause the larvae to freeze; when the temperature is too high, the larvae in the box with access to air pupate, and the tightly packed ones stretch out in length and die.
If the stretched out larvae remain motionless and appear dead, they should be ventilated at room temperature for several hours - they may come to life.
Storing maggots in winter
Some fishermen keep maggots frozen all winter.
Here are two ways:
- The grown larvae are collected in a glass jar, bran or flour mixed with cottage cheese are added, covered with a lid with tiny holes and frozen. In the spring, it is enough to thaw the contents of the jar - and the nozzle is ready.
- In another case, maggots are mixed with bone meal, a 3-4 cm layer of dry sand, covered and placed in extreme cold. In the spring, defrost and mix with fresh bone meal.
Extraction of maggots for fishing
Maggot is a white blowfly larva. In terms of catchability, in some cases it is not inferior to bloodworms and the same dung worm, but is used by fishermen less often than the above baits.
Getting larvae is not that difficult. You can take some amount of meat, or even better if it is the liver or lung of some animal. Deep cuts are made in the meat, and it is hung out in the sun. After a while, many blow flies will fly in and larvae will be laid in the cuts. After being in the open sun for some time, this piece of meat is placed in a container (pot) and closed with a lid. After these actions, after a certain period of time, worms (also called “bubbles”) appear from the eggs, with black dots inside the body.
Wheat bran is added to the container, and within a few days (3-4 days), the maggots acquire the size required for fishing. Then they are transferred to a container, half of which should be filled with wheat bran. Then a certain amount of meat (liver) is added, which serves as food for the larvae. After a few days, the black spots in the bodies of the maggots disappear, they become clean and suitable for fishing.
Read: Bait for bream - fisherman's secrets
Some fishermen hang the meat from sticks placed crosswise over a container half filled with dry clay (or bran). The larvae thus fall into the container and burrow.
Also, fish, mainly small in size (bleak, stickleback and others), are perfect for feeding maggots. An open container with fish is placed outside for flies to lay eggs there. Often the larvae become twice as large as ordinary ones. This means that these are maggots from a large blue fly, which are much better suited for bait than regular ones.