Carp rigs and rigs come in a variety of varieties; there are a large number of them. The choice of specific equipment will depend, first of all, on the characteristics of carp fishing: type of bottom, casting distance, current speed, pond depth and other factors that need to be taken into account for effective fishing.
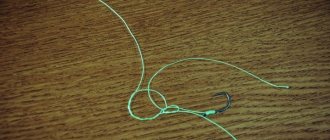
Carp installation with PVA mesh
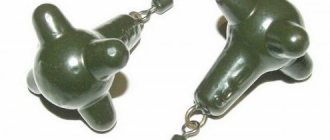
Carp equipment In-line
Carp rig “Inline” is one of the types of self-cutting gear, when the fishing line passes through a weight or spring. The equipment has been developed for trouble-free and targeted carp fishing.
The principle of operation is this: when the fish takes the bait, it does not feel danger (that is, there is no resistance from the sinker). But when the carp moves away with the bait in its mouth, a spring prevents this and self-hooking occurs. You just need to get the trophy out of the water.
Also often used is one of the varieties of this gear (not so traumatic for fish), “In-line with shooting a weight.”
Online editing
Materials for production:
- leadcore needle;
- scissors;
- silicone tube;
- In-line carp feeders;
- swivel;
- leadcore.
Inline equipment for carp fishing
How to tie in-line equipment for carp fishing with your own hands:
- First, a special swivel is put on the leadcore to shoot the weight.
- Then, using a needle, the leadcore is threaded through a silicone tube.
- Next we “work” with the Inline weight. First, we take out the rubberized insert from it, carefully cut off the back side and install a swivel here.
- We install the assembled “structure” back into the weight.
- We insert the leader into the top of the weight and install a silicone tube underneath.
- Using slight force, carefully straighten the equipment and slightly tighten the cone.
- Next, a carp leash is attached.
How to knit an Inline montage correctly, watch the video:
Features of online installation
Inline feeder editing requires some knowledge. To prepare inline feeder gear before fishing, it must be roughly divided into 3 sections: the main zone, the feeder zone, and the leash zone. When hooked, the entire tackle may be lost, so during installation, each subsequent section is made up of fishing line of a smaller diameter.
This division will allow you to have equipment elements in stock and quickly change them while fishing according to changing fishing conditions.
The main zone of the inline rig is the line stored on the reel. The type of fishing line and its diameter are selected depending on the fishing conditions; usually 0.3 to 0.5 mm is used.
If there is a protective layer at the passage rings, a braided cord is used. It is well suited for feeder fishing.
The leash area requires a careful approach. It is the main part of the entire equipment and largely determines the success of fishing. Fluorocarbon thread is best. It does not scare away fish due to its invisibility. Diameter from 0.2 to 0.35 mm. You also need to remember about tying knots on such a fishing line - put a drop of glue on the knot, otherwise it will unravel.
The leash itself should not be made long; it may overlap with the feeder. Usually the length is 15-25 cm and it quickly sinks behind a heavy feeder.
Flat method
This is a carp installation with a feeder, where the spring is similar to a balalaika, while one part of it has a flat shape. The gear is best suited for fishing in places where there is a muddy bottom or overgrown with aquatic vegetation, since this installation does not fall into them. At the same time, such feeders allow for excellent casting accuracy.
To make them you will need:
- silicone tube;
- stainless steel pin;
- steel wire;
- mold for casting a lead base.
Installation steps:
- The bent wire and pin are placed in a mold into which hot lead is poured.
- When everything has cooled down, the structure is removed, the pin is removed, and a silicone tube is attached to it.
How to make a rig for catching carp using the flat method, watch the video:
Safety clip
The main advantages of this installation are that you can install almost any weights and throw the tackle into the fishing spot with maximum precision. At the same time, cast at different distances, both medium and ultra-long.
Another advantage: if the carp tackle was assembled correctly, then it is possible to “program” the further behavior of this installation. As examples:
- the weight will be “shot back” only as a last resort (if it gets firmly stuck in a snag or gets tangled in algae);
- for convenient fishing for a trophy specimen, under difficult fishing conditions, immediately after hooking, the weight is “unfastened”.
Attention: The main purpose of this equipment is a solid bottom plateau.
Materials for production:
- direct safety clip;
- cone;
- swivel;
- weight;
- silicone tube about 35 cm.
Recommendation: When making carp rigs and equipment for carp fishing, try to choose all materials from the same manufacturer, so they are guaranteed to be compatible with each other.
How to make a rig with a safety clip:
- First, we tighten the tube onto the fishing line (directly to the clip).
- Afterwards, the fishing line is threaded through the cone and, with a little effort, is pressed into the tube.
- A swivel is attached to the clip and the coupling is tightened.
- Through the metal eye of the clip we attach a leash with a carp hook attached to it.
Attention: This mounting option is very common among professional carp anglers, but many beginners do not fully understand the principle of operation of a safety clip. Therefore, the equipment is knitted in the wrong place or completely incorrectly.
To understand how to tie and use a catchable carp rig, it is recommended to watch the video:
Sliding equipment
This carp mount is not difficult to manufacture. In this rig, the clip and weight are not attached rigidly; they slide freely along the fishing line.
Sliding carp mounting has the following advantages:
- It’s easier to determine when a fish is biting. When the carp takes the bait, the bite alarm immediately goes off.
- Sliding rigging provides the maximum opportunity to avoid carp “running off” small leashes. Even a slight hit on the hook causes the carp to flee, and it begins to unwind the tackle from the reel. But a blind weight, unlike a sliding one, in this case becomes a kind of “pendulum” and allows the carp to spit out the hook.
Sliding carp installation
However, there is a drawback - incomplete transfer of the weight of the weight to the hook. But there are some types of equipment that allow the load to remain in a fixed position for a short time during a bite; it begins to slide when required.
Materials for production:
- clip;
- weight;
- buffer coupling;
- rubber tube;
- swivel with ring.
The classic method of sliding tackle is knitted as follows:
- We put a rubber tube on the fishing line and knit the leadcore.
- A swivel and coupling are threaded onto the ring.
- We tie the swivel to the fishing line using a palomar knot.
- Afterwards a latch with a tube is fixed to it.
- The weight is attached to the latch.
There are other methods of making tackle for catching carp and carp. The simplest of them is to put a weight with a swivel on a fishing line, then attach a bead between the leash and the weight. In order not to bother at all, you can buy ready-made tackle in the store.
How to knit a slip montage correctly, watch the video:
Types of online editing
Despite the fact that the inline feeder rig was developed for fishing in still waters for carp and crucian carp, with minor modifications, it can also be used for fishing in the current.
Sliding inline installation implies that the feeder moves freely along the fishing line or leadcore. In the sports version of the sliding installation of the Running Feeder Rig, sliding is not limited by stoppers or knots and allows the fish to swim away freely in the event of a break in the entire equipment.
Depending on the fishing conditions, different installation schemes for feeder equipment are used. Conventionally, they can be divided into three types:
Online editing
- For catching carp and crucian carp in still water of ponds and lakes. This is a classic flat feeder rig, in which the line or leadcore runs directly through the flat feeder. Moreover, it can be either sliding or tightly fixed.
- Universal inline installation. The line passes through the ring of the swivel or the connector of the feeder. This equipment is suitable for fishing both in currents and in still water.
- Inline installation with outlet. The line passes through the bead or ring of the swivel, to which the outlet with the feeder is attached. This feeder rig is suitable for fishing in currents and in silted waters. Installation with an outlet allows the equipment to be used in reservoirs with soft soil. When immersed in silt, the feeder does not drag other elements of the equipment with it. It is a kind of analogue of the paternoster.
Having differences in the method of attaching the feeder, all these types of installation are built on the inline principle: the leash with the hook is not retractable and forms a straight line, and the feeder can slide freely along it.
All these types of inline installation can be performed on regular nylon, fluorocarbon or braided fishing line. Leadcore or other similar material can also be used. When fishing with a low-stretch line, feeder rubber is used to compensate for the jerks of the fish.
There are many modifications of inline editing, it is done using different elements, but the main thing is the “inline” principle, which must remain unchanged.
Symmetrical loop
This is a popular installation for a feeder with a self-cutting effect. Most often, the equipment is used in ponds in which there is a weak current.
For production you will need:
- fishing line;
- weight;
- several swivels with clasp;
- hooks for carp;
- fluorocarbon for knitting reins;
- spring.
Step-by-step assembly instructions:
- The main line is laid in half, with its ends twisted in any direction.
- About 10 twists are made, then a knot is tied.
- The swivel is placed on the fishing line, and a free space of 20 cm must be left from it.
- A knot is tied, then the line is twisted again.
- Another swivel is fixed at the second end.
- A loop is made on either side of the fishing line into which a leash 0.5 meters long is tied.
- A hook is attached to it.
A symmetrical loop is one of the best types of installation for standing water.
How to knit a symmetrical loop, watch the video:
How to tie
Option 1
- A swivel with a fastener is put on the working end of the fishing line.
- A piece of 15 cm is separated from the end of the fishing line and folded in half.
- A Figure Eight knot is tied.
- A twist is made, it should be rigid and 10 cm long. It is also twisted into a Figure Eight knot.
The equipment is complete, the feeder is attached to the swivel. A leash is attached to the loop. But such equipment does not have self-hatching of fish, so the angler must always be in place.
Option 2
- Beads are placed on a piece of fluorocarbon with a diameter of 0.3 mm;
- we fold this fluorocarbon halfway so that these beads are inside the loop;
- around the bead we twist up to 10 cm;
- put on the tube and pull until the twist begins;
- We thread a swivel with a clasp onto the ends;
- we pull the ends of the fluorocarbon through the tube, then clamp this crimp tube with pliers;
- the outlet is ready.
Now attach this entire structure to the main fishing line through beads. When fishing there is no swivel or carabiner, you can use a ring. The bead is usually placed above the swivel; it will protect this unit from being hit by the feeder.
You should also choose a swivel for the feeder; this is more suitable for homemade feeders. For example, when using a 60 g feeder, use a No. 14 swivel, and when fishing in still water, use No. 12. Use swivels and carabiners only in dark colors; a bright color will scare away the fish.
Sometimes when preparing an inline rig, a problem with the leader material may arise. Monoline is not suitable for the feeder, but braided line is just right. But this cord must be soft. The advantage of the cord compared to monofilament is that it has almost no memory. Almost always, after a few bites, a simple fishing line requires replacement.
Asymmetrical loop - installation for carp fishing on the current
The main advantage of this installation is increased sensitivity and effective hooking. As a rule, the tackle is used for fishing in strong currents in the river.
For production you will need:
- spring;
- fishing line;
- weight;
- hook No. 6;
- several swivels;
- fluorocarbon for making leaders.
Step-by-step instruction:
- You need to start in the same way as in the case of a symmetrical loop. The main part of the fishing line is bent in half, and the ends are twisted in one direction.
- A swivel, spring and weight are fixed at one end.
- On the second there is another swivel. A knot is made here.
- A leash with a hook is installed.
Asymmetrical loop
How to knit an asymmetrical loop, watch the video:
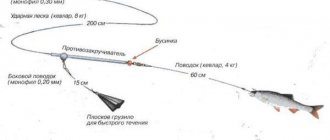
Carp montage “Helicopter”
It was specially designed to protect the equipment from getting tangled when casting over long distances, when fishing in strong currents, when fishing on a rocky bottom. That is, in places where classic gear does not work. The “Helicopter” carp rig got its name because of the rotating leashes, like a helicopter propeller.
The following materials will be required:
- several silicone beads;
- leadcore;
- swivel with a large ring;
- a small heat-shrink tube (about 5 cm);
- bait and PVA bags.
The installation of the “helicopter” is carried out in this way:
- We install the sinker on the shock leader.
- Using a needle, we put the coupling on the swivel and leadcore.
- We place a heat-shrink tube near the weight.
- Using a needle, we install the beads and the swivel with the ring directly onto the already threaded tube.
- We fix the shock leader to the main line, and attach the leash to the swivel ring. Make sure that the beads slide freely through the knot formed.
- At the end, you need to hammer the bait into the PVA bag at the same time as the weight.
“Helicopter” installation
How to knit “Helicopter” installation correctly:
How to tie
On monofilament line
The knitting order is as follows:
- We put a stop bead on the main line of small diameter;
- then we put a swivel there;
- its ring on the fishing line can be slightly pressed so that the stop bead does not slip through it;
- from the free ring of fishing line, which we pull through the swivel (the pull must be absolutely free!), we make a small loop;
- we fix it with a figure-eight knot;
- make a twist of 10 cm;
- At the other end of the twist we install another stop bead;
- We tie a leash with a hook and bait to the loop of the fishing line;
- We attach a feeder to the other end of the swivel.
It is believed that such a relatively simple tackle is especially catchy when catching trophy fish.
Installation with outlet
Here you can already use fluorocarbon:
- a bead is placed on a piece of fluorocarbon;
- We fold the fluorocarbon into a loop, the bead should be at the bottom;
- We make an even twist around it;
- We put another bead or crimp tube on the ends of the fishing line and bring it to the end of the twist;
- We pass a swivel through the same free ends;
- then we put a crimp tube on them;
- We attach the structure to the main fishing line, threading it through the bead; we make a loop with a twist in the fishing line and attach a leash with a hook to it.
On a braided line
This installation method is similar to the previous ones:
- We put a swivel on the main cord;
- string a bead;
- take a small piece of monofilament fishing line and tie it to a braided cord;
- fold the monofilament in half to form a loop;
- do a twist;
- We attach a leash with a hook to the loop, and a feeder to the swivel.
Recommendations from experts
The manufacture of absolutely any carp equipment is not complete without various accessories and elements of gear, a certain supply of which in different variations and design features is a must-have for every fisherman in his arsenal. In this case, experts recommend the following:
- The color of the fishing line, weights and other consumables must match the environment of a particular body of water . There are a large number of colors of fishing line and braided cords, this makes it possible to choose the necessary products. At the same time, there is a fluorocarbon line that is almost invisible in the water.
- It is necessary to wet all knots before tightening them . This will strengthen them and reduce the chances of breakage.
- All installation elements must be minimized taking into account their strength . It makes no sense to fish with equipment that is designed for carp weighing 10 kg in a pond where there are simply none. At the same time, it is impractical to construct very weak installations in places where you can catch trophy fish.
- If there are no bites, there is no need to completely replace the tackle ; you can only partially make certain additions.
- The tackle must be securely at the bottom . Otherwise, it will be carried away by the current, and the opportunity to see a bite in a timely manner and quickly hook the carp is reduced.
- Elements of gear should not emit artificial odors (rubber, plastic, etc.). All carp fish have a very good sense of smell. Therefore, strong aromas simply scare away prey.
- It is recommended to put various types of bait into the feeders . This will significantly increase the chance of attracting fish.
A worthy carp - you need to find one from the beginning, find its places of stay.
And finally, practice is the best teacher. You need to experiment with different types and combinations of montages. Customize the equipment for yourself. Only in this case can you achieve good results in carp fishing.