The main thing is that before knitting you need to take into account the material on which the loop is supposed to be constructed. For example, monofilament and braid are quite elastic materials, so they are ideally suited for knitting any types of loops.
- Why do you need a loop?
- Methods
- How to knit for different types of fishing?
In almost all types of fishing, it becomes necessary to use a loop on the fishing line. Beginners often become confused when they see the huge number of different loops that experienced fishermen tie on their gear. However, don’t worry that nothing will work out. In fact, there are many options for creating simple loops that anyone can tie correctly, and their effectiveness is in no way inferior to complicated tying methods.
To get started, you can familiarize yourself with the Figure Eight knot for tying hooks and organizing loops on a fishing line. Simple and reliable unit.
Knot "Surgical loop"
The knot is easy to make and does not require complex manipulations with fishing line. When knitting a loop on thick fishing lines, there is a bend in the knot; the loop and the main fishing line do not lie on the same straight line.
Used for loop-to-loop connection when connecting the leash to the main line or to the swivel. The loop can be used when installing bottom gear. Not recommended for fly fishing equipment.
Knot tying process
- At a distance of 7-10 cm from the end of the fishing line, fold it in half.
- Use the double end of the fishing line to tie a regular knot, but do not tighten it.
- Thread the end of the double line through the loop of the regular knot again.
- Tighten the knot, forming the required loop size at the end of the double line.
- Wet the knot and tighten it.
- Remove the protruding end of the line near the knot.
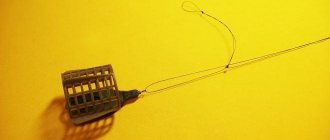
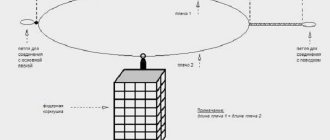
1. Using a figure eight knot (see previous article), we make loops on the main fishing line and the rig (leash). (If you are attaching equipment to an existing feeder, then make sure that the loops are larger in diameter than the feeder itself).
Typically, this method is used to connect the equipment to the main fishing line or cord. Thus, having homemade equipment, while fishing it is quite simple and quick to replace one equipment with another, without wasting time on knitting complex knots. The main advantage of the “loop-to-loop” connection is that it is easily dismantled and one leash can be quickly replaced by another.
1. Using a figure eight knot (see previous article), we make loops on the main fishing line and the rig (leash). (If you are attaching equipment to an existing feeder, then make sure that the loops are larger in diameter than the feeder itself).
2. We have two loops: A – main line, B – equipment.
3. Insert loop B into loop A.
4. Inside loop B we pass the end of the equipment.
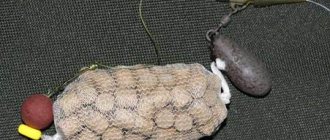
5. Tighten the connection well by pulling both lines in opposite directions.
6. We cut off the ends of the “eights”, leaving 1-1.5 mm in length. The connection is ready!
A loop-to-loop knot ties the two ends of a fishing line together and is not actually a knot, but rather a joining method. You can call it a nodeless connection. The connection is based on two loops, one at each end of the fishing line. True, it turns out that there are still 2 nodes, because there is no loop without nodes. But don’t be upset - the figure eight knots we use are very simple and reliable.
Loop to loop or swivel. Swivel - description, types, scope and methods of knitting
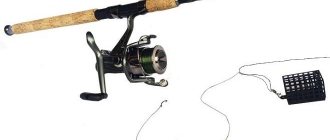
Every angler is familiar with a swivel; it is an important part of fishing equipment, so you must know how to tie a swivel to a fishing line in the most reliable way so that such a connection does not fail at the most crucial moment.
Few people can name at least five fishing knots, but in reality there are much more. There are methods of tying thread that are more than a hundred years old, and there are modern ones that appeared thanks to the invention of new gear; they are still being improved.
Nowadays, gear manufacturers usually indicate recommended fastening methods on the packaging
, but these recommendations do not always take into account such subtleties as weather conditions. Therefore, it is a good idea for every angler to have several additional methods in his arsenal to select the knot that is ideal for the situation.
Rules for reliable connection of the swivel and fishing line
There are a number of principles that should be followed when attaching a swivel to a thread:
- Swivels with various defects on the rings, such as burrs, spikes or splits, should not be used. They will inevitably damage the line, slow it down, and ultimately lead to it breaking.
- The cross-section of the thread should not be flat, but round, because a round one twists less when tying and tightening loops, which means the fastening is much stronger.
- The thread should be lightly moistened with water before tightening the knot. Thus, it will not overheat and will not lose its elastic properties, the knot will hold better.
- The thicker the section, the more reliable and stronger the fastening will be, since thick fishing line is less susceptible to tearing, stretching and deformation.
- For thin lines, simple types of fastenings should be selected, since they have less impact on the structure of the fibers.
- When cutting off excess ends of the fishing line, leave ends of 1.5 - 2.5 mm.
- Open fire should not be used for circumcision.
- You should not tighten the loops unless necessary.
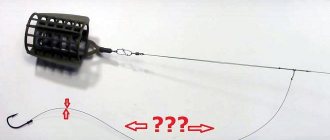
How to tie two fishing lines loop into a loop - step by step instructions
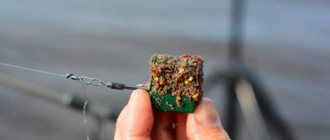
- Make small loops at both ends of the fishing line, use the figure eight knot , which we discussed in the last article. Be careful if in the feeder rig or any other rig (which you will attach to the main line) you have a firmly fixed element that cannot be removed - make a loop of a size slightly larger than the size of this element so that it can easily pass through this loop .
- Let's call the loop of the main fishing line the letter A, and the loop of the equipment that we tie with the letter B.
- Loop B is inserted inside loop A.
- The end of the equipment is inserted inside loop B
- The connection is tightened.
- Tighten the figure eight knots well and you can cut off the excess ends almost right under the knot. The loop-to-loop connection is ready.
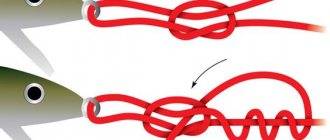
The bloody knot is no less popular. The name of the technique is a little scary, although in practice this method is indispensable to others. To learn how to make this knot correctly, you don’t need a lot of effort, the main thing is desire and attentiveness so as not to miss any step. The two ends are aligned crosswise, then one is wrapped around the other several times. Then he returns to his place and passes between two monofilaments. This is the place you need to press with your fingers.
Loop in loop knot
The next technique is called the loop-in-loop knot, because the role here is played by the loops that support the weight of the catch. The method is more reliable than other knot connections and an excellent replacement for a carabiner.
It is enough to tighten both ends of the fishing line with a knot. Next, the loop of the leash is placed on the loop of the fishing line, and its end is pulled out through it. Then you need to stretch the main line and the leash in different directions, and as a result we get a reliable connection.
Albright node
When fishing, an Albright knot is often used. In most cases, it is used when fishing with spinning rods. The technique is performed like this: one line is folded into a loop, and the second needs to be pushed into it and twisted 5-10 times.
Next, you should push its end into the small loop that remains. After which the knot is tightened and you can start fishing. This method is very popular among fishermen, because even when tying thin lines, it retains good strength.
Yesterday we figured out how to properly tie a figure eight knot (the strongest and most non-moving knot), and today you will learn a method for connecting two fishing lines, which is called “loop to loop.”
Surgical knot
The fastest and easiest way to tie a leash to a fishing line is called a surgical knot. This is the method doctors use during surgery. It is suitable for connecting two different lines. To make this knot, you need to draw two threads in parallel, form loops in them, then pull the ends into them and make a cross.
This movement should be repeated several times, and the ends should be tightened into a knot. It can withstand a fish weight of 25-30 kg.
Types of loops
Simple loop
Many fishermen do not accept overly complex connections, making do with the easiest ones. This point of view has a basis - the simpler the knot, the greater the chance that it will be tied correctly . The easiest way to tie a loop on a fishing line, perfect for monofilament and braid, is as follows:
It is necessary to remember that by correctly and carefully connecting the parts of the equipment, you will often half guarantee successful fishing. And vice versa, inattention in this matter can lead to breaks in the gear, fish disappearances and a spoiled mood in general. If you are not very sure of the quality of the resulting connection, it is better to redo it at home than to regret later about lost time or fish in the pond.
Perfect loop
The connection is especially suitable for fluorocarbon leaders , which are characterized by high rigidity and low relative strength. It is not recommended to knit fluorocarbon with simple knots, in particular, “figure eight” knots. Their use can lead to disruption of the integrity of the thread with subsequent breakage of the gear.
On the main line
It often becomes necessary to tie one or more leashes to the main line. This can be either float or bottom tackle. How can you make a loop on the fishing line in this case:
In the desired area, fold the fishing line in half.- Tie it with a regular figure eight, without tightening it completely.
- Measure out the sufficient length of the loop by moving the knot in the desired direction.
- Moisten the area of the resulting knot with water or saliva.
- Finally tighten the knot.
- Trim off the excess part.
For beginners, when tying knots, it is recommended to leave a reserve of fishing line for ease of tightening them. In the future, as experience grows, you can save fishing line, leaving the required minimum.
In ordinary life, a person may know quite a few different types of knots, but not all of them are suitable and will help him in hunting for fish. As a result of this, both experienced fishermen and beginners who want to get a good catch and enjoy fishing should know not only the most convenient knots that can be useful to him while fishing, but also how to make loops on the fishing line. This is exactly what we will talk about in this article.
Features of tying loops
It is also important to note that, depending on the place where the fishing line will be tied and its type, you should pay attention to a number of points in order to avoid any mistakes during the tying process.
At the end of the line
Of course, a large number of fishermen have faced the question: “How to tie a loop at the end of a fishing line?” In order to make a high-quality loop in this place, you should use the surgical option, which is very durable.
It is quite easy to tie, use the following sequence of actions:
As you may have noticed, there are no particular difficulties in the knitting process. Just be careful and follow the steps outlined.
On the main line
A loop on the main line is required in order to attach a leash to it. Before starting to carry it out, the angler determines the length of the leash depending on the fish he wants to catch (for example, for bream they make longer leashes from 0.5 -1 m).
The required length is marked with a triple knot, only after this the leash is attached to the fishing line:
- in the place where the knot will be, another double one is made, which does not need to be tightened to the end, because an eight should appear;
- the end of the leash is passed into it from the first ring to the other;
- after this the figure eight is tightened.
The result is a great loop on the main line.
Fishing knot carrot
Another technique that helps connect the leader and line is the carrot fishing knot. It is suitable for various materials and allows them to be combined with each other. A correctly made “carrot” looks no thicker than a thread. It is done like this: the two ends are folded together. One fishing line is tied with a light knot at a distance of 20 mm on the other, and with its end you need to tie the first fishing line in a different direction several times. Then you need to thread this end into the one that was made from the very beginning. To tighten the carrot, you need to take both lines and pull them together. This knot can be coated with waterproof glue for smoothness, because the ends that remain may prick.
There are many methods for connecting a leash to a fishing line. The fisherman chooses which technique to use. It depends on the product with which he catches fish, on the thickness of the fishing line and other fishing items. All units are practical to use and help you easily achieve a good catch.