The advent of feeder gear helped anglers begin to explore different ways to mount bait to the main line. After all, spending the whole day fishing and being left without a catch is very disappointing. Since fishing with feeders involves long casts, the main tasks of the equipment were to ensure the sensitivity of the gear and not tangle.
Currently, the following types of equipment exist:
- Paternoster.
- Symmetrical loop. Suitable for fishing in calm water.
- Asymmetrical (unsymmetrical) loop. Its main feature is high sensitivity to bites and prevention of leash tangling.
- "Method".
- "Helicopter". It is one of the types of feeder loops.
- "Combine harvester." It is a combination of Gardner equipment and anti-twist devices.
- Inline.
- Equipment with an anti-twist tube.
It is important to know that each design is designed to catch a wide variety of fish. For example, inline is suitable for fishing on a bottom overgrown with algae . The Gardner rig, symmetrical and asymmetrical loops are suitable for self-hooking fish, the anti-twist tube helps well on muddy bottoms and, importantly, prevents the gear from twisting. The first thing any beginner should do is learn how to knit a Gardner paternoster.
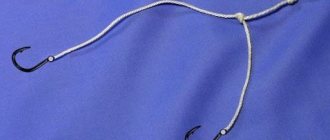
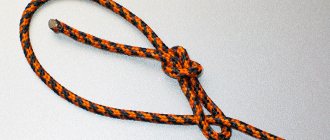
Symmetrical loop
A symmetrical loop is knitted as an independent equipment on a rigid feeder monofilament line with a diameter of 0.28-0.32 mm or the same fluorocarbon.
You can also knit with braid, but the twist in this case will be soft, which leads to the leash getting tangled or twisting around the feeder. The correct asymmetrical loop is knitted on monofilament or fluorine, and then completely attached to the main equipment (shock leader). It makes no difference whether there is a monofilament line on the feeder or a braided cord. The advantage of a separate symmetrical installation is the possibility of repeated use. Tying a symmetrical rig takes about a meter of material (less with experience), so every time tying on a fishing line means reducing its length by this segment, which is impractical. You can make a lot of ready-made rigs at home and take them with you, so as not to waste time on tying while fishing. The symmetrical equipment consists of a twist for bypassing the feeder with a loop for a leash, in fact, an equilateral loop and an outlet for attaching to the main equipment.
Material
As already mentioned, symmetrical rigging is knitted on rigid monofilament or fluorocarbon. It is these fishing lines that satisfy the following material requirements for such equipment.
Material requirements:
- Rigidity. The twist for the leash should normally lead the thin line away from the feed to avoid overlaps. This is why you need a stiff line.
- Abrasion resistance. Installation of the feeder is the direct working part, which is constantly in contact with sand, pebbles, and shells at the bottom. In addition, a metal swivel eyelet with a clasp constantly runs along one of the shoulders.
- Inextensibility - as for all fishing line used in feeder gear (except for leashes).
How to knit a symmetrical loop on a feeder
The installation procedure for a symmetrical loop is exactly the same as for an asymmetrical one. The only difference is that the symmetrical loop for the feeder is made equilateral. Everything else is identical. Loop length from 10 cm or more. The longer it is, the greater the free play before self-cutting. This question is selected for a specific fish and body of water with experience. Usually - 15 cm. The twist on the leash must be longer than the overhang of the feeder, by 2-5 centimeters - otherwise the function of protecting against overlaps will not be fulfilled. The standard twist length is 7-15 cm, depending on the size of the cage and the fastener on it.
We knit a symmetrical loop for the feeder:
- Fold a piece of fishing line in half. At the end with a bend in a figure eight knot we form a loop for the leash.
- We form a twist by holding the loop with our teeth and twisting the ends around each other. For those who know how, we twist it with our fingers.
- We limit the required twist length with a figure eight knot.
- We thread the feeder through one end. In front of the lower assembly, you can place a rubber stopper or a bead as a bump stop - to protect it from being hit by a swivel.
- We put both ends together again, with a swivel for the feed hanging on one. We measure the required distance, depending on the desired size of the loop. Usually - 15-20 cm. Again we tie a figure eight.
- We cut off one of the remaining ends, and on the other we form a loop for attaching the noose to the main equipment. The length of the outlet is from 10-50 cm, as desired. Wet all knots before tightening. Instead of a figure eight, you can use a surgical knot (simple double or triple).
- Installation is ready. All that remains is to attach it to the base, attach a feeder to the clasp, and a noose leash to the twist.
Features of the Gardner loop
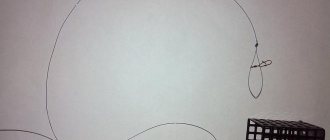
The Gardner loop is a feeder rig invented by the English floater Steve Gardner. Today it is one of the most popular feeder equipment.
Technically, the Gardner loop is one of the paternoster variants. The paternoster, in turn, is one of the basic equipment in bottom fishing. It is an installation of fishing tackle in which a leash is attached to the main line above the sinker or feeder.
Due to its ease of installation and efficiency, the popularity of the Gardner loop was so great that it practically became synonymous with the paternoster. In the classic version, the main feature of this equipment is the free sliding of the feeder in the loop. Thus, the standard Gardner loop for the feeder could be structurally classified as loop equipment, along with a symmetrical and asymmetrical loop. But since the feeder does not move along the loop of the fishing line when biting, it can be fixed to the equipment using the loop-to-loop method.
The Gardner loop is one of the most popular equipment among athletes and amateurs
Photo of Gardner's loop
Note!
Catching carp on a feeder: the subtleties of fishing and advice from professionals on how to catch carp using different methods (110 photos)Catching crucian carp on a feeder - tips and secrets of professionals. 115 photos and videos master class for beginners
- Bait for the feeder - popular mistakes, recipes and do-it-yourself bait. Ingredients for bait (110 photos)
Read here Fishing for bream on a feeder: equipment, bait, preparation of gear and its installation for bream fishing (90 photos + video)
Help the project, share on social networks 
1+
Gardner's loop is a type of paternoster
- The feeder equipment is a Gardner loop in terms of the mechanics of its operation - the same as a paternoster, or in our opinion - a blind feeder at the end of the fishing line and a retractable leash. It’s just that, unlike the bottom outlets we are used to, this equipment is more effective. A hook is made to the leash from a thick fishing line, the same one that is used as the main one.
- The length of the branch exceeds the length of the fishing line to the feeder and ends with a loop into which the leash is attached. In general, the leash together with the outlet turns out to be much longer than the distance from the point of its attachment to the base to the feeder. But, thanks to the thick, rigid and long lead, it does not get tangled when casting or reeling in the feeder.
- The Gardner paternoster for the feeder differs from the classic one only in that the outlet to the feeder is made on a loop. In the classic form, this shoulder is made from a weaker and thinner fishing line - specifically so that when hooked, the feeder comes off, and not the leash with the fish.
- According to legend, the famous fisherman Steve Gardner from England came up with this rig when he watched his wife while fishing for a long time could not tie a regular installation on a tap. In England, this editing is simply called “Loop”, which means “loop”. And already in our country this type of paternoster is called the Gardner loop.
Gardner's paternoster
Which is better, a Gardner's loop or a classic paternoster? In terms of operation, these are absolutely identical installations. The Gardner rig is easier to knit - one knot to form a loop. At the remaining end there is a loop for a leash. We don't need the function of tearing off the feeders. On the contrary, it’s better to let the fish come off when hooked than to tear off an expensive feeder. It’s just that the classic paternoster comes from England, from a time when feeders were not yet used, and losing a cheap sinker instead of a fish was considered normal there. Read more about paternoster feeder equipment.
Regular paternoster
Gardner loop for feeder - how to knit and use
The Gardner Loop Feeder is the gimmick that most feeders start with due to its ease of tying and effectiveness. Some anglers confuse this device with the classic paternoster. This is partly true, the gardener's paternoster is a variation of several of these devices.
The main problem for beginners is twisting the leash around the main line or catching it while casting. However, if installed correctly, such problems do not arise. In this article, we will examine in detail the specifics of installing a gardener’s paternoster and the nuances of its use for feeder fishing.
Feeder equipment
A Gardner loop for a feeder can be knitted on a pond in just a few minutes. Does not require special units or additional fishing accessories - the main fishing line and the fisherman’s hands. That is why this mount is popular among anglers. However, the gardener's paternoster is not universal - it is just one of several effective types of bait equipment.
A jig-gardner works better in a variety of fishing conditions, an asymmetrical loop in others, and a linear feeder assembly in a third. The angler's job while fishing is to figure out what works best under those particular conditions. Therefore, it is very important to master all the basic elements of feeder equipment. Article number of feeder equipment:
Application on a pond
As already mentioned, the Gardner loop paternoster is an effective and simple equipment, but not a panacea. The main advantage is sensitivity. However, due to the peculiarities of the installation, this sensitivity is preserved only in comfortable or moderately difficult fishing conditions - there is no strong current, kinks of the main line over the edge, etc.
For the sensitivity of the Gardner equipment and, in general, any paternoster, it is important that there is direct contact between the quivertype and, in fact, the installation. Then all the smallest touches of the fish on the nozzle are transferred to the tip of the feeder
If the line is blown into an arc by the current, or it bends at the bottom on the upper part of the edge, the bites are no longer transmitted so clearly. In difficult fishing conditions, it is better to use an asymmetrical loop or inline.
Fishing with a Gardner loop is effective when the fish tries the bait and takes it completely in place, then swims away. This equipment will not work well when the fish does not take the bait properly, and large hooks are used - for example, it slightly grabs the bait with its lips and tries to swim away without swallowing it.
In this case, when hooking (or when the fish picks up the slack from the hook to the feeder), the effect is “kicked in the teeth.” This often happens when fishing for roach. Treatment is to install small hooks and a longer leash. If, on the contrary, the bite is good, if the hook is too deep in the fish’s mouth and it is difficult to remove it, you need to shorten the leash and the outlet to the feeder, and hook a little earlier.
Testing during fishing
Therefore, theoretically, apart from the reservoir, it is impossible to say which is better, an asymmetrical loop on the feeder or a Gardner loop (or inline). Under different conditions, one or another installation works better. Each rigging method has its own advantages and disadvantages, which are learned with experience.
The further you cast, the larger the loop you need to make. But as this element increases, the risk of entanglement increases; the lead to the leash will also have to be made longer. For ultra-long casts, it is better to use inline or asymmetrical equipment. However, at close and medium distances the paternoster is very sensitive, and it is also easy to knit.
In a strong current with a long line to the feed and a short leash, the hook with bait may not touch the bottom at all, but hover above it. This can be used, for example, when fish are attracted to the bait not on the bottom, but dangling in the stream. For roach this is rather a favorable option, but not for bottom bream or crucian carp. But when fishing there are always exceptions - sometimes even bream or crucian carp prefer a rig dangling with the current (or slowly sinking, on a longer leash).
Advantages and disadvantages
The advantages of this equipment, which ensured its popularity, are widely known:
- ease of installation - this is one of the simplest equipment in technical terms;
- the speed of production is a consequence of the simplicity of this installation. With a certain skill, production time does not exceed 1-2 minutes;
- sensitivity – this equipment allows you to record the most careful bites in still water and in the current, being slightly inferior in sensitivity only to the asymmetrical loop;
- versatility - this equipment can be used in almost any conditions - when fishing in ponds, lakes and rivers;
- good aerodynamic properties - due to the absence of unnecessary elements, this is one of the most “long-range” equipment.
The disadvantages include the following qualities:
- tendency to twist when the installation is tied on the main line. To neutralize this negative effect, the rig is kept suspended for some time between casts, allowing the line to unwind, or a swivel is included in the rig between the mounting and the main line;
- the presence of a nozzle on the hook while reeling in the rig creates the effect of a propeller and, accordingly, twists the leash;
- inferior in sensitivity to loop equipment, primarily the asymmetrical loop, as mentioned above. However, the difference in sensitivity is not critical.
To reduce tangling, the leash loop should be below the feeder
Comparison table of Paternoster with other equipment
| Equipment | pros | Minuses | Fishing conditions, type of reservoir |
| Paternoster | Twisting reduces the chance of the gear getting tangled. | Not self-clipping. | Both standing and flowing. |
| Inline | Extremely sensitive, good in standing water | Complete loss of gear due to breakage. | Good in a standing position, bad in a current. |
| Symmetrical loop | Self-cutting, high sensitivity. | Tendency to snag. Difficult installation. | In a standing position, in a weak current. |
| Asymmetrical loop | Good sensitivity, self-clipping. | Frequent entanglements. Difficult installation. | In a standing position, in a weak current. |
| Anti-twist | Good at long casts. Ideal for beginners. | Noticeable to fish, frequent overlaps. | On a stagnant and weak current. |
| Helicopter and two knots | Performs well in strong currents. | Multiple tangles in gear. | Good on both types. |
| Flat Method | Indispensable on a “difficult” bottom - silt, snags, grass, debris. | Frequent twisting of the equipment. Short leash. | Standing only. |
| Harvester | Slightly damaged. Sensitive. For muddy bottom. | Holds the bottom weakly. Visible in the water, which scares the fish. | On a stagnant and weak current. |
How to outwit a wary fish
When biting very carefully, the fish often takes the bait into its mouth and spits it out several times, and if it also feels the tension of the fishing line, it will not take the bait anymore. In such a situation, the length of the leash plays a very important role, which allows the fish to swallow the bait deeper, and the asymmetrical loop further promotes free movement and the number of successful hooks
For example, if we are fishing with a feeder in a pond with standing water, and the bite is neat and not very active, then an asymmetrical loop is much better suited for such conditions.
The length of the loop can also be different and the longer it is, the greater the slip margin will be before the fish hits the feeder.
To sum up which equipment is better or more effective, I want to say that they are both good and worthy of each other. The results depend primarily on the conditions of the reservoir and the behavior of the fish. Don't be afraid to experiment and choose the most workable option for each individual case.
How to knit an asymmetrical loop for a feeder
In order to make an asymmetrical loop, we need a piece of really stiff fishing line with a diameter of 0.2 - 0.4 and a length of 1 - 1.5 meters
I would like to immediately emphasize that the fishing line should actually be a wire, and fluorocarbon is also good for this task.
It’s very easy to check whether the fishing line is suitable or not. Wrap a few turns around your finger and release. If the line straightens immediately, it means it’s suitable.
- Take the prepared piece of fishing line and fold it in half, with one side shorter than the other by about 10 cm.
- Using a double or triple knot we prepare a small loop for attaching a leash with a hook.
Now it’s time for one of the most difficult and crucial moments in the rig – the retraction leash. It should come out dense and hard. It depends on its quality whether the leash will get tangled on the equipment when casting or not.
- We twist the double fishing line as in the photo with a length of 10-15 cm and fix it with a double knot.
- Now, we thread a swivel with a clasp through the long side to fasten the feeders
- We measure the required distances of the loop and fix it with a double knot.
Let me remind you that the length of the loop depends on the conditions in which you are fishing and usually ranges from 30 to 70 centimeters.
In order to have something to attach our loop to the main fishing line (cord), thread the swivel at the end of the loop and secure it with another knot. The remaining tendrils of excess fishing line must be trimmed so that they do not contribute to tangling the tackle during casting.
But I suggest storing your finished asymmetrical feeder pellets in these bags.
What is an asymmetrical loop?
Let's start with the fact that an asymmetrical loop is a separate equipment that is attached to the main cord using a swivel and latch. This immediately removes the question of possible twisting of the gear.
You've probably already heard that an asymmetrical loop is more sensitive. To understand why this is so, it is worth looking underwater and observing the behavior of the fish. What's going on there?
After the fisherman has cast the feeder, he must pull the line a little towards himself and put it in the draw. After this action, the feeder moves to the very edge of the loop and remains in that position.
A fish that swims up to the bait will try to take the bait into its mouth and swim to the side, away from its relatives, in order to calmly eat it. At this stage, both the paternoster and the asymmetrical loop work the same way, but only until the length of the leash runs out.
If you used a paternoster, self-cutting will occur. If you used a loop, the line will slip through the load at a distance that is equal to our loop. During this period, the fisherman observes a bite at the tip of the sensitive feeder rod and must react accordingly by hooking.
How to knit an asymmetrical loop for a feeder
To tie an asymmetrical feeder loop for the first time, you need to take a larger piece of fishing line - about a meter long. Later, with experience, the correct length will be selected automatically so as not to waste excess material.
- Fold the fishing line in half. At the bend we form a small loop of 2-3 cm for the leash. This can be done with a figure eight or a surgical knot (that is, the usual ones with a double or triple pass of the fishing line into itself). The same units are used at all other installation points.
- Before tying an asymmetrical loop for the feeder, you need to form a twist, thanks to which the leash will not twist around the main line and get tangled when casting. The standard twist length is 15 centimeters. This is a critical point. The twist should be 2-5 cm longer than the overhang of the feeder, so that the leash does not reach the installation itself. We begin to twist from the tied loop - together with it this will be the lead to the leash. Twisting can be done by hand by grasping both ends of the fishing line and turning them inward at the same time. Another way is to take the loop in your mouth and lightly squeeze it with your teeth, and twist the ends of the lines around each other. It’s slower this way, but the weaving is tighter. Twisting in this installation is a direct part of the equipment. However, the idea can be applied to other fishing equipment. Learn more about how to make a twist on a fishing line.
- After reaching a length of 15 cm, we clamp the end of the twist. Tie a figure eight knot. The result was a leash with a loop and two fishing line ends of equal length. Let's start forming the shoulders for the feeder.
- But the end of the monofilament, which will be the long shoulder, we put on a swivel. We will then attach the feeder to it via a carabiner. We then measure 10-15 cm along the fishing line by eye. We move the end with the swivel towards the outlet by 2 cm - this is exactly the difference in the shoulders. If you do less, you’ll get an almost symmetrical version; if you do more, you’ll lose the sensitivity of the gear. A difference in symmetry of more than 2 centimeters will also register active bites, but weak ones may not be noticed. A large difference in the length of the arms conceals bites, and the meaning of asymmetry is lost. The long arm should be exactly 2 centimeters larger than the short one - this has already been tested and verified many times by experienced feeders. We tie a figure eight knot - the diagram of the asymmetrical loop on the feeder is almost ready.
- Of the two remaining ends, we leave one for connection to the tackle, and cut the second for a knot so that underwater debris does not stick to the remaining stump. At the remaining end, using a figure eight, we again make a loop for attaching to the main fishing line. The size of the loop is 4-5 cm, the resulting equipment for tying on the base should fit into it.
Feedergam insert
When installing an asymmetrical loop for a feeder, it often becomes necessary to use thin leashes to catch cautious fish - up to 0.1 mm. However, when using the main braided cord, the entire rig turns out rigid - the braid does not stretch
Because of this, you can lose large fish. To add shock-absorbing properties to the tackle, an insert made of feedergam 5-10 cm long is inserted between the leash and the outlet for it (depending on the characteristics of the feeder rubber and the required strength). The breaking load of the feederham must exceed the tensile strength of the leash. Read more about the use of feedergam in installations.
Separate installation or on the main cord
Such manufacturing options are not based on the wishes of the angler, but on the obvious issue of functionality - the absence of tangling and twisting. You can knit a tackle with a Gardner feeder loop directly on the main monofilament or shock leader, if they have the required stiffness characteristics. That is, it is a rigid feeder line or fluorocarbon. Then no entanglements occur. All other options are a search for working options against such entanglements.
If soft fishing line or braid is used as a base or shok leader, we knit a Gardner fishing loop as a separate installation, from the same fluorocarbon or hard monofilament. Then we attach all the equipment to the base. As an option, the entire section to the feeder is made of wattle, and the outlet is made of feeder rubber.
We use a whole braided bundle only out of desperation - when there are no hard materials. And only with a soft casting technique and not over long distances - otherwise overlapping and twisting cannot be avoided.
Standard paternoster
For these purposes, you can use both monofilament and braided fishing line, the thickness of the monofilament line is 0.15-0.35 mm, length 70-100 cm.
So, on the main line, we knit a loop under the feeder, 10-15 cm long, the most common length of the bend is 10 cm (some anglers do not like to use long loops and make a bend of 5 cm). We fold part of the fishing line in half so that we get the required length, and at the end we make a figure-of-eight loop to secure the outlet. To this loop, we will attach a feeder with the help of fasteners. You can also attach a swivel to this loop by moving it inside the loop, and then attach the feeder clasp to it. Then, from the shorter edge, we measure a piece of fishing line so that it is 5 cm away from the edge of the feeder, fix this distance with our fingers, and at this point we make a small surgical loop, 2-3 cm in size. If we use monofilament, then we make a double loop, if the braid is triple. A leash 50-100 cm long will be attached to this loop, although you can often find fishermen who reduce its length to 30 or even 10 cm. The “loop to loop” method is suitable for attaching the leash; it avoids unnecessary deformation
If the active leash is biting, we set a shorter one, if the fish takes it carefully, then a long one works better. The remaining edge of your fishing line should be 35-40 cm long, at its end we knit a carabiner to which we will attach the main fishing line
We make the distance between the leash loop and the edge of the feeder longer by 3-5 cm, so that the leash does not get confused with the feeder.
Gardner loop for twisted feeder
With a 99% probability, this installation allows you to avoid the leash from overlapping with the feeder, since it will be rigidly pulled to the side. Basically, the twist is done on the loop for the feeder, but just to be sure, the twist can also be used for a leash. In order to make a twist, it is advisable to use a feeder line; it has minimal stretch and the twist is rigid.
So, we take the fishing line and start twisting it with our fingers in one direction, if our ring for attaching the feeder (habit) turns out to be very large, then we spread our hands to the side, thereby tightening the twist and reducing the diameter of the ring. When we make a twist of 10-15 cm in size, we need to fix it, for which a triple surgical knot is made.
Sliding paternoster
Another way to knit a Gardner loop is to install a feeder with a sliding loop. Its undoubted advantage is increased sensitivity. In this case, the feeder is attached not to a loop fixed on the main line, but to a swivel, which moves freely along the line, limited by two stoppers. Beads, beads - the main thing is that the eye of the swivel does not pass through them, it is also desirable that the beads match the color of the bottom of the reservoir.
The first bead stands in front of the loop to which we will attach the main fishing line, the second in front of the lead outlet. In order to secure the beads, you can sew them with one turn of the fishing line on which they are strung, or make locking knots in front of them. Of course, the feeder is not attached to the swivel directly, but through a piece of fishing line 10-15 cm long, and the length of the lead under the leash should be 5 cm longer.
How to knit a blind installation of a Gardner loop
At the end of the main fishing line we make a surgical loop 15 cm long, then we cut it, at one of the ends we make a loop again - this is a loop for the leash,
on the second we make a loop for the feeder, but with such a calculation that the line outlet for the leash should be 5 cm from the edge of the feeder.
Do-it-yourself tackle installation
It is extremely easy to knit a paternoster with your own hands, even on the spot, right next to a pond. The equipment gained its popularity due to a certain versatility in use. That is, it is good for both long and close casts, both on the current and in still water.
How to make a Paternoster correctly? The diagram is below.
Paternoster
Required items:
- Twisting;
- Swivel;
- Fluorocarbon line;
- Braided 0.1-0.14 mm;
- Closed / semi-closed feeder with a load (obviously loaded) 100-120 grams for current, 40-100 for standing water.
Installation
The entire tackle is connected to the main line using a “Loop to Loop” connection. Make a loop using a surgical knot.
The main line of the rig (0.3 mm) goes to the twisted connection. One part of the twist goes to the feeder, the other to the leash. The length of the twist to the feeder is 20 cm. To the leash – 10 cm.
The feeder is attached to the twist with a swivel and a carabiner, or a wrapping loop. The twist going to the leash is also attached through the “Loop to Loop” connection. The length of the leash is 50-100 cm. The leash is connected to the hook with a Sliding Snood, if the hook does not have a loop, or with a Double Palomar, if the hook has a loop. You can use two hooks when an additional hook is also attached to the twist. However, this will not be a classic Paternoster, but a modernized one.
Do not try to connect the fishing line and the leash by burning, otherwise a break is inevitable.
Gardner's loop
The Gardner Paternoster rig differs from the classic one in that it has a sliding loop, which reduces the chance of tearing and overlap.
Required items:
- Twisting;
- Swivel;
- Fluorocarbon line as a leader, 0.14-0.22 mm;
- Braided 0.1-0.14 mm;
- Closed/semi-closed feeder.
The equipment is attached to the main line with a surgical loop. You tie a 20-30 cm loop to the feeder, the feeder is fixed in the middle of this loop using locking beads or rubber bands. Then, using a loop-to-loop connection, the main line is connected to the leader. The leash is made of fluorocarbon, 0.14-0.22 mm. The hook is attached with a Snood or Double Palomar.
Installation of Paternoster Gardner according to Fadeev, video
Fadeev described in detail the structure of Paternoster's tackle.
Gardner's sliding paternoster
Few people know, but a sliding Paternoster is a possible option. Place the stopper on the leash side only, using stopper beads or elastic. Then comes the twist, the end of which is attached to the leash using a loop-to-loop connection. The twist can be replaced with a feedergum rubber band, this will increase the sensitivity of the tackle.
The sliding rig is attached to the main line using a carabiner or loop-to-loop connection. Then comes a fishing line 30-40 cm long. A feeder is attached to the fishing line through a swivel, and immediately after it a stopper. After this there is a twist of 10-15 cm or a feeder. The leash is made of fluorocarbon, 50-100 cm long. It is important to use leashes of faded colors, such that they do not catch the fish’s eyes. The feeder is attached to the fishing line with a swivel and carabiner.
Sliding paternoster
As already mentioned, the paternoster registers short bites well, this feeder installation is very sensitive. But this is only done in comfortable conditions, when the current does not inflate the line loop too much, and the fishing distance is not very significant. Otherwise, accurate bites simply will not be transmitted to the feeder quivertip across such a distance, even with an arc due to the current. The fish can take the bait, but the angler cannot see it. When the fish already begins to move away, it will move the feeder, the fisherman will of course notice this, but it may be too late - precious fractions of a second are lost to react. In difficult conditions, sliding options, partially or completely, work better. This can be a symmetrical or asymmetrical feeder loop, discussed in separate articles, or a sliding paternoster.
A sliding paternoster works better in strong currents, as the fish freely pulls the line, acting on the quivertip, bypassing the weight of the feeder. This feeder rig is actually called a Running Feeder Rig with a tap. Visually, this is the same paternoster, only the outlet to the feeder is not tightly tied to the installation, but moves freely along it. Read more about the advantages, disadvantages and advantages of a sliding paternoster in the article on inline installations for a feeder.
Running with retraction
Elements included in the paternoster (Gardner loops)
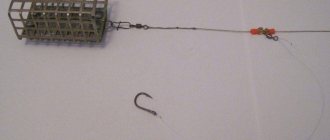
The Gardner loop consists of the following elements:
- Line for feeder equipment.
- Fishing line for the base.
- Feeder.
- Swivel with clasp.
For this, you may also need an anti-twist, stoppers and, of course, a carabiner.
- The main line wound on the reel of a fishing rod. For the base, monofilament or braid is usually used, and the second option is considered more preferable, since such a cord does not twist, and the tackle itself becomes more sensitive when used.
- Leash with hook. The leash with a hook for this equipment is made in length from 0.3 m to 1.1 m. Most often, fluorocarbon fishing lines are used for this.
- Loop for attaching the feeder. A loop for attaching the feeder is made on the main fishing line at a distance of 10-15 cm from its end, on which another knotted loop is made for attaching the leash. The size of the loop for attaching the feeder should be such that the latter passes through it.
- Hinge attachment point. The loop attachment knot can be made in only a few ways, but most often a double loop or a so-called surgical loop is tied. The second type of loop is more suitable for a slippery cord. The main difference between a “surgical” loop is that the cord in the place where it is planned to knit the future knot is first bent and twisted a couple of turns (2-4), then a double knot is knitted from the resulting twist.
- Swivel for attaching the feeder. For this type of equipment, only one swivel with a clasp is required, with which the feeder is attached.
- Feeder. When fishing with a feeder, various feeders are used. I use a Gardner loop rig; it is recommended to give preference to lighter samples that are attached to a special loop.
- Paternoster leash. To prevent the paternoster leash from twisting around the base, feeder fishing experts advise increasing its rigidity by twisting it in the upper part.
- A “loop-to-loop” connection for tying a leash to the main fishing line. A leash with a hook is connected to the main fishing line using the “loop-to-loop” method. To do this, you need to tie regular double knots at their ends, thereby making loops.
Do-it-yourself Paternoster feeder equipment - 4 most catchy options
We have collected 4 of the best types of Paternoster rigs for fishing on a feeder in one article and talked about how to knit a rig with your own hands for fishing on a muddy bottom, in snags and on ordinary shell rock. This rig is used when fishing for carp, crucian carp, bream and any other white fish: only the length of the leashes and the size of the hooks are different, chosen in proportion to the fish.
The guide is useful for beginner anglers, since the classic variation and Gardner loop are very easy to knit, and for advanced anglers we recommend tying a sliding Paternoster with 1 stopper.
The instructions for making equipment were based on a video by Alexey Fadeev, world champion in feeder fishing. We recommend that you study the article with the remaining 9 best feeder equipment.
A paternoster is a rig for fishing on a feeder with the removal of a weight-feeder using a 15-20 cm piece of fishing line. Main purposes: fishing on a muddy bottom and in dense bottom vegetation (the feeder can sink, and the bait with a hook on a leash will remain on the bottom surface, where fish will easily notice it).
We’ll tell you how to properly make a classic version for amateur anglers, and we’ll finish with sports equipment.
Required components:
- Swivel with carbine;
- Feeder load;
- Monofilament line 0.2-0.3 mm;
- Thinner monofilament line 0.15-0.25 mm (for classic);
- Fluorocarbon line 0.1-0.18 mm;
- Swivel without carbine (for sports equipment).
Installation The Paternoster works well on any type of reservoir (a river with a rough bottom or a pond with slush). See diagram:
The main task of the equipment is to preserve the prey, even if the feeder gets caught on a snag. The fishing line securing the feeder breaks and the fisherman continues to fish out the prey.
Use 2 fishing lines of different diameters. For example, the main one is 0.3 mm, and the secondary one is 0.25 mm.
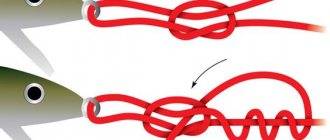
- Fold two fishing lines in one line, measure a 40 cm segment and tie a Double Eight knot at this point.
- The double eight is knitted in exactly the same way as a regular one, but the last movement needs to be threaded into the fishing line not 1 time, but 2 times, as shown in the diagram. The figure eight is a universal knot for tying fishing lines with a fixed connection. When pulling, be sure to wet it so that the fishing line does not deform or burn out.
We recommend double eight. It is more reliable than a single one and does not slip. Especially relevant on twists. There are 11 more knots for tying fishing lines in our article.
- We have a main line and a secondary line going to the side that is thinner - cut it from the knot at a distance of 25 cm.
- Now, at a distance of 10 cm from the knot on the secondary line, form a small loop with a figure eight knot.
- Secure the swivel with the cape clasp into the loop.
Insert the loop into the swivel ring and loop the loop around it, tighten. Attaching the swivel to the fishing line loop using the “Cape” method - Insert a feeder weight into the swivel.
Use the Paternoster in a littered bottom, where there are a lot of snags and very rough depth changes. If your feeder gets caught on the bottom and there is a fish on the hook, the thin part of the rig will break and you will save the fish. If the fish breaks the tackle, then sooner or later the feeder will come off, entangled in the snags, and the life of the fish will no longer be in danger.
The Gardner loop is the most popular sports feeder equipment, but it also attracts beginners because it is very easy to tie directly onto the main fishing line. For a faster start, prepare 6-8 fluorocarbon leashes at home, and you can tie the rig itself according to the instructions in 1 minute.
Gardner's paternoster is easy to tie on the main fishing line with your own hands while fishing.
- Measure 50 cm from the tip of the fishing line and make a large loop 5-10 cm long. Tie 10 cm. Secure the loop with a Figure Eight knot (it is easy to make and does not untie).
- Place a swivel with a cape clasp inside the loop. To catch carp and other large fish, use Owner swivels, they are very durable and reliable.
- Attach the feeder weight to the swivel with a clasp.
- Pull the free end of the 0.3 mm fishing line towards the feeder and form another small loop at a point 3 cm below it. This is the attachment point for the future fluorocarbon leash. We measured the arm 15-18 cm long (3 cm below the feeder) so that the thick line going to the leash does not overlap with the feeder when casting or when removing from the water.
- Measure 1 m of fluorocarbon line and cut. On one side, form a loop with a Figure Eight knot, and on the other, tie a hook.
- The equipment is ready. Do not fasten the leash when feeding the fish. As soon as you make the starting feed, connect the loops using the “Loop to Loop” method, attach the bait and fish.
Tie a twist if, using a Gardner loop or a classic Paternoster, the leash gets twisted and gets tangled with the main line and the feeder. The diagram shows that the twist is longer than the outlet for the feeder, this is very important for creating an anti-tangle effect.
To form a twist on the Paternoster:
- Fold the line in half.
- Make a loop with a Double Figure Knot.
- Then twist both ends of the fishing line together clockwise or counterclockwise so that a twist is formed - a tightly twisted segment of two fishing lines.
- Secure the end of the twist with another Double Eight knot to prevent it from unwinding.
A twist longer than the length of the outlet for the feeder will allow the leash not to twist around the equipment, and therefore there will be much less tangling when casting the equipment.
The competitive sliding Paternoster with the use of a bead stopper eliminates the possibility of the fish hooking itself, and therefore is allowed in competitions where it is important to show skill and hook the fish after a bite on the quivertip rod yourself.
Manufacturing instructions:
- Thread the main fishing line into the swivel (later attach a branch for the feeder using thin fishing line to it).
- Insert the stopper. We recommend a rubber fishing stop, a plastic bead, or even a large knot such as a double figure eight or carrot, but then the eye of the swivel will have to be narrowed with pliers.
- At the end of the fishing line, form a loop with a figure eight knot.
- Tie a feeder outlet 15 cm long to the swivel using a Double Clinch knot. At the end of the outlet, form a loop for the feeder weight.
- Attach the feeder to the outlet using the cape method, and connect the loop under the fluorocarbon leash using the loop-to-loop method. The equipment is ready.
The still sliding Paternoster is ideal for carp fishing. In carp fishing, they do not use the tip of a rod (quivertip) as a bite indicator, but when fishing with this equipment you will have to look at the tip, otherwise there is no point in designing a tackle with a feeder outlet. When using alarms, use other equipment, for example, Inline.
Disadvantages of sliding equipment:
Pros:
- Can be used in competitions.
- Increased interest in fishing due to the sensitivity of the equipment, you will see the slightest touch of a large carp or bream.
- Safe for fish. If the gear breaks, the prey will swim away only with a hook in its mouth, which it is likely to easily get rid of. The feeder will remain at the bottom.
Installation Paternoster is very sensitive to bites, but it cannot be considered self-catching fish. Let's consider 2 situations:
- The fish leaves the fisherman. When the fish touches the hook and slightly pulls away from the angler, the tension in the fishing line is instantly transferred to the tip of the rod. Make a hook and fish it out.
- When the fish bites, it goes to the fisherman. In this case, the self-cutting effect will work. First of all, when moving with bait, the fish will feel the weight of the feeder and will be hooked by its weight. You will see the movement of your quivertype and hook it.
Paternoster and inline
So, if the feeder in the installation is fixedly attached to the main fishing line, then it is a paternoster or its variety. When the feeder moves freely along the cord, this is inline or modification.
Inline is considered a sport rig and is required in all bottom fishing competitions. Why? The answer is simple - it is safe for fish. If a break occurs, the hooked fish remains in the wild with only a hook in the lip, which allows it to survive in the future. The paternoster often breaks off along with the feeder, which leaves no chance for the fish.
These two installations constantly compete with each other among feeder fans. Each angler can justify and defend his choice, but this is often a biased opinion. If we are objective, then both cases have their advantages and disadvantages.
Other methods of installing feeder equipment
In addition to the above methods, the following methods of installing feeder gear are used.
Helicopter and two knots
Using this method, you can quickly make feeder equipment both at home and on a pond.
Knitting instructions.
- Measure 40 cm from the lower end of the fishing line and fold the thread in half.
- On a double line, measure 15 cm and tie a loop.
- Step back 20 mm from the knot and make another one.
- Attach the feeder to the large loop in a loop-to-loop manner.
- Attach the leash to the small loop with a cape. It will rotate between the nodes.
This type of equipment is perfect for fishing in a body of water with a strong current. See the diagram and video that describes this technology.
"Inline" or Running Feeder Rig
Using this technology, feeder equipment is made in three ways. They are characterized by the following general features.
- The main part of the line passes through the feeder or its outlet.
- The movement of the feeder along the main line is limited on both sides by beads.
- A leash with a hook is attached to the end of the main line using a loop or swivel.
Mounting options are as follows.
- The line passes through a swivel tied to the feeder outlet. The equipment is suitable for fishing on water with current.
- The line is pulled through a swivel, to which the feeder is attached tightly. The equipment is suitable for fishing in still or slow flowing water.
- The line runs directly inside the feeder. The scope of application of such equipment is only standing water.
If you have questions, watch the video that talks about online technology.
Methods for beginners: installation with anti-twist and combine
The anti-twist is a plastic curved tube. There is a carabiner on the bend for attaching the feeder.
For installation:
- Thread the line through the tube.
- Put on stoppers.
- Make a knot for insurance.
- Back off 50 mm and form a small loop for tying the feeder leash.
The equipment is ready. This simple and effective installation method minimizes the likelihood of tangling gear and twisting the main line.
Harvester
Installation takes place using the same technology. The difference is that a special anti-twist is used, to which the feeder is not attached closely, but on a small outlet.
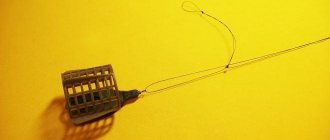
Equipping a Gardner loop feeder for a feeder
Mesh feeders
When fishing in the current, metal feeder feeders work great - a cage that has a rectangular, cylindrical on a flat base, and triangular shape. Triangular feeders resist current best, but have a smaller feed capacity. Metal feeders sink quickly, so they are good to use at depth. Unfortunately, they float up slowly, which is why they collect algae on themselves, and can also get caught on snags or stones on a steep climb. When fishing on a standing reservoir, especially at shallow depths, plastic feeders work well; on silted reservoirs, it is advisable to use feeders with side wings, which increase the plane of the feeder, and it gets stuck less in silt. Plastic feeders float well, but sink slowly, which can attract small things from the water column to the bottom.
Asymmetrical loop for feeder, features and method of knitting
Despite its popularity, not many people succeed in using an asymmetrical loop in business. Unlike Gardner, this equipment is more complex. If used ineptly, it can constantly get tangled, break off and shoot off, but if you get the hang of it, fishing will be a pleasure.
Properties of an asymmetrical loop
This type of loop is characterized by different arm lengths. The rig is knitted from a piece of rigid fishing line about 1-2 m long and 0.3 mm in diameter. You can use monofilament or fluorocarbon, the main thing is that the fishing line has maximum rigidity and is suitable for asymmetric installation.
An asymmetrical loop for a feeder consists of two parts: the loop itself and a twist with a small loop for attaching a leash with a hook. The equipment is thrown into the water, the line slack is removed to the desired tension, after which the feeder slides down along the loop. The fish takes the bait in its mouth and begins to move without feeling any resistance. The free movement continues until the feeder moves to the upper edge of the loop. As soon as this happens, the tip of the rod begins to tremble, making it clear that the bite has begun. The fisherman immediately needs to hook before the fish spits the bait out of its mouth.
Asymmetric feeder loop
The asymmetrical feeder loop can be used several times as long as it is not damaged. As practice shows, a well-tied loop can withstand 2-3 fishing trips, but it is better to have 3-4 equipment in stock.
Advantages and disadvantages
The main advantages of an asymmetrical loop include:
- high sensitivity. The rod tip responds instantly even to weak and cautious bites;
- the equipment does not twist due to the fact that the loop is attached to the main line through a swivel;
- not susceptible to negative external factors and bad weather;
- different lengths of the arms allow you to remove the slack of the fishing line and create tension;
- deeper ingestion of bait and bait by fish;
- the fish is reliably caught and held after a successful bite;
- effective even with light feeders and thin leashes;
- Suitable for passive fishing.
Despite many advantages, the asymmetrical feeder loop also has disadvantages:
- installation is difficult, knitting skills are required to obtain high-quality equipment;
- It is not a self-cutting type of hinge. With active biting this will cause difficulties;
- with inept use and long leashes, the fishing line may become tangled;
- long knitting process.
It is better to knit an asymmetrical loop for the feeder in advance in order to get high-quality equipment and not waste time on it while fishing.
How to knit loops for an asymmetric type feeder
Installation of an asymmetrical loop is a painstaking and responsible task. Prepare the necessary equipment components in advance. This is a piece of fishing line, a feeder, a swivel and a leash. Knitting is carried out in several stages.
- A fishing line up to one meter long is folded in half.
- A loop is made for attaching a leash with a hook. The knot for the loop can be anything, but the so-called “surgical” one will be stronger.
- A rigid twist about 10-13 cm long is made behind the loop, at the end of which a knot is also tied. Visually it will look like a loop, twist and two free ends of the fishing line.
- A swivel with a carabiner under the feeder is put on one of the free ends.
- We make the end with the carabiner 2 cm longer than the second. This way we get the tool arm. We measure the length of 10-12 cm and knit a locking knot.
- The remaining end is cut off, and a loop is made at the end of the second for attachment to the main fishing line.
- A feeder is hung on a carabiner.
- The leash is attached to the outlet using the loop-to-loop method.
The asymmetrical loop for the feeder is ready. Pack it in a bag before your fishing trip.
Where is asymmetrical equipment used?
Feeder equipment of an asymmetrical type can be used both on a clean bottom and in conditions of abundant vegetation, in standing reservoirs or in strong currents, but provided that the feeder has been correctly selected. Proper tying and loading of the tackle allows you to make long casts at a distance of up to 50 meters. In addition, the equipment can be used when catching passive individuals, small fish and in pressed-in reservoirs. Fish species such as bream, carp, tench, crucian carp, etc. are caught using an asymmetrical loop.
Gardner loop for feeder: pros and cons
Advantages
- Hooks fish very well. Although the Gardner loop does not apply to self-hooking equipment, often, after a bite, the fish remains on the hook even without the participation of the angler.
- Due to the fact that the feeder is attached to a loop (twisted line) at a distance of 10-15 cm from the leash loop, this feeder works great on a muddy bottom, because even if it buries itself in it, bites will still be noticeable.
- Excellent sensitivity, thanks to the same installation features.
Paternoster
- Versatility, suitable for fishing in still water and in currents.
- Works well in areas with uneven bottom topography.
- A quick and easy way to install equipment, which is another plus for anglers wondering how to tie a Gardner loop, especially if it is necessary to install it on a pond. After all, we all know how when there’s a bite, you don’t want to waste extra minutes.
- The likelihood that the leash will overlap during casting is very low. But when using an asymmetrical loop, this happens periodically.
Flaws:
- The sensitivity of the gear is less than that of an asymmetric loop.
- If you attach the feeder without a swivel, it will twist the fishing line. In order to solve this problem, it is enough to periodically lift the rod up and pull the feeder out of the water, allowing it to spin the line back on its own.
What kind of fish is most often caught using the paternoster (Gardner's Loop)?
Most often, the paternoster is used when catching fish species such as carp, carp, bream, tench, crucian carp and some others. This is due to the fact that this equipment is well suited for fishing from the bottom in reservoirs with standing water or with a slight current, as well as with a muddy or uneven bottom. The Gardner loop can also be used in areas of reservoirs with complex bottom topography, for example, rocky ones.
The Gardner loop has a number of advantages over other types of equipment. Among the main ones are the following:
- Simplicity and speed of production. It takes literally 2-3 minutes to make the equipment. By the way, learning how to take it is not difficult and takes a minimum of time.
- High sensitivity. Thanks to the features of this paternoster described above, it is possible to achieve a high level of the gear itself - especially if you use light weight feeders.
- No overlaps.
- Although the equipment is not self-hooking, the chances that the fish can hook itself are very high. Due to the fact that the Gardner loop is installed on the main line, as well as its versatility, it is likely that the fish will be able to hook on its own, and this despite the fact that the paternoster does not belong to the classic self-hooking fishing equipment.
- There is no need to use additional swivels and other means. Thanks to its design features and simplicity, the paternoster does not need to install additional swivels and third-party items.
- Possibility of the most convenient modernization. To effectively catch fish in different conditions, upgrading your gear may often be necessary. For example, it depends on the strength of the current, the type of bottom soil, depth, and the need for long casting. The use of this equipment allows you to do a variety of manipulations with it, including modernization at the fishing site and, most importantly, as quickly and efficiently as possible. You should always have additional parts in stock - this will make your fishing as efficient as possible.
- Versatility. This is achieved through the use of long leashes and light feeders, and on reservoirs with complex bottom topography and rocky bottom, a paternoster on a snow leader is ideal. It can also be recommended in difficult fishing conditions and even in reservoirs with a serious and very noticeable current.
- No serious flaws.
How to knit a Gardner loop?
What is this? Origin History Advantages and Disadvantages Variations Linking Methods How to Use?
Questions about how to properly tie a Gardner loop to a feeder arise quite often among novice fishermen. This type of equipment is very popular and provides relatively high reliability and sensitivity. In order to master the assembly of feeder rigging, it is necessary to disassemble the paternoster circuit in more detail and study the secrets used by experienced fishermen.
What it is?
The paternoster, more commonly known as the Gardner loop, is popular with shore anglers with a long casting range. This connection works well for the feeder, providing a strong connection between all components. The classic paternoster with knitting needles is suitable for those who are just learning to fish. More experienced craftsmen refine them, adding complex elements to the schemes, taking into account fishing conditions.
Paternoster fishing gear belongs to the category of bottom types. They are used not only in conjunction with feeder rods. The Gardner Loop works great with classic bottom bars, giving you the opportunity to avoid counter twists and wire pulls. The paternoster is well suited for fishing without a feeder, with a large weight - with high casting intensity, for active fish.
The Gardner loop is one of the types of installations that provide effective uncoupling of production. This is due to the fact that in combination with the device, heavy feeders and weights are used, which are characterized by low mobility. The fish, trying to take the bait by the leash, gets stuck, and when we try to pull it out, it gets stuck even deeper. However, it works during the period of active biting.
If the prey behaves passively, you will have to change the latch - most of the hooks in this case will be in vain.
Origin story
The name of the lower loop rigging comes from the name of its creator. British sportfishing enthusiast Gardner has developed an improved version of the rig for his bottom-fishing wife. To make this task easier for his wife, he came up with the idea of making a loop directly on the main conductor. This type of connection made it possible to quickly attach the lace.
The Gardner Loop has already been named by Russian fishermen. In English-speaking countries this is known as a loop. This relationship is widespread in fishing circles. Moreover, this name gradually acquired semi-official status; it can often be found even in professional publications.
Advantages and disadvantages
The use of Gardner loops has a number of obvious advantages. It is for them that both beginners and experienced fishermen choose it. The main advantages of the paternoster are the following features.
Research functions. It is the rigging of the loop that is well suited for predicting the success of the chosen fishing tactics. Simplicity and speed of binding. Assembly of the structure takes less than 1 minute, even directly on the pond. Efficiency of use on electricity and in calm water. The paternoster works equally well in any conditions. There is no need for additional fasteners. It can be made of monofilament or woven material. Since the paternoster does not get too tangled or twisted, different types of fishing line can be used.
The disadvantage of the Gardner loop is that it is not very effective at catching fish during periods of low activity. If the equipment shows high sensitivity with a good bite, then when the sensitivity decreases it gives the opposite result. There are many false signals that do not give real results. When removing the line, you can twist a loop of monofilament.
Varieties
Paternoster has several varieties, differing in the way of knitting and some other subtleties. The differences usually lie in the choice of mounting accessories to prevent the line from becoming tangled. The basic set of materials remains fairly standard and does not change.
It includes the following elements:
- basic braid or fishing line; feeder or heavy sinker; carbine with swivel; cork elements; Lace material: nylon, fluorocarbon; hook.
Paternosters should not be confused with asymmetrical loops, which are also used as bottom baits. These are not classic solutions based on the knitting technique developed by Gardner.
Unbalanced trains are used in conjunction with feeders; they are made separately and are not formed on the main line. The Paternoster itself also has several varieties, which allows you to choose the right solution for anglers with different experience.
The most popular options include the following.
Classic paternoster. It is made on the basis of ordinary fishing line or braided tape with an additional thinner branch for attaching the feeder. The double figure eight is used to tie knots. Sports loop. Designed for quick change of equipment, dynamic fishing with a sinker or deer. Designed for use in sport fishing in active biting conditions. Twisted paternoster. This jig is often used as a lag guard when fishing on muddy bottoms. Gardner loop with 2 hooks. This option is used to increase the chances of a successful bait. The second hook and leader can be attached to the same loop as the first. Long dead loop. In this case, the entire installation is performed on the backbone.
Whatever tying method you choose, the Gardner loop is the ideal solution for feeder or bottom fishing.
Knitting methods
Assembly diagrams help to correctly tie a Gardner loop on monofilament or braid. They list step by step all the steps that need to be followed to get the result. You can make a paternoster using any of the convenient patterns; you can practice in advance so as not to waste time on the shore. Installation is carried out both on the shockproof beam and on the main line. The branch under the leash is always longer than the one left to attach the feeder - this is necessary so as not to scare away the cautious fish from nipping and hooking.
Classic way
The sequence of steps for making a traditional Gardner loop is as simple as possible. Please follow the diagram below.
The twine of the main line and the main material are connected and folded in half. The resulting loop is used to knit a figure eight, but not a straight one, but a double one. The difference between this knot and a regular knot is that you pull the line over and over again. The knot is tightened. The protruding ends are shortened so that no more than 25 cm remains from the knot to the edge. This tail will be needed for assembly in the future. A regular loop is knitted. To form it, we take that part of the “tail” of the fishing line that connects to the main line. A cord is permanently attached to this loop. The thin part of the “tail” is cut off. The length of the remaining element should be approximately 100 mm. Another simple loop is knitted on it, most often asymmetrical, used to attach the feeder. Auxiliary elements are mounted into the resulting mounts. A strap and feeder complete the installation. You can use the installed equipment.