Features of knots for braided fishing line
The fisherman should take into account that knots on a braided line will in any case negatively affect the breaking load parameter, and this even without taking into account the peculiarities of its structure.
Structural features that influence the type of knitting include the method of cord production. As you know, braids are made by weaving thinner threads into a common cord or by gluing straight fibers into a single structure. The same method of binding the material will cause different, essentially, deformations, twisting the threads to the limit with a woven circular cross-section and squeezing the structure with direct sizing of the fiber. In almost all cases, on new reels of purchased material there are recommendations with drawings and descriptions of knots for braided braids of a given brand. If the cord is not marked, then the fisherman will have to determine its structure visually. For welded even structures, knots with the least number of tightened loops are used. Knots for fishing cord with a woven structure are more resistant to deformation, but are afraid of excessive tightening of the knot, which is subsequently expressed by the effect of curling of the fibers from their single break caused by excessive overstrain.
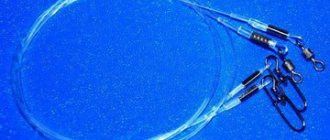
Auxiliary units for outlet and side leash
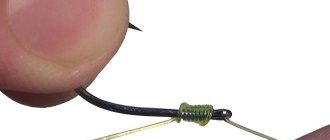
Knot for a temporary loop used to attach a diverter leash
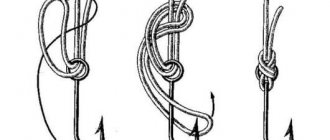
QUESTION: how to tie a lead leash to the main line?
ANSWER: It is knitted as follows:
- The main line is made two turns around the index finger of the non-working hand (for a left-handed person - the right, for a right-handed person - the left) hand. In this case, the tension of the fishing line is not strong.
- The resulting turns are carefully removed from the finger and fixed with the fingers of the other hand at the base;
- Above the turns on a thick fishing line, make a 4-6 centimeter simple loop;
- The loop is threaded through the turns;
- Having fixed a thick fishing line near the resulting knot, pull it by the top of the loop and tighten it;
- A leash with a limiting knot (“figure eight”) is threaded into the resulting loop and secured with a suspender to the main fishing line;
This is interesting: Retractable leash for perch: installation, fishing, bait
If the need arises to replace or completely remove the leash, carefully cut off the restrictive assembly and remove it. The temporary loop knot is untied by pulling the main line near it in different directions.
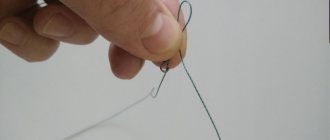
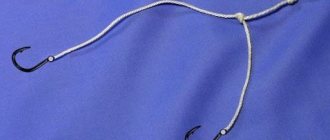
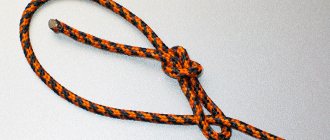
Knot forming a permanent loop for tying a side leash
QUESTION: How to tie a side leash to the main line?
ANSWER: Let's consider the scheme for tying the side leash to the main fishing line:
- A regular cross loop no more than 10 cm long is formed on the main line;
- Having fixed the base of the loop with the fingers of the left hand, the top is thrown over the hand;
- Then the base of the loop is intercepted with the fingers of the right hand, and with the left hand its upper part is placed behind the fingers of the right;
- Having grabbed the base of the loop again with the fingers of your left hand, repeat the manipulations described in the previous paragraph;
- After repeating these steps 4-5 times, lightly tighten the loop at its top;
- Between the turns of the fishing line, pass the upper part of the free loop and tighten it slightly;
- Having moistened the knot, it is carefully tightened with a uniform pull at the opposite ends of the connecting lines.
Unlike the previous one, such a loop can no longer be removed from the fishing line. The leash is attached to it using a “Loop to Loop” knot connection.
Techniques for increasing the reliability of nodes
To get a strong knot you need to know some techniques that help improve the quality of knitting.
Important! The main criteria affecting reliability are the overall thickness of the material, the cross-sectional shape of the cord and measures that reduce frictional forces when tightening the knot, which are carried out by moistening the material at the site of the operation.
Thickness has a positive effect on strength properties and when knitting, in which even an ordinary knot is used, the cord loses a small part of its breaking load. From this we can conclude that braided fishing lines over 0.2 mm in diameter can be knitted in any way. We have already mentioned above that round sections are less susceptible to twisting of fibers when clamped, and the variety of knots on such a cord also has little effect on the strength characteristics of the connection. Flat glued structures require an individual approach to knitting with strict adherence to the supplier’s recommendations, or, in the absence of such, they are knitted using methods with the fewest number of loops. Let’s not forget about the third most important factor: even despite the diameter and method of production of the cord, before tightening the knot, you need to wet the material, thereby reducing friction forces and preventing burnout of the structure.
Important! It is worth noting that the implementation of these techniques still reduces the parameters of the breaking loads of the cords, even in the best case, by an order of 20%.
Best connections
In this section we will present several connections that a novice angler can master after 2-3 training sessions. Some of the presented knots are more difficult to knit, so we will try to describe them in more detail. Look carefully at the illustrations. It is known that knots are invented not only after the development of braided lines. The emergence of new fishing gear and methods of equipping it entails similar consequences.
Palomar
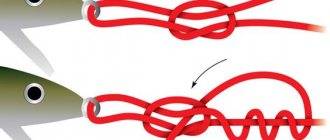
"Palomar" is considered one of the best knots. It is reliable and simple. Mentions of it are found in articles containing information about dropshot gear. In her equipment, Palomar is indispensable, because with its help the hooks, after tightening, take a horizontal position. The knot is somewhat reminiscent of, and, one might even say, is a type of the universally recognizable “eight”, the topic of which we will touch on later. Palomar is knitted like this:
- Take the end of the braid and fold it in half and hold it.
- We tamp the resulting loop and pass it through the eye of the hook.
- We wrap the loop with the double end three times. Throw the double cord over the point, do not tighten the knot yet.
- Lubricate the structure well with water or saliva.
- Tighten the knot as shown in the picture. Palomar is ready! Don't forget to cut off any excess cord.
Excess sections of fishing line scare away fish. They are clearly visible in the water.
Beginner fishermen are recommended to practice several times so that in fishing conditions they can quickly assemble any equipment with this connection.
Grinner
The Uni or Grinner knot (second name) is also suitable for knitting braided cords and is one of the best connections in the history of fishing. It belongs to the “Self-tightening” class. We knit:
- We take the cord and pull its end through the eye of a swivel, carabiner or hook. Only then do we make a loop.
- Wrap the end of the fishing line 5-6 times, making another loop.
- Bring it through the resulting loop.
- Blot the structure, tighten the knot and cut off the excess area. This is the Uni knot.
It is used not only for fishing purposes. Climbers readily use Grinner; they tie carabiners and stakes. Sometimes it is found in the sea and river fleets. Uni has one excellent quality - durability. Wear of both the connection and the material is reduced to a minimum!
Clinch
How to knit a non-tightening loop on a fishing line
The Clinch knitting technique can also be mastered by a novice angler. It is simple, which means it is reliable. Its advantages are similar to the previous knot: it is used when tying carabiners, hooks and swivels with a small eye to a fishing line, when it is not possible to create a Palomar. We train:
- We take the tip of the cord and insert it into the eyelet, move it about 10 centimeters.
- We wrap the end around a long section of thread 6-7 times.
- Take a closer look at the eye of the hook. A small loop formed near it.
- Place the end that you wrapped around the cord into this loop.
- You'll get another, bigger one. We skip again.
- Start tightening the knot, but not all the way! Wet it. Tighten.
- We cut off the excess fishing line. Clinch ready!
The simpler the knot, the longer it holds the attached component to the rig.
IMPORTANT! Some fishermen recommend using “liquid nails” glue, which is known to everyone as “little tube”. Do not lubricate the knots with it under any circumstances! The entire structure loses elasticity and becomes brittle. It will break under load.
Knot Blood
No one knows why the corresponding installation method was nicknamed the “Bloody Knot.” There is an assumption that it was compared to the expression “death grip”. The blood knot is used by fishermen to tie two fishing lines together, regardless of their texture. Instructions that we decided to simplify without losing meaning:
- We take one cord. We wrap its tip around a long section of thread six times, and we thread it into a small loop.
- We do not tighten the structure, place it on the table and cover it with a coin (fixation with a weight).
- We take the second cord, the end of which we pass into the loop of the previous design. We repeat the procedure.
- The lines got stuck. Don’t forget to lubricate the loose connections with liquid, and then tie the knots. We cut off the ends with scissors or a blade (you can burn it if there are no sharp objects at hand).
The ends should be pulled simultaneously.
IMPORTANT! The process described in the instructions resembles the previous method. A Clinch knot can also be used to connect one fishing line to another using a loop of one of the connections. A similar point applies to attaching leash cords.
Double sliding
The Double Slip Knot is somewhat reminiscent of the Blood Joint technique. The first, according to fishermen, is superior to the latter design in reliability, but inferior in simplicity. Only after much training will a novice fisherman be able to perform a “double sliding rig” in fishing conditions. Let's get started:
- We place two cords on top of each other so that their ends point in different directions.
- Use your fingers to press the pieces in the middle.
- We bring one end of the braid to the fingers, making a loop. We thread the same section into it.
- We wrap each of the segments with the end 6-7 times.
- Moisturize and tighten. The procedure for the second cord is similar.
- It turned out to be two nodes. We pull the threads. If we tied it correctly, the knots, tightening, will begin to slide towards each other. Hence the name.
- As they slide, lubricate them with liquid again. We cut off the remaining sections of the cords.
Do not make sudden movements while tightening. Due to such actions, the friction force increases, and with it microcracks appear.
The double sliding knot also allows you to securely attach the shock leader. We knit swivels, carabiners and hooks in a similar way. Experienced anglers have noticed that the double slip knot works great on fluorocarbon! Braided fishing lines can be tied to threads made from the appropriate material.
The most reliable knots for braiding
Fishing knots for braiding are distinguished by a wide variety and complexity of knitting technology. We will focus on the five most accessible, understandable and easiest to implement knitting options, which are easy to remember and perform directly on the shore of the reservoir, without resorting to additional equipment and gluing the installation. The scheme of these options is suitable for various types of cord structure and thickness, and will also help to assemble equipment from various installation elements into a single, complete structure.
Palomar, palomar knot
Palomar can be confidently classified as one of the most popular types of nodule. In addition, it is universal and can be applied with equal success to various types of material. This knitting is performed for an accessory that has a winding or fastening ring in its design. To perform the fastening operation according to this principle, you will need a piece of fishing line of at least 40–50 centimeters. The final tightening of the knot leaves the cord strength at 80%. For the most part, braided fishing lines of small diameters are connected using this type, since the technology by which doubly folded material is threaded into the eye of the element does not always allow this to be done with thicker cords due to the disproportion of the winding ring.
Uni, uni knot, grinner knot
The uni knot is a fairly common knitting when the accessory contains a very small element for fastening. Often this is a miniature hook or swivel in a microjig. The technology involves threading a single-diameter cut of wattle into a winding loop, after which we add the main loops, moisten and tighten the knot. The formation of the mating will require at least 50–60 centimeters of material. The strength after tightening will remain at 70–75%. To perform the technique competently, a short period of training time will be required to master a stable skill.
Clinch
Clinch refers to the simplest tying technology, mastering the twisting technique of which can definitely be recommended to a novice fisherman. The improved clinch ideally copes with the problems of self-untying; it requires a piece of cord of 20–25 centimeters for installation, but the result of tightening the twist has a more negative effect than the options described above and affects the final strength of the fishing line, leaving no more than 65% of the strength to the original parameter.
Bloody
This option is a type of knot for braided fishing line that allows you to connect two pieces of it. To carry out the joining operation, you will need two ends of the braid of at least 40 centimeters each. As a result of alternate winding of the same number of turns, and for braided cords, 3-4 twists are enough, and subsequent tightening of the installation, we obtain a neat, uncluttered structure. The connection is suitable for mounting leashes and shock leaders. The technology allows you to reliably connect braids that differ in diameter by 1.5-2 times.
Slip double knot
A more complex type of knot that requires a certain knitting skill. The technique mastered by the fisherman allows the use of twisting both for fastening the braid with accessories, and for connecting different diameters of cords that differ in thickness by four to five times. In addition, you can tie braid in this way with other types of materials, fluorocarbon and monofilament. For installation, use 50 centimeters of a free piece of cord, resulting in a connection strength of at least 70% of the initially stated parameters.
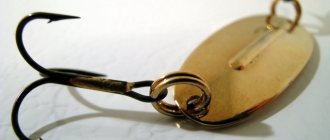
How to tie a braided line to a hook
You can tie a hook to a braid using Palomar, Uni and Clinch knots.
Important! The main criterion for choosing a connection option is the presence of a fastening loop on the accessory and a hole size comparable to the diameter of the cord.
Before joining, carefully inspect the winding loop for the absence of metal burrs and nicks that could cause chafing of the fishing line material, and after that they knit a knot, finally cutting off its free end to the body of the formed knit. The tightened installation is aligned along the fastener ring, symmetrically, placing the cord and hook shank in one straight line, and begin to attach the bait.
Let's figure out how best to tie a braid?
A couple of years ago, Sports Fishing magazine tested what they considered three of the strongest fishing knots for braided line: Palomar (aka Palomar knot, Swivel knot), Grinner (more popular name - Uni , aka Grinner knot, Uni knot, Hangman's Knot ) and Homer (Homer knot).
You can see the test results for braids from different manufacturers in the table below:
As you can see, Palomar has a slight advantage when using various five cords, followed by the Uni knot. It is these knots, even compared to Homer, that are simpler and also have high strength and popularity when tying regular fishing line.