Using a node connection
The self-tightening rope knot has found its greatest application in the navy. They are the simplest and most reliable, learning to knit them is not difficult. In addition, such loops are actively used in mountaineering and maritime affairs, however, their use is quite possible in home life.
The main use of such tightening knots helps in the following cases:
- In order to hang a hammock or attach hanging structures;
- Attach a rope for drying clothes or various herbs;
- With its help, you can tie up an animal on the street or walk various goats or cows;
- When fishing, it helps to tie the boat and fishing line to the fishing rod;
- It is also often used in the manufacture of various costume jewelry such as bracelets or other products.
The main purpose of self-tightening knot connections is to fix a rope on a stationary object or the ability to fix a load on the rope itself, while the load itself will move along the knot product.
Where is it used?
He will find his place in all spheres of life. It is often used in mountaineering and in warehouses (they are used for hanging heavy objects). Fishermen use it when tying gear for fishing from the shore.
Shock-absorbing units are popular. They are formed on an additional rope, which is used to connect a spare fastening in case of destruction of the main one. There are also self-tightening units for transporting goods or for various rescue operations. These include the braking unit, “belts” and mariner.
There are two types of fastenings - simple and complex, for different life situations. In the navy, the original self-tightening knot is rarely used, with preference given to its variations.
How to make such a design
The main feature of such a loop is that it will be reliable if there is a load on the running end. At the same time, it must be on a permanent basis, otherwise such a nodal structure will come undone without any problems. The sequence of actions to create such a node:
- We select a support to secure the knot, for example, a tree trunk, a pole or other support. We make a half ring around the base;
- Next, we pass the end under the main rope and insert it into the created loop;
- Pull the running end and tighten the node connection.
The result is a truly high-quality knot that will press the running end to the base, preventing it from coming undone.
Advantages
The self-tightening knot has gained recognition primarily due to its ease of knitting and high efficiency. Despite its unreliability, it is often used, but only in those cases when they are sure of the presence of constant weighting. When forming the unit, no additional materials or devices are required. The main task, which it copes with brilliantly, is to withstand a load proportional to the density of the cable (rope, fishing line, cable) from which the knot is knitted.
If there is constant weight, the knot is not able to untie on its own, only manually, which will also not cause trouble. It is as easy to untie as it is to tie. This advantage was appreciated by fishermen and climbers, for whom every second is precious. This property makes this node a leader.
Even a child can learn how to knit a noose, and proper use contributes to the maximum realization of the expected result - reliable holding of a large weight.
Varieties
Depending on the purpose of use and the material of the product that will be tied, there are several types of self-tightening knots. Below are just a few of them.
- Simple knot. The simplest and requires no skills. Its density directly depends on the traction force. In order for the knot to be constantly tensioned, it is necessary to apply continuous effort.
- Self-tightening marine knot with half bayonet. A slightly more complicated variation of the first variety. Several half-pins are added to a simple knot, thereby giving it the greatest reliability.
- Constrictor (boa constrictor). It is one of the most durable units. They are very convenient for bandaging round objects that do not have sharp edges. Widely used in medicine for emergency dressing of wounds, application of tourniquets, etc.
A more complicated variety is the double constrictor. It tightens more tightly, making it almost impossible to untie it.
- "Cow" knot. Probably got its name from its original purpose - tying cattle to a support. Despite the name, it is a reliable connecting link for rope made of twine, jute, ropes and cables.
- Fisherman's knot. It is well suited for fishing line, is simple to make, and also has a small diameter, due to which the fishing line tied with such a knot passes well through the holes of the spinning rod. It is also called “bloody” due to the fact that such a knot was originally tied at the ends of a whip, which was used to punish guilty sailors or military men.
- Shakhtarsky. A fairly simple and reliable type of unit. It should be used when the load on the rope is constant. It was originally used in mines, hence its name.
- Camel knot. It is used when it is necessary to attach a thinner one to a thick rope or cable. Once done correctly, you can pull loads at almost any angle, since it does not slip at all. Despite the fact that this type of fastening is quite tight, it is easy to untie - just wet it well with water.
Blind loop
This ligament does not depend on the presence of a constant load in order for it to hold, just tie it and tighten it tightly. To tie a knot, you need to thread one loop into another and tighten it.
See also: The most difficult knot. Marine knots: diagrams, drawings, methods. Nautical knots: history and knitting pattern
Fastening
The mount is often popular with fishermen. Although experienced fishermen suggested tying a self-tightening knot for fishing line without additional parts, their use makes life much easier. The fastening helps to fix the loops during knitting, prevents the knot from unraveling abruptly, and simplifies the knitting process. On the shelves of fish stores you can now see reels with a stopper for attaching braid. Many anglers reel in the line held by the spool without unnecessary fasteners, but only those who have gained experience over many years.
There are 18 types of self-tightening knots in total, but using one rope there are only 4 types:
● With an “arb” carbine.
● Bachmann knot (with carabiner).
The number of turns is unstable; if necessary, it can be increased.
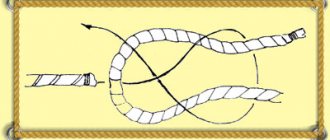
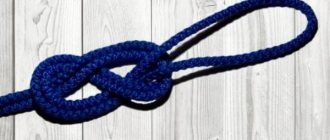
Scheme of a self-tightening sea knot
A marine self-tightening knot is considered one of the simplest and most reliable. It is used not only in the navy, but also in fishing, for attaching a reel with wound fishing line.
The main advantage of the connection is that it strengthens as the load increases. In other words, the more weight, the tighter the knot will tighten.
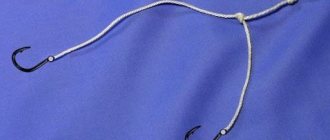
Let's look at the knitting pattern using the example of attaching a fishing line:
- The line is wrapped around the spool of the reel. It is advisable to leave the tip long to make the tackle more convenient to hold.
- A loop is made at the end of the fishing line. To do this, it is turned in the opposite direction, having previously been wrapped with the leading end of the fishing line.
- At the base of the twist, a loop is formed into which the free end of the fishing line is threaded. To keep the connections stronger, the fishing line is moistened with water and tightened.
- The resulting loop is put on the spool and the knot is tightened again by pulling the main end.
In the future, the fishing line will completely retract on its own. All that remains is to trim off the protruding ends.
You will find more information about methods of tying self-tightening knots in the video.
Tricks for winding fishing line on a reel
When winding fishing line onto a reel, it is necessary to take into account some subtleties that will allow you to wind the fishing line correctly and trouble-free use of the fishing tackle.
After tying the loop on the spool, you can stick a piece of plaster or tape on the first turn of the fishing line. This will ensure that the line does not slip around the spool. If a braided cord is used as the main fishing line, then the use of a patch is mandatory. The braided cord has a special treatment that reduces friction. Therefore, no matter how tightly the loop is tightened, the braided cord will still slide on the spool.
The line must be wound onto the spool with tension. If the fishing line is wound without tension, then during fishing, when playing, it will be wound with force, crashing into the loose turns of the fishing line on the spool. Subsequent casts will definitely result in the fishing line coming off, a beard, and, most unpleasantly, the entire equipment being shot off.
If the spool for tying the knot was removed from the reel, then before installing it back you must remember to fold back the line handler. If the spool has not been removed, then the line guide shackle must be folded back before tying the line to the spool or the line must be passed through the line guide roller.
In conclusion, a visual video demonstrating how to tie fishing line on a reel.
To completely fill the spool container with fishing line, you can, if necessary, use backing, which is located under the main working fishing line.
Using special self-tightening knots when winding fishing line onto a spool, as well as taking into account some nuances, will help avoid misunderstandings when fishing.
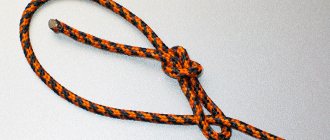
Knot for bracelet
In order to secure the ends of a bracelet or any other ring-shaped accessory together, it is best to use a slip knot. It is quite easy to knit, and it is also quite durable. If necessary, this unit allows you to adjust the diameter of the product. In order to tie a slip knot, you need to follow these steps sequentially.
- The rope folds into a horseshoe shape. The ends should be located on top and closer to each other.
- After this, you need to tie and form a loop in any convenient way. One end of the rope should be stretched over the other so that they overlap by several centimeters and are parallel to each other.
- The outer end of the rope needs to be bent approximately in half. To do this, you need to take it and carefully move it back. Try not to touch the inner end.
- The ends of the rope are brought together, thereby forming a loop. In this case, the end that is on the inside should be close to the outside. As a result, at the intersection of the two ends there should be three parallels.
- On the outside you need to leave a free end, which will complete the knitting of the knot.
- The remaining outer long end of the rope should be wrapped around three parallels, first once above them and three times below. It is better to perform these actions with your right hand (for left-handed people - with your left hand).
- The remaining end of the rope is tied around the resulting loop and three parallels. The minimum of such turns should be 3-4 or until the overlapping sections are completely wrapped. At this stage, you must carefully ensure that the rope does not tangle around itself, otherwise the knot will not tighten and will be weak.
- The free end of the rope is threaded through the resulting loop. It should remain quite long so as not to slip out of the loop.
- The last step is to secure the self-tightening knot. The resulting ring around the loop must be tied tightly. In this case, the right end of the rope must be additionally supported with two fingers.
You can check the strength of the knot quite easily. You need to make sure it actually slides. To do this, you should move it along the bracelet, making sure that it will not come undone when you continue to wear the product.
Additionally, you can play it safe by tying a regular knot at the very end of the free end of the rope or tying two sliding knots at different ends of the product.
Sources
htps://berlogakarelia.ru/snasti/samozatyagivayushhiysya-uzel-dlya-verevki htps://turizmens.ru/ekipirovka/kak-sdelat-samozatjagivajushhujusja-petlju-dlja-verevki.html htps://manrule.ru/rybolovnye- uzly/vidy-samozatyagivayushchihsya/ htps://prouzel.ru/morskie-uzly/samozatyagivayushhijsya-uzel.html htps://nowifi.ru/snaryazhenie-i-ekipirovka/uzly/306-samozatyagivayuschiysya-uzel.html
Self-tightening knot, how to knit, step-by-step diagram
Application
Self-tightening knots are used not only by climbers and sailors. Some sources claim that there are about twenty such schemes. Knowing them all is not necessary even for a professional. But some universal combinations can be useful to the common man.
When relaxing outdoors, the “constrictor” knot will securely secure the hammock, and the “gazebo” will help to equip a canopy from the rain. For housewives, there is a “burlak sea loop” if there is a need to tighten a clothesline from sagging or organize drying for collected medicinal herbs. When walking your dog, sometimes it becomes necessary to leave your pet securely tied to a support for a while. A simple cow knot will do the trick. It knits easily and quickly allows you to release the leash.
This is interesting: How to tie two ends of a rope together
Self-tightening fishing line knots are a must have in any fisherman's arsenal. They are also useful for securely fastening the boat. For those going on a mountain hike, knowledge of the components for belay equipment is simply necessary.
Complication
Using a simple self-tightening knot as a basis, you can easily move on to the “noose” pattern. To do this, before tightening, the free end is twisted three times around the rope that forms a loop. When tightened evenly, the connection is securely fixed due to repeated pressing force against the support. Untying such a knot without loosening the main rope is problematic.
This is interesting: How to dress in a post-apocalyptic world?
A self-tightening knot with a loop can be useful in everyday life for shortening a sagging clothesline. With its help, you can temporarily “hide” (make inactive) a section of the cord with damaged fibers, which theoretically can break under load. The advantage of the “burlatsk sea loop” knot is its ability to be tied on any part of a fixed rope that does not have free ends.