Types of sliding knots and where they are used
The essence of the sliding knot is that the free end of the rope is tied around an object (weight, support, another rope). This fastening is often used in everyday life, for transporting something, in agriculture, livestock breeding, fishing, handicrafts and much more.
Main subtypes of sliding knots:
- Simple (or running loop);
- Eight;
- Bowline;
- Silk loop;
- Fisherman's Knot;
- Lynch loop;
- Fisherman's Knot;
- Double sliding;
- Lasso loop.
Let's look at a few basic ways to use the node.
How to make a sliding loop?
A person, in the course of his life, uses a diverse set of various knots and loops. Some of the most popular fasteners are simple sliding devices and various variations based on them.
There are many ways and options for knitting such designs. Sliding loops are used by sailors, they are necessary for slingers, climbers, they have found their application among fishermen and hunters, and are indispensable in handicrafts, medicine, and everyday life. These are convenient and very reliable devices. There are several of the simplest ways to tie a sliding loop:
The free edge is passed through the turns of the knot.
The knot is pulled up, holding the bottom of the loop.
In the second option there is a blind sliding loop:
This type of tying is very popular among fishermen.
Simple sliding knot: step by step diagram
This type of fastening is used to secure one end of the rope to a support. In everyday life, such a knot can even be used in crocheting.
To begin with, you should form a simple loop at the free end of the harness and secure it with the fingers of one hand. Nearby, with the other hand, we form another loop and thread it into the previous one. We place a knitting needle into the resulting gap and tighten it. In this way, you can easily fix an object of any size, thanks to the sliding structure of the knot.
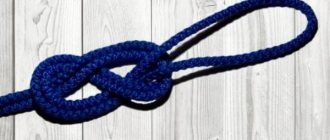
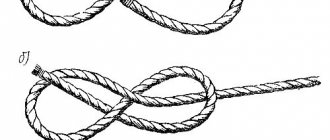
Bowline knot: diagram, photo
The sliding bowline is considered the king of knots. Its main difference from the previous one (simple sliding) is that it is not put on a support, but is formed around it.
There are many types of it, consider the diagram of a simple running Bowline:
- First, a simple loop No. 1 with a long end is formed (step 1);
- The free edge is wrapped around the base of loop No. 1 in a figure-eight fashion (step 2);
- Then another loop No. 2 is formed from the remaining rope (it goes around the support), and its edge is threaded into loop No. 1 (step 3);
- Now the Bowline can be tightened (step 4).
You may also be interested: Influence - what is it?
Types of cords for a cross
Laces (another name for gaitana) used for wearing a cross are divided according to materials of manufacture into the following types:
- Leather;
- Rubber;
- Silicone;
- Silk;
- Textile.
Gaitana made of leather.
Leather gaitans are durable. They are elastic and treated with special solutions that repel moisture. There are models on sale with inserts and clasps made of precious metals (gold, silver). For massive crosses, thick braided laces are suitable. More elegant products look good on thin leather ropes. This natural material is suitable for everyday wear, complementing any look.
Cords made of rubber and silicone are also not afraid of moisture, have flexibility, softness and at the same time good strength. Silicone cords, unlike rubber cords, have a glossy appearance. It lasts throughout the entire wear time.
Silk braid for the cross.
Silk laces and ribbons made of cotton fabric can be bought directly in the church, during baptism. They can have a variety of colors, wash well and have a delicate texture. These gaitans are ideal for children. They do not irritate the baby's skin and are easily cleaned of dirt while bathing the child.
When tying such ropes to a child, they should be too long. The lace should not get tangled, cling, be comfortable during movements and not choke the child (easily removed if necessary, without untying the knot). The knot should be made small so as not to irritate (rub) the baby’s skin.
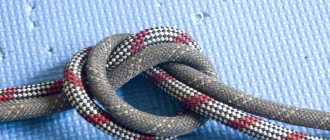
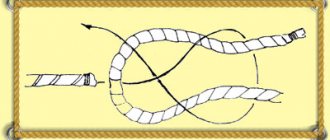
Fisherman's knot
Sliding knots are used by fishermen to attach weights, hooks, leaders and lures, as well as to connect two ends of fishing line or thread.
The photo shows a simple diagram with which you can securely fasten two free edges of the thread. At the same time, the knots will remain movable and can be easily untangled if necessary.
There are a huge number of fishing knots. The simple version shown above can be complicated by adding several turns of winding on each side before tightening. This will strengthen the knot and add strength under load.
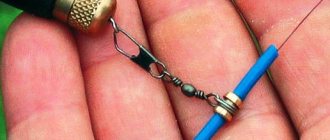
Sliding fishing knots
Anglers use the technique of knitting slip knots to tie the two ends of a fishing line, secure the material to the reel spool, tie a weight (top), hook (bait), and leader.
Another common use for them is to create stoppers for sliding equipment.
There are a large number of different knitting techniques. The most famous and popular are:
Applying knowledge of these techniques will help when tying more complex knot configurations.
Double Slip Knot for Bracelet
In needlework, this fastening method is used for ties on a bag, bracelet and other jewelry. The double sliding knot allows you to move the ties to adjust the size of the product. At the same time, their edges are held tightly and do not move arbitrarily.
To perform such fastening, it is necessary to prepare two free ends of the thread: determine their length, and secure them at the ends with large knots. This will prevent the tips from slipping out of the finished product during further use.
To form the knot itself, you will need a separate piece of cord from the same material, or any other if desired. The size of the segment can be taken larger, since the excess will be cut off at the end.
First you need to put the ties of the product on top of each other, as in the photo. A piece of cord is applied to the ties. Thus, three threads are held under the finger: two ties and one edge of the connecting piece. The second edge of the same segment is bent in the opposite direction and wrapped in several rings around three laces under the finger. Then you need to thread the remaining edge of the cord into the resulting loops and tighten the edges. The remaining parts of the connecting element can be cut and cauterized if necessary. The resulting knot will securely hold the ties, allowing them to move when pulled.
You may also be interested: Freestyle and Greco-Roman wrestling - what are they and the differences
How to properly tie a knot on a bracelet so that it is adjustable?
To tie an adjustable knot on such jewelry, you can use one of the methods below.
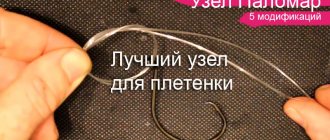
weaving knot
This is the most basic way to make an accessory with adjustable length. Using such a fastening will allow you to make a bracelet with only a bead (pendant) and waxed cord.
Technique:
- you need to take 2 ends of the lace and put on the pendant, placing the cords parallel;
- then you need to tie a knot with each end in turn.
As a result, both tips should point down, diving into the loop. Now you can lengthen the structure by moving both one knot and the second.
Using waxed cord it will look like this. The knots must be tightened tightly. The ends should be cut short. After this, they can be scorched with a lighter (if the cord is dark in color) and coated with colorless varnish.
Chinese slip knot
This method is quite easy to implement. it will take a few minutes at most . This is a great option for making a bracelet with adjustable length.
Technique:
- The lace must be bent in the shape of the Latin letter U, bringing the opposite ends closer.
- Now you should form a loose loop. One end of the cord should be pulled over the other so that they overlap by approximately 10 cm, and they should be placed parallel to each other.
- The outer end of the cord must be bent in half. You need to grab the top end of the lace and pull it back along the outer edge of the loop. There is no need to touch the inner end of the cord parallel to it.
- The ends of the cord must be brought together to form a small loop. The inner end of the lace should be brought to the outer end, bent in the shape of a small loop. There should be 3 parallel layers of cord in the area where the ends intersect. You need to leave a free long end on the outer edge. It will help complete tying the knot. Hold the overlapping sections with one hand and pull the free end with the other hand.
- The outer (free) end of the lace must be wrapped around three parallel layers. The free end should be passed first over three parallel sections, and then under them, pulling it up.
- Now you need to tie the cord around the loop. The free end must be wound around three parallel pieces of cord. You need to make at least 2-3 turns until the entire free end is used or until 3 overlapping sections are completely wrapped. It is advisable to ensure that the loose end does not overlap itself, as this may cause the cord to become tangled.
- The free end (it should be long enough) must be threaded into the loop at the end of the cord.
- Now the knot should be secured. To do this, you need to tighten the “ring” around the loop as tightly as possible, holding the right end of the large loop with your ring and little fingers in the process. If the knot is tied correctly, it will slide freely along the cord.
Adviсe
To make it easier to master tying such a cord, it is advisable to use the following recommendations:
- for training it is better to use a longer lace ;
- to learn how to make such knots, it may take several trial attempts;
- if the knot stubbornly fails , you need to continue training and they will definitely be crowned with success.
Reference! The Chinese slip knot is in some cases also called a triple connecting knot.
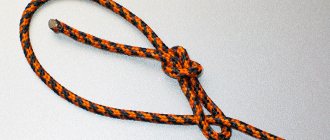
Sliding knot for fastening
Such a knot can be made on a thin cotton cord, the length of which does not exceed 90 cm.
To do this you will need to do the following:
- The ends of the lace should be taken so that there is a margin of 14 cm on each side, and directed towards each other.
- Now the right tip of the lace needs to be bent so that it is outside and located at the edge (as shown in the photo). The resulting loop must be fixed. Its length should not exceed 10 cm. You need to continue working with the right end; the knot will move along the left end in the future.
- The first end must be placed from left to right, circle the loop and part of the cord several times. Then you need to carefully lay the rings formed after entwining in the direction opposite to yourself. Then you should make 3 more such turns, holding the knot with your finger and adjusting the tension of the cord. After this, both ends must be passed through the resulting loop so that they can be pulled into a knot. There is no need to tighten it too much.
- The next knot must be tied similarly to the previous one. This will be a passive node. Then you should make a loop at the second end of the cord. To do this, you need to wrap the free end around it about 5 times and tighten the knot. You need to thread the remaining tip of the lace into the loop formed. The remainder can be trimmed with scissors.
An adjustable knot is an indispensable item when making simple jewelry. The ability to tie such knots will help you easily turn any available cord or thin rope into a bracelet. And no special fittings are required for this.
Source: tkaner.com
How to tie a scarf beautifully with a slip knot
In everyday life, sliding knots are also applicable in clothing. A boring tying of a belt, scarf or shawl can be diluted with an unusual pattern, adding elegance and freshness to your style.
To create a new look, you don’t have to spend money on new things; tying a familiar scarf is not boring enough.
To do this you will need a long stole or sling, and a minute of time:
- the ends of the scarf must be thrown behind the back, and the front loop lowered to chest level;
- then cross the edges of the sling behind the neck and bring it forward;
- twist the front loop once;
- insert both ends of the scarf into the hole formed;
- All that remains is to tighten the sliding knot to the height you need.
Similar self-tightening patterns can be made with a coat belt, a loose cape or a summer pareo.
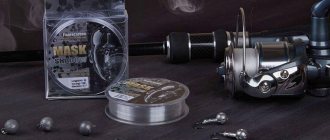
How to prepare knots for future use
If you are a fan of match or feeder fishing, you cannot do without stopper knots in any case.
In order not to have to worry about tying them every time you mount the gear, you can stock up on them in advance.
To do this, take a plastic tube like an ampoule from a ballpoint pen or electrical wire insulation 5-8 cm long and tie the required number of knots on it. Now you will always have a whole set of stoppers at hand. To use them, just put the tube on the main fishing line, pull the outermost knot onto it, guide it to the desired area, tighten and trim the ends.